Author Archives: Dave

Erta Ale: The Selfie

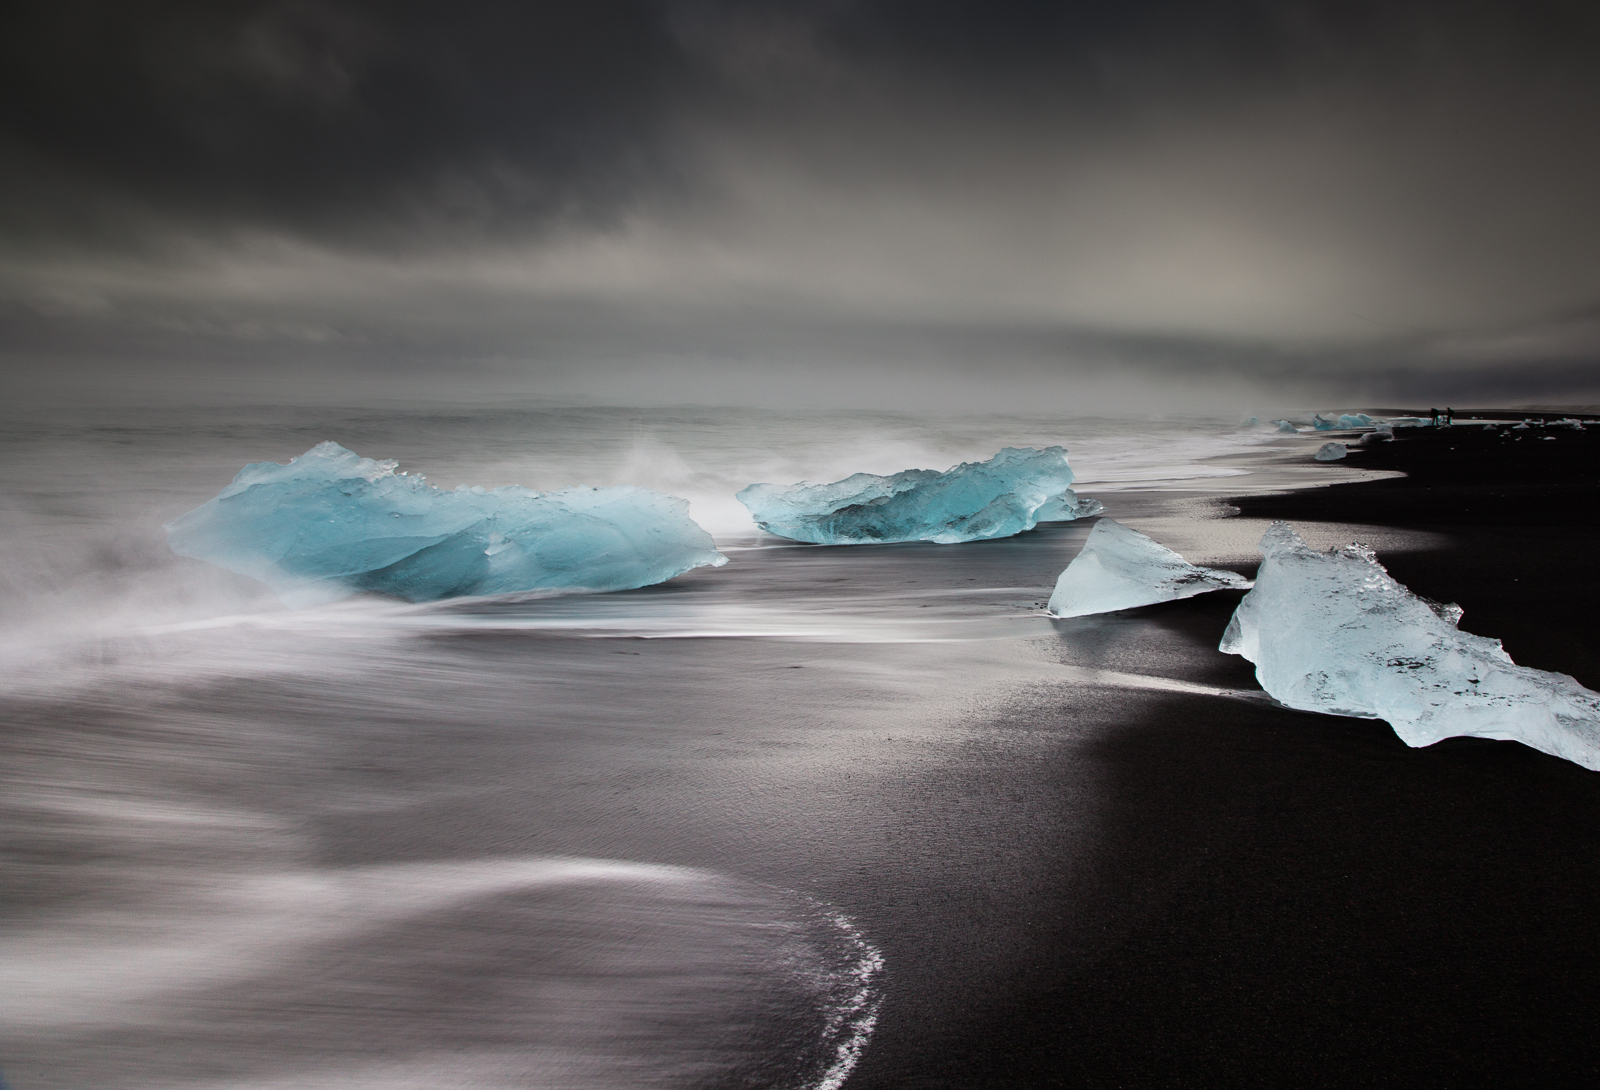
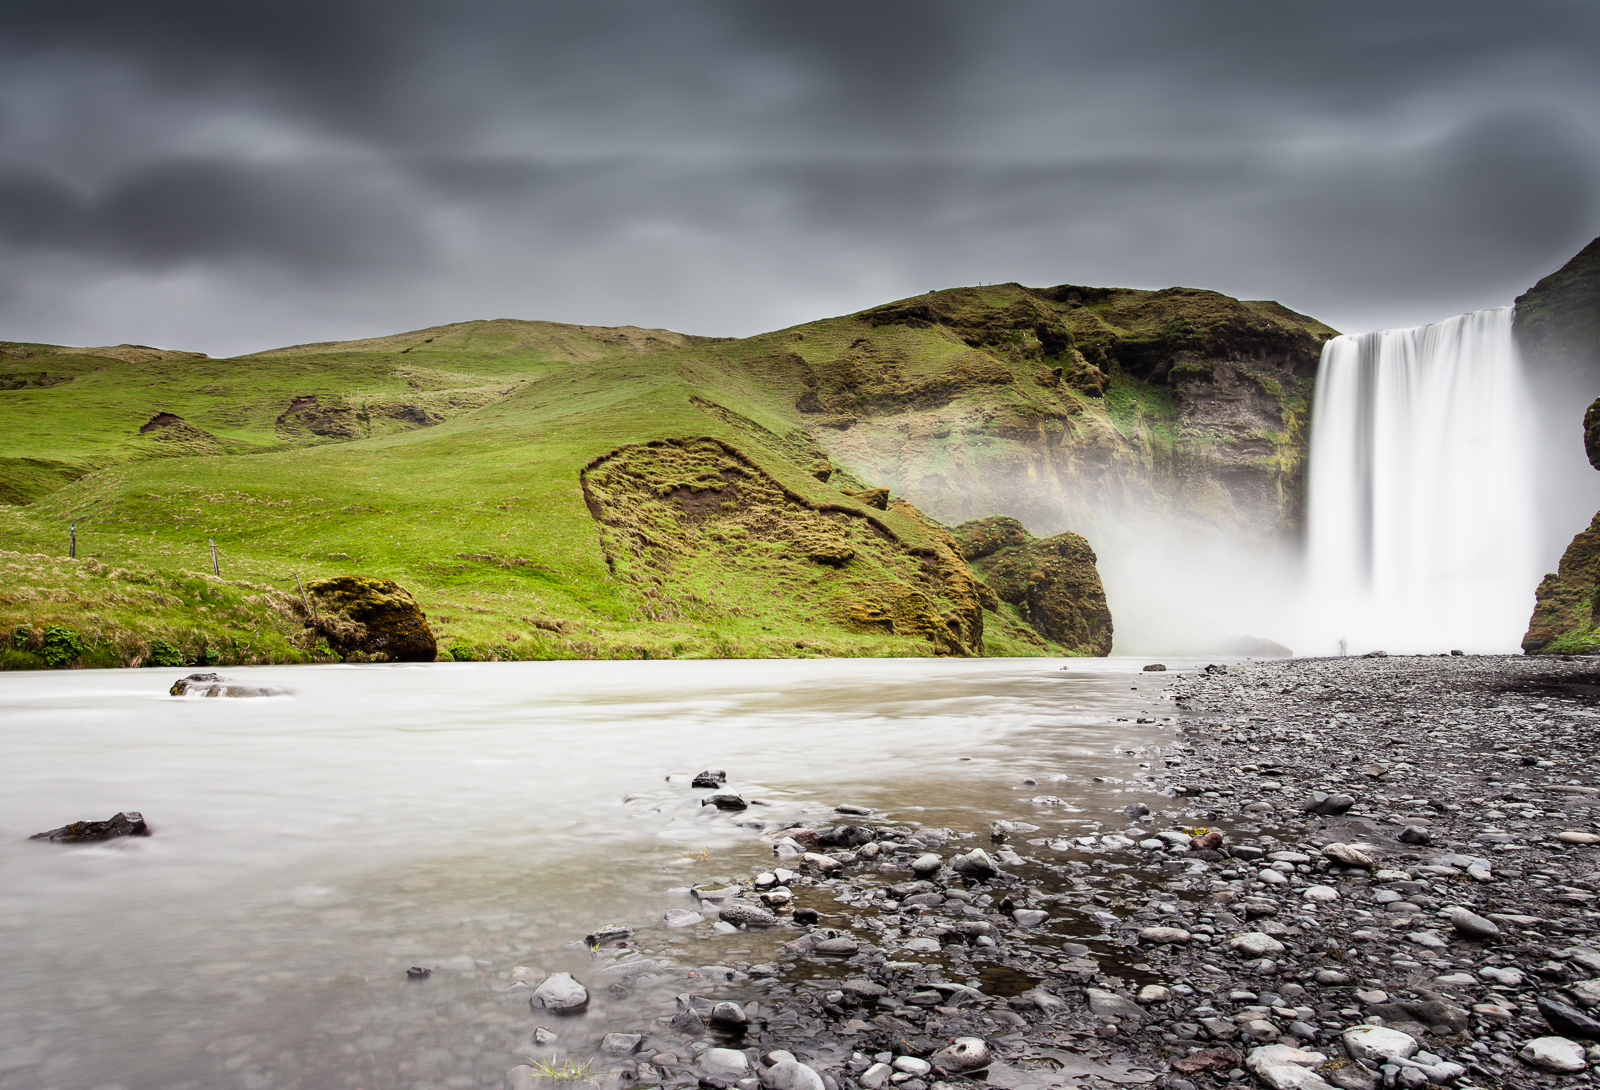
After taking my first deliberate ‘selfie’ in Iceland against a backdrop of the stunning Skogafoss waterfall that was less about being a selfie and more about the sheer immensity of nature, I knew I was going to take another selfie in Ethiopia. And I knew precisely where too.

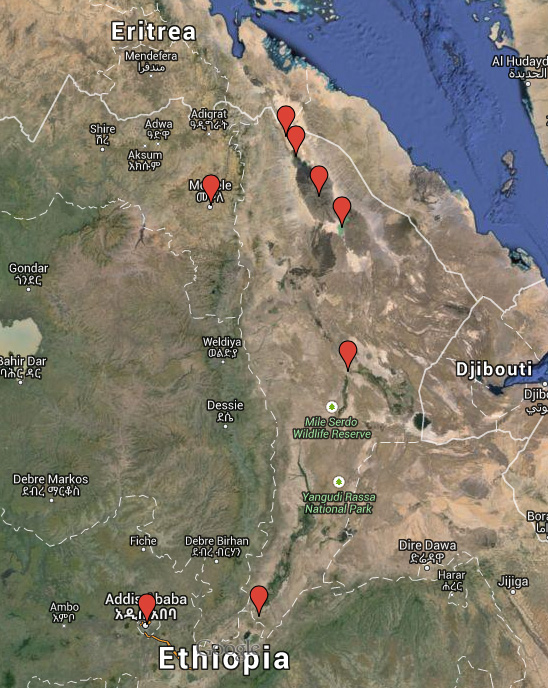
The volcano at Erta Ale – ‘smoking mountain’ in the local Afar dialect – is an unusual phenomenon. One of only six known lava lakes and the oldest having been present since 1906 it is the result of a hole descending 47 kilometres into the Earth at a place where three tectonic plates are slowly ripping the African continent apart. The resulting upwell of magma isn’t pressurised under a cap as is the case with normal volcanoes and so rather than violent and explosive eruptions the lava displays far more gracefully.

But lava is lava and as benign as Erta Ale appears the lava is a distinctly warm 1200°C. The lake also passes through cycles of activity and by the third day of our visit there was a significant rise in the amount of gas in the upwell resulting is some pretty spectacular eruptions. One of the side effects of the eruptions was the occasional lava bomb being thrown into the air and that is not something you want heading your way: Even if they are small, they are still molten rock and will burn through you like a hot knife through butter. It is one of the reasons that you do not stand at the very edge of the crater, the other being that the edges are so brittle and fragile that they collapse at the slightest provocation. Over the years several tourists have died here, our guide Enku himself losing one, simply as they ignored the advice they were given.

I knew I wanted a silhouette shot where I was as close to the edge as I could be so I stood out against the glow of the lake. I also knew that I didn’t want to die either so I headed off with Enku to find an appropriate spot. As a trained geologist, having worked for a number of mining and exploration companies, he could read the rise and fall of the edge and decided that here, at about one metre, was the closest it was safe to approach. Even then he was less than keen about spending time this close and I remember being a little disappointed that a nice Strombolian eruption didn’t occur as I stood there. But, even at a metre back from the edge, the heat was intense – over 60°C if the readings earlier in the day were correct – and waves of poisonous hydrogen sulphide were buffeting me. I had to be quick.

So it was a bit of a surprise when I finally got round to taking a proper look at my photographs today to find my selfie had been photobombed by a surprise guest lying at my feet…

Well, if you're going to visit one of the more unique places on the planet, you're going to take a selfie, aren't you...?

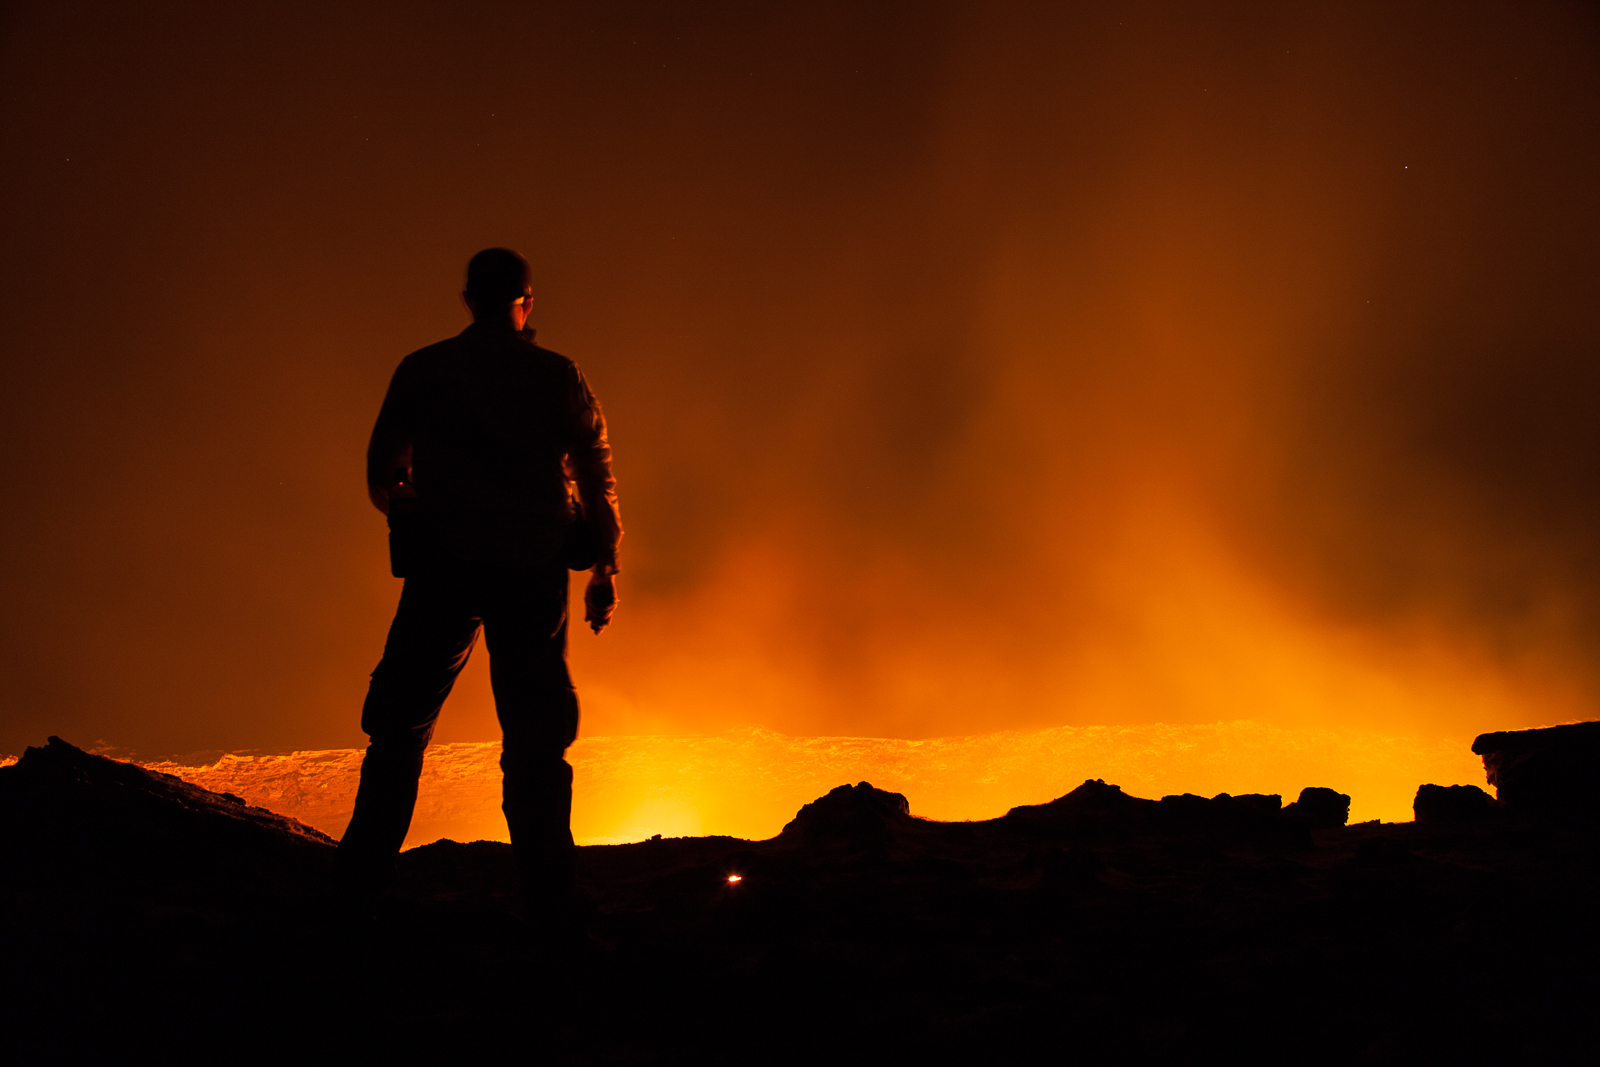
Well, if you’re going to visit one of the more unique places on the planet, you’re going to take a selfie, aren’t you…? [Click to enlarge]

Posted in Destinations, Frame by Frame, Travel Tagged , , |

There’s Big Money in Battery Packs

After the heat of a lava lake caused a couple of my Canon LP-E6 batteries to begin show issues when charging it is time to replace them. Better now than forget about it until two days before I head off on the next expedition and then panic ensues. In any event, as the recent Ethiopian trip proved, you can never have too many batteries.

Up until now I have been using a mixture of official Canon LP-E6 – which came with the camera bodies – and aftermarket batteries. Without actually looking at them I would be hard pushed to tell the difference between the official and aftermarket cells; both appear to last a for a high shutter count and the Canon 5D MkII body happily shows the charge left on both.

But, as both battery packs that have now developed issues are the aftermarket ones, I have decided to replace them with the official Canon ones. It was not an easy decision to make: £79 for an official battery pack versus £20 for a good quality aftermarket one. But as my work takes me to more extreme and remote locations, I do have to rely on the kit I take. As the old proverb goes “For want of a nail” – the nail in this instance being the battery pack the powers the camera and lens.

Now, whilst I didn’t buy the battery pack because of the packaging, I do have to say that I’m impressed. A lot of time and effort and been spent on the whole presentation. It oozes quality. In fact, had I not actually been examining every detail I would have never known.

But it is definitely a fake. Can you spot why?

Can you spot why this Canon battery pack is not the real thing...?

Can you spot why this Canon battery pack is not the real thing…?

Here’s some more shots of the very detailed packaging.

Convincing, and high quality, packaging...

Convincing, and high quality, packaging…

The hologram is a nice touch...

The hologram is a nice touch…

Needless to say that this was bought off eBay so it is very much caveat emptor, but this was being sold as “genuine and original” with a price high enough that made me think that it could well be precisely that. It could have been any number of legitimate sellers: unwanted present, Christmas cost more than expected unused items being sold off, someone no longer interested in photography to name but three.

But for someone to go to all this trouble to make a fake look and feel like the genuine battery pack does make me wonder just how much money there is in the fake market.

Now the point of this is not to suggest than battery packs from a source other than the original manufacturer are bad: there is a big difference between aftermarket batteries and fake ones. For many years I have been quite happy with aftermarket batteries (on my current 5D2, and 7D and well as my previous 40D) and before they went bust Diamondback batteries were my favoured option. I also own a Hahnel battery pack and they too are another well regarded manufacturer. Well made aftermarket battery packs from reputable manufacturers include all the require protection circuitry to stop overheating and potential fires. But if a seller is masquerading a battery pack as an original then it is going to be for profit. In that case you can probably forget the niceties such as protection circuits.

So, what are your options?

First, buy from a reputable source and official Canon resellers. If it appears to a ‘too good to be true’ deal, it probably is. That said, you still have to exercise caution. Amazon is a good example:


Don't blindly buy just because the order is 'fulfilled by Amazon'...

Don’t blindly buy just because the order is ‘fulfilled by Amazon’…

Amazon is a reputable company, but there is a big difference between ‘sold by’ and ‘fulfilled by’. The best option here is the £46.48 option as that is sold and fulfilled by Amazon, who incidently are an authorised Canon reseller.

Second, take some time to learn about some of the obvious signs of counterfeiting. Canon have a link off their US site (http://usa.canon.com/cusa/about_canon/standard_display/aboutcounterfeits) although Canon’s images are too small to be of use. A well written and clearly documented article for Canon LP-E6 counterfeits can be found at http://tazintosh.com/en/canon-batteries-watch-out-for-counterfeits/

Third, simply accept that, after spending £1500 on a camera body and sticking a lens costing in the region of £1000 on it, trying to save money by buying cheap batteries to power the whole thing isn’t going to be your greatest decision. Frankly, put in those terms, it really make no sense at all. Even at the full retail price, the Canon LP-E6 is less than 3% of the average camera/lens combination it powers.

But back to my story. The seller has refunded me and I’ve decided not to name-and-shame, primarily as there is no real point. There are too many counterfeits out there and highlighting a single seller will not achieve much. Better to cut the problem off at the source and accept that a reliable and good quality battery pack is going to cost.

Of course, I could go cheap and save £40 but given that my average trip these days costs at least one hundred times that, if the battery pack stopped charging on my next expedition and I missed the shots I was after I had better be near another lava lake – that would give me something to throw myself in…


Posted in Hints and Tips Tagged |

Voltaic Systems’ 17W Solar Charger Field Review

Back in November I gave my initial impressions of the Voltaic Systems solar charging kit and its applicability to photographers in the field. At the time I also mentioned that, as with many things, the real test would be in an actual field trial. Well, after two weeks on location in northern Ethiopia it is safe to say that it has been put through its paces and its strengths and weaknesses revealed.

The kit I took to Ethiopia consisting of the panel (top), the red cable connecting the panel and V72 battery, the black cable to connect the V72 to the camera charger and the white/black cable to connect to my MacBook Air. The car charger (bottom) also came in useful. The camera charger is not shown as it did not survive... [Click to enlarge]

The kit I took to Ethiopia consisting of the panel (top), the red cable connecting the panel and V72 battery, the black cable to connect the V72 to the camera charger and the white/black cable to connect to my MacBook Air. The car charger (bottom) also came in useful. The camera charger is not shown as it did not survive… [Click to enlarge]

The kit in question is the 17W single-panel kit consisting of the panel, the V72 20,000mAh lithium polymer battery and a number of connecting cables and adapters. In addition to the base kit I ordered the Canon LP-E6 battery charger and an Apple MagSafe power adapter for a 2011 model MacBook Air. It is hard to tell whether the panel and V72 are designed by Voltaic or merely off-the-shelf items but the advantage to me as a photographer was that I didn’t have to spent inordinate amounts of time trying to work out which items were required, which were not and whether they would work together. The Canon battery charger was definitely a third-party item (more on that later) whilst the MagSafe adapter was definitely hand-crafted by Voltaic.


PREPARING FOR THE TRIP

Before heading out I knew that, given our location, there would be no chance of a power source during critical parts of the journey. There are some stunning landscapes in the north of the country, but they are far from civilisation. So, whatever power requirements I had needed to be met by the kit that I carried. In the original article I outlined what I considered to be fairly simple needs: I needed a means to charge the LP-E6 batteries for the 5D Mk II and 7D bodies and also my MacBook Air that would be used for the end-of-day review and image backup. It was a simple requirement and one that the Voltaic web site suggested fell well within the capabilities of the kit.

I had also given a fair amount of consideration to how – and when – I would need to charge my equipment and I anticipated two basic scenarios. First, when moving between locations in the 4WD vehicles. Second, when on location. In the first scenario, we’d be spending a lot of time sitting around and not doing much shooting. According to the itinerary, these would be long days driving and arriving at the destination after sunset. In the second scenario, we’d be out-and-about but with a fixed camp to return to at the end of the day.

The issue that I could see, however, was that there was no easy way to attach the solar panel to the vehicle. Voltaic Systems had very kindly included a set of plastic attachments that would allow the panel to be tied to something (for example with velcro or cable ties), but they weren’t too much use on a vehicle. Luckily a good friend of mine has a mechanical aptitude and a comprehensive workshop, after a few conversations, he created a magnetic mounting kit for the panel. Now I could attach the panel to any magnetic surface – such as the roof of a 4WD – and simply run the connecting cable to the V72 safely inside the cabin. So now I was ready: I could mount the panel on a vehicle, a camel or any other fixed structure.

Although not part of the provided system the magnetic mount really made a huge difference - and one I recommend Voltaic Systems consider adding... [Click to enlarge]

Although not part of the provided system the magnetic mount really made a huge difference – and one I recommend Voltaic Systems consider adding… [Click to enlarge]

A close-up of the panel on the 4WD showing the (home-made) silver metal magnetic mounts and the (provided) plastic loops in each corner for cable-tie mounting. The panel happily survived repeated bumps and knocks as well as being covered in dust and volcanic ash... [Click to enlarge]

A close-up of the panel on the 4WD showing the (home-made) silver metal magnetic mounts and the (provided) plastic loops in each corner for cable-tie mounting. The panel happily survived repeated bumps and knocks as well as being covered in dust and volcanic ash… [Click to enlarge]

One of the nice things about the V72 battery is that you do not have to use the solar panel to charge it. The recommended input is a 14-20V DC input and the kit came with an appropriate mains adapter for this purpose. Initial tests in the UK (and shown in the original article) also showed the solar panel happily generated around the 20V mark. Voltaic also include a cigarette lighter lead suggesting that even a 12V DC supply can charge the battery. This was especially convenient as, for the first few days as we covered the 700km from the capital to the north of the Rift Valley, we would have access to cigarette lighters in the 4WD vehicles. Once at the Erta Ale base camp however, where we swapped transport to camels, we would be on our own.

One of the things that separates Voltaic’s solar kit apart from the other ones I researched is the capacity of the V72. At 20,000mAh it has, in theory, enough reserve for ten of Canon’s 1,800mAh LP-E6 batteries although Voltaic’s web site suggests a more conservative 3.5 times reserve. Voltaic also suggested that a single, full, charge of the V72 would be enough to replenish the Air’s own internal cells.

Using the ten foot cable I had a lot of flexibility as to where I put the V72 in the 4WD. All I then had to do was wait for the sun to work its magic... [Click to enlarge]

Using the ten foot cable I had a lot of flexibility as to where I put the V72 in the 4WD. All I then had to do was wait for the sun to work its magic… [Click to enlarge]

The charging process can work in one of two ways, depending upon what you are charging. Voltaic’s web site suggests that camera batteries can be charged directly from the panel, presumably relying on the battery charger’s regulation circuitry to ensure the battery is not over-cooked. However, smart phone and laptop charging should be performed via the V72 battery. In the end everything was charged via the V72 battery although it was here that I hit a bit of an inconvenience. Voltaic offer two cables (the red cables in the photographs) to connect the panel to the V72, one at 4 feet and one at 10 feet in length. In both cases they are terminated in a 3.5mm male DC plug. This is fine for the camera charger but for the V72 – which takes a 5.5mm input – a small (provided) adapter had to be used. One thing I have learnt is that when moving about at some point during the various unpackings and repackings, you lose small stuff. It is inevitable. Given that Voltaic only recommend direct charging for camera batteries, this seems an odd choice of connector. In the end I replaced the provided 3.5mm plug with a 5.5mm plug before heading out.

The other reason that I ended up always charging the V72 is one of convenience. At 12° north of the equator we were still in winter and so daylight hours were limited. Sunrise was around 6:30AM and sunset around 6:30PM. The activities of the day meant that direct charging was almost always impractical until we came to a halt in the evening.


IN USE

The first few days were spent covering distance as we moved up country. Long hours in the 4WD interspersed with stops to examine some interesting geologic phenomenon. It was a light draw upon the camera batteries but in the evening it was still worth topping them up from the V72. An unexpected power drain, however, was the iPhone 6. Quite by accident I began to use it to record video clips and take those panoramas that didn’t quite seem worth setting up the panoramic tripod head for. The iPhone turns out some quite reasonable results, but its video capabilities have a heavy drain on the battery.

With the added load of the iPhone battery using the long hours of driving to keep the V72 fully charged turned out to be very useful. Even so, the first few days were a gentle introduction for the charging kit.

Home at Erta Ale. "A compact, fully air-conditioned, one bedroom apartment backing on to a stunning panoramic landscape." it said in the brochure. It even came with free mice... [Click to enlarge]

Home at Erta Ale. “A compact, fully air-conditioned, one bedroom apartment backing on to a stunning panoramic landscape.” it said in the brochure. It even came with free mice… [Click to enlarge]

Once we arrived at the Erta Ale base camp and headed up the volcano, the solar charging kit panel took a more fundamental role. A few of the other travellers also had Canon 5D MkII and/or 7D bodies, one had a quadracopter and the rest had their own cameras form different manufacturers. With three days at the edge of a lava lake we all became a little shutter-happy. I managed, with no real effort, to take over a 1000 shots as well as a large number of video clips and I was not alone. The quadracopter was set free and captured some stunning footage although you could literally watch the batteries drain. The problem was that we had zero access to power. The 4WD vehicles were three hours away and as the journey would require a military escort to be organised, short of a medical emergency, we weren’t going to be making it. Only one other person had a solar kit – a $60 affair off eBay – and that was so ineffective as to be useless. Suddenly I had become a popular guy to know.

We relied on the Voltaic charger. Several Canons, a Fuji, two iPhones and even the quadracopter were all kept alive by the solar charger... [Click to enlarge]

We relied on the Voltaic charger. Several Canons, a Fuji, two iPhones and even the quadracopter were all kept alive by the solar charger… [Click to enlarge]

Due to the number of videos I was taking and a lot of use of image stabilisation I was getting through around two of the Canon LP-E6 batteries a day, some of the other serious photogs were too. The iPhone battery also required daily attention and the end-of-day upload to Adobe Lightroom on the Air drained its battery at an unholy rate. A queue formed. The Voltaic charger simply could not keep up with it all. This is in no way a criticism: It is intended vey much as a personal charging solution and we were asking it to keep up with four people each placing a heavy demand upon it. In truth it actually coped better than I expected and the ability of the V72 to output as USB and simultaneously one of 12,16 or 19V really shone; there were a couple of instances where charging the iPhone and a camera battery simultaneously was a real benefit.

It was whilst camped up on the crater of Erta Ale that the provided ‘tie-attachments’ came in useful as they allowed me to cable tie the panel to the wooden branches of the hut I was it. It was unlikely to be stolen, but we were exposed and the wind did pick up every now and then. As my hut backed on to a sheer drop to the old, razor-sharp lava, caldera floor, had the wind decided to get too playful then panel would have met a very quick end.

The provided plastic attachments allowed the panel to be cable-tied to the shack and the cable fed inside via one of the many, many holes. The next nearest source of power was a 4WD somewhere in the distance... [Click to enlarge]

The provided plastic attachments allowed the panel to be cable-tied to the shack and the cable fed inside via one of the many, many holes. The next nearest source of power was a 4WD somewhere in the distance… [Click to enlarge]

Disaster almost struck. The Canon battery charger provided by Voltaic broke. After disassembling it I discovered that the DC input socket had a snapped solder joint and had lifted the solder tracks off the circuit board. In other words it was definitely not repairable in the field. Had it not been for one of the guys having a USB Canon charger I, and the other Canon users would have been in dire straits. It is worth pointing out that I was not trying to be overly rough with any part of the provided kit, but I was in the field. Things do get knocked about, repeatedly plugged and unplugged otherwise moved and I would expect the elements of the charging kit to withstand this level of abuse. If I am blunt about it, the supplied battery charger is (or rather was) a rather cheap-and-cheerful piece of kit. But to balance that negative, the solar panel and V72 stood up to field work admirably. The V72 may have a few scratches now and a dent or two, but it continues to be rock-solid. The panel itself has a few surface scratches but these have no effect upon its operation. The only let-down is the provided third-party battery charger.

By day three the lack of camera battery charger would have been catastrophic to the shoot and shots like this would have been missed... [Click to enlarge]

By day three the lack of camera battery charger would have been catastrophic to the shoot and shots like this would have been missed… [Click to enlarge]

After descending from Erta Ale we moved further north to Dalol (or Dallol, depending upon which map you read) and close to the DMZ between Ethiopia and Ertitrea. Here the accommodation improved as we swapped the crude huts with volcanic ash floors and mice for crude beds under the stars. We did have one structure available to use and this doubled as a kitchen and storage area for our bags. It’s roof also server as a convenient high place to mount the panel out of the reach of the local children. Whilst we again had access to the 4WD vehicle as so everyone returned to charging their batteries that way, continuing to use the panel meant that I did not have to wait in line – and took some strain off the vehicles.

Eventually we returned to civilisation and for the last couple of days found ourselves in hotel rooms. Aside from the joy of now actually having toilets and showers, everyone rejoiced in the concept of electricity that came from sockets in the walls! Except me. I had left all my mains chargers back in the UK and so I still relied on the solar kit to provide me with power. In the first hotel $5 bought me access to the roof; in the second there was a rooftop bar.


CONCLUSION

So, the bottom line is whether I can recommend the Voltaic offering or not. The answer is an almost definite yes but I would like to suggest to Voltaic Systems the following changes:

  • Include a magnetic mounting system for vehicles.
  • Change, or at least offer an alternative cable to connect the panel to the V72 battery terminating in a 5.5mm DC plug thereby removing the need for an adapter.
  • Offer a more resilient camera battery charger.

In addition to the suggestions to Voltaic Systems I recommend having a second V72 to hand. I’m not totally sure how keeping two charged would work given that the panel couldn’t charge a single V72 in one day, but heading out to location with two fully charged 20,000mAh batteries certainly would not hurt.

In spite of these suggestions, and even without my modifications, the bottom line is that the kit not only worked, it worked well. Despite being asked to perform far beyond it’s intended use it helped all of us keep power to our cameras and get shots from a location we’ll likely never see again. And since that was the whole point of having a solar charging kit in the first place, I can only say that it was well worth the price of purchase and import costs to the UK, the extra luggage weight and the need for me to modify it. Next time I head out to a location where power will be scarce, it is definitely on my packing list.


UPDATE: 30 JAN 2015

After posting this review Jeff over at Voltaic responded pretty much immediately (which seems to be normal for their customer service) to the points I raised. I’ve then sat on the interesting replies until now (although in my defence I have been busy).

Voltaic now link to an US-based web site that provide off-the-shelf magnets that can be purchased and fit directly to the panel’s threads. For USA customers this is a great solution although I would just point out that (1) shipping to the UK (and presumably anywhere else outside of the US) was prohibitively expensive when I sent Voltaic the link last year, and (2) the magnets have no protection and so may scratch the surface they are attached to.

Not mentioned elsewhere on their site but they have now changed the style of adapter that I was so concerned over losing (as it would prevent solar charging) that I discarded it and soldered on my own connector. Apparently Voltaic now provide an adaptor that clips over the cable coming from the solar panel. If this is anything like the one they already use on the red connecting cable then you’re probably not going to lose it – it needed a serious amount of pulling to detach the cable from the panel.

As for the failed battery charger, right now it seems that they are still being sold and I guess that my experience was not-so-common. Voltaic are interested in alternatives and I’m testing a German-made one right now. But my advice would be to take at least one spare charger – they’re critical yet very lightweight and only a few dollars.

Voltaic have posted highlights of my review on their web site here.

Posted in Travel Tagged , , , , , |

My (Second) Top Five of 2014: The Beach

Just because I travel with the specific aim of photography doesn’t mean I don’t have fun And today’s image was definitely involved a lot of fun

Jokulsarlon, Iceland.

Beware, icebergs can bite back… [Click to enlarge!]

One of the most visited spots along Iceland’s southern coast is the glacial lagoon of Jökulsárlón. Indeed, even at almost 400km from Reykjavik, there is a steady stream of tourists making the arduous coach trip out here and back in a single day which usually ends up as 9 hours in a coach and two to three hours at the lagoon. But despite what little time they get to spend around the lagoon they invariably leave impressed at what they have witnessed.

As mentioned Jökulsárlón is a lake that has formed at the base of Vatnajökull – Europe’s largest glacier – and more specifically at the base of Breiðamerkurjökull, an outlet glacier. There are many complex processes linking these three entities but in essence Vatnajökull is highland ice cap where erosion, glacial motion, snow fall and gravity result in the edges of the ice cap spilling downhill forming what are known as outlet glaciers or glacial tongues. Eventually the outlet glacier meets warm air, ground, or both and collapse under their own immense weight into icebergs – a process referred to as calving.  But words and the science behind them are definitely nothing compared to the sight itself.

I can understand why Jökulsárlón is so popular – thousands of icebergs at the foot of an awe-inspiring glacier – I would have been awestruck too had I not been to Antarctica. Alas however, I have been and so, as impressive as the lagoon is, it left me a little, well, cold.

One of the interesting things about Jökulsárlón is that it vents out via a narrow estuary on to the very top of the North Atlantic and because of this there is a natural tide that pulls the icebergs out to sea. Get there early in the morning after low tide and you’ll be greeted with a sea full of icebergs. It is not a time to go for a swim – some of the larger icebergs can weigh upwards of a 100 tonnes but the power of the North Atlantic tosses them around as if they weighed nothing. The incoming tide also pushes some of the icebergs back onto the beach, grounding them on the black sand. It is truly stunning: A landscape of only black, blue and white. Alas, if you are taking a coach trip out of the capital, you won’t get to see this marvel of nature – as the waves beat rhythmically against the beach and the temperature rises, the mighty icebergs melt and by evening only small lumps remain, the largest the size of a pet dog.

I found myself on Jökulsárlón beach several times trying to do justice to what nature had designed. As can be seen from this image – and the rest in the gallery – the best angles are side on to the sea shooting along the beach. All well and good and I had even bought Wellington boots for this very purpose, which were 1100 miles away back in the UK as I couldn’t get everything into the suitcase! So I ended up playing chicken with the Atlantic: Set up the tripod just out of reach of the waves and begin the task of trying to capture the right shape of wave on the beach at the right time (which is tricky with multi-second exposures), all the while keeping an eye open on the waves coming in to the side of me. Of course, just as soon as I would get in to the swing of things, a rogue wave would come hurtling in and it would be a mad dash out of its path, often having to leave the camera behind perched on the tripod and hoping that there would be camera to return to. Over the course of my visits I discovered a list of handy tips, the hard way.

First, don’t set up the tripod with a thigh-high iceberg right behind you and between you and safety as, when an incoming wave means it time to make a dash for it, the iceberg is somewhat less bothered. You learn a lot about momentum, high centre of gravity, pivot points and just how big a bruise a iceberg can make by crashing full speed into one.

Second, just because you find a nice, solid feeling iceberg you can stand on to raise yourself above the level of the incoming wave, don’t get smug. Given a big enough wave that solid feeling iceberg suddenly becomes far less solid and the thing about ice is that it isn’t exactly a high friction surface.

Third, no matter how far up on the beach you leave your camera backpack out of harm’s way, it won’t be enough. The tide is coming in and you’re engrossed in trying to capture the perfect moment. You end up relying on the goodwill of others to either shout a warning that your backpack is about to get a good wash, or to move it for you.

Fourth, no matter how much you rinse the sand off your tripod after a session you’ll still take half the beach home with you. By the end of the trip my lovely carbon fibre Feisol was making alarming grating noises. Luckily John over at Feisol’s UK distributor was brilliant and had the tripod serviced and back in my hands within a week.

But the biggest thing I learned on my days to the beach was that, despite the bruises and the soaking wet feet, I was having more fun than I’d had in years.

Oh, and not to leave my wellingtons at home again…


Posted in Frame by Frame Tagged , , |

My (Second) Top Five of 2014: The Plane

Today I’m halfway into my alternative top five from this year and is one of the harder-to-find places along the southern coast.

Faith can be an important quality when trying to get the shot...

Faith can be an important quality when trying to get the shot… [Click to enlarge!]

Whilst accounts of the exact date and route – and even the cause – vary some believe the original report in the Icelandic newspaper bear the closest resemblance of the truth. On 21st November 1973 whilst returning from Höfn a US Navy Super Douglas DC-3 was forced to make an emergency landing when heavy icing set in over the Mýrdalssandur sand flats. The plane was able to stay aloft long enough to send out a mayday before eventually eventually coming to rest on Sólheimasandur Beach along Iceland’s southern coast and about 170km from Reykjavik. The crew of seven survived  – surprisingly with no injuries – and were rescued in very short order. The US Navy made plans to recover the craft but these never came to fruition whether due to the weather or the cost. And so forty years on the aircraft still sits on the beach as a silent reminder that Iceland’s  unpredictable weather should not be underestimated.

Finding the wreck requires a combination of planning, keen eyesight and faith. It is not on any map and nor is it signposted and so if you do want to see the wreck for yourself, planning is the order of the day. I had discovered the GPS coordinates of the site and so could accurately locate it on Google Maps. In fact once you know where to look you can actually see an indistinct dark outline of the plane if you zoom right in on the map. But, locating the plane on Google Maps merely tells you were the plane is and, as the old saying goes, it is not the destination that is important, but rather how you get there.

I continued trawling the Internet and found a few descriptions on the route people have taken although distilling the most descriptive of these to its essence effectively left me with “after a long but slight incline on Route 1, turn through a white gate after a green field”. Not exactly confidence building. Still more time was then spent using Google Streetview back and forth along sections of Route 1 and then I found a likely candidate albeit the gate was not white and the field wasn’t particularly green.

So it was facing this gate that I found myself one morning debating if I really wanted to take the hire vehicle off on to the black beach with no actual path to follow and simply drive toward the sea.  Getting lost was not really the issue; getting stuck was. But fortune favours the brave and so off I went.

It was an odd experience. The beach is wide and long and essentially looks as flat as a pancake. Visibility was good but as I continued to drive the landscape didn’t really change much. Planes are quite big and this one was a shiny, silvery lump of metal on an otherwise black background. So where was it? And that is where the faith was required. The beach may look flat, but is wasn’t and  just after what must have been the third thought of giving up, I crested a mound and there it was!

I visited the plane twice, each time for over an hour. In that time three other visitors made the journey out to see the plane. Maybe more did but their faith failed them.

But that is OK; it was nice to be alone with a little bit of history…


Posted in Uncategorized

My (Second) Top Five of 2014: The Falls

Today I’m looking at the second of the alternative top five images from my travels in 2014. These are alternative only in that I’ve already posted about my top five and I like these for completely different reasons.


One reason to avoid coach tours: When they've left you have the whole place to yourself...

One reason to avoid coach tours: When they’ve left you have the whole place to yourself… [click to enlarge!]

Iceland conjured up a lot of different emotions as I travelled across the island. Awe is probably the one that most often came up and that is pretty unsurprising given the landscapes to marvel at. Inquisitiveness is probably the next: Why are those mountains all those different colours at once? Why is that beach so black? Why does it rain every five minutes?

But, and it may be something that I shouldn’t publicly admit, but I did begin to feel a sense of the blasé setting in at some point. Yes, as impressive as Iceland is I did eventually inwardly exclaim “Not another waterfall!” That’s OK though, there are a lot of them.

To simplify Iceland’s geography down to its absolute basics, there is a central snow-capped glacial highland region surrounded by lowlands. As winter gives way to spring the glaciers begin the long thaw and water flows in the one direction gravity permits: down. The result is hundreds of waterfalls – literally hundreds – of every conceivable size and shape and even those visitors travelling on a time budget will see at least a few waterfalls if they head out of Reykjavik along Route 1.

One of the most popular of these along the south western coast is Skogafoss. It is popular for a variety of reasons but here’s two. First it is, relatively speaking, close to Reykjavik so even those on a city weekend break can take an organised day trip out to see it. At approximately 200km from the capital you’ll see –and stop at – other sites along the way giving you a full and rewarding day out.

The second reason for its popularity is that it is truly impressive. At 60 metres high its sheer power has a palpable physical effect on you. I visited Skogafoss a couple of times and can attest to how it affects your senses. It is loud. It is big. It is wet and cold. There are no safety barriers preventing you from walking right up to the water pool at its base – although let me know if you try. I got to about 30 metres before the force of the falling water pushed through the waterproofs I was wearing – ones which survived Antarctica – and drenched me to the core. Yes, you don’t just visit Skogafoss, you experience it.

This image captures another aspect of the country I became aware of. Like the majority of the sights in Iceland the falls are free and publicly accessible and if you are prepared to spend a little longer or arrive a little earlier, you’ll spend a lot of time alone with nature. The coach parties beat a rhythmic drum. They arrive, people spill out and get their photographs before the cold gets too much and they get back on board the coach. Maybe a few intrepid tourists take the pathway to the top, but usually not. The coach then disappears leaving about twenty minutes before the next one arrives.

And this image reminds me of all those in-between moments…

Posted in Frame by Frame Tagged |

My (Second) Top Five of 2014: The Expedition

Maybe it is age or maybe just being too pre-occupied with other things right now but my grand plan to reveal my top five images of 2014 hit a bit of a snag yesterday when I suddenly realised that I’ve already posted about them over the past few months! I could of course just run through them again, but where is the fun in that. So I’m going to try again and this post about my second top five. Technically that would make them part of my top ten, but – and this is hard to explain – they are not images six to ten. They are a top five of their own in my mind. So, with that cleared up…

Brattafonn, Iceland.

Fimmvörðuháls is not a place that has global recognition, but it could have been a very different story…


Back in 2010 Iceland, which hitherto the World at large had only modest interest in, suddenly found itself a bit of a media darling. The fact the you know exactly why is proof of that, but just in case you have forgotten, it was the year that a rather unimpressive volcano had a minor eruption and – only due to a freak sequence of events – did it have global implications. Yes, Eyjafjallajökull become the household word that no-one mentioned, although only because no-one could pronounce it. At some point an inspired American presenter referred to it as E-15 (‘E’ followed by an unfathomable combination of 15 characters) and the name stuck. So it was rather obvious that, on the travels along the southern coast, I wasn’t not going to see it if I could.

The thing that most people do not know – and I only knew as I researched it – is that there were three eruptions at Eyjafjallajökull in 2010 each with a few weeks of each other. The first took place slightly off centre at the mountain pass of Fimmvörðuháls and was fairly uneventful – even referred to as a ‘tourist eruption’ by the guides – due to the fact that you could pretty much stand around and watch the eruption. It was the second eruption that caused the chaos. You still can’t get to the site of the second eruption, the area being not only officially out-of-bounds, but also because it is geologically unstable and hence not worth the risk. But the site of the first eruption is a different story.

It may have been a ‘tourist eruption, but the ground still steams as the hot ground hot evaporates off the snow. We were hiking up to Magni, one of the two new craters that had been formed and this is the view that greeted us upon out arrival. It is not particularly high up – only 1200 metres or so, but the mountain pass of Fimmvörðuháls sits between two glacial caps and the surrounding peaks cause weather fronts to back up as they struggle to climb over the high ground. The pass is also part of the popular three (or four) day hike between Skógar to the south and Þórsmörk (Thorsmork) to the north. The weather was closing in again rapidly and we were just getting ready to head back down when  a group of intrepid hikers were making their way along the path en route to  Þórsmörk.

This image really sums up one of the aspects of my photographs I most like: It is spartan. I am not keen on ‘busy’ images, I like negative space and how a few details can convey a feeling or a mood. The old adage is that a picture can convey a thousand words, but often you only need a few to make a point. It is this aspect of my work I am keen to develope.

I do envy that they got to stay and experience the power and beauty of nature whilst we had to return down the mountain.

Posted in Frame by Frame Tagged , , |

My Top Five of 2014: Dog Walking a Man

As I’m not going to be around over the Christmas period, I thought I’d share the five images taken this year that I am most happy of.

The idea came to me whilst on a train home at the end of a 61 hour work week: I was fighting not to fall asleep and so began going through some photographs on my iPad in an effort to stay awake. It worked as I found myself flicking back and forth between images trying to decide which I liked more.

I thought I’d share my choice of top five over the course of the week. I hope you enjoy them.

Tel Aviv – June 2014         


Is the dog keeping up with the man, or the man with the dog? I'll never know for sure but the question keeps making me smile...

Is the dog keeping up with the man, or the man with the dog? I’ll never know for sure but the question keeps making me smile…

This image was taken in Tel Aviv in early June. I was on a training course at the headquarters of one of our vendors. The days were long and we didn’t finish before 6PM each evening which, considering that sunset was just before 8PM, meant heading straight to the local push bike rental station and a mad dash across central Tel Aviv to the beach in the hope of a hour of photography.

If you ever visit Tel Aviv – and you should as it is a great city – the beach is a must: A long golden ribbon of sand stretching from the wall of Old Jaffa to the chic bars and restaurant by the harbour. What I loved about it most was the rhythm – the palpable thrum – of humanity that could be found along its length. The old, the young and the in-between. The athletic, the office worker, the card sharks, the musicians, the friends and the lovers. Everyone was making use of the beach and, as I have described it before, for me it was the heart of the city.

One of the nice things is the beach is also west-facing, so if you like the whole ‘sun setting over the sea’ thing then you’re in luck. But I was after something a little more – well to be honest I don’t know what I really wanted, but something that summed up Tel Aviv. And there was only one thing: Youthfulness. Not of body, but of spirit.

I found a great spot up near the harbour and it seemed that it was a popular path to get down to the beach. It had this great reflection of light coming off the cobbled stones so I set up an waited for the right moment but it became obvious that I may have chosen the wrong spot as there was a near constant flow of people either heading to, or coming back from, the beach. The resulting images were a mass of ill-defined silhouettes with no focus and no real story. Still I waited and people became curious as to why I was sitting in the middle of a path, camera on tripod and not actually taking photographs. So conversations ensued luck was wished. Then it happened.

A young couple appeared over the crest of the path carrying surfboards. It was what I had been waiting for – the essence of Tel Aviv in my mind. There were very few people around and I had a clear definition of them in silhouette (I love shooting people in silhouette). They knew I was photographing them and so we got talking and they liked the image so email addresses were exchanged.

I stuck around a bit longer and I was just thinking of moving on as the light was fading when these two appeared over the crest. It made me smile even as I pressed the shutter. And it made me smile again yesterday after a long and tiring week.

Posted in Frame by Frame Tagged , , |

Ethiopia: Dreaming of a White (and Black and Red) Christmas

Well, with just twelve days until I leave for Ethiopia and after spending the bulk of yesterday picking and ordering the last of the clothing and equipment, most of the shopping is now complete. All that remains is the medical kit, a plastic funnel for transferring water between containers, some coloured pens and pencils and a few inflatable globes. So with all of that now done I have finally started thinking about the thing that made me want to travel to the remote Danakil Depression in the first place: Landscape photography. 

Starting in Addis Ababa we’ll head east to Awash National Park before heading north and entering “No Man’s Land”

Starting in Addis Ababa we’ll head east to Awash National Park before heading north and entering “No Man’s Land”

It is going to be a packed two weeks as we travel northwards from the capital of Addis Ababa up to the very top of the country and then back again along a loosely counter-clockwise route. As we travel everything will change around us: the landscape, the climate, the wildlife, the people, even the predominant religion will alter as we descend from Addis Ababa at an altitude of 2300 meters to Dallol with an altitude of -130 meters, one of the lowest points on the Earth’s surface.

For me the highlights of the expedition are the three days spent at the Erta Ale shield volcano and the time spent at Dallol. There are many descriptions of Dallol but Wikipedia probably best describes it:

Dallol features an extreme version of hot desert climate (Köppen climate classification BWh) typical of the Danakil Desert. Dallol is the hottest place year-round on the planet and currently holds the record high average temperature for an inhabited location on Earth, where an average annual temperature of 34.5 °C (94.1 °F) was recorded between the years 1960 and 1966. The annual average high temperature is 41 °C (105 °F) and the hottest month has an average high of 46.7 °C (116.1 °F). Dallol is also one of the most remote places on Earth. In addition to be extremely hot, the climate of the lowlands of the Danakil Depression is also extremely dry and hyper-arid in terms of annual average rainy days as only a few days record measurable precipitation. The hot desert climate of Dallol is particular due to the proximity with the equator, the very low seasonality impact, the constance of the heat and the lack of efficient nighttime cooling.

For someone who is as fond of cold weather climates as I am, it will be interesting to see how well I cope with such opposite conditions. The temperature will be further exacerbated by the heat coming off the lava lake at Erte Ale whose surface temperature is a mere 1200 °C

Whilst we spend three days at Erta Ale it is, for all intents and purposes, a single environment. At an altitude of 600 metres there is little else other than the lava lake itself and the black balsaltic lava ground. Getting a good series of photographs here is likely to be as much luck as skill as we will be at the mercy of just how active the volcano is at the time, but I have a series of photographs in my head that I want to try and capture in the limited colour palette of volcanic black and lava red.

Once we descend from Erta Ale and head towards Dallol the pace will pick up dramatically and photography is going to be more of a challenge as the area offers several different landscapes with only approximately two days to capture something decent. One of the big landscapes is a salt flat much like the Salar de Uyuni in Bolivia although much smaller at only approximately 200 square kilometres. Here I’ll hopefully have a number of opportunities – from the wide vistas of the salt flats themselves to the Afar miners who extract the salt with picks, to the camel trains that take the salt to market. I may even get a chance to try my hand at salt mining in what can only be described as intensely harsh conditions.

Salar de Uyuni, Bolivia.

The Salar de Uyuni salt flat in Bolivia. A similar white Christmas awaits me in Ethiopia.

The volcanic area of Dallol is a sight that still causes me wonder at just how such a place can exist. It is a landscape that would look at home in an old science fiction movie where they have pumped the colours to the maximum and day-glo blues, greens, pinks and yellows all mix together. Lighting here will be a key factor – it has to be right first time as there will be no chance for a revisit.

Another thing that I want to try whilst in the Afar region, and particularly the Danakil Depression itself, is astrophotography. It is not a style of photography I have any experience of and involves its own set of rules and techniques that I know very little about. But the one thing that every astrophotography web site and blog I have visited agree upon is that astrophotography works best when there is no light pollution to obscure the incredibly faint light from distant stars.


Yellow is light pollution and blue is darkness: Jazan on the top border is typical of towns and cities. In the northwest of Ethiopia we’ll have no problems with light. The only light sources are from lava.

Yellow is light pollution and blue is darkness: Jazan on the top border is typical of towns and cities. In the northeast of Ethiopia we’ll have no problems with light. The only light sources are from lava.

Looking at the above image from blue-marble.de – a web site that shows satellite imagery of light pollution across the planet – it is easy to see why the one thing I can guarantee is that – in what Wikipedia and National Geographic call one of the most remote places on Earth – light pollution will not be a problem.

So I have given myself a crash course in astrophotography which in turn has led to having to learn the basics of how to locate and identify the constellations and navigation by the stars. I am hopelessly under-prepared but there is not much I can do now other than make use of the location and hope that what little I have learned will help me produce something I like. Unfortunately however, whilst I would love to take a photograph showing the Milky Way galaxy in the night sky, I believe I’ll be there at the wrong time of year. On the plus side however, to capture some really rich star field images, even the moon can be a problem and most recommendations suggest shooting on nights leading up to and immediately after a new moon. As I start the expedition on the 21st December – the day of the new moon, I’ll have ideal conditions to shoot the night sky – assuming it is not cloudy, that is.

Posted in Destinations, Trip Planning Tagged , , , , |

Ethiopia: T Minus 20

With twenty days until I leave for Ethiopia, and it being my last chance before then to perform all the time consuming checks, the pace has picked up on the trip planning.

The most fundamental task was to ensure that I have all the clothing and equipment that I will need to take with me and to that end I have been purchasing bits over the past few weeks. This weekend’s task was to collect it all together and see what’s is missing – and if it is all going to fit!

Clothing

When I went to Antarctica I went through the pain of having to research, and then buy, a complete cold-weather wardrobe. Now I have had to do the same for the other end of the climate scale. As with the online advice for cold-weather gear, advice for hot-weather clothing is equally diverse. In the end though I have settled upon taking the following:

  • One pair hiking boots – Salomon Quest 4D GTX (plus spare laces)
  • One pair hiking shoes – Salomon Ultra X
  • Two Rohan “Core Silver T” base-layer T-shirts
  • Two Bspoke “Epping” Coolmax base-layer T-shirts
  • One Rab “MeCo 120” base-layer T-shirt
  • Four pairs Rohan “Cool Silver” Trunks
  • One pair Rab “MeCo 120” Trunks
  • Two pair Smartwool “PHD Outdoor Ultra Light” Socks
  • One Pair Icebreaker “Hike Light” Socks
  • Three Craghoppers Nosilife long sleeve shirts
  • Two pairs hiking trousers [TBC]
  • One Berghaus Polartec 100 fleece.
  • My trusty wide-brimmed hat

As you can see it is a bit of a mix: three different types of base-layer t-shirt for example. My reasoning for this is simply that when reading around the general consensus was that synthetic material doesn’t work well for some people: I didn’t want to stick to one brand or technology only to find that it didn’t work for me.

The hiking boots and shoes are both new. My trusty 18 year-old Scarpa BX boots failed in Iceland and despite being waxed began letting in water. My Merrell Moab hiking shoes finally fell apart in Israel – only just surviving due to a couple of tubes of superglue. So back in September I went in to the local GoOutdoors shop with the intent of trying them on and them buying online and went through several makes – Mendl, Scarpa, Mammut – but all slipped when I walked – a recipe for blisters. In the end the guy took one feel of the shape of my heel and ankle, disappeared and came back with the Salomon. They fit like a glove (well, a foot-glove). The whole process took 40 minutes and it was not service that should go unrewarded by then buying elsewhere. I was so impressed that I even emailed them to say how pleasantly surprised I was, and that rarely happens. The hiking shoes were bought yesterday, Salomon again due to the fit.

The other thing – which is a new experience for me – is that I’m taking only five days of clean clothes for a two week trip. For the experienced trekkers amongst you this may not seem particularly noteworthy, but for me is it a big departure from what I am used to. Well, almost. On my trips to Iceland and then Israel earlier this year, despite having sufficient clothes for a daily swap of underwear and t-shirt, I didn’t use half of them. So this is really just an extension of that although it will be much hotter than both Iceland and Israel in the Danakil Depression and so sweat will be more of an issue. As a backup I am taking a small tube of travel washing liquid although given the lack of running water and that the only bodies of water are either highly acidic, poisonous or have a higher salt concentration than the Dead Sea, I’m not altogether sure how I would get to use it.

The trousers are still to be bought as I am still stuck on the decision: I love the multiple pockets of cargo-style trousers, but I also like the idea of those which can be converted to shorts. This is a decision that needs to be finalised this week. I’ll also be buying two more pairs of lightweight hiking socks.

Equipment

For the majority of the expedition we’ll be away from civilisation and in the middle of nowhere. This means no electricity, gas, running water, mobile phone coverage and no sanitary facilities. With the exception of the first night in Awash and the last night in Mek’ele, accommodation is listed as being ‘under the stars’  – a euphemistic term for sleeping on the ground. Our comfort – and more importantly health – will be dependent upon whatever we take with us.

  • A Vango Sherpa 65 litre backpack
  • Snugpak “jungle” sleeping bag
  • Exped Ultralight inflatable pillow
  • Karrimor sleeping mat
  • Gas mask
  • Mountain Warehouse large travel towel
  • Lenser P7 LED torch
  • Petzl Tikka XP head torch
  • Medical kit
  • Voltaic Systems’ 18W solar charging kit
  • Swiss Army knife
  • A funnel
  • Several large plastic bags and some zip-loc bags

The pillow may seem like a luxury item but I’ve woken up with a stiff neck too many times to know that it can real pain (so to speak) to have a sore neck when you’re rushing around. And at 46g in weight, it is not exactly cumbersome.

The jungle bag – so called as it is a lightweight one season sleeping bag- is less to keep warm and more to provide protection from the little critters that will be roaming around – mosquitoes included. It has a thermal comfort rating of down to 7°C and includes a handy zip-up mosquito net over the head opening. The pillow fits in the hood nicely.

The gas mask is probably the oddest item on the list, but it is required for certain areas, especially around the crater of the volcano and the lava lake. The biggest risks here will be hydrogen sulphide and sulphur dioxide gasses, both of which have a habit of killing you if left untreated. As we’ll be around 600km from any form of medical aid, prevention is definitely better than cure in this case.

The solar panel is the luxury item. As mentioned in a previous post it is there to charge the camera batteries and the battery on my trusty MacBook Air. I could survive without the laptop – although doing of would make checking image quality tricky – and five camera batteries may be enough for the trip. In a pinch I could charge the batteries off the cigarette lighter socket in the 4WD, but there is possibility that may not be an option. Any in any event, there is nothing wrong with a bit a tech geekery!

So, the big question is: Has this weekend been a success? The answer is both yes and no.

No in the sense that I have not performed a complete test pack and checked the weight. This is only a little annoying in that it would have been nice to do, but a quick educated guess would suggest that I should be OK.

Yes in the sense that I now have a final shopping list which can be summarised as:

  • Two more pairs lightweight hiking socks
  • Two pairs of hiking trousers
  • Medical supplies
  • Sanitary and personal care supplies
  • An inflatable globe
  • Glucose tablets, energy bars, dried nuts and fruit.

The biggest challenge of this is the trousers simply as I need to actually go somewhere that has what I am after and try them on – a struggle given my busy work schedule and hence why this weekend was so important. By contrast the other items are easy to come by.

Including the all important inflatable globe of the World…

Posted in Travel, Trip Planning Tagged , , , , |