Category Archives: Travel

Airline Cabin Baggage: A Photographer’s Minefield

As a photographer every international destination always brings its own unique logistical challenges, but one constant amongst them all is the dread of being forced to check my cabin baggage full of valuable and delicate camera gear into the hold.

Like many photographers I carry my camera gear in my cabin baggage or, more accurately, my cabin luggage is a camera bag with a minority of essentials, such as passport, ear plugs, eye mask and overnight toiletries. It represents not only a sizeable financial investment but also is the very reason I travel. It would not matter whether it was lost, damaged or stolen; all would have a disastrous impact on my trip. So it stays with me, come what may. But as any airline traveller will tell you, assuring that your cabin baggage does not get checked into the hold is a bit of a black art. But why?

Double Standards

For as long as I can remember the cabin baggage size allowance was set at 56 x 45 x 25cm. This size was suggested by IATA, the International Air Transport Association – an association comprising the majority of the world’s commercial airlines. This was not a requirement; it was a recommendation and an effort to clarify for all parties what was permissible cabin baggage. Airlines were ultimately free to choose a maximum size allowance and whilst some did, many simply adopted the IATA recommendation. An industry for cabin baggage grew up around this recommendation including camera bags and many camera bag manufacturers help by clearly stating whether the bag meets the IATA recommendation, such as the example from Lowepro’s site below.
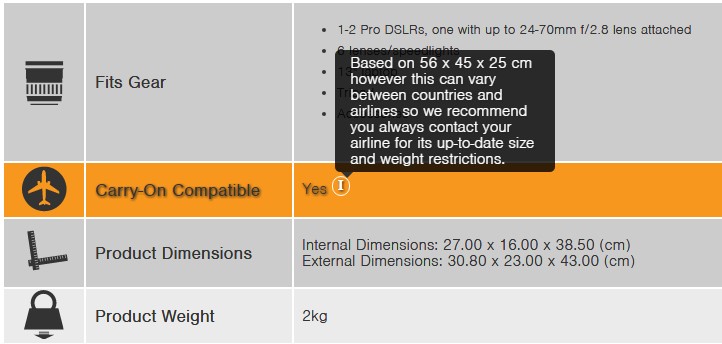
Many manufacturers provide helpful guidance on cabin compatibility but beware, they may not be using the same standard size as your airline.

Many manufacturers provide helpful guidance on cabin compatibility but beware, they may not be using the same standard size as your airline.

The rapid rise of the “no frills” airlines – the ones that charge you for every extra, such as hold luggage – led to a rise in passengers trying to cram everything in their cabin allowance. The result was increased abuse of the cabin baggage allowance, overcrowding of the storage bins, passengers increasingly being told to check their baggage into the hold, arguments, fights and most importantly of all to the airline, delayed flights. Airlines increasingly began to impose their own, more restrictive cabin allowance resulting in cabin-compatible luggage suddenly not being as compatible as it once was.

In order to bring some order to this chaos in 2015 IATA introduced an initiative (http://www.iata.org/pressroom/pr/Pages/2015-06-09-02.aspx) which initially found acceptance with airline companies to standardise a new cabin baggage size that would, at least in theory, guarantee that cabin baggage would not become hold baggage. The size, 55 x 35 x 20cm was important for two reasons. First, it meant that on aircraft with 120 seats or more every passenger could fit their cabin baggage in the overhead bins. Second, it was smaller than most airlines’ maximum cabin baggage allowance and so was pretty easy for airlines to implement. Unfortunately, the rollout of the initiative was suspended a few months later after concerns from North American airlines about it being too restrictive. Quite how they came to that conclusion is a mystery as I’ve read the initiative and it is very clear that it in no way defines a recommended maximum size – it defines a size at which a passenger could expect that, in an overcrowded aircraft their bag would not be checked into the hold, whereas a larger one might. In any event, the initiative was suspended but not before some airlines adopted it as a new maximum; again not really understanding the point that IATA was trying to address.

If this were not already complex enough the US Federal Aviation Authority (FAA) have their own recommendation – 55.8cm x 36.8cm x 22.9cm and US manufacturers of cabin compliant luggage are likely to adhere to this standard before IATA.

So, why is this relevant to me now? Well at least that has a simple answer: An upcoming trip sees me make part of the journey on regional ATR42 twin propeller aircraft that is going to be a lot more restrictive on cabin baggage than the international Qatar flight on the first leg of my journey. In the past I have always had a bit of stress regarding the size of my current camera backpack, but the regional flight is a clear case of having it checked into the hold. Something had to be done.

Old, Not Obsolete

Like many photographers I’ve had my fair share of camera bags. For years I was a Lowepro user and I’ve worked my way through a number of their backpacks as my kit and travel patterns changed. But more than once I have returned from a week-long trip with aching shoulders after hefting my gear around all day, every day. It seems a common problem – for me at least – with Lowepro backpacks and so it was time to change brands.

Then I discovered the Think Tank Airport Accelerator v2.0 (https://www.thinktankphoto.com/) and fell in love. Capacious to the point of decadence but still within the FAA and IATA (original) recommendations at 35.6 × 52.1 × 22cm. I’ve used it for a couple of years now and find it to be extremely comfortable when hiking for long periods, even with 12kg of camera gear. The backpack straps are very well padded, the zips rugged and lockable and Think Tank’s customer service is unfailingly good.

But it isn’t the perfect bag. It almost is, and maybe it once was, but as I travel to ever more remote places and airlines continue to clamp down on passengers abusing cabin baggage limits I am finding it more difficult to have that guarantee – that peace-of-mind – that I won’t be asked to check my camera gear into the hold. For although it fits within FAA and the original IATA guidelines it (1) only does so when empty and (2) they’re only guidelines, which airlines are increasingly ignoring.
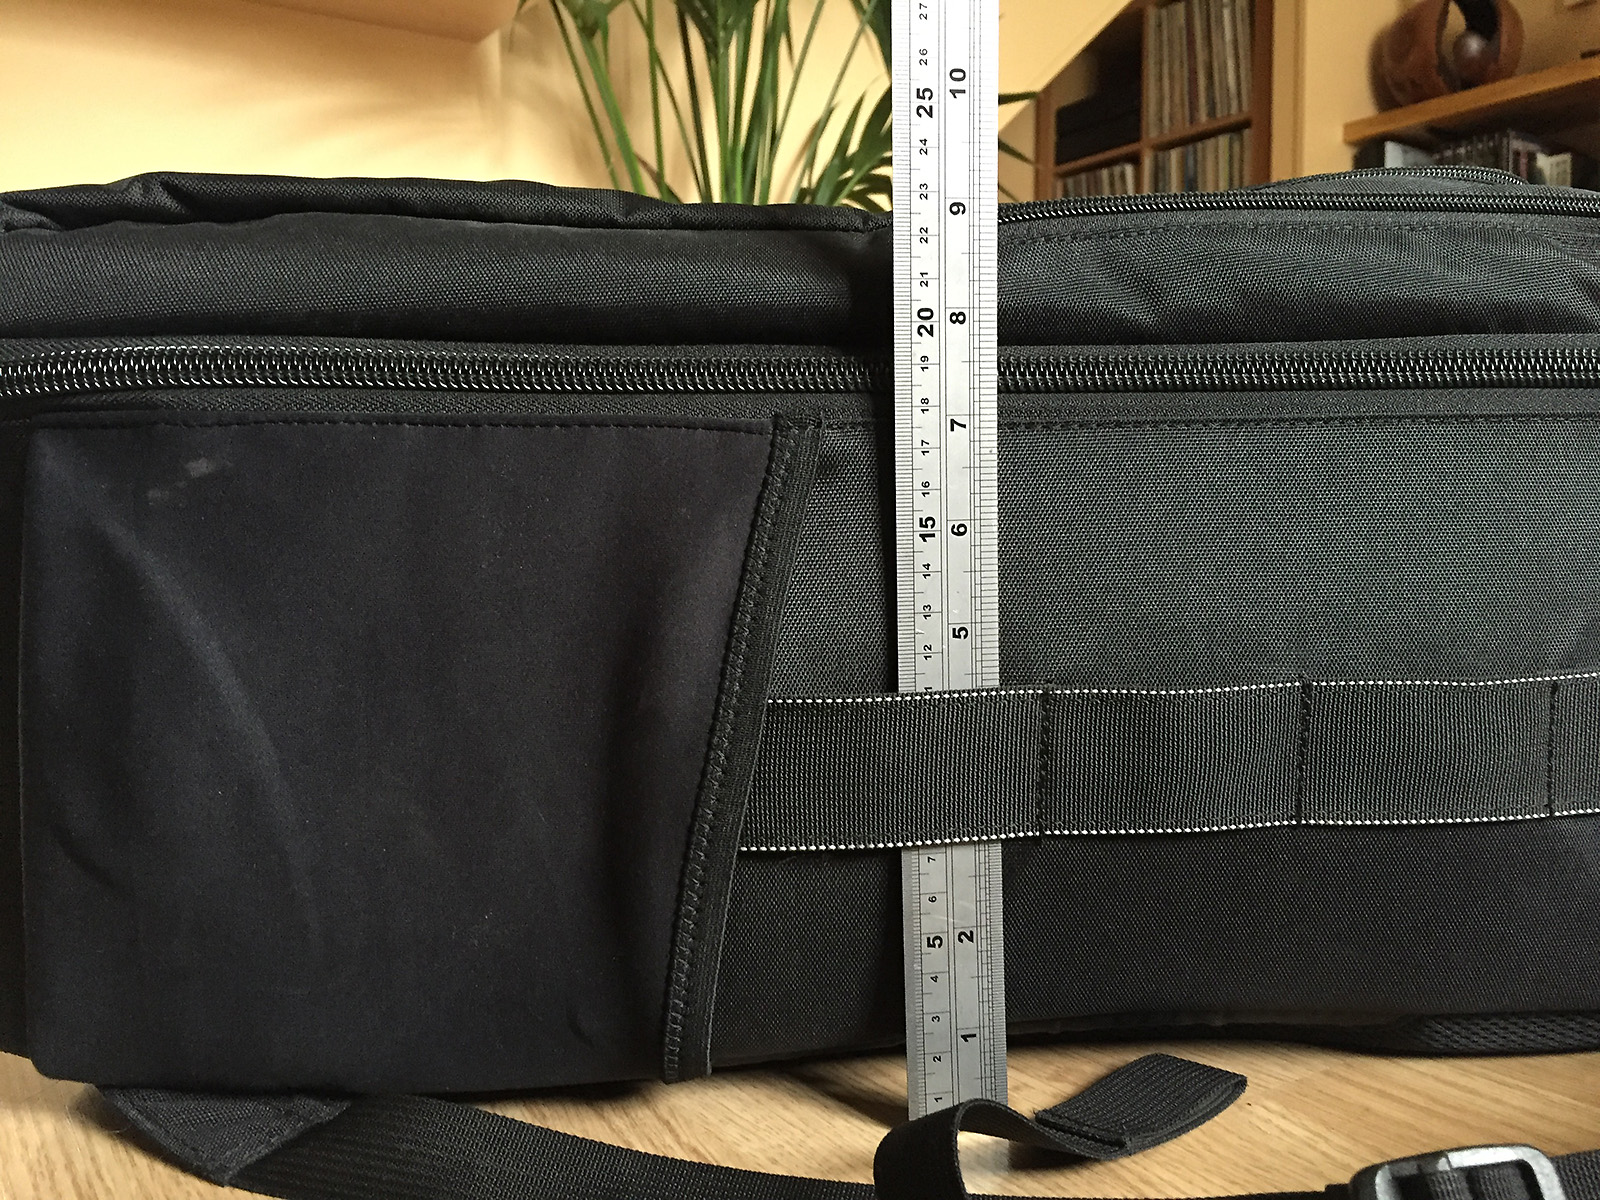
The Think Tank Airport Accelerator may have a depth of the FAA recommended 22.9cm but that is without the anything in the front pockets. Adding another 2-3cm for a laptop makes this bag much less cabin-friendly.

The Think Tank Airport Accelerator may have a depth of the FAA recommended 22.9cm but that is without the anything in the front pockets. Adding another 2-3cm for a laptop makes this bag much less cabin-friendly.

So began a search for a travel backpack and as I was playing ‘fantasy camera bag’ I might as well assemble my dream team of features!

  1. It had to meet IATA’s 2015 size recommendation of 55 x 35 x 20cm as this would meet pretty much any airline’s cabin baggage allowance.
  2. It had to accommodate two DSLRs each with a lens attached, specifically a D810 with 24-70 f/2.8 and a D750 with 70-200 f/4. My photography is increasingly in hostile environments – saltwater, deserts, volcanoes and snow – and changing lenses is to be avoided wherever possible. So I need to be able to swap between wide and zoom without exposing the camera sensor to contaminants.
  3. It had to be a backpack. Most of the things I photograph require a bit of a trek to get to and I want the gear strapped to my back in comfort, leaving both hands free to clamber up rocky paths and over uneven ground.
  4. It had to allow easy and fast access to all of my gear. Landscapes tend not to move that fast but in hostile environments, conditions do. The ability to pack up quickly is an important as unpacking.

Think Tank were my first choice but whilst they have a smaller camera backpack that satisfies requirement (1), it definitely wasn’t not going to accommodate requirement (2). I looked at other brands – Lowepro, Gura Gear, F-stop, Tenba, Manfrotto etc. – but nothing that met my needs. Things were not looking good.

Then during one of my Google searches I found the Think Tank Airport Antidote v2.0. Not listed on their web site it appears that this is an older model in their Airport series but one that showed promise. With nothing else presenting a viable option I took a gamble on a second-hand one.
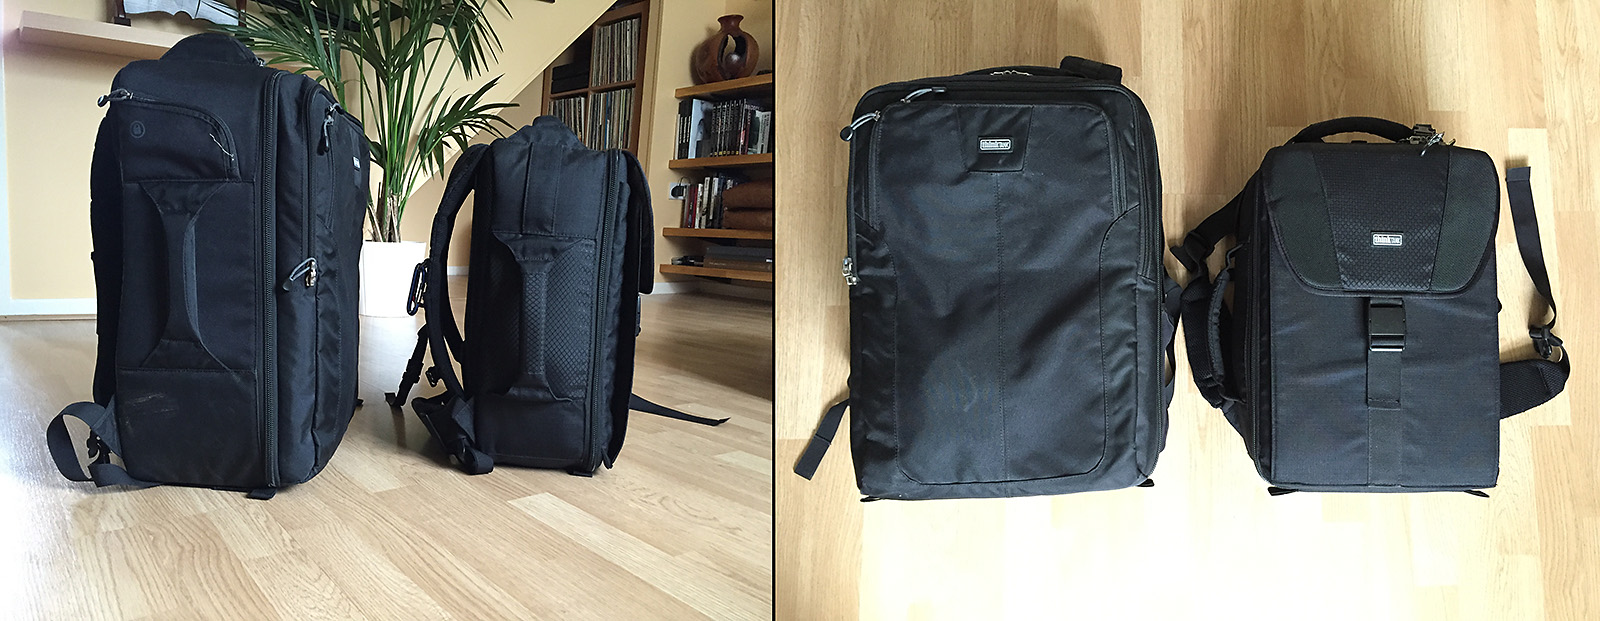
The difference between the Think Tank Airport Accelerator and Airport Antidote v2.0 is immediate and noticeable.

The difference between the Think Tank Airport Accelerator and Airport Antidote v2.0 is immediate and noticeable.

The size difference is obvious. At 43 x 30 x 18 cm its external dimensions are smaller than even the most punitive airline restrictions and it even fits inside the Airport Accelerator. So, it meets requirements (1), (3) and (4) but what about the all-important requirement (2)?
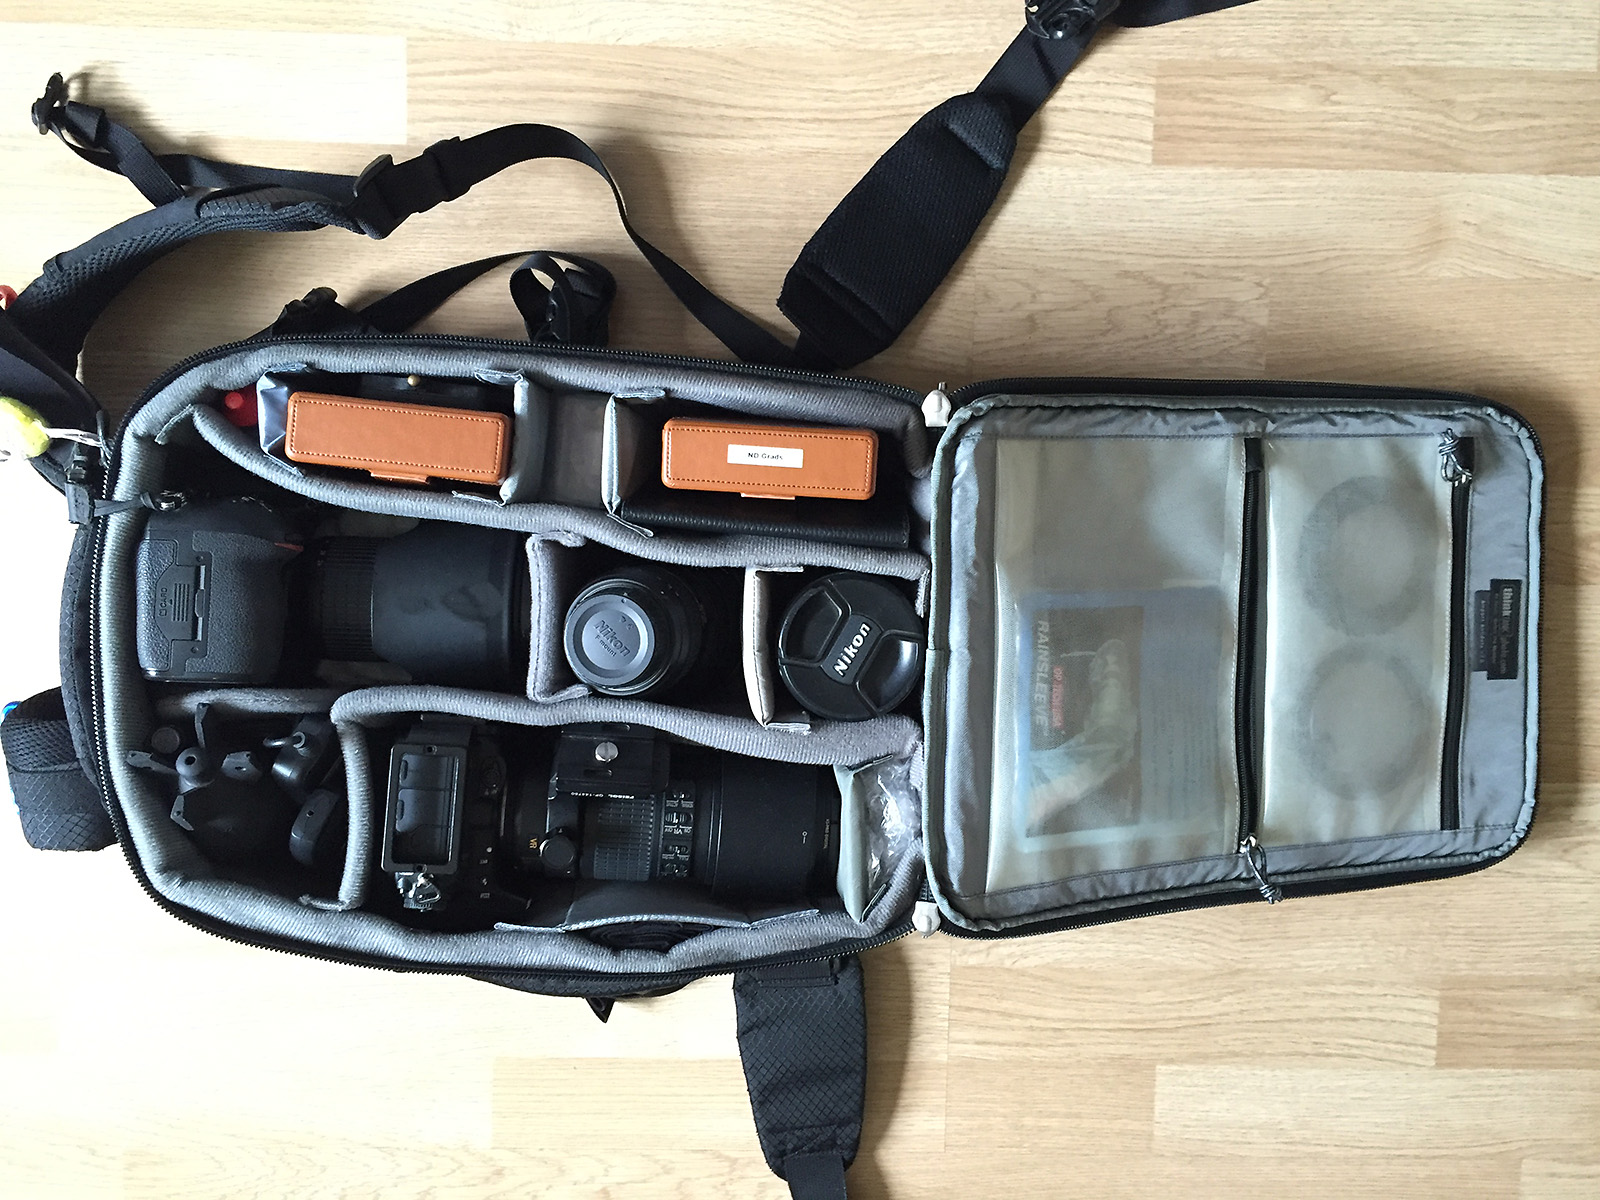
"Old, not obsolete." Despite its diminutive size the Think Tank Airport Antidote v2.0 manages to fit a in impressive amount of gear without comprising ease of access.

“Old, not obsolete.” Despite its diminutive size the Think Tank Airport Antidote v2.0 manages to fit a in impressive amount of gear without comprising ease of access.

Yes, although tight I can get two DSLRs with lenses attached in the bag, along with a full complement of filters, two additional lenses, batteries and cleaning gear. Had I needed a longer zoom lens then this have been an issue but (my) photography rarely needs much above 200mm.

A Crash Diet

Of course, size is only one issue when to comes to cabin baggage; the weight allowance is the other and, as any photographer will attest, your camera gear always weighs more than the allowance. I’m planning on handling this in a couple of ways.

First, simple psychology. People assume that small bags are lighter than big bags so the mere fact that the Airport Antidote v2.0 is quite compact gives it a perception of lightness, especially if it looks less like a camera backpack and more like a day backpack. Coupled with the time-honoured technique of casually carrying it on only one shoulder and it shouldn’t invite a check-in or gate assistant to look more closely.

There is always a chance that it might get weighed and at that point you’re pretty much stuck. One tactic is to keep an eye on the check-in queue ahead of you and, if you see cabin baggage being weight-checked it may be time to discretely get out of the queue and move to plan B. There are plenty of photographer gilets that provide innumerable pockets but they are almost universally expensive. A fisherman’s gilet will do exactly the same thing (and be much cheaper) or camera belt can be used to carry enough extra gear to get the cabin bag down to the right weight – at least until you’re sure it won’t be checked into the hold (i.e., when you’re on board the plane). Of course being discrete is the key here and so wearing it under a fleece or – in hot climates – a somewhat oversized shirt can go a long way to not bring attention to your sudden gain in weight.

Including laptop, my Airport Antidote is 11.5kg against Qatar’s 7kg allowance so I potentially need to shift 4.5kg to my person. Tough, but just about possible. Yes, it is a pain to have to go through this, but there are not really many options.

The other thing is to keep the weight of the hold luggage down below the maximum allowed. I’ve been stopped at check-in in the past, but as the hold luggage was under the 23kg maximum the additional weight of the cabin baggage was tolerated.

So, here are some guidelines for maximising your chances of getting your beloved camera gear in the cabin with you:

  • Aim for a size of 55 x 35 x 20cm or less.
  • Aim for a weight of 7kg and, if you can’t, have a plan B for how to deal with the excess weight as you pass through check-in.
  • Do not blindly believe the manufacturers “cabin friendly” label on their web site. It may be an old or different definition to the one your airline uses.

In the end there will never really be a guarantee that a cabin bag won’t be checked, but keeping it as small and light as possible certainly helps. For photographer’s the challenge is finding that balance between size, weight and usability. Hopefully this article shows that it is possible to get a significant amount of camera gear into a lowest common denominator size allowance of 55 x 35 x 20cm; that such camera bags do exist and that there are creative options for making cabin baggage temporarily lighter than they actually are.

Good luck!

Tagged , , |

The Iceland Trip’s “Worst Case Scenario”

With the trip to Iceland being tomorrow and packing essentially complete I’m now at the point where I’m actually beginning to get excited. In fact there are only a few items left to deal with, including buying a few of those “meals in a bag” for the middle of the trip when I’m up in the Icelandic highlands and nowhere near a supermarket. That’s the double-edged nature of Iceland: It’s a truly breath-taking country but it favours the prepared.

Now, I do consider myself a reasonably prepared traveller, including the steps I take to stay out of trouble. But a recent post by a regular contributor over on the Trip Advisor Iceland forum did stop me in my tracks. In it she suggested that the profile for those travellers to Iceland that end up never leaving (alive) is male, a solo traveller, hiking and often with some experience. I fit 100% into that profile and whatever the source of this statistic I found myself double-checking my preparations for a “worst-case scenario”.

Risk analysts with tell you that there are three ways to deal with risk: Accept it and carry on (assume the risk), take steps to reduce the risk (mitigate the risk) or get someone else to handle the risk (transfer the risk). Depending upon the situation each option can be a valid approach, but in the case of my time in Iceland’s highland interior as the predictably unpredictable weather continues to worsen, option one would be plain, flat-out, stupid and option three (in this case meaning going on an organised trip) would be too expensive – if possible at all – and so inflexible as to render the reason for being there not worthwhile. So it was time to take the middle ground.

It is worth pointing out that there are usually three potential sources of danger in a given environment: From other humans, from animals and from nature itself. In Iceland you can disregard the first two completely. If anything is going to cause you problems, it will be the weather.

Staying on the Grid

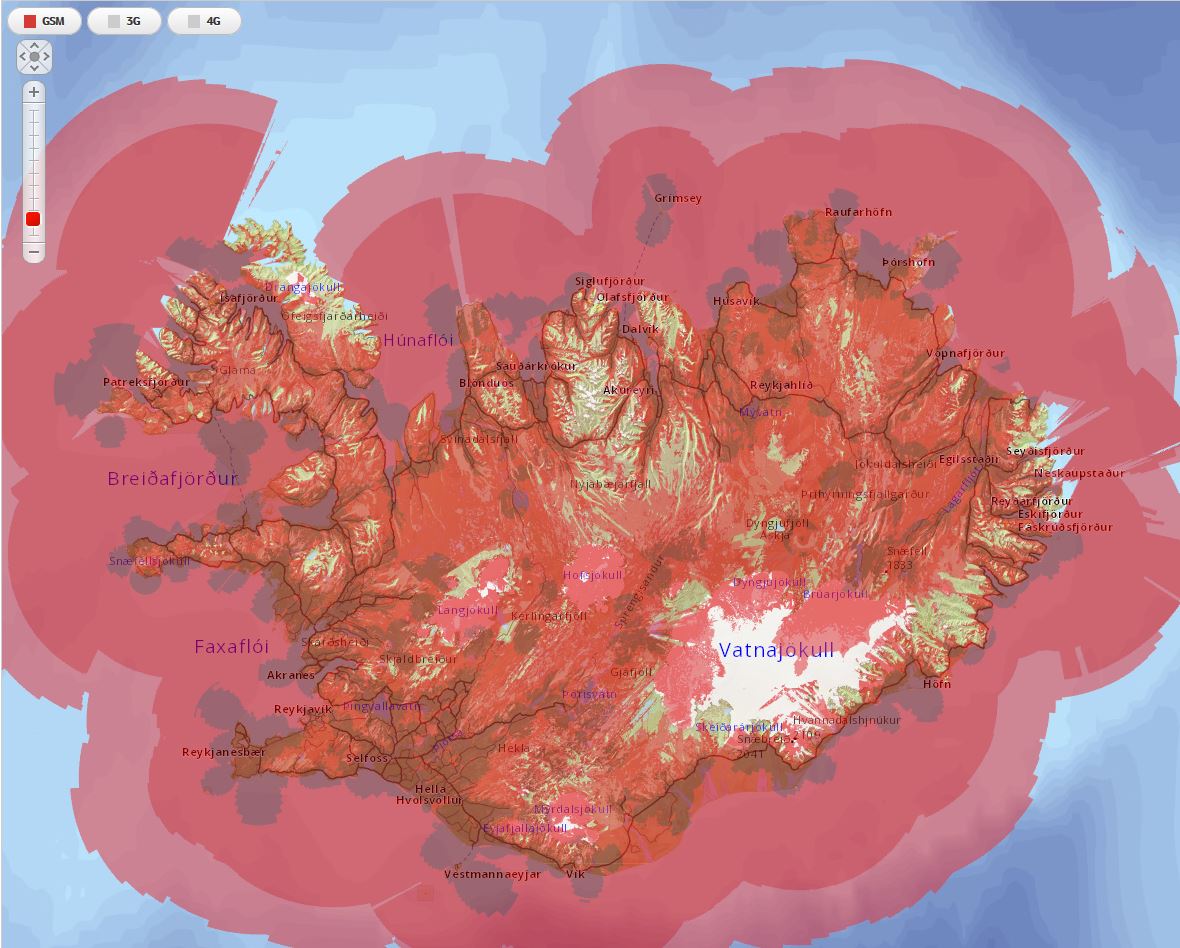
The first thing to mention is telecommunication. Iceland has excellent mobile phone coverage from a number of operators. For example, take a look at Vodafone Iceland’s GSM coverage:

Everybody love 4G but despite being “so last century” GSM is your new best friend in Iceland.

Everybody loves 4G but despite being “so last century” GSM is your new best friend in Iceland.

So, should the worst happen I’m more than likely going to have access to the outside world, but who am I going to call?

Perhaps the obvious would be friends or family back home. If I had no other alternative then, well, I have no other alternative but I’m not going to be calling for a chat – I’m going to be having an emergency. If you’ve ever tried it trying to organise a rescue for someone from another country it is very difficult and as time is the enemy here, I really I don’t want to be in that position. So I’m making sure that I have the phone numbers for my accommodation in Iceland and confirming my arrival with each of them on the morning of arrival.

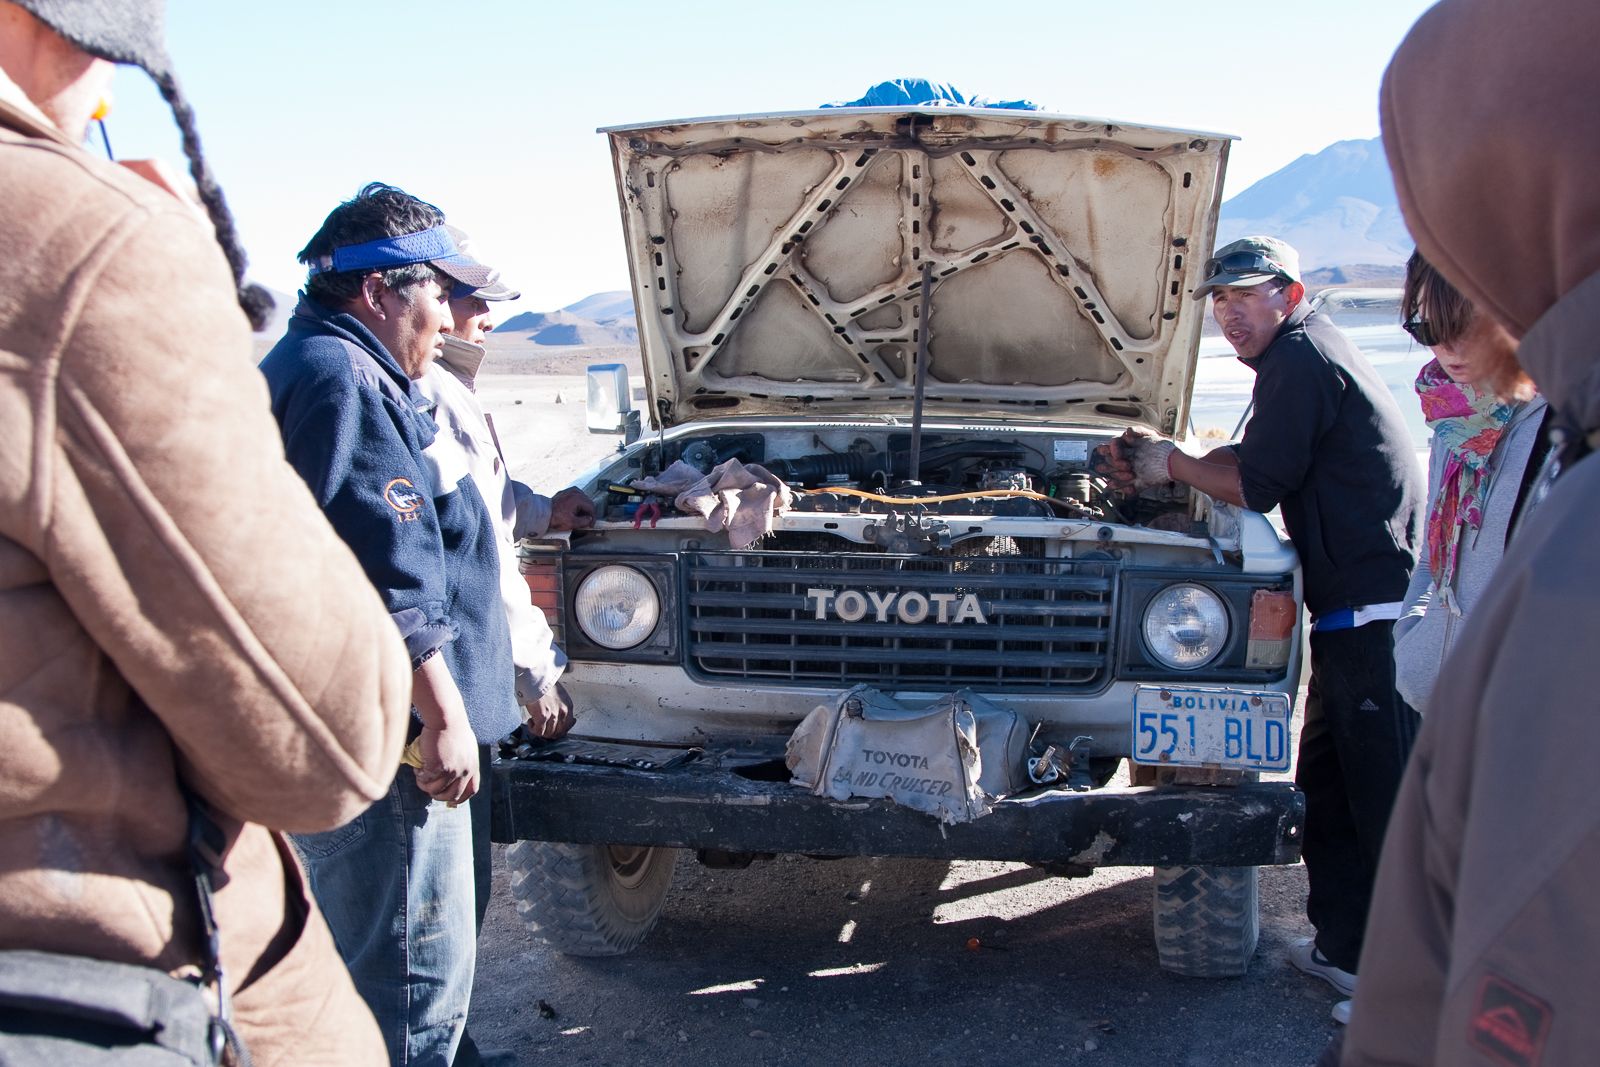
An example of why making sure that the accommodation knows you’re definitely arriving is useful happened to me back in 2010. We were taking a 4WD from the village of San Pedro de Atacama in northern Chile to the town of Uyuni in southern Bolivia. It’s a route taking three days and involves travelling through the northern Andes at an altitude of 4,500 metres. It’s a barren, unending wilderness where the temperature drops to -15°C or below once the sun goes down.

It is official – the fuel pump is dead. At 4,500 metres altitude that's not what you want to hear...

It is official – the fuel pump is dead. At 4,500 metres altitude that’s not what you want to hear…

Due to contaminated fuel the fuel pump died stranding us on the second day. Despite having been told otherwise there was no radio to call for help – and mobile phones were definitely out – and it was only because we were on a route that other 4WD vehicles used that we were able to ask a passing driver to let people know we needed help once he arrived back in civilisation. Which he didn’t do.

Luckily the accommodation we were staying in that evening were expecting us and when we didn’t show up they contacted the company who had organised our arrival and help was sent overnight to look for us. It was an uncomfortable evening – and we missed out on seeing some spectacular sights due to the delay – but we were rescued because of the accommodation raising the alarm.

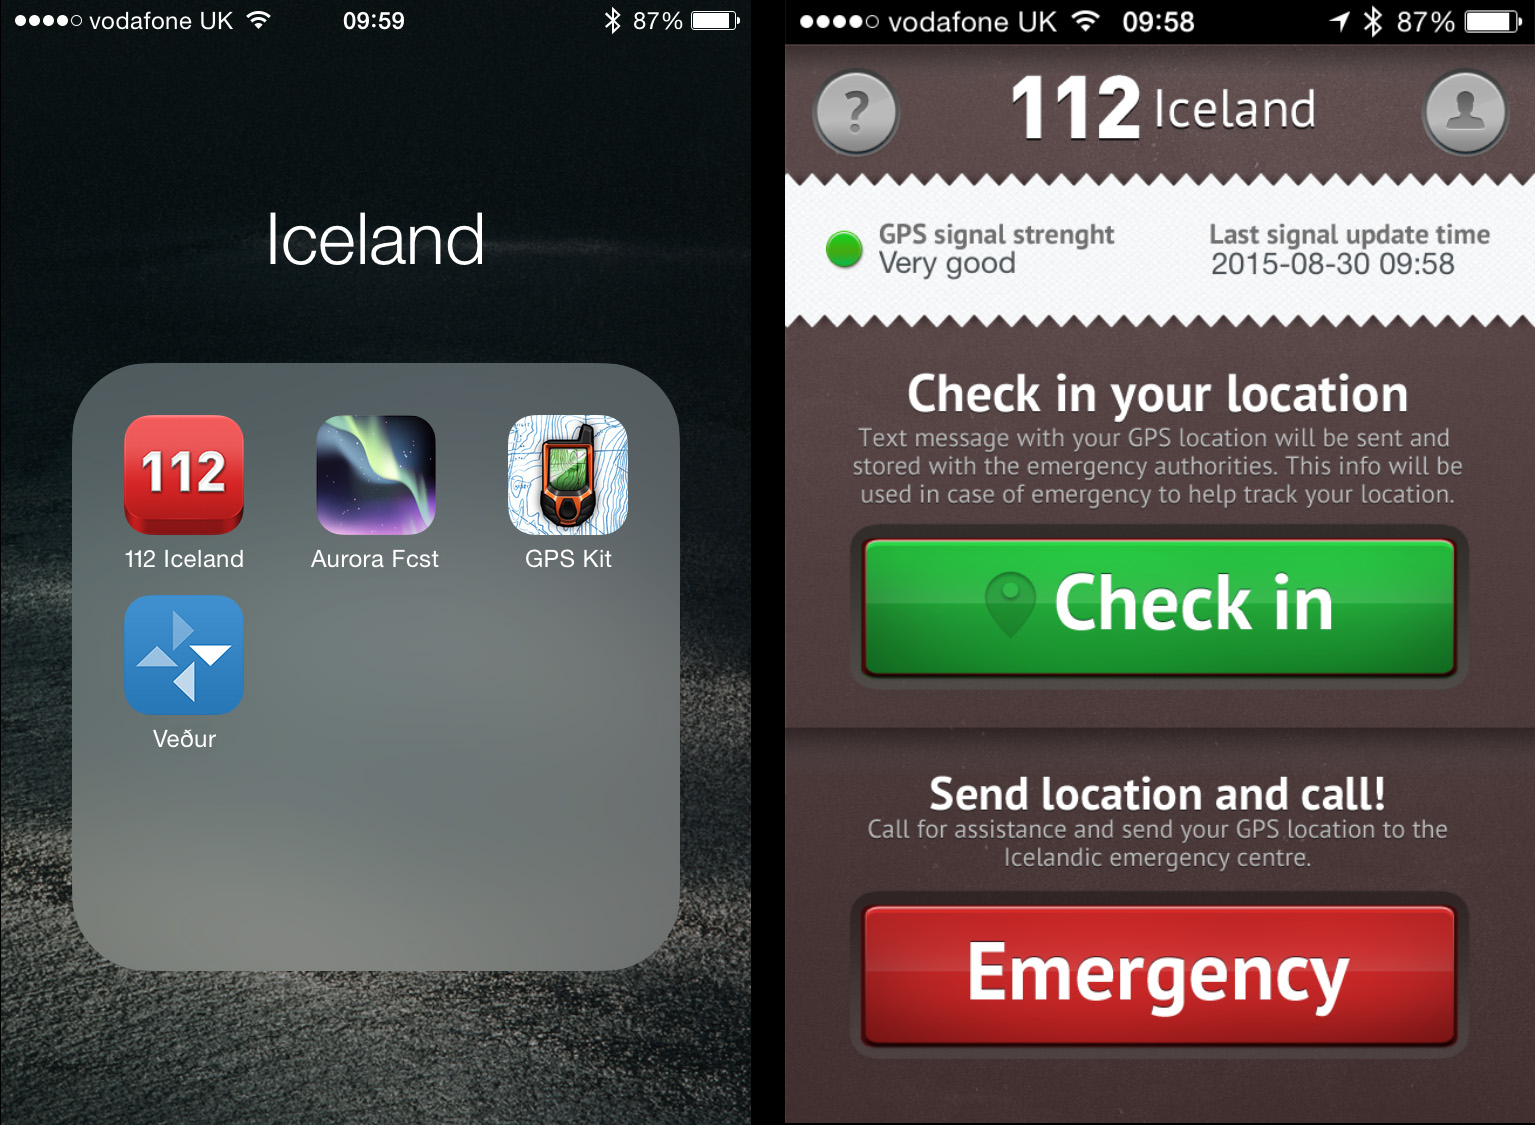
In Iceland you have other tools at your disposal. The completely free 112 app from safetravel.is and available for iOS, Android and Windows mobile devices allows you to keep in contact by letting the emergency services know your location. It’s simple to use and works by sending a SMS text message so doesn’t need 3G or 4G to operate, hence why I showed the GSM coverage map above – it’s all the app needs to work.

Free, easy to use and could possibly save your life. What's not to like?

Free, easy to use and could possibly save your life. What’s not to like?

How you use it is up to you this but I just set my watch to remind me every 30 minutes to check-in. That way if the worst were to happen then the emergency services know my approximate location.

So, letting people know is very, very important and Iceland makes it so easy to do that there is no excuse not to do so. It is a zero-cost option for having someone looking out for me. I’d be stupid not to use it.

Of course, should I find myself needing assistance I’m likely going to have to wait until help arrives. For my trip I’ve considered three scenarios when travelling by myself: (1) The 4WD breaks down (2) I’m out hiking  and the weather unexpectedly turns for the worse and I end up in a biting cold storm with very low visibility or (3) I sprain an ankle. Each of these conditions is quite possible and can be life-threatening if not prepared.

The “Car Breaks Down” Scenario

The ‘car breaks down’ scenario is a relatively easy one to deal with: Phone the car hire company. However, it may be that they cannot rescue me quickly and so I have to spend the night in the car. That’s where my trusty Alpkit SkyeHigh 600 sleeping back comes in. Rated down to -5°C it means that an evening stuck inside the car out of the wind and rain inside will also be a warm one and a break-down becomes an annoyance rather than dangerous.

The “Bad Weather” Scenario

Due to its geography and location the weather in Iceland can change exceptionally quickly, especially in the highlands, and so the best course of action is to assume the worst. For me this entails being out hiking in the highlands of Kerlingarfjoll and a sudden snow or rain storm comes in and reduces visibility to near zero.

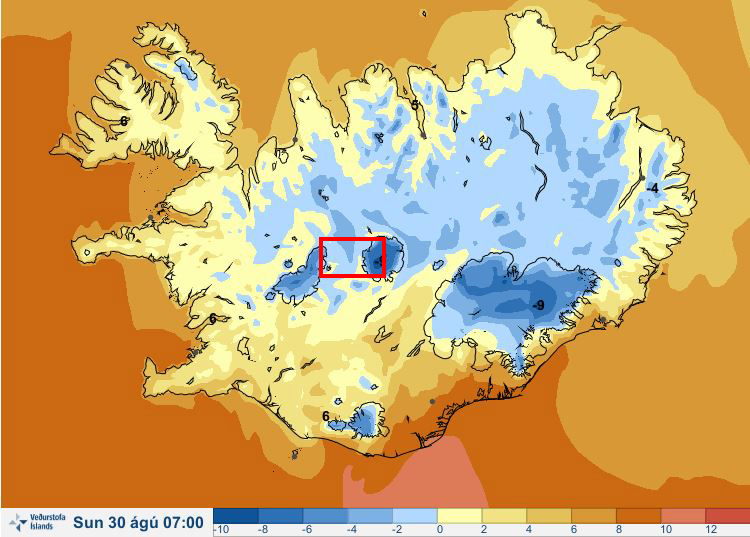
Cold! The red rectangle shows the highland area that I’ll be hiking in.

Cold! The red rectangle shows the highland area that I’ll be hiking in.

The first common-sense thing to do is check the weather forecast. It’s not accuracy that I’m after but rather a general idea and as can be seen in the above image from vedur.is – Iceland’s meteorological office – Kerlingarfjoll is going to be reaching sub-zero temperatures and so I need to ensure that I can keep warm and dry when out-and-about.

The easiest way to dress for the occasion is to use the layering principle of clothing (if you’ve not come across this then Google ‘layering principle clothing’). This is a tried-and-tested method of ensuring that your clothing suits your environment and in the highlands the outer waterproof and windproof layer is as important as the warmth-providing base and mid layers. Easy things to forget are gloves and some kind of hat.

I am pretty confident in my clothing and I’m happy that it will cope with the extremes of Iceland’s weather that I’ll be facing – it better as 66 North is an Icelandic outdoor brand – but I’m definitely following the advice of many experts who recommend avoiding jeans and cotton as, when wet, they don’t dry quickly and in a cold environment they can accelerate the cooling of your body and speed up the onset of hypothermia.

So, should the weather turn nasty, it won’t present an immediate danger and I’ll be warm and dry enough to get back to camp. Assuming I can find camp!

GPS used to be the tool of the seasoned outdoor adventurer but smart phones have put this powerful navigational tool into the hands of just about everybody. GPS apps are available for all brands of smart phone and, given that the software is cheap – and you can have a lot of fun later by downloading the data to your PC and showing your friends and family exactly where you hiked on Google Maps – it makes sense to invest in the app.

The display may look a little unfriendly but there are also options to download Google Maps data and use if when away from 3G/4G mobile coverage. You can then watch your route unfold as you walk.

The display may look a little unfriendly but there are also options to download Google Maps data and use if when away from 3G/4G mobile coverage. You can then watch your route unfold as you walk.

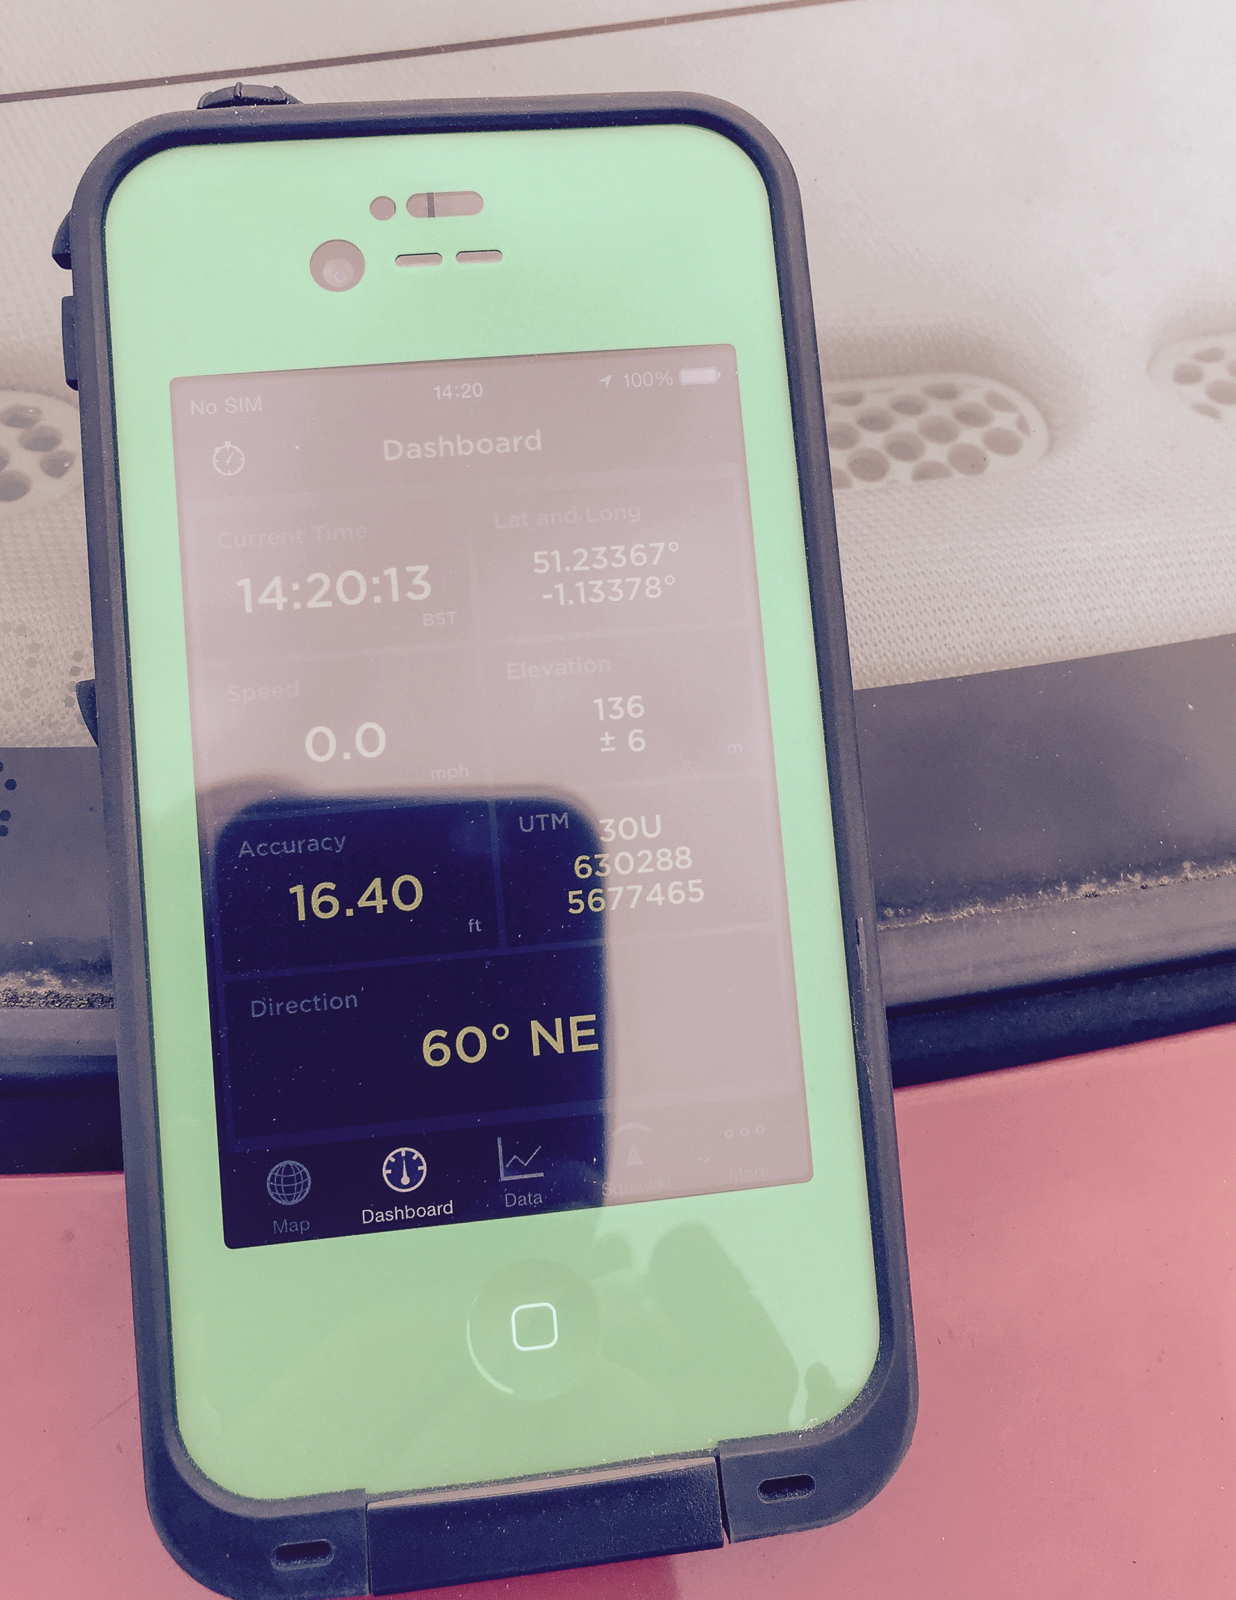
I use an old iPhone 4S with no SIM card and running a dedicated GPS app – in this case GPS Kit. Other than the obvious ability to pinpoint my location it also has a tracking option that will allow me to backtrack without having to rely on visible clues such as path markers should I need to. The phone is in a rugged, waterproof case (by Lifeproof) that I picked up second-hand on eBay so there is no worry about using it in rain or snow. I’ve actually tested the waterproof nature having been diving with it to a depth of 12 metres so it doesn’t matter how bad the rain gets, it won’t be worse than that! I’ve also got a portable USB battery pack that is small enough to be easy to carry but can charge the iPhone twice over.

The “Injured” Scenario

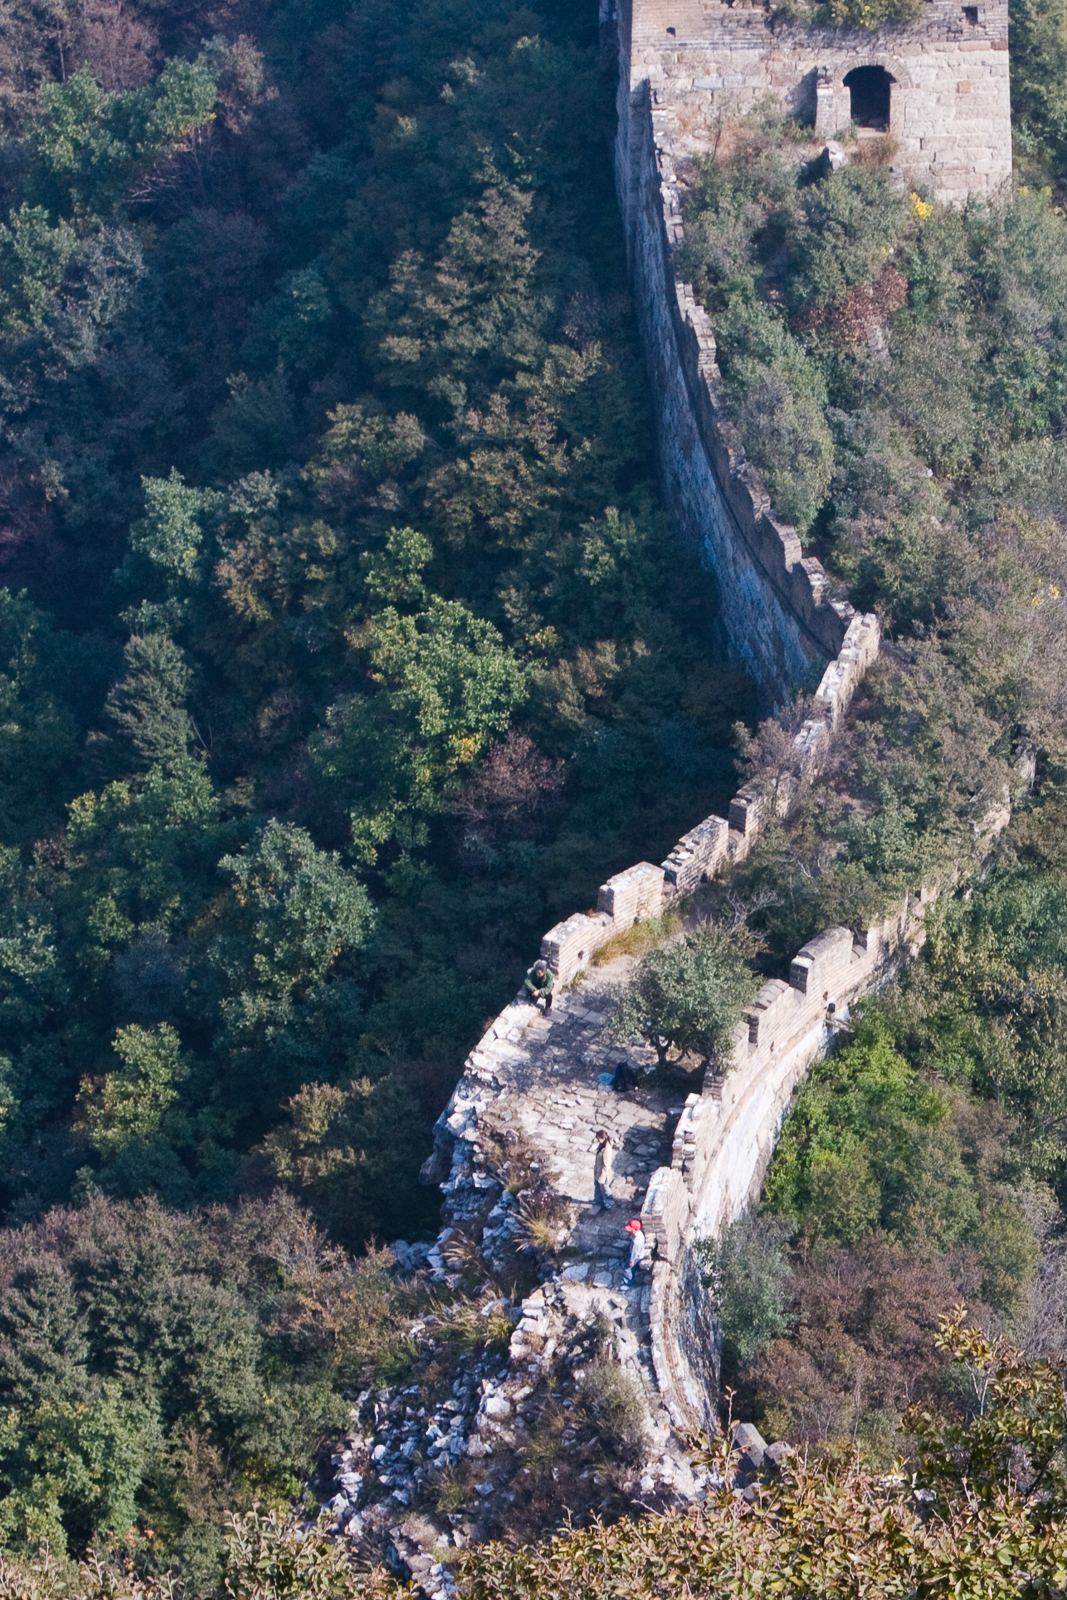
The most likely form of injury when out hiking is a sprained ankle, especially when walking over uneven ground. Anyone who has had a sprained ankle will tell you how painful it can be, but when out-and-about by yourself it can be deadly. Back in 2008, when I was preparing to walk the wild section of the Great Wall of China, I relied a lot on the local knowledge of a photographer based out there and his advice as simple: Do not walk it alone. People have died after an injury and not being found for a couple of weeks. The good news is that in Iceland’s highlands you wouldn’t have to suffer that long – a night would probably be enough to finish you off.

There’s a reason that the “Wild Wall of China” is closed to hikers.

There’s a reason that the “Wild Wall of China” is closed to hikers. This was a complete section until someone walked on it…

The single best piece of advice I have been given for hiking is to wear properly fitted walking boots that support your ankle. This does not necessarily mean the most expensive walking boots you can find – my current boots were significantly cheaper than all the others I was considering but they hold my feet securely. Looking where you are going and not rushing is good advice too. As my clothing is going to keep me warm and dry, I have no need to rush and anyway, having 10kg of camera gear to carry always slows you down.

No, should the weather turn nasty and visibility fail, the only thing that will likely kill me is panic.

But should it happen there are a number of tips for dealing with a sprained ankle and whilst I have a plan the simple fact of the matter is that the injury scenario is really one of those where my best hope of survival is the steps I will have already taken that day and outlined above. In the case of my stay at Kerlingarfjoll in the highlands my plan is simple:

  1. Each morning tell hotel the route I’m taking, when I expect to be back and that I will check in with reception on my return.
  2. I’ll also double-check the weather that day – local knowledge is always good.
  3. Use the 112 app.
  4. Use the GPS app to plot my route.
  5. Don’t rush and watch where I’m going.

Of course, I have my Icelandic “worst-case scenario” kit-bag (which is really just my usual travel kit with a dramatic name)  which contains a few, cheap, lightweight items – along with a couple of larger items I use in photography.

  • Strong painkillers
  • Sprain bandage
  • Spare bootlaces (handy for so many things, including boots!)
  • Emergency stitches (also called suture strips)
  • Liquid plaster (a paint-on anti-sceptic plaster)
  • Plasters
  • Compede (a UK brand of blister plaster)
  • Scissors
  • Tweezers
  • Survival blanket
  • Gaffer tape (carried due to its use for photography, but handy for splints)
  • GPS
  • USB power brick
  • LED Torch (again, used for light painting in photography but has a 20 hour charge)
  • Swiss Army Penknife (well, it’s not proper hiking without one!)

Despite seeming a large and costly list, the medical bits all fit into sunglasses case so really easy to carry around in a pocket or backpack.

At the end of the day you can never plan for every eventuality. What you can do is identify the potential dangers and plan as best you can around them. That’s usually the difference between trips that have “moments” that to tell your friends about for years afterwards and those trips that are your last.

Also posted in Trip Planning, Uncategorized Tagged , , , |

What’s the Rush?

As a result of not spending so much time diving on the forthcoming trip to Iceland (see last post for the “why”) I now have an extra day or two spare. But whilst having some slack time in the schedule is always a good thing, I’ve already planned “quiet” days and so don’t really need any more. For some destinations it might be a struggle to fill these extra days, but not so with Iceland – it has the opposite problem: What to leave out.

I’ve been driving to a customer site the past couple of days and so had plenty of time to mull the various options over in my mind and I have decided to take my usual “quality over quantity” approach – after all Iceland is notorious for its unpredictable weather and all the images I have planned have specific moods that would easily ruined by the wrong weather. But whilst this approach makes sense to me, others do not seem to share my opinion. I spend a fair bit of time over on the Trip Advisor Iceland forum and not a day goes by without someone asking something along the lines of “Here’s my seven-day itinerary to see the whole of Iceland – what do you think?” I do understand that people have limited time for travel, but seriously, what kind of experience are you going to have rushing around trying to cram everything in? Surely it would be much better to pick a few highlights and explore them a bit more?

A classic example of this is Seljalandsfoss, one of the most popular tourist destinations in Iceland.

Seljalandsfoss is extremely popular due to its close proximity to Reykjavik and the fact that you can walk behind it. Oh, and it’s a waterfall – everybody loves a waterfall… [Click to enlarge!]

Seljalandsfoss is extremely popular due to its close proximity to Reykjavik and the fact that you can walk behind it. Oh, and it’s a waterfall – everybody loves a waterfall… [Click to enlarge!]

Seljalandsfoss sees tourists arrive by the coachload – thousands of them every day during the summer months – and it is easy to understand why. It is an easy day trip from Reykjavik, it is impressively big and easy to approach – you can even walk behind it along a path. The chances are good that you’ll even get to see a rainbow due to the water vapour in the air. So, if you’re looking to see Iceland’s top attractions, you’ll end up here. On my last trip I visited Seljalandsfoss a few times hoping to get an image I was happy with and spent quite a bit of time watching the tourists arrive and depart like waves breaking on the shore. And virtually all of them followed the same pattern: arrive, follow the path to the waterfall, take some pictures, then either return to the car or coach or continue along the path and walk behind the falls and then return to the car or coach. And if you’re on a tight time schedule that’s your total experience of Seljalandsfoss – you’re already off to ‘bag’ the next tourist hotspot. What almost none of them did was take time to look around but had they done so they would have had a bit of a surprise as there are actually two waterfalls. A short walk past Seljalandsfoss is Glufrafoss. Unlike its more popular brother Glufrafoss is hidden from view – in fact you have to walk through a crevice in the cliff face in the above image.

Glufrafoss is only a short walk from Seljalandsfoss but for the number of tourists it sees, it could be a million miles away… [Click to enlarge!]

Glufrafoss is only a short walk from Seljalandsfoss but for the number of tourists it sees, it could be a million miles away… [Click to enlarge!]

As a picturesque setting there may be better waterfalls, but as a private table for two having a picnic it will be an experience few others will have had. [Click to enlarge!]

As a picturesque setting there may be better waterfalls, but as a private table for two having a picnic it will be an experience few others will have had. [Click to enlarge!]

But when you do you have the falls all to yourself as you stand in a 6 metre wide opening with the rock face towering above you on all sides. It’s loud and you can feel the refreshing effects of the ionised air and you’ll probably want to stay a while – luckily there is a handy rock to sit upon. The brave could even stop for a picnic – just bring your waterproofs as it does get wet!

The other advantage of the “quality over quantity” approach is that you get to have different experiences of the same place. Skogafoss, another extremely popular tourist stop – and usually on the same tour as Seljalandsfoss – is a great example of this. Here’s what Skogafoss looks like to most tourists:

Skogafoss, a truly magnificent sight by any standards, is usually hidden by a mass of tourists. [Click to enlarge!]

Skogafoss, a truly magnificent sight by any standards, is usually hidden by a mass of tourists. [Click to enlarge!]

And here’s what looks like to those who take more time:

With plenty of slack in the schedule you can afford to wait until you are, quite literally, alone with nature. [Click to enlarge!]

With plenty of slack in the schedule you can afford to wait until you are, quite literally, alone with nature. [Click to enlarge!]

I know which experience I prefer.

So, that is a very long-winded way of saying that, now that I have more time to explore the Thingvellir region of Iceland, I’m not adding any additional sights to visit and instead am going to concentrate on those already on the itinerary: The geyser Stokkur, Gulfoss and the enigmatic Bruarfoss. I may revisit Skogafoss as, although it is 100km out of my way, I still feel a photograph is waiting for me there.

Tagged , , , |

Iceland 2015: The Itinerary

In the last post I mentioned that I’m returning to Iceland as the ‘reward’ for learning to dive. Of course there’s no point in travelling to what is a photographic dream of a country and not spending a bit of time exploring, especially as I have seen so little of it, and so the past few weeks have seen me spending hours hunched over maps and making good use of Google and the Trip Advisor Iceland forum. And finally I have what I believe to be a workable outline for the 14 day trip.

The trip in 2014 concentrated on a section of the southern coast between the Reykjanes peninsula and Jokulsarlon. Despite being such a small section of the country there is an incredible amount to see – a testament to how much Iceland has to offer – and I left feeling that I had spent my time well and not regretting the decision to limit myself.

Much like the trip in 2014, for this trip I’ve picked just three bases to work from in the centre and west of the country: Thingvellir National Park, Kerlingarfjoll and Grundarfjordur.

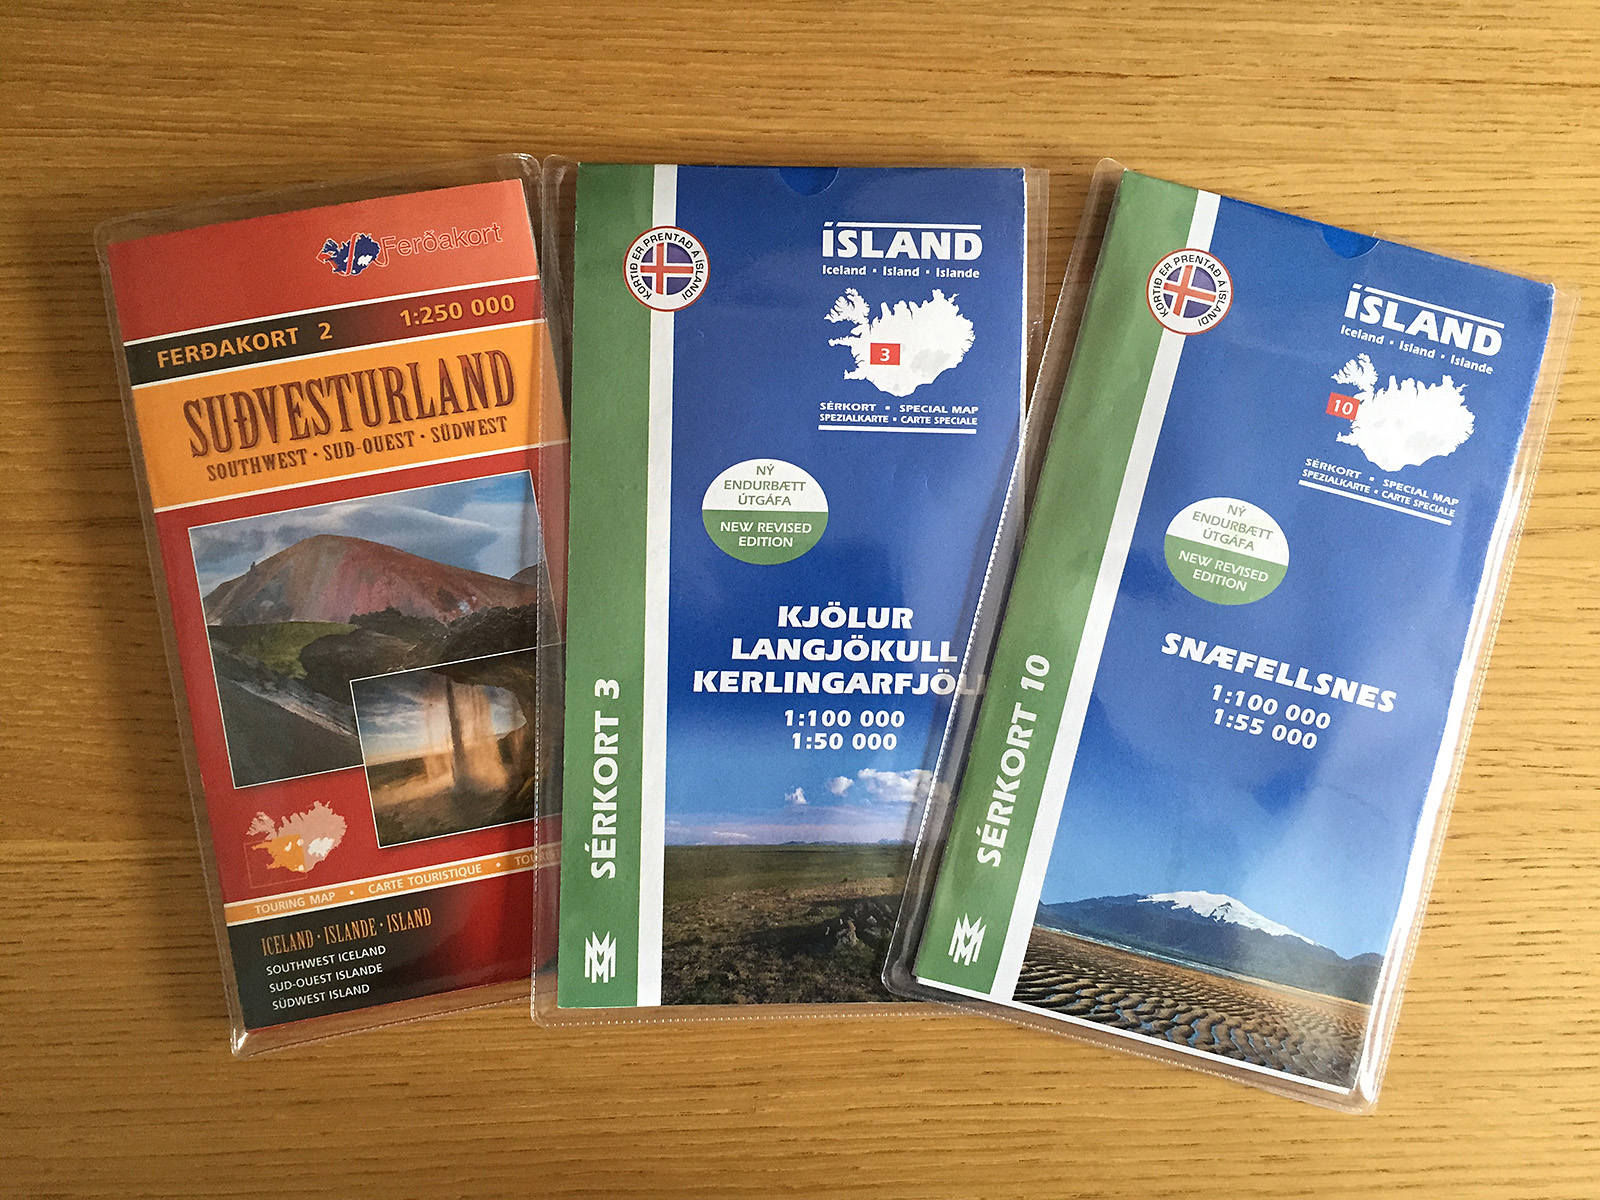
As good as Google Maps is, I recommend that you invest in the Ferdakort 1:250,000 touring map for the area that you are visiting. They’re clear, detailed and full of highly useful information such as locations of petrol stations, camping sites, accommodation and, for those venturing onto the highland roads, where you will have to drive through rivers. For my 2015 trip I only need to take Map 2, covering the south west. They are perfect for driving but if you’re considering hiking, you may want to invest in some higher scale maps, such as the Serkort 1:50,000 maps.

A good map can make all the difference when on a self-drive or hiking trip.

A good map can make all the difference when on a self-drive or hiking trip.

Thingvellir

Arriving on the evening of day 1, the first base is just south of Thingvellir National Park. Thingvellir is a popular tourist stop for its historical and geological significance although for me it is the latter that draws me there. Whilst the immense North American and Eurasian tectonic plates are separating along their entire length at a rate of approx. 2cm per year, only in Iceland can you see the result of this on land. In dramatic terms, Iceland is literally being torn, very slowly, in half although it would be more accurate to say that, due to the resulting magma rising up to fill the void, Iceland is very slowly getting bigger. Whilst most visitors view the geologic transformation from above, it is here that you find Silfra, a lake formed by glacial runoff filtered through volcanic rock. The resulting waters are crystal clear and said to offer some of the best diving visibility on the planet. It is also jolly cold.

Being under no illusions as to my lack of underwater skill I have allowed for two days diving, each day consisting of a morning and afternoon dive. I’ve also left a spare day just in case I need it. I’ve checked and they dive even if there is only a single participant although I hope I’m not the only one as a lot of the shots I have in my head require more people.

The remaining day – or two if a third day of diving is not needed – is spent visiting Gulfoss and Geysir and the national park itself. I’m not planning on spending too much time at these two sites as they are very touristy and anyway, you don’t go to visit Geysir but rather its little brother Strokkur – Geysir rarely erupts these days but Strokkur repeats approximately every six minutes.

The second half of day 5 has been reserved for one of the sights worth visiting although it has turned into something akin to my own Moby Dick: Bruarfoss, a picturesque waterfall with wonderfully vivid blue waters. However, the more I read about this waterfall the more I become confused as to whether it is easily accessible or not. After three evenings of reading trip reviews, blogs and going over Google Maps inch-by-inch I’ve ended up with a definite “maybe”.

The issue isn’t its location – it is on the map and I have GPS co-ordinates – the issue is how to get there. From what I have been able to piece together it is behind a summer home area with three access roads. Two of these have already had barrier access erected and the third is an unknown. The next issue that reports from those who have been there recently suggest that you then have to pass through a hole in a fence which may, or may not, still be there when I arrive. However I have a plan B that entails parking along route 35 at a safe place and hiking for about 90 minutes along the Bruar river. I’d prefer to get the car as close as possible as I’m after dusk shots and so the thought of hiking back along the river in pitch black isn’t enticing. Last time I was in a similar situation was on the Falkland Islands and the only person at Cape Pembroke. There were only three kilometres between me and any form of civilisation but it was all marshland and I discovered the hard way that hiking on boggy ground in the dark not only wasn’t fun, it bordered on dangerous. I want to avoid the same in Iceland if I can…

As pretty as Cape Pembroke was at sunset, hiking back wasn’t a fun experience. [Click to enlarge!]

As pretty as Cape Pembroke was at sunset, hiking back wasn’t a fun experience. [Click to enlarge!]

But, the main reason to be here is really the diving.

The Highlands and Kerlingarfjoll

On day six I head out from Thingvellir and head north into the highlands. I’ve left a whole day travel time to get to the hot spring at Hveravellir, in part because I know that I’ll be stopping every so often to marvel at some new landscape, but also because most of the journey is on route F35, a notorious, pothole-filled highland road. Accommodation is (hopefully) at the hot-springs although they haven’t confirmed yet. Well, they had confirmed but it went into my SPAM folder and so I only found it a week later. So I have confirmed their confirmation, but I may be too late. But if there are problems I am not really too worried as it is only for a single night and so if the worst happens I can simply sleep in the 4WD. In some ways I’m hoping they don’t confirm as it adds to the adventure. Ah, well its time to live up to my words: They don’t have a room anymore for that evening so it looks like sleeping in the 4WD is the plan! I’m pretty sure that the back seats fold down flat and I will have a sleeping mat and sleeping bag. The Alpkit sleeping bag is a serious bit of kit which I really want to try ‘in-the-field’, and throw in a couple of beers, pasta cooked the night before and I’ll not only be OK, I’ll have a ball!

Much of the day will be spent on the highland road F35 - not something you would want to attempt without a 4WD. [Click to enlarge!]

Much of the day will be spent on the highland road F35 – not something you would want to attempt without a 4WD. [Click to enlarge!]

On day seventh I have a dawn shoot planned at one of the hot springs after which I travel back down the F35 from Hveravellir about 35km to Kerlingarfjoll. This leg of the journey takes me past Gígjarfoss, a waterfall that I discovered during the original trip planning in 2013, and so I’m keen to see it this time around. To be honest the entire day is quite relaxed. Whether I spend the day at the waterfall and arrive late afternoon, or arrive early afternoon and go on a recon mission into the Kerlingarfjoll mountains I don’t know, however the main focus is to arrive at the second base at Kerlingarfjoll at some point.

Kerlingarfjoll offers some stunning landscapes; the lights hues of the rhyolite mountains sandwiched between two vast glacial caps. Peppered around the area are hot springs and fumaroles. There are a number of marked hiking paths in the area of differing lengths and difficulties and with two days to explore I’m going to get see a fair bit. The only thing to watch – as is always the case in Iceland, but particularly in the highlands – is the weather. It can turn from sun to blizzard in a very short period of time.

It is also in Kerlingarfjoll I get to try the Serkort 1:50,000 scale maps. A scale of 1:250,000 is perfect for driving – and you’d have to prise the Ferdakort out of my cold, dead, hands – but for hiking I wanted a lot more detail. Ferdakort do have higher scale maps, but not that I could find in the UK so the Serkort maps are about to get chance.

On day 10, I have a full day of travel as I travel back south along the F35 again before turning west and out to the Snaefellsnes peninsula. The original plan was to turn on to the F338 as this is what Google Maps’ directions option suggested. But while examining both the Ferdakort and Serkort maps I noticed a discrepancy: On the Ferdakort map it lists both the F35 and F338 as gravel roads, but on the Serkort it lists the F338 as a track. A small difference but one that had me asking about the F338 on the Trip Advisor Iceland forum. And, just as well I did as the F338 is apparently a power line service track and one that not only passes through several rivers but it may already be impassable in early September! So, as good as Google is, always double-check your sources!

Luckily with the entire day set aside for travel the error has not put me in a difficult situation and is another reason that travelling in Iceland is best done with plenty of ‘slack’. In this case allowing a whole day for travel had meant the new, significantly longer, path F35 – 37 – 365 – 36 – 48 – 47 not only doesn’t cause a problem it allows me to travel the coastal road around Hvalfjordur and see the fjords there. The real delay will be the innumerable stops I’ll be making.

Google Maps chose the blue line as the 'best' route between Kerlingarfjoll and Grundarfjordur, but best for whom? Reseach and local knowledge suggests the longer, but safer route in blue/white. [Click to enlarge!]

Google Maps chose the shorter blue line as the ‘best’ route between Kerlingarfjoll and Grundarfjordur, but best for whom? Research and local knowledge suggests the longer, but safer, route in blue/white. [Click to enlarge!]

Snaefellsnes Peninsula

From day 11 I’m at my final base of the trip, Grundarfjordur, a small town conveniently located halfway along the peninsula’s northern coastline where I have easy access to many of the locations I want to visit. The Snaefellsnes peninsula is often said to have some of the best landscapes Iceland has to offer including the distinctive Kirkjufell mountain and the Snaefellsjokull glacier made famous by Jules Verne’s Journey to the Centre of the Earth.

Again I’m hoping that the 1:25,000 Serkort maps prove their worth as a lot of the trip here is on foot along the countless hiking paths that criss-cross the peninsula.

The day-to-day plans are much more loosely defined at this point and the only reason that I’ve been so specific for the first two-thirds of the trip is necessity – rapid changes in accommodation and trying to be in places at specific time dictating the schedule. Once on Snaefellsnes I can relax a bit more.

The trip ends on day with a leisurely drive back to Keflavik airport for a late afternoon flight. Even if I err on the side of caution and allow four hours for the journey that still leaves me half the morning to sort out any last minute shots.

Snaefellsnes may be a relatively small peninsula but it offers a wide range of landscapes to photograph. I struggled to limit myself to the dozen points of interest above. [Click to enlarge!]

Snaefellsnes may be a relatively small peninsula but it offers a wide range of landscapes to photograph. I struggled to limit myself to the dozen points of interest above. [Click to enlarge!]

Planning a photographic trip takes a lot more effort than normal – in large part because everything is so time-dependent. But after a few weeks of planning and a few major changes to the schedule I’m now happy that I have a workable itinerary. I’m confident in the time I have allowed at various places and also in knowing what to expect when travelling (no dubious power line tracks, for example). Importantly I also know where and when to stock up on food and fuel. All I need now is to turn up. Oh, and learn to dive…


Tagged , , , , |

The Diving Gift Horse

Years ago I subscribed to the UK travel magazine Wanderlust for a short while. It is a magazine that styles itself as one for “adventurous” travellers, eager to go beyond tourism.

One of the first editions I received had an article on Iceland and its lead image, a full page shot, showed a diver in the crystal clear glacial waters of Silfra with arms extended. To their right they touched the vast North American continental plate; to their left the touched the equally gargantuan Eurasian plate. A lone human between trillion tonne lumps of rock.

I can’t dive, but it stuck I in my mind and a few years later in 2013 I found myself planning a trip to Iceland. I made the classic mistake of “doing Iceland” in 14 days although Iceland is in part to blame as it offers those who dare an easy round-the-country path in the form of the oval route 1. After a few weeks of planning I realised that, as someone interested in trying to capture the essence of what they see in a photographic image, this was a foolish idea. Being so close to the departure date meant that I couldn’t change accommodation and so the trip was scrapped.

In 2014 the trip was reborn as a 15 day trip covering a route along the southern coast. It was a good trip with just me and the rental car and three bases to work from. I fell I love with the solitude that Iceland offered me and left with images I felt proud of.

Like most offices across the globe in ours there are always several lines of conversation going on about peoples’ interests and hobbies and you learn to tune out one that you are not particularly interested in. One of the guys at our place is a keen diver – passionate about it – and spends as much free time as he can pursuing his dream. Maybe it was the recent return from Iceland and the remembered full-page image in Wanderlust, or his utter enthusiasm, but I began paying more attention. I put learning to dive on the 2014 list of things to achieve, but then the trip to Ethiopia suddenly appeared and sucked up a lot of time and money. By the end of 2014 I still hadn’t learnt to dive.

But the return from Ethiopia brought two things: First it was the start of a new year – the time at which I set my yearly goals. Second, Ethiopia had cemented in my mind something that had been troubling me for some time – a lack of photographic direction. After witnessing one of the more extreme environments nature has to offer I had a direction. There are many extreme environments on the planet, but the one underwater remains one of the most enigmatic.

So learning to dive is an aim for 2015, but it is nice to have a specific goal to aim for and mine is to dive at Silfra in Iceland. I’ve set an aggressive target; Aiming to get my PADI Open Water certificate in early July, then the PADI Advanced soon after, followed by diving at Silfra in early September. In between there’ll have to be plenty of practice dives too.

I’m under no illusion just how difficult this will be; diving is difficult enough but trying to photograph under water – and in temperatures of 2°C – adds a layer of complexity on top of that where even something as simple on land as standing still becomes a battle underwater. Plus trying to operate a camera with 7mm thick neoprene gloves is an acquired skill. Frankly, right now, I don’t even know how you focus a camera underwater. It is going to be a very steep learning curve and one where the chance of not being good enough to take the images I have in my head is easily 50% and likely much higher.

But if you don’t try you don’t know. If nothing else I’ll be able to learn from the mistakes making the next attempt easier. And anyway, it is a little early for me to be talking about failure. I’m very lucky. I know a passionate diver very willing to give advice and help with any questions and less than an hour’s drive away is a place where I can go and practise diving on a Tuesday evening – which is a traditionally dead evening for me. And as for the expensive underwater camera gear needed, well, I have the loan of that too. At any other point in my life, learning to dive would have a number of challenges to overcome but right now I’m being given this opportunity on a plate.

And, as the saying goes, never look a gift horse in the mouth.

Tagged , , , , |

The Danakil Depression: Trip Review Part 1

Back in the middle of last year, once I had begun take the idea of going to Ethiopia seriously I started to read around on what options I had. I knew that I wanted to see the Erta Ale volcano and the bizarre landscape at Dallol – both conveniently close to each other in the Danakil Depression – but, other than that, I was open to suggestions.

There were many options for four and five day trips that covered the Danakil region but I just knew that, from a photographic standpoint, these were going to be too rushed. There was one trip I found that was 13 days in length and, more importantly, billed as a photographic expedition, but I could find very little independent review on this. To be honest, there wasn’t really too much more describing the shorter trips either.

One of the main reasons that I was more keen than usual to read the experiences of other travellers was that the Danakil region is listed by the UK government as being an area to which you should not travel for any reason, a fact that makes it very difficult to get any form of travel insurance from a UK company. I did ask for advice on one of the photography forums explaining that I couldn’t find much about these trips on the web to which the replies were generally unhelpful stating “that should tell me something”. So in the end my trip was really a result of a bit of a leap of faith. Because of my inability to find anything useful to help me know what to expect – both as photographer and simply as a curious traveller – I have decided to describe the trip I took – in general and its usefulness to photographers – in the hope that, if you too are thinking of going, I can answer some of your questions.

Before continuing I just want to clear up a few of so-called “facts” that you’ll see mentioned time and again as you read various web sites:

  1. “The Danakil Depression is the hottest place on the planet.” No, it is not. It currently has the title of ‘place with the highest average temperature’ which is not the same thing. In fact the measurements upon which this record is based were taken at the (now) ghost town of Dalol (often written Dallol) back in the 1960s. It does get hot of course, but when I was there in December the temperature really only reaches the early 40’s centigrade. The thing that you’ll notice is that even once the sun goes down, the temperature remains in the high 20’s throughout the night. Keep covered up and drink plenty of water mixed with rehydration salts.
  2. “It is a seriously dangerous region for tourists.” At the most northerly point of where you’ll travel you’ll be very close – about 8km – from the highly disputed border with Eritrea. The short story is that Ethiopia tried to annex Eritrea in the 1960’s which lead to the 30 year Eritrean War of Independence that Eritrea finally ‘won’ in 1991. Since then relations have been cool, but with the exception of a couple of clashes – the  1998 – 2000 Ethiopian/Eritrean War being the most notable – the border is generally stable.
  3. “There is a risk from terrorism.” Well, yes. But there is in most major western cities too. What this refers to is the 2012 attack at Erta Ale that killed five tourists, injured two and kidnapped four (later released). The attack was carried out by the Afar Revolutionary Democratic Unity Front, the Afar being the nomadic tribes that live in the Danakil region. There was also a kidnap in 2007  with an attempted one in 2008. So yes, there is a risk that you have to consider. However, the Ethiopian government, and perhaps more importantly, the Afar themselves, understand just how much money tourism brings in to the region and they have moved a long way to providing security for guests. Both Erta Ale and Dalol have military bases and you have military and police escorts from when you enter the region until when you leave.
  4. “The Afar are known to castrate foreigners”. Oh please. Yes, back in the 1930s there was custom that, as a rite of passage into manhood, a boy had to castrate a member of a neighbouring tribe. But that over 80 years ago. Women had barely been given the right to vote in the UK at that point, we’ve had World War 2, nearly had World War 3 and the word ‘minging’ regrettably has entered the Oxford English dictionary. A lot has changed since the 1930s and the Afar have too. So, don’t worry; you’re going to leave Ethiopia with all the bits you arrived with.

The reason I want to highlight – and rebuff – these oft made comments is that they can cause people to not travel to one of the most stunning places on Earth. It is OK if you decide not to travel, but it is important to do it based on facts.


Trip Options

Most of the shorter trips start and end in the Tigray capital town of Mek’ele. This has the benefit of being significantly closer to the Danakil Depression – and where you really want to be – but it does mean that international visitors will need to factor in time to get from the international airport in Addis Ababa to Mek’ele – this most likely being via an internal flight. At around US $600 the shorter trips are a lot cheaper but, from a photography perspective, pretty much pointless. Whilst some will likely disagree, the whole point for me was to spend time at the lava lake at Erta Ale and walk away with images I was happy with. Looking at the itineraries of all the four-to-five day trips I could find and they all had the same basic approach: Begin the three-hour ascent to the lava lake in the early evening, head over to the lava lake and then descend in the early morning. So all you get is a few hours in the dark at the lava lake. For this reason alone, I would not recommend them, but there are other reasons I’ll cover in the later posts looking at days 4 to 6.

At the time of looking at my options there were really only two other choice available. The first would have been to arrange a custom tour, but given the complex geography, harsh climate and political instability (both with neighbouring Eritrea and within the Afar clans themselves) this would have resulted in a serious financial outlay. The second option was the 13-day trip offered by the German company Volcano Discovery. As it turns out the actual trip is handled by Addis-based Origins Ethiopia and it is they that provided the vehicles and drivers, the cook, and the guide as well as organising the police and military escorts required in parts of the Danakil Depression. You will pay a lot more than $600 – it was $4700 in 2014 – but if you are travelling with the aim of landscape photography, or even just to understand the region a bit more then the shorter trips are really going to leave you disappointed. That said, I am not saying that the trip I took was perfect and I’ll cover the strengths and weaknesses (for me) in a later blog entry.

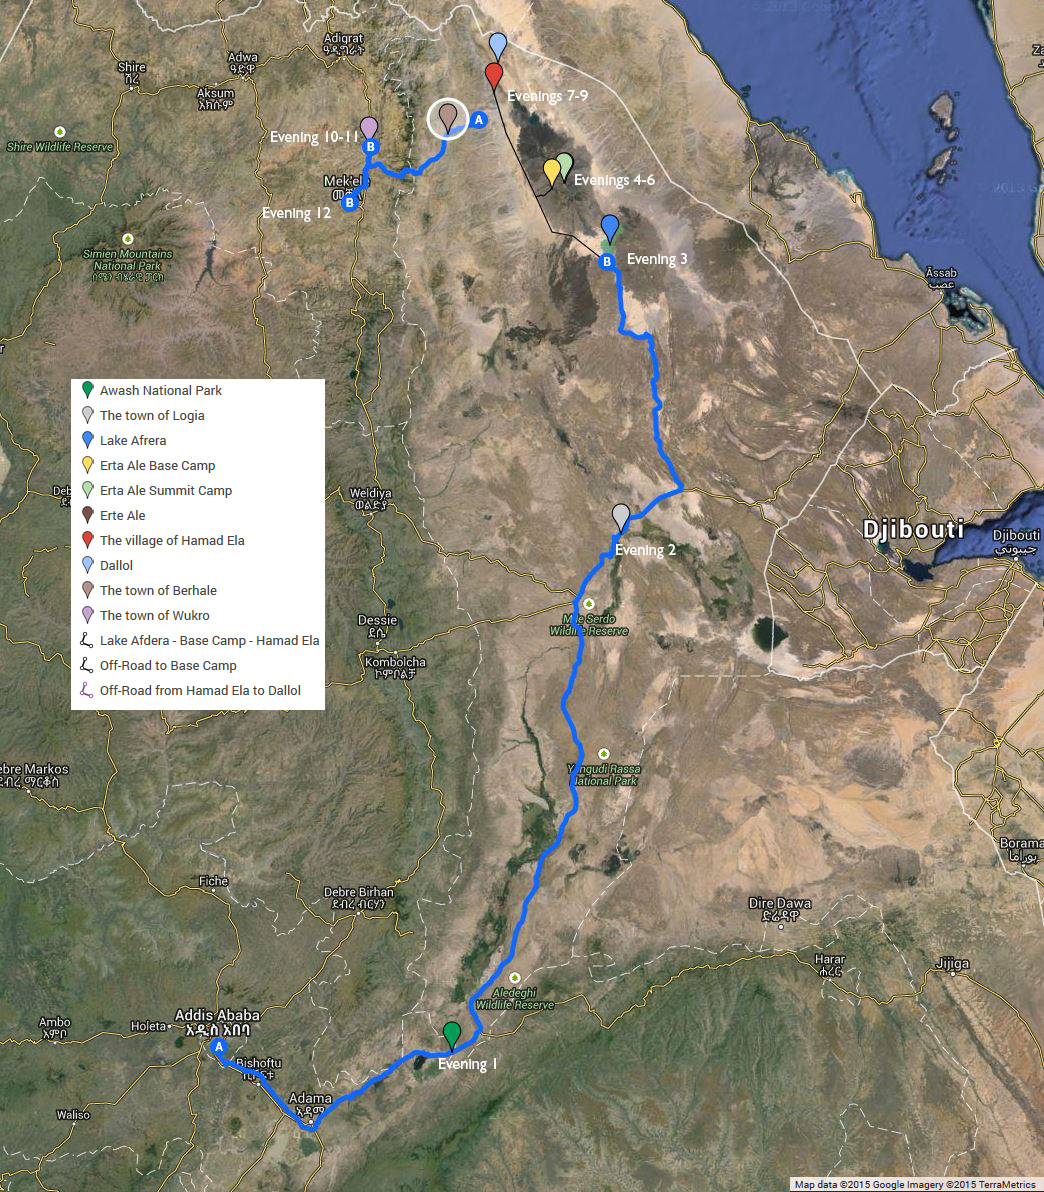
An overview of the route taken on the 13 trip.

An overview of the route taken on the 13 day trip. The lines in blue show the sections where you’re mostly sitting in the 4WD vehicles. The real fun happens between evenings 3 and 9…

Despite the trip being advertised as a 13 day tour of the Danakil Depression you are not going to be spend 13 days behind the camera. This is in no way a criticism of the tour’s itinerary but it does reflect the fact that it is a big country and it takes time to get from one location to the next, especially as Erta Ale and Dallol have been described by National Geographic as being in one of the most remote places on Earth. In the end you will have about five days of solid landscape photography time, quite a few 30 minute blocks when you stop at some of the other points of interest (such as the rock churches in Tigray) and lots of quick five minute stops. You’ll probably be shooting a lot from a moving vehicle too.

One of the many short stops you'll make over the next 13 days. The trip is all about volcanoes and geology and with a trained geologist for a guide you'll certainly learn about geology... [Click to enlarge!]

One of the many short stops you’ll make over the next 13 days. The trip is all about volcanoes and geology and with a trained geologist for a guide you’ll certainly learn about geology… [Click to enlarge!]

I’ll divide the review into several parts over the next couple of weeks simply because the overall thing is quite large. I’ve written this is referring to “you” an awful lot so I better explain why. Simply I am working on the basis that, if you do decide to travel to the region, you’ll bypass the shorter trips and opt for the longer one – of which Volcano Discover/Origins Ethiopia seem to be the only one who really focus on Erta Ale. As this is an expedition they have run a number of times now it is pretty much a set schedule and the trip I had will most likely be the one you have. I do refer to “I” every so often – usually to voice some personal feeling, or simply because I forgot to say “you”!


Day 1

The first day's travel was along route 4 to Awash National Park covering a stretch of approximately 200km... [Click to enlarge!]

The first day’s travel was along route 4 to Awash National Park covering a stretch of approximately 200km… [Click to enlarge!]

Depending upon how you organise your international flights you’ll likely arrive early morning on a red-eye flight. The international airport is surprisingly close to the heart of Addis and so this gives you a couple of hours to have breakfast at the hotel, freshen up and, in my case, transfer everything I needed from a suitcase to a backpack before the expedition officially begins. You spend the rest of the day driving the 200km to Awash National Park where the first night is spent. How much photography you get done is largely dependent upon your interests – and your ability to shoot from a moving vehicle. There are stops, of course, for lunch and a couple of volcanic craters, but it could be difficult to get a decent composition from them given the short time you stop at them. As there are few stops I did end up shooting from the 4WD as it made its way across the landscape but I’m not a “shoot from the hip” photographer. One of the other guys produced some great shots this way so you may be lucky and is something I would definitely practise before you arrive as you will pass some interesting sights. Perhaps of more interest would be the frequent road-side villages that have developed that you see as you drive. You will only get to see these villages today and tomorrow as they are a result of being on the main route  (routes 4, 18 and 2) between Addis and the port cities in neighbouring Djibouti and so there’s a lot -and I mean a LOT – of transportation along the route.

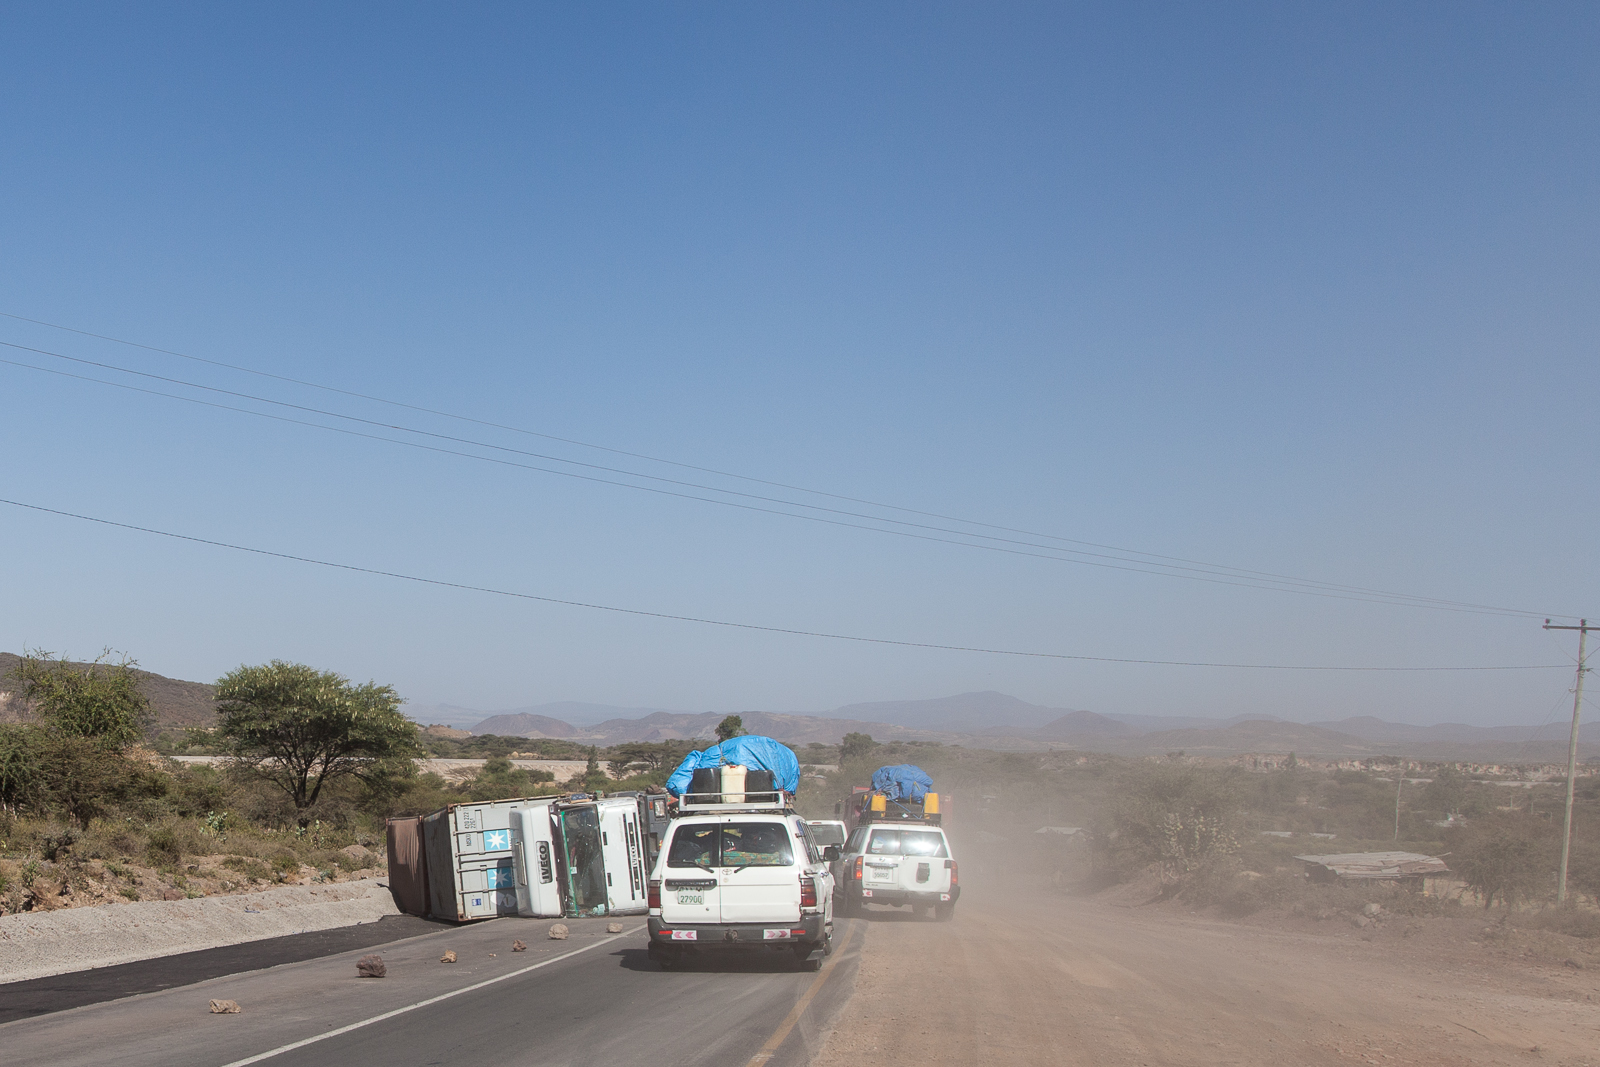
On the first day of driving we saw in the region of 20 overturned trucks. [Click to enlarge]

On the first day of driving we saw in the region of 20 overturned trucks. [Click to enlarge!]

And another one...

And another one… [Click to enlarge!]

Speaking of the transportation another thing you’ll see is a lot of accidents. It is hard to give an exact figure – simply as we didn’t start counting until after we had seen the first few – but a good guesstimate would be around 20. That is 20 articulated lorries – some with the 40 foot freight containers on them. As grim as it sounds, one of the first we saw still had blood dripping out of the crushed cabin. It is a long road from Djibouti to Addis and there are no maximum hours for driving.

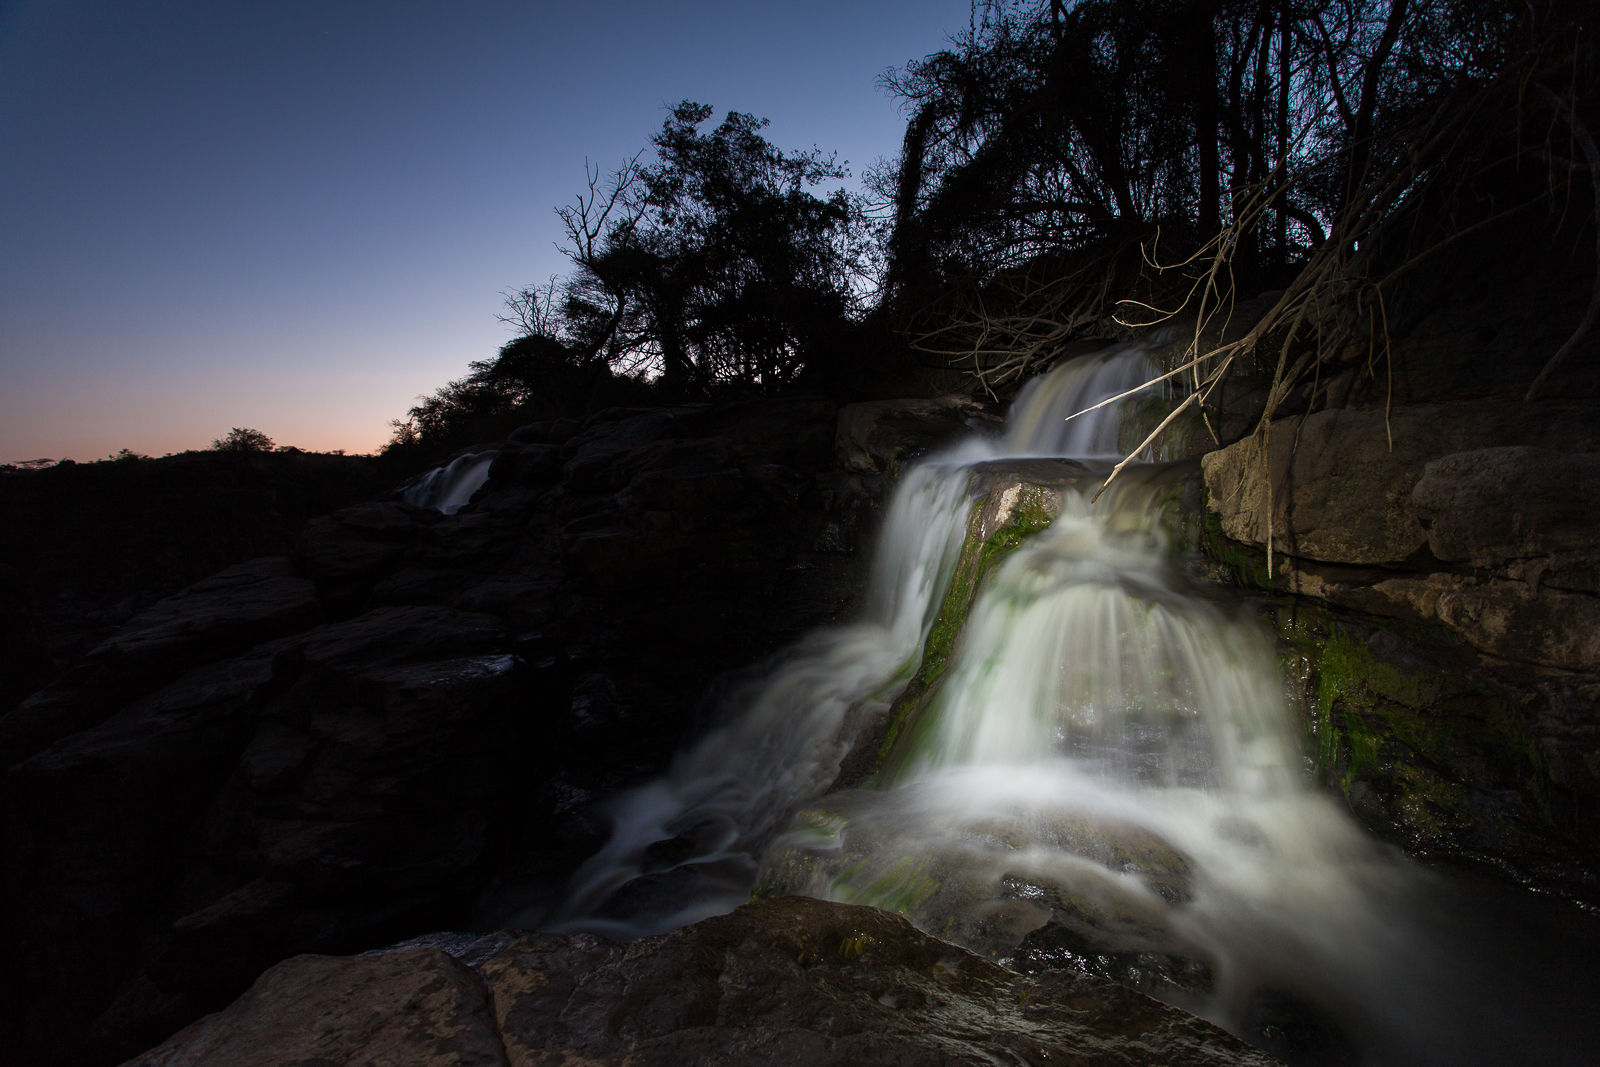
At the lodge in the national park there may be some time before darkness completely takes hold to make the easy three minute trek to the Awash waterfalls. The waterfall is certainly worth taking the time photograph – what will be against you is the fact that you arrive late in the afternoon. The light likely will not be ideal, but you can get creative with some light painting.

_MG_9738
The light was fading even as we arrived, but a handy torch always comes in useful! [Click to enlarge]

The evening was spent in comfort. The food was good and the beds comfortable. Mosquitoes are a problem here – you are close to water after all – and so make sure you are protected. You will also get to bathe properly as the huts have a toilet and shower, albeit the water is not that warm and has a distinct odour to it. Still enjoy it a few days from now you’ll give anything for a cold, odd-smelling shower. The other thing you will get to experience, which for a town-dweller like myself was breath-taking – is the night sky. Before coming to Ethiopia, read up on how to photograph the night sky – you won’t regret it!


Day 2

Day two is more time in the 4WD vehicles covering distance... [Click to enlarge!]

Day two is more time in the 4WD vehicles covering distance… [Click to enlarge!]

The day starts reasonably late at about 7AM with breakfast although you may be up about an hour earlier if you’re hoping to find a good angle for sunrise. There is an argument that a dawn start at Awash is worthwhile but the most impressive sight there is the waterfall which is largely cast in deep shadow even after sunrise due to the high cliff face immediately opposite.

If you're looking to get some quality wildlife photography this may not be the trip for you. We spent a couple of hours in Awash national Park and saw relatively few animals... [Click to enlarge!]

If you’re looking to get some quality wildlife photography this may not be the trip for you. We spent a couple of hours in Awash National Park and saw relatively few animals… [Click to enlarge!]

You also get to experience the very flexible notion of time that will be the norm for the rest of the trip – the 8AM start is more like 9AM before everyone is ready and the 4WDs area packed. The day starts with a couple of hours in the national park itself day although – and please remember that I am not interested in wildlife photography – it is not that spectacular.

The remainder of the day is spent driving a further 360km north to Logia – what is possibly best described as a truck-stop town. Again there are a few token stops and you may be able to get a good composition from them. You’ll likely stop for lunch in one of the many road-side town that you have been passing through since starting yesterday and it is really you’re first opportunity to see how rural Ethiopians live up close.

Today you'll get to stop in one of the road-side towns that have grown around the busy transport link between Addis and Djibouti [Click to enlarge!]

Today you’ll get to stop in one of the road-side towns that have grown around the busy transport link between Addis and Djibouti [Click to enlarge!]

One of the things you will also begin to notice is the panoramic vistas. This is a big country with big stretches of nothingness – it is a land of unbroken horizons.

The second day begins to show just how empty Ethiopia can be... {Click to enlarge!]

The second day begins to show just how empty Ethiopia can be… [Click to enlarge!]

Again the accommodation was fine – a basic hotel, but clean and there was a toilet, shower (again cool) and electricity. Now would be a good time to make sure that all your batteries are charged as from here on in, with the exception of the cigarette lighters, there is no electricity and with everyone wanting to charge phones and cameras, there’s guaranteed to be a queue. Or you could do what I did and take a solar charger.

Here we were also introduced to the cook Muscara who would be preparing us food for the next few days and had just prepared dinner. There is a saying that ‘an army marches upon it’s stomach’. How true this is I do not know, but I do know that a person can forgive a lot of discomfort when they are happily fed. At the end of the trip when we were all discussing what we had experienced, we all agreed that the high quality of food made a lot of what we had been through bearable. Whilst this may seem a little melodramatic, it is worth remembering that at this point we are still in relative civilisation.

Speaking of which enjoy the sleep you get tonight as it will be your last in civilisation for a while…


Also posted in Destinations, Uncategorized Tagged , , , , , , , |

Erta Ale: The Selfie

After taking my first deliberate ‘selfie’ in Iceland against a backdrop of the stunning Skogafoss waterfall that was less about being a selfie and more about the sheer immensity of nature, I knew I was going to take another selfie in Ethiopia. And I knew precisely where too.

The volcano at Erta Ale – ‘smoking mountain’ in the local Afar dialect – is an unusual phenomenon. One of only six known lava lakes and the oldest having been present since 1906 it is the result of a hole descending 47 kilometres into the Earth at a place where three tectonic plates are slowly ripping the African continent apart. The resulting upwell of magma isn’t pressurised under a cap as is the case with normal volcanoes and so rather than violent and explosive eruptions the lava displays far more gracefully.

But lava is lava and as benign as Erta Ale appears the lava is a distinctly warm 1200°C. The lake also passes through cycles of activity and by the third day of our visit there was a significant rise in the amount of gas in the upwell resulting is some pretty spectacular eruptions. One of the side effects of the eruptions was the occasional lava bomb being thrown into the air and that is not something you want heading your way: Even if they are small, they are still molten rock and will burn through you like a hot knife through butter. It is one of the reasons that you do not stand at the very edge of the crater, the other being that the edges are so brittle and fragile that they collapse at the slightest provocation. Over the years several tourists have died here, our guide Enku himself losing one, simply as they ignored the advice they were given.

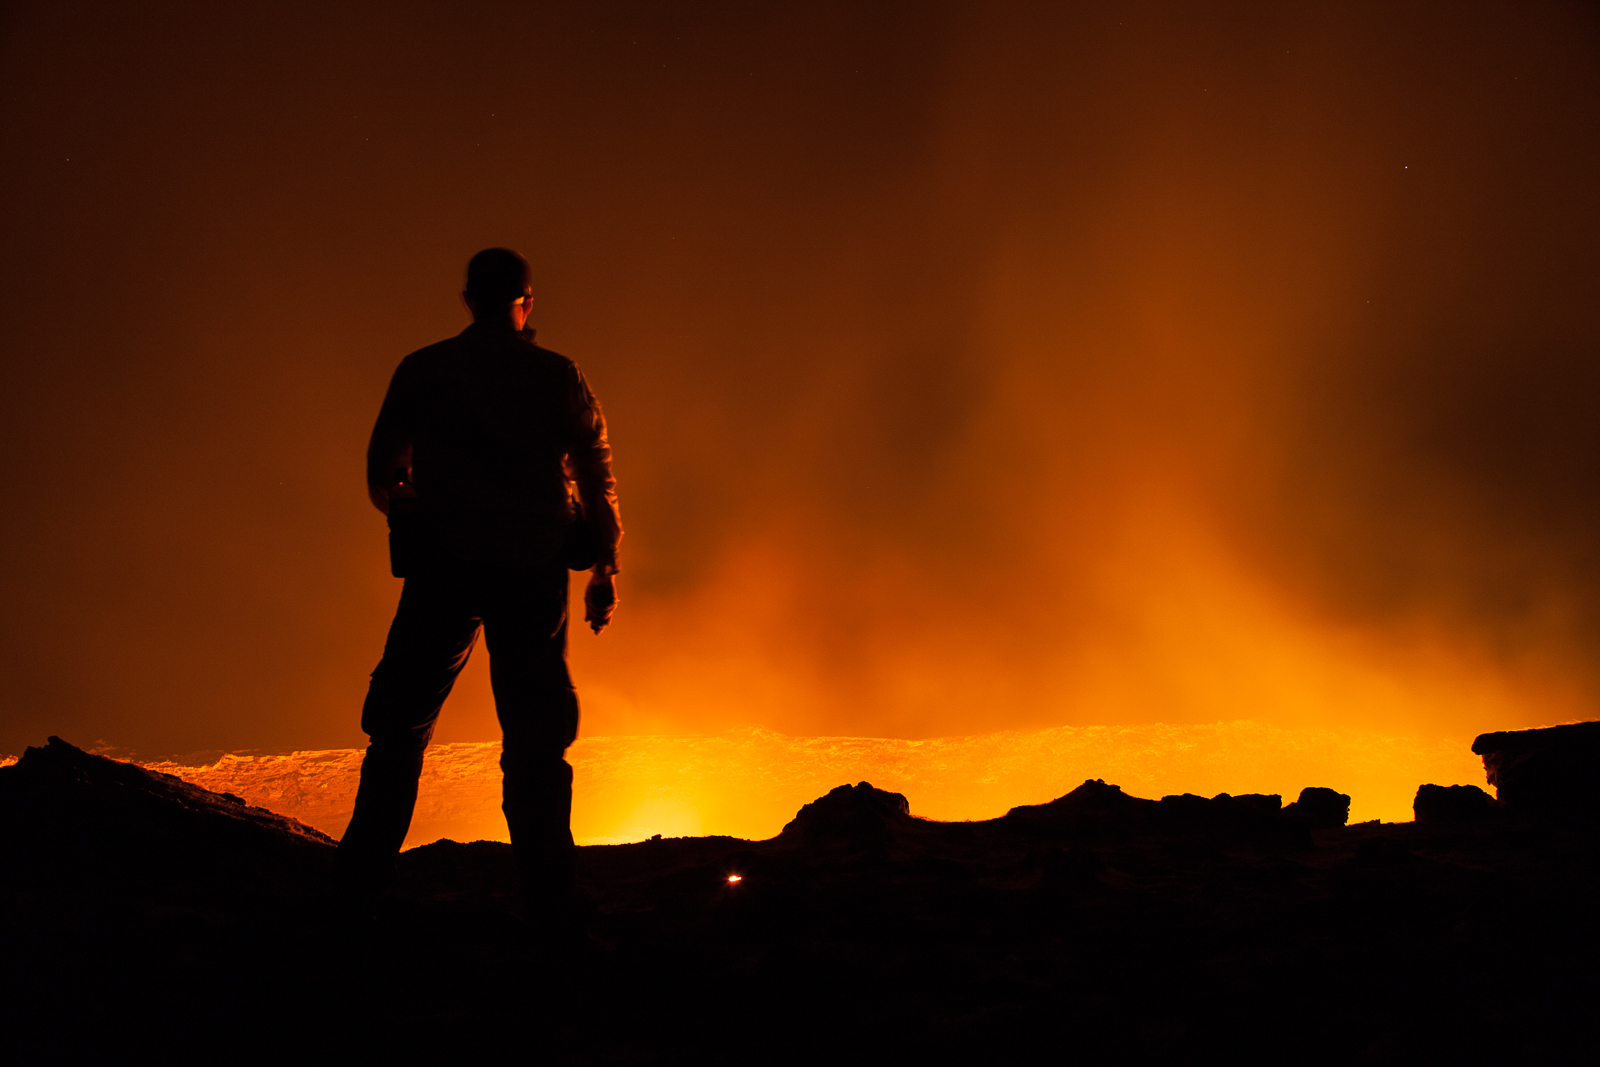
I knew I wanted a silhouette shot where I was as close to the edge as I could be so I stood out against the glow of the lake. I also knew that I didn’t want to die either so I headed off with Enku to find an appropriate spot. As a trained geologist, having worked for a number of mining and exploration companies, he could read the rise and fall of the edge and decided that here, at about one metre, was the closest it was safe to approach. Even then he was less than keen about spending time this close and I remember being a little disappointed that a nice Strombolian eruption didn’t occur as I stood there. But, even at a metre back from the edge, the heat was intense – over 60°C if the readings earlier in the day were correct – and waves of poisonous hydrogen sulphide were buffeting me. I had to be quick.

So it was a bit of a surprise when I finally got round to taking a proper look at my photographs today to find my selfie had been photobombed by a surprise guest lying at my feet…

Well, if you're going to visit one of the more unique places on the planet, you're going to take a selfie, aren't you...?

Well, if you’re going to visit one of the more unique places on the planet, you’re going to take a selfie, aren’t you…? [Click to enlarge]

Also posted in Destinations, Frame by Frame Tagged , , |

Voltaic Systems’ 17W Solar Charger Field Review

Back in November I gave my initial impressions of the Voltaic Systems solar charging kit and its applicability to photographers in the field. At the time I also mentioned that, as with many things, the real test would be in an actual field trial. Well, after two weeks on location in northern Ethiopia it is safe to say that it has been put through its paces and its strengths and weaknesses revealed.

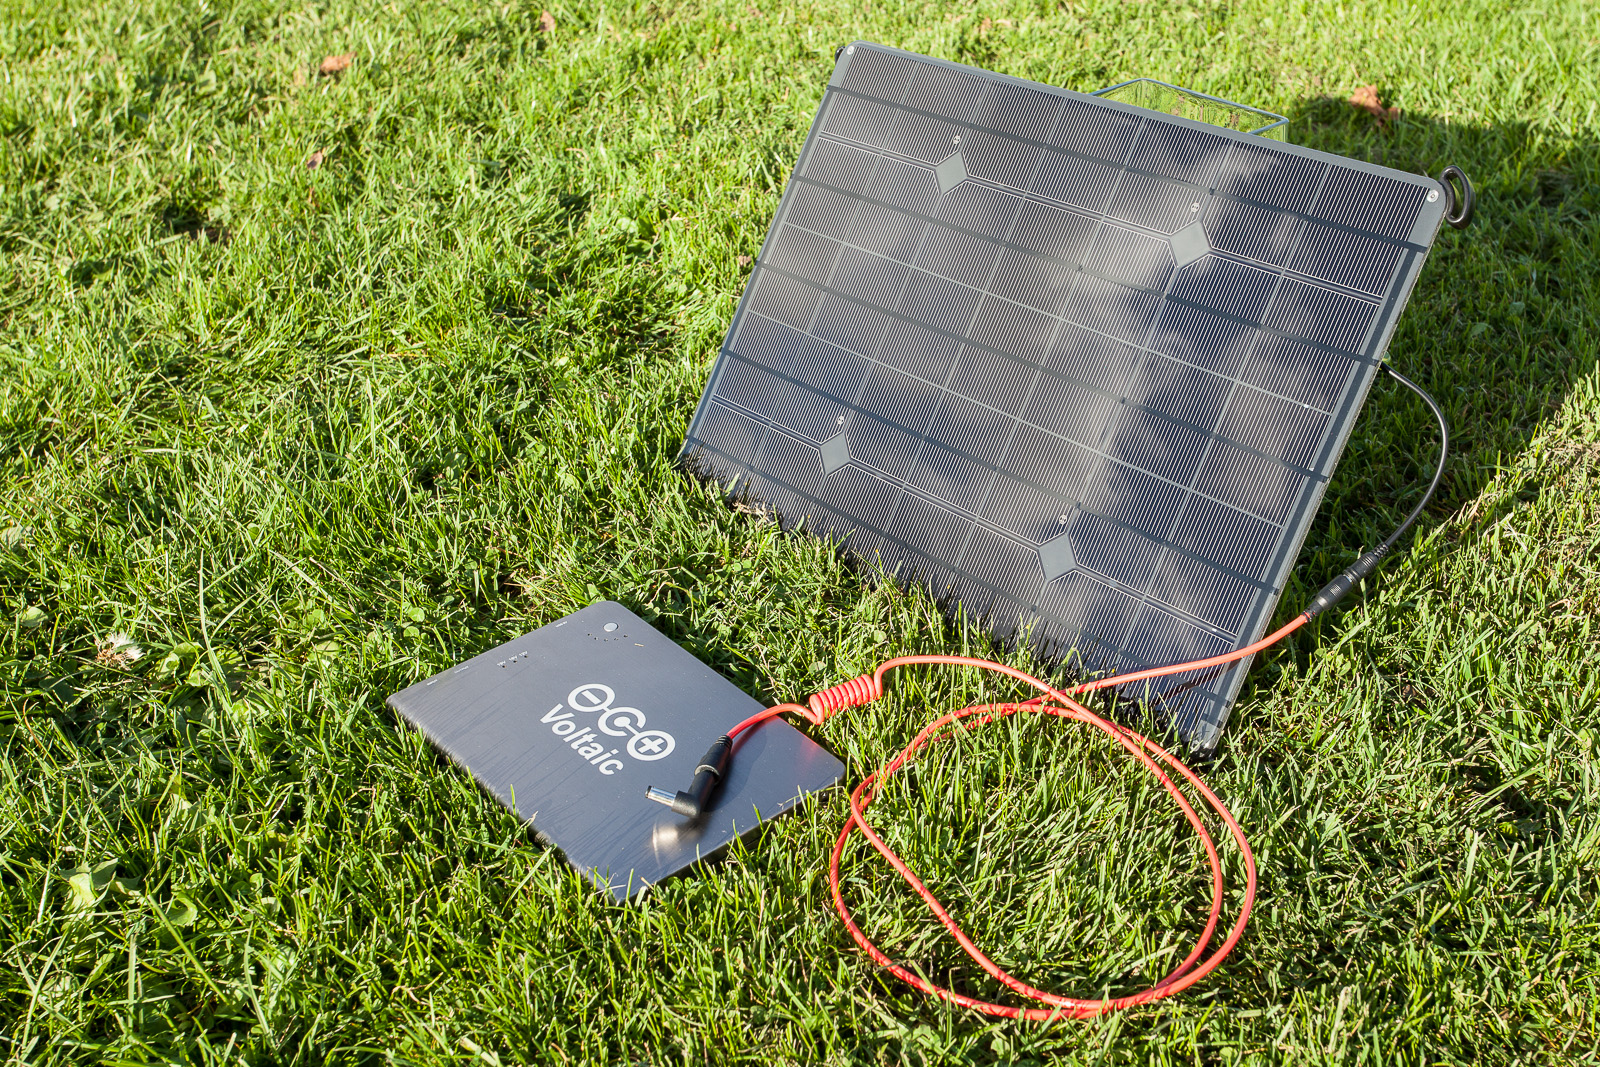
The kit I took to Ethiopia consisting of the panel (top), the red cable connecting the panel and V72 battery, the black cable to connect the V72 to the camera charger and the white/black cable to connect to my MacBook Air. The car charger (bottom) also came in useful. The camera charger is not shown as it did not survive... [Click to enlarge]

The kit I took to Ethiopia consisting of the panel (top), the red cable connecting the panel and V72 battery, the black cable to connect the V72 to the camera charger and the white/black cable to connect to my MacBook Air. The car charger (bottom) also came in useful. The camera charger is not shown as it did not survive… [Click to enlarge]

The kit in question is the 17W single-panel kit consisting of the panel, the V72 20,000mAh lithium polymer battery and a number of connecting cables and adapters. In addition to the base kit I ordered the Canon LP-E6 battery charger and an Apple MagSafe power adapter for a 2011 model MacBook Air. It is hard to tell whether the panel and V72 are designed by Voltaic or merely off-the-shelf items but the advantage to me as a photographer was that I didn’t have to spent inordinate amounts of time trying to work out which items were required, which were not and whether they would work together. The Canon battery charger was definitely a third-party item (more on that later) whilst the MagSafe adapter was definitely hand-crafted by Voltaic.


PREPARING FOR THE TRIP

Before heading out I knew that, given our location, there would be no chance of a power source during critical parts of the journey. There are some stunning landscapes in the north of the country, but they are far from civilisation. So, whatever power requirements I had needed to be met by the kit that I carried. In the original article I outlined what I considered to be fairly simple needs: I needed a means to charge the LP-E6 batteries for the 5D Mk II and 7D bodies and also my MacBook Air that would be used for the end-of-day review and image backup. It was a simple requirement and one that the Voltaic web site suggested fell well within the capabilities of the kit.

I had also given a fair amount of consideration to how – and when – I would need to charge my equipment and I anticipated two basic scenarios. First, when moving between locations in the 4WD vehicles. Second, when on location. In the first scenario, we’d be spending a lot of time sitting around and not doing much shooting. According to the itinerary, these would be long days driving and arriving at the destination after sunset. In the second scenario, we’d be out-and-about but with a fixed camp to return to at the end of the day.

The issue that I could see, however, was that there was no easy way to attach the solar panel to the vehicle. Voltaic Systems had very kindly included a set of plastic attachments that would allow the panel to be tied to something (for example with velcro or cable ties), but they weren’t too much use on a vehicle. Luckily a good friend of mine has a mechanical aptitude and a comprehensive workshop, after a few conversations, he created a magnetic mounting kit for the panel. Now I could attach the panel to any magnetic surface – such as the roof of a 4WD – and simply run the connecting cable to the V72 safely inside the cabin. So now I was ready: I could mount the panel on a vehicle, a camel or any other fixed structure.

Although not part of the provided system the magnetic mount really made a huge difference - and one I recommend Voltaic Systems consider adding... [Click to enlarge]

Although not part of the provided system the magnetic mount really made a huge difference – and one I recommend Voltaic Systems consider adding… [Click to enlarge]

A close-up of the panel on the 4WD showing the (home-made) silver metal magnetic mounts and the (provided) plastic loops in each corner for cable-tie mounting. The panel happily survived repeated bumps and knocks as well as being covered in dust and volcanic ash... [Click to enlarge]

A close-up of the panel on the 4WD showing the (home-made) silver metal magnetic mounts and the (provided) plastic loops in each corner for cable-tie mounting. The panel happily survived repeated bumps and knocks as well as being covered in dust and volcanic ash… [Click to enlarge]

One of the nice things about the V72 battery is that you do not have to use the solar panel to charge it. The recommended input is a 14-20V DC input and the kit came with an appropriate mains adapter for this purpose. Initial tests in the UK (and shown in the original article) also showed the solar panel happily generated around the 20V mark. Voltaic also include a cigarette lighter lead suggesting that even a 12V DC supply can charge the battery. This was especially convenient as, for the first few days as we covered the 700km from the capital to the north of the Rift Valley, we would have access to cigarette lighters in the 4WD vehicles. Once at the Erta Ale base camp however, where we swapped transport to camels, we would be on our own.

One of the things that separates Voltaic’s solar kit apart from the other ones I researched is the capacity of the V72. At 20,000mAh it has, in theory, enough reserve for ten of Canon’s 1,800mAh LP-E6 batteries although Voltaic’s web site suggests a more conservative 3.5 times reserve. Voltaic also suggested that a single, full, charge of the V72 would be enough to replenish the Air’s own internal cells.

Using the ten foot cable I had a lot of flexibility as to where I put the V72 in the 4WD. All I then had to do was wait for the sun to work its magic... [Click to enlarge]

Using the ten foot cable I had a lot of flexibility as to where I put the V72 in the 4WD. All I then had to do was wait for the sun to work its magic… [Click to enlarge]

The charging process can work in one of two ways, depending upon what you are charging. Voltaic’s web site suggests that camera batteries can be charged directly from the panel, presumably relying on the battery charger’s regulation circuitry to ensure the battery is not over-cooked. However, smart phone and laptop charging should be performed via the V72 battery. In the end everything was charged via the V72 battery although it was here that I hit a bit of an inconvenience. Voltaic offer two cables (the red cables in the photographs) to connect the panel to the V72, one at 4 feet and one at 10 feet in length. In both cases they are terminated in a 3.5mm male DC plug. This is fine for the camera charger but for the V72 – which takes a 5.5mm input – a small (provided) adapter had to be used. One thing I have learnt is that when moving about at some point during the various unpackings and repackings, you lose small stuff. It is inevitable. Given that Voltaic only recommend direct charging for camera batteries, this seems an odd choice of connector. In the end I replaced the provided 3.5mm plug with a 5.5mm plug before heading out.

The other reason that I ended up always charging the V72 is one of convenience. At 12° north of the equator we were still in winter and so daylight hours were limited. Sunrise was around 6:30AM and sunset around 6:30PM. The activities of the day meant that direct charging was almost always impractical until we came to a halt in the evening.


IN USE

The first few days were spent covering distance as we moved up country. Long hours in the 4WD interspersed with stops to examine some interesting geologic phenomenon. It was a light draw upon the camera batteries but in the evening it was still worth topping them up from the V72. An unexpected power drain, however, was the iPhone 6. Quite by accident I began to use it to record video clips and take those panoramas that didn’t quite seem worth setting up the panoramic tripod head for. The iPhone turns out some quite reasonable results, but its video capabilities have a heavy drain on the battery.

With the added load of the iPhone battery using the long hours of driving to keep the V72 fully charged turned out to be very useful. Even so, the first few days were a gentle introduction for the charging kit.

Home at Erta Ale. "A compact, fully air-conditioned, one bedroom apartment backing on to a stunning panoramic landscape." it said in the brochure. It even came with free mice... [Click to enlarge]

Home at Erta Ale. “A compact, fully air-conditioned, one bedroom apartment backing on to a stunning panoramic landscape.” it said in the brochure. It even came with free mice… [Click to enlarge]

Once we arrived at the Erta Ale base camp and headed up the volcano, the solar charging kit panel took a more fundamental role. A few of the other travellers also had Canon 5D MkII and/or 7D bodies, one had a quadracopter and the rest had their own cameras form different manufacturers. With three days at the edge of a lava lake we all became a little shutter-happy. I managed, with no real effort, to take over a 1000 shots as well as a large number of video clips and I was not alone. The quadracopter was set free and captured some stunning footage although you could literally watch the batteries drain. The problem was that we had zero access to power. The 4WD vehicles were three hours away and as the journey would require a military escort to be organised, short of a medical emergency, we weren’t going to be making it. Only one other person had a solar kit – a $60 affair off eBay – and that was so ineffective as to be useless. Suddenly I had become a popular guy to know.

We relied on the Voltaic charger. Several Canons, a Fuji, two iPhones and even the quadracopter were all kept alive by the solar charger... [Click to enlarge]

We relied on the Voltaic charger. Several Canons, a Fuji, two iPhones and even the quadracopter were all kept alive by the solar charger… [Click to enlarge]

Due to the number of videos I was taking and a lot of use of image stabilisation I was getting through around two of the Canon LP-E6 batteries a day, some of the other serious photogs were too. The iPhone battery also required daily attention and the end-of-day upload to Adobe Lightroom on the Air drained its battery at an unholy rate. A queue formed. The Voltaic charger simply could not keep up with it all. This is in no way a criticism: It is intended vey much as a personal charging solution and we were asking it to keep up with four people each placing a heavy demand upon it. In truth it actually coped better than I expected and the ability of the V72 to output as USB and simultaneously one of 12,16 or 19V really shone; there were a couple of instances where charging the iPhone and a camera battery simultaneously was a real benefit.

It was whilst camped up on the crater of Erta Ale that the provided ‘tie-attachments’ came in useful as they allowed me to cable tie the panel to the wooden branches of the hut I was it. It was unlikely to be stolen, but we were exposed and the wind did pick up every now and then. As my hut backed on to a sheer drop to the old, razor-sharp lava, caldera floor, had the wind decided to get too playful then panel would have met a very quick end.

The provided plastic attachments allowed the panel to be cable-tied to the shack and the cable fed inside via one of the many, many holes. The next nearest source of power was a 4WD somewhere in the distance... [Click to enlarge]

The provided plastic attachments allowed the panel to be cable-tied to the shack and the cable fed inside via one of the many, many holes. The next nearest source of power was a 4WD somewhere in the distance… [Click to enlarge]

Disaster almost struck. The Canon battery charger provided by Voltaic broke. After disassembling it I discovered that the DC input socket had a snapped solder joint and had lifted the solder tracks off the circuit board. In other words it was definitely not repairable in the field. Had it not been for one of the guys having a USB Canon charger I, and the other Canon users would have been in dire straits. It is worth pointing out that I was not trying to be overly rough with any part of the provided kit, but I was in the field. Things do get knocked about, repeatedly plugged and unplugged otherwise moved and I would expect the elements of the charging kit to withstand this level of abuse. If I am blunt about it, the supplied battery charger is (or rather was) a rather cheap-and-cheerful piece of kit. But to balance that negative, the solar panel and V72 stood up to field work admirably. The V72 may have a few scratches now and a dent or two, but it continues to be rock-solid. The panel itself has a few surface scratches but these have no effect upon its operation. The only let-down is the provided third-party battery charger.

By day three the lack of camera battery charger would have been catastrophic to the shoot and shots like this would have been missed... [Click to enlarge]

By day three the lack of camera battery charger would have been catastrophic to the shoot and shots like this would have been missed… [Click to enlarge]

After descending from Erta Ale we moved further north to Dalol (or Dallol, depending upon which map you read) and close to the DMZ between Ethiopia and Ertitrea. Here the accommodation improved as we swapped the crude huts with volcanic ash floors and mice for crude beds under the stars. We did have one structure available to use and this doubled as a kitchen and storage area for our bags. It’s roof also server as a convenient high place to mount the panel out of the reach of the local children. Whilst we again had access to the 4WD vehicle as so everyone returned to charging their batteries that way, continuing to use the panel meant that I did not have to wait in line – and took some strain off the vehicles.

Eventually we returned to civilisation and for the last couple of days found ourselves in hotel rooms. Aside from the joy of now actually having toilets and showers, everyone rejoiced in the concept of electricity that came from sockets in the walls! Except me. I had left all my mains chargers back in the UK and so I still relied on the solar kit to provide me with power. In the first hotel $5 bought me access to the roof; in the second there was a rooftop bar.


CONCLUSION

So, the bottom line is whether I can recommend the Voltaic offering or not. The answer is an almost definite yes but I would like to suggest to Voltaic Systems the following changes:

  • Include a magnetic mounting system for vehicles.
  • Change, or at least offer an alternative cable to connect the panel to the V72 battery terminating in a 5.5mm DC plug thereby removing the need for an adapter.
  • Offer a more resilient camera battery charger.

In addition to the suggestions to Voltaic Systems I recommend having a second V72 to hand. I’m not totally sure how keeping two charged would work given that the panel couldn’t charge a single V72 in one day, but heading out to location with two fully charged 20,000mAh batteries certainly would not hurt.

In spite of these suggestions, and even without my modifications, the bottom line is that the kit not only worked, it worked well. Despite being asked to perform far beyond it’s intended use it helped all of us keep power to our cameras and get shots from a location we’ll likely never see again. And since that was the whole point of having a solar charging kit in the first place, I can only say that it was well worth the price of purchase and import costs to the UK, the extra luggage weight and the need for me to modify it. Next time I head out to a location where power will be scarce, it is definitely on my packing list.


UPDATE: 30 JAN 2015

After posting this review Jeff over at Voltaic responded pretty much immediately (which seems to be normal for their customer service) to the points I raised. I’ve then sat on the interesting replies until now (although in my defence I have been busy).

Voltaic now link to an US-based web site that provide off-the-shelf magnets that can be purchased and fit directly to the panel’s threads. For USA customers this is a great solution although I would just point out that (1) shipping to the UK (and presumably anywhere else outside of the US) was prohibitively expensive when I sent Voltaic the link last year, and (2) the magnets have no protection and so may scratch the surface they are attached to.

Not mentioned elsewhere on their site but they have now changed the style of adapter that I was so concerned over losing (as it would prevent solar charging) that I discarded it and soldered on my own connector. Apparently Voltaic now provide an adaptor that clips over the cable coming from the solar panel. If this is anything like the one they already use on the red connecting cable then you’re probably not going to lose it – it needed a serious amount of pulling to detach the cable from the panel.

As for the failed battery charger, right now it seems that they are still being sold and I guess that my experience was not-so-common. Voltaic are interested in alternatives and I’m testing a German-made one right now. But my advice would be to take at least one spare charger – they’re critical yet very lightweight and only a few dollars.

Voltaic have posted highlights of my review on their web site here.

Tagged , , , , , |

Ethiopia: T Minus 20

With twenty days until I leave for Ethiopia, and it being my last chance before then to perform all the time consuming checks, the pace has picked up on the trip planning.

The most fundamental task was to ensure that I have all the clothing and equipment that I will need to take with me and to that end I have been purchasing bits over the past few weeks. This weekend’s task was to collect it all together and see what’s is missing – and if it is all going to fit!

Clothing

When I went to Antarctica I went through the pain of having to research, and then buy, a complete cold-weather wardrobe. Now I have had to do the same for the other end of the climate scale. As with the online advice for cold-weather gear, advice for hot-weather clothing is equally diverse. In the end though I have settled upon taking the following:

  • One pair hiking boots – Salomon Quest 4D GTX (plus spare laces)
  • One pair hiking shoes – Salomon Ultra X
  • Two Rohan “Core Silver T” base-layer T-shirts
  • Two Bspoke “Epping” Coolmax base-layer T-shirts
  • One Rab “MeCo 120” base-layer T-shirt
  • Four pairs Rohan “Cool Silver” Trunks
  • One pair Rab “MeCo 120” Trunks
  • Two pair Smartwool “PHD Outdoor Ultra Light” Socks
  • One Pair Icebreaker “Hike Light” Socks
  • Three Craghoppers Nosilife long sleeve shirts
  • Two pairs hiking trousers [TBC]
  • One Berghaus Polartec 100 fleece.
  • My trusty wide-brimmed hat

As you can see it is a bit of a mix: three different types of base-layer t-shirt for example. My reasoning for this is simply that when reading around the general consensus was that synthetic material doesn’t work well for some people: I didn’t want to stick to one brand or technology only to find that it didn’t work for me.

The hiking boots and shoes are both new. My trusty 18 year-old Scarpa BX boots failed in Iceland and despite being waxed began letting in water. My Merrell Moab hiking shoes finally fell apart in Israel – only just surviving due to a couple of tubes of superglue. So back in September I went in to the local GoOutdoors shop with the intent of trying them on and them buying online and went through several makes – Mendl, Scarpa, Mammut – but all slipped when I walked – a recipe for blisters. In the end the guy took one feel of the shape of my heel and ankle, disappeared and came back with the Salomon. They fit like a glove (well, a foot-glove). The whole process took 40 minutes and it was not service that should go unrewarded by then buying elsewhere. I was so impressed that I even emailed them to say how pleasantly surprised I was, and that rarely happens. The hiking shoes were bought yesterday, Salomon again due to the fit.

The other thing – which is a new experience for me – is that I’m taking only five days of clean clothes for a two week trip. For the experienced trekkers amongst you this may not seem particularly noteworthy, but for me is it a big departure from what I am used to. Well, almost. On my trips to Iceland and then Israel earlier this year, despite having sufficient clothes for a daily swap of underwear and t-shirt, I didn’t use half of them. So this is really just an extension of that although it will be much hotter than both Iceland and Israel in the Danakil Depression and so sweat will be more of an issue. As a backup I am taking a small tube of travel washing liquid although given the lack of running water and that the only bodies of water are either highly acidic, poisonous or have a higher salt concentration than the Dead Sea, I’m not altogether sure how I would get to use it.

The trousers are still to be bought as I am still stuck on the decision: I love the multiple pockets of cargo-style trousers, but I also like the idea of those which can be converted to shorts. This is a decision that needs to be finalised this week. I’ll also be buying two more pairs of lightweight hiking socks.

Equipment

For the majority of the expedition we’ll be away from civilisation and in the middle of nowhere. This means no electricity, gas, running water, mobile phone coverage and no sanitary facilities. With the exception of the first night in Awash and the last night in Mek’ele, accommodation is listed as being ‘under the stars’  – a euphemistic term for sleeping on the ground. Our comfort – and more importantly health – will be dependent upon whatever we take with us.

  • A Vango Sherpa 65 litre backpack
  • Snugpak “jungle” sleeping bag
  • Exped Ultralight inflatable pillow
  • Karrimor sleeping mat
  • Gas mask
  • Mountain Warehouse large travel towel
  • Lenser P7 LED torch
  • Petzl Tikka XP head torch
  • Medical kit
  • Voltaic Systems’ 18W solar charging kit
  • Swiss Army knife
  • A funnel
  • Several large plastic bags and some zip-loc bags

The pillow may seem like a luxury item but I’ve woken up with a stiff neck too many times to know that it can real pain (so to speak) to have a sore neck when you’re rushing around. And at 46g in weight, it is not exactly cumbersome.

The jungle bag – so called as it is a lightweight one season sleeping bag- is less to keep warm and more to provide protection from the little critters that will be roaming around – mosquitoes included. It has a thermal comfort rating of down to 7°C and includes a handy zip-up mosquito net over the head opening. The pillow fits in the hood nicely.

The gas mask is probably the oddest item on the list, but it is required for certain areas, especially around the crater of the volcano and the lava lake. The biggest risks here will be hydrogen sulphide and sulphur dioxide gasses, both of which have a habit of killing you if left untreated. As we’ll be around 600km from any form of medical aid, prevention is definitely better than cure in this case.

The solar panel is the luxury item. As mentioned in a previous post it is there to charge the camera batteries and the battery on my trusty MacBook Air. I could survive without the laptop – although doing of would make checking image quality tricky – and five camera batteries may be enough for the trip. In a pinch I could charge the batteries off the cigarette lighter socket in the 4WD, but there is possibility that may not be an option. Any in any event, there is nothing wrong with a bit a tech geekery!

So, the big question is: Has this weekend been a success? The answer is both yes and no.

No in the sense that I have not performed a complete test pack and checked the weight. This is only a little annoying in that it would have been nice to do, but a quick educated guess would suggest that I should be OK.

Yes in the sense that I now have a final shopping list which can be summarised as:

  • Two more pairs lightweight hiking socks
  • Two pairs of hiking trousers
  • Medical supplies
  • Sanitary and personal care supplies
  • An inflatable globe
  • Glucose tablets, energy bars, dried nuts and fruit.

The biggest challenge of this is the trousers simply as I need to actually go somewhere that has what I am after and try them on – a struggle given my busy work schedule and hence why this weekend was so important. By contrast the other items are easy to come by.

Including the all important inflatable globe of the World…

Also posted in Trip Planning Tagged , , , , |

Power on Location: Part 1

Whilst every trip that I have embarked upon has had its own unique character and challenges, they have all had their similarities too, so much so that I just simply accept their existence. So, when beginning to think about the practicalities of the forthcoming trip to the Danakil Depression, it was a bit of a surprise to be hit by a rather obvious fact: There’ll be no electricity. Now really, this should be of no surprise whatsoever as we will be, quite literally, in one of the most desolate and inhospitable places on the face of the planet but still, up until this trip it is not a problem I have had to face before.

Now to call this a problem may seem a little melodramatic – Mankind had lived quite happily without electricity for millennia and so I’m sure I can cope for a mere two weeks. It’ll even be fun. No, Man does not need electricity to survive. But camera batteries do.

A few years ago I was up in the Andes on a four-day trip between San Pedro de Atacama in northern Chile and Uyuni in Southern Bolivia. We travelled in jeeps, slept in refuges and ate fried spam for dinner. In many ways it was the forerunner to the Ethiopia trip; a barren wilderness unscathed by humans. And no electricity. I managed to survive on the five camera batteries I had, but did run most of them down. That was four days without being ‘connected’. Now I have two camera bodies, invariably forget to turn off battery-sucking image stablisation and am shooting more video – and 13 days of power to provide.

To make matters worse, I’ll be taking my trusty 13” MacBook Air with me which serves the dual purpose raw file backup and Adobe Lightroom viewer. I did spend a while thinking that I could just do without the laptop – a luxury after all – but I have increasingly found the ability to look at images on a big screen at the end of each day invaluable. After all, I’ll not be going back and so I want to make sure that those killer shots on the camera’s LCD display are equally killer when viewed at a more normal size. And just like the camera batteries, the Air is not solar powered.

But it could be.

I know basically how solar charging works but I also know that the theory does not always translate into a practical solution, or at least an affordable and portable practical solution. And Google was throwing many, many options my way. In the end I found the interesting web site of Voltaic Systems a company based in the USA who stood out for two reasons. First, they offered a complete charging kit; the panel, the lithium ion battery and all the cables and adapters. Second, they offered the right cables and adapters. They had a charging adapter suitable for my Canon 5D2 and 7D cameras batteries and they had an adapter cable for my 2011 model MacBookAir. In short they were a one-stop shop for exactly what I was after.

A few emails were exchanged over the weekend and later that week a package turned up on my desk, followed a few days later by a smaller one containing some adapters to allow the solar panel to be strapped to a backpack. And so I was sorted. If it works, that is.

The core elements of the solar charging kit: The panel, the battery and a cable to connect the two...

The core elements of the solar charging kit: The panel, the battery and a cable to connect the two…

The kit looks to be essentially very straightforward to use: You use the panel to charge the 20,000mAh lithium polymer battery and then use the battery to charge the laptop or camera batteries. You can charge the batteries directly from the solar panel, but Voltaic Systems strongly advise against connecting a laptop direct, presumably due to voltage regulation issues. The V72 battery in the kit is estimated to provide a MacBook Air with a single full charge. So, at the end of the day I could be charging the Air whilst charging a battery. For my Canon LP-E6 batteries, the estimate is six hours charge time.

Initial tests were, frankly, disappointing. I spent a few hours in my study with the panel facing the window and eagerly watched the provided battery show signs of charging by the miracle of harnessing the power of nature. Except that it didn’t. Being the geek that I am, I adopted the nuclear approach and immediately reached for the voltmeter – 15.9V. It is rated as an 18V panel and so at least something was working. It was only then that I did what a normal person would have done and read the copious instructions on the website.

So, rule number one: Perhaps the clue is in the name – solar charging kit –  but it doesn’t work very well when indoors. Even window glass will reduce the amount of light reaching the panel. Once I opened the window and gave the panel a more direct view of the sky, the voltage jumped up to a more usable 17.9V. And more importantly the indicators on the battery sprang into life. I had finally mastered nature!

And then they died again.

This happened several times over the next hour and no amount of cable-wiggling or repositioning of the panel helped. But the voltmeter did show the voltage coming off the panel was intermittently fluctuating and then I worked out why. So, rule number 2: Clouds passing in front of the sun can cause the voltage to drop enough to stop charging.

This was all way back in August and having some time I today went out into a bright British November afternoon for more testing. So, how did it do?

If the panel can generate 21.2 volts on a November afternoon in the UK, I'm hoping it will drink up the African sun...

If the panel can generate 21.2 volts on a November afternoon in the UK, I’m hoping it will drink up the African sun…

Whilst 21 volts may not seem like much it is worth remembering that a car battery generates 12 volts and most mobile phone and tablets require a mere 5 volts. But, does it charge the all-important V72 battery?


Now it may not be the most exciting movie but to me those LEDs lighting up in sequence is pure action-adventure because it means that, just like the movie guns with an endless supply of bullets, I’ll be able to keep on shooting all day long…


Tagged , , , |
Buy trazodone from Raleigh Singulair heavy heartbeat Where to buy caverta online in Delaware Buy alphagan online from Frankfort Vancouver allopurinol shipping What is xtandi Nebraska shipping keflex 250mg Generic caverta from Alberta Madison diflucan shipping