Monthly Archives: December 2015

Deadvlei, Namibia

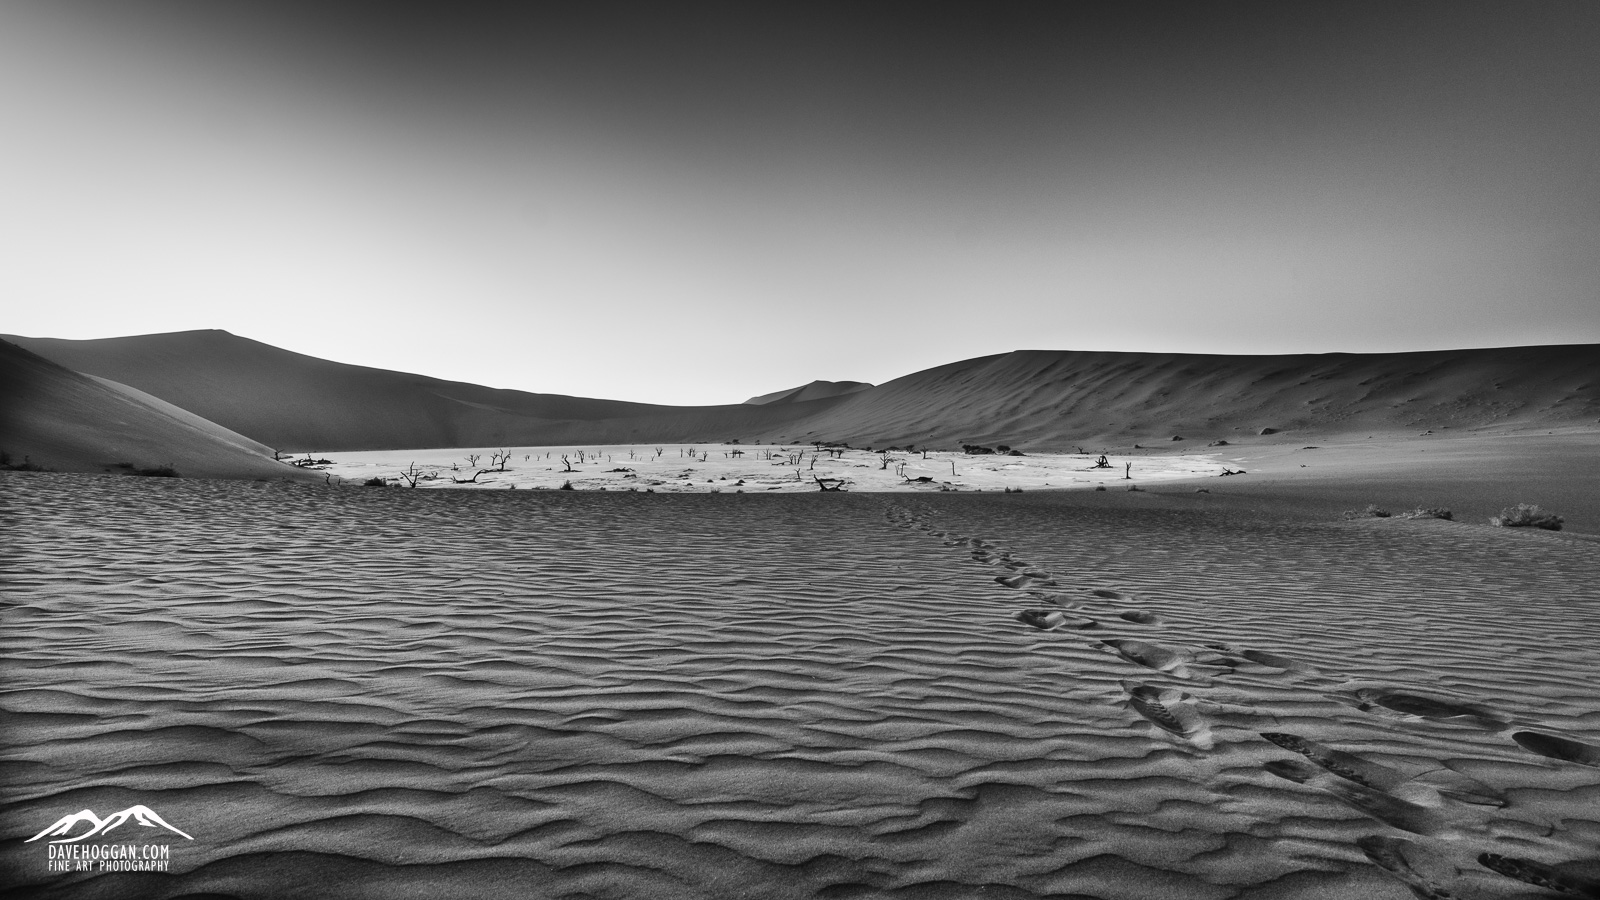
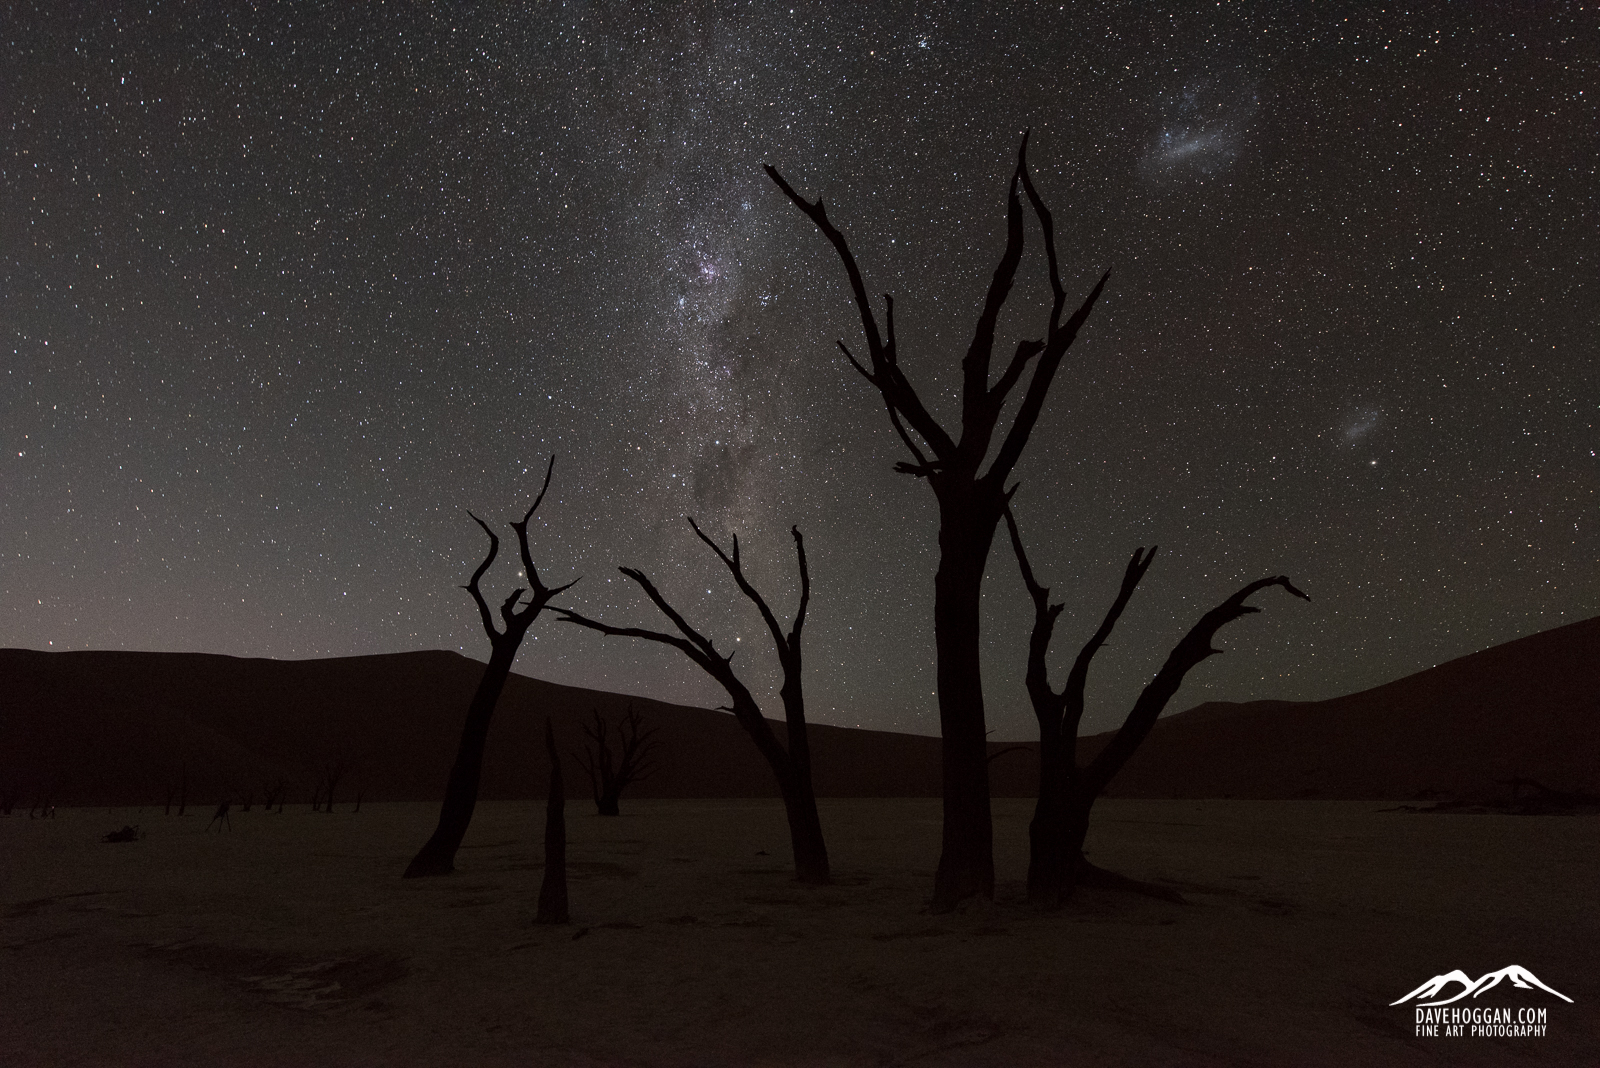
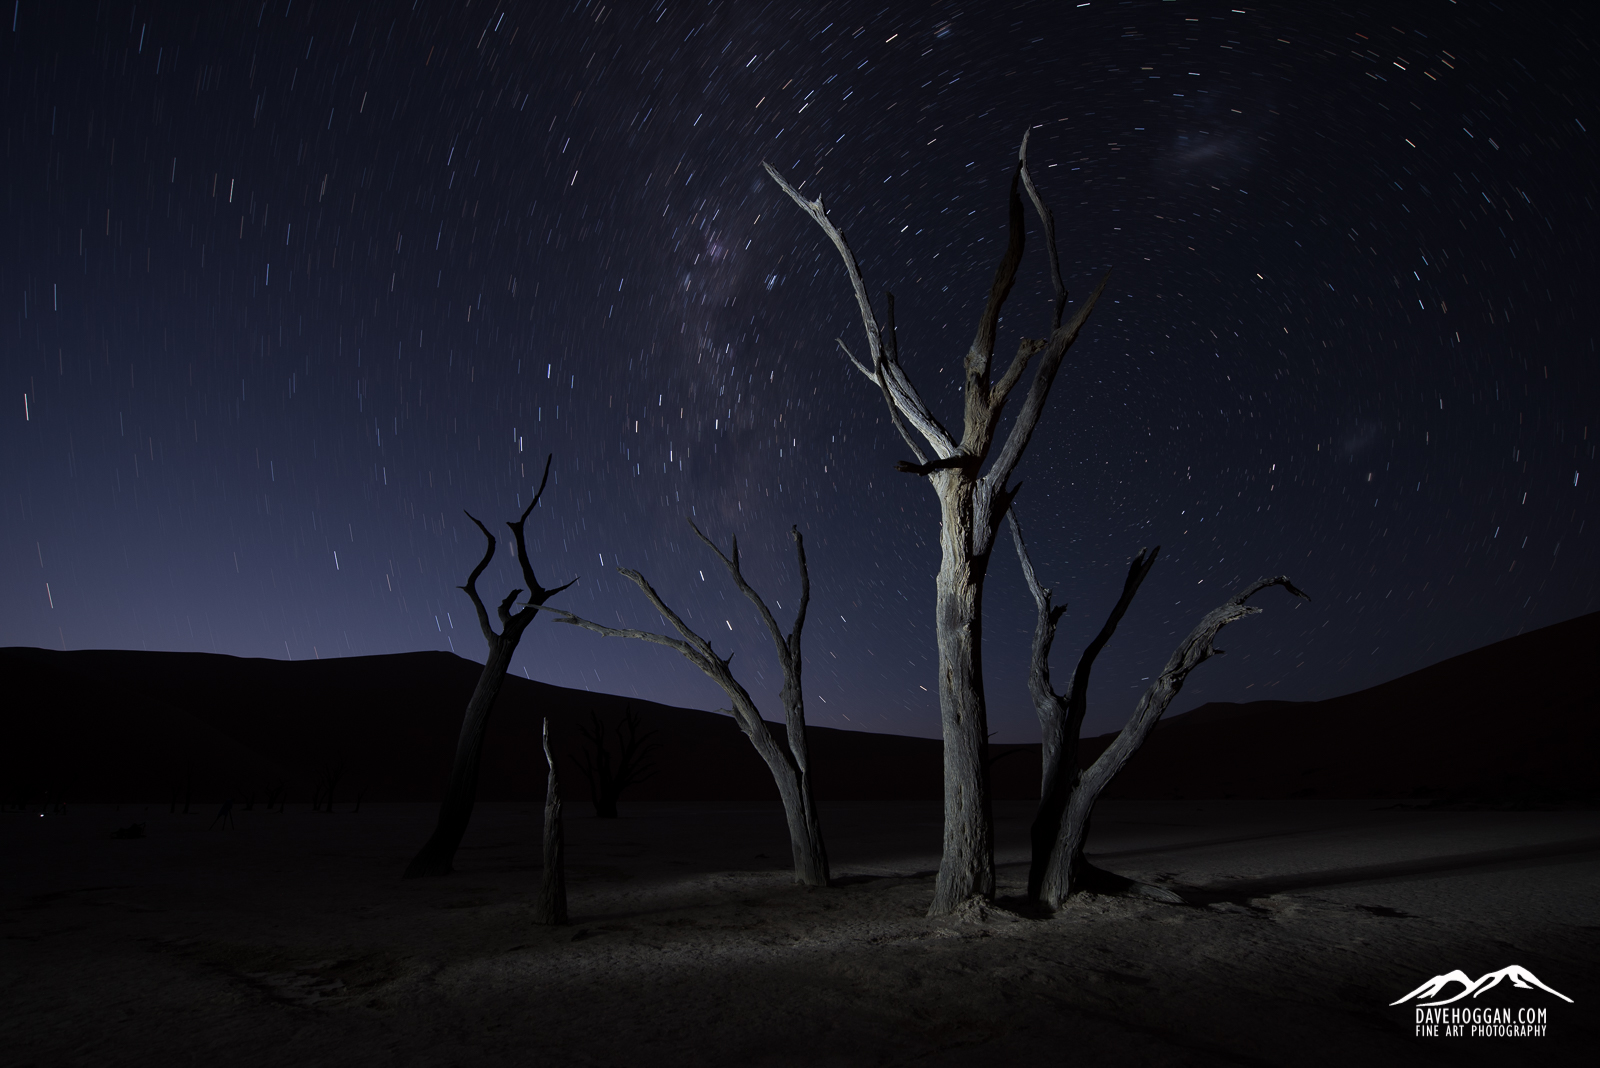
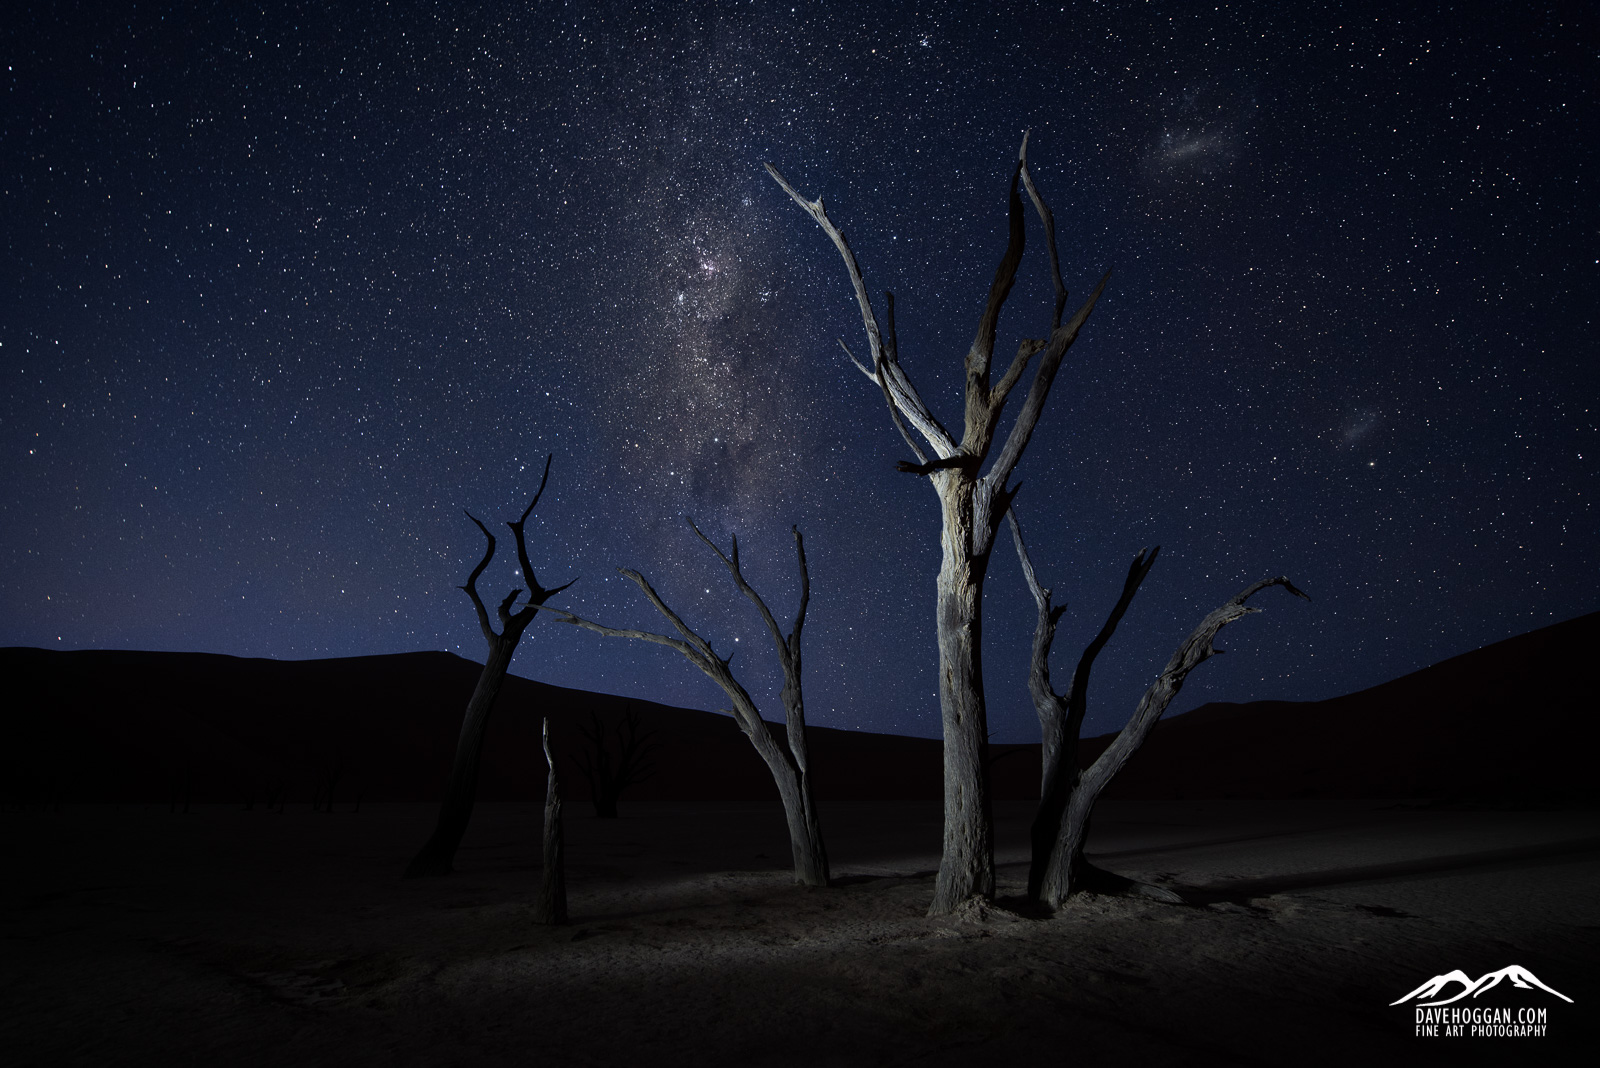
If I had to choose one location in Namibia that I enjoyed shooting more than the others it would be Deadvlei.

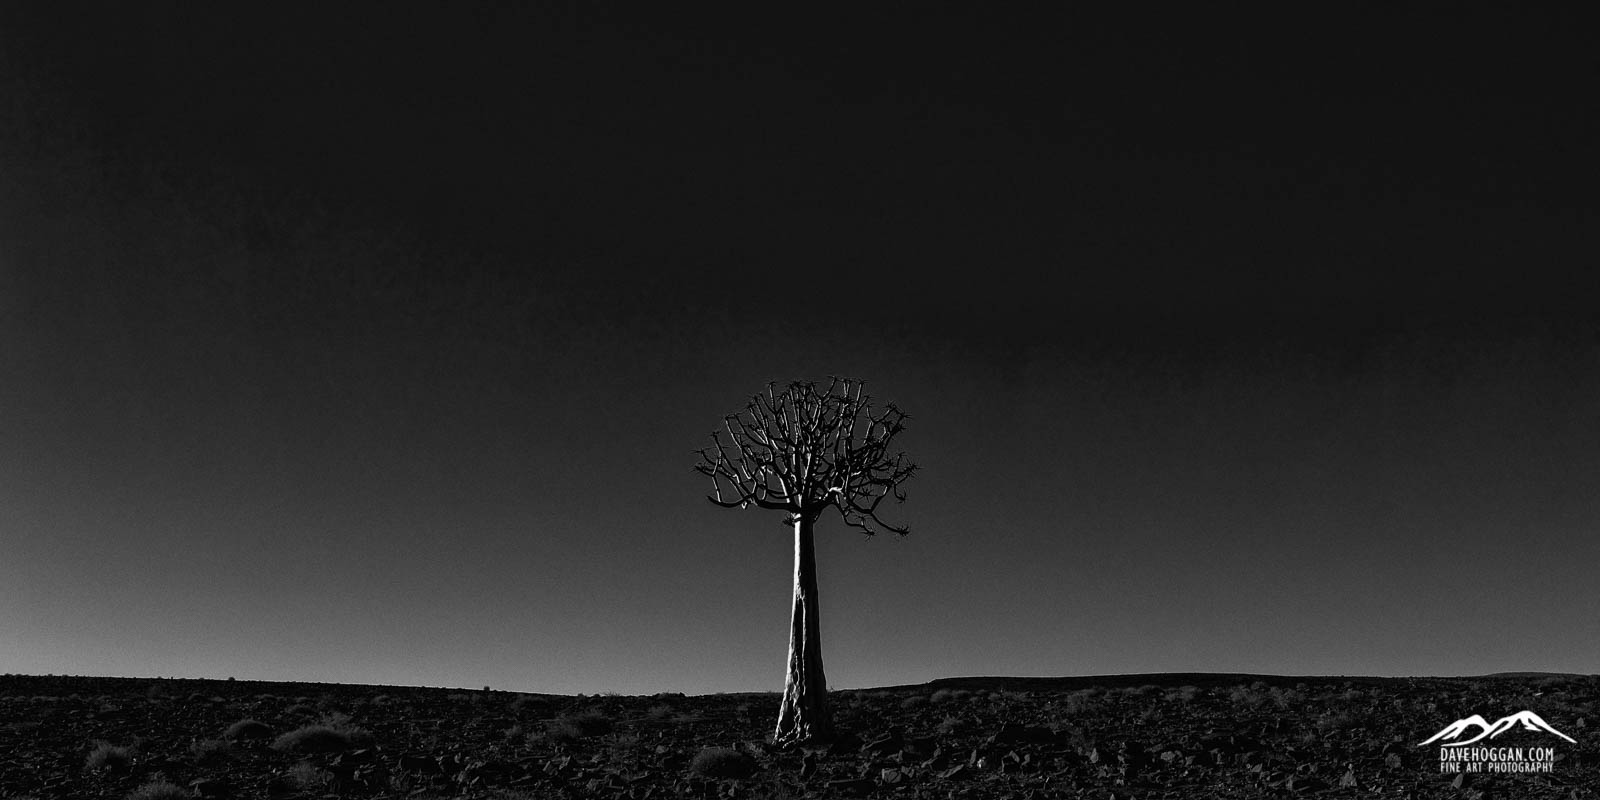
Once a marshland (vlei translates as marsh) the shifting sands of the desert isolated the area around 650 years ago. The intense desert sun baked the clay ground into a rock-solid block whilst the trees blackened as they slowly desiccated. What remains are the ancient skeletons of trees, self-made gravestones, surrounded by some of the highest sand dunes on the planet.

Despite being an hour’s drive from the nearest human population followed by a half hour walk across the dunes, Deadvlei is one of the most popular locations in Namibia. As such it does not take long after the first visitors arrive for the pristine sands, uniquely sculpted by the wind each night, to soon become a discordant jumble of footprints.

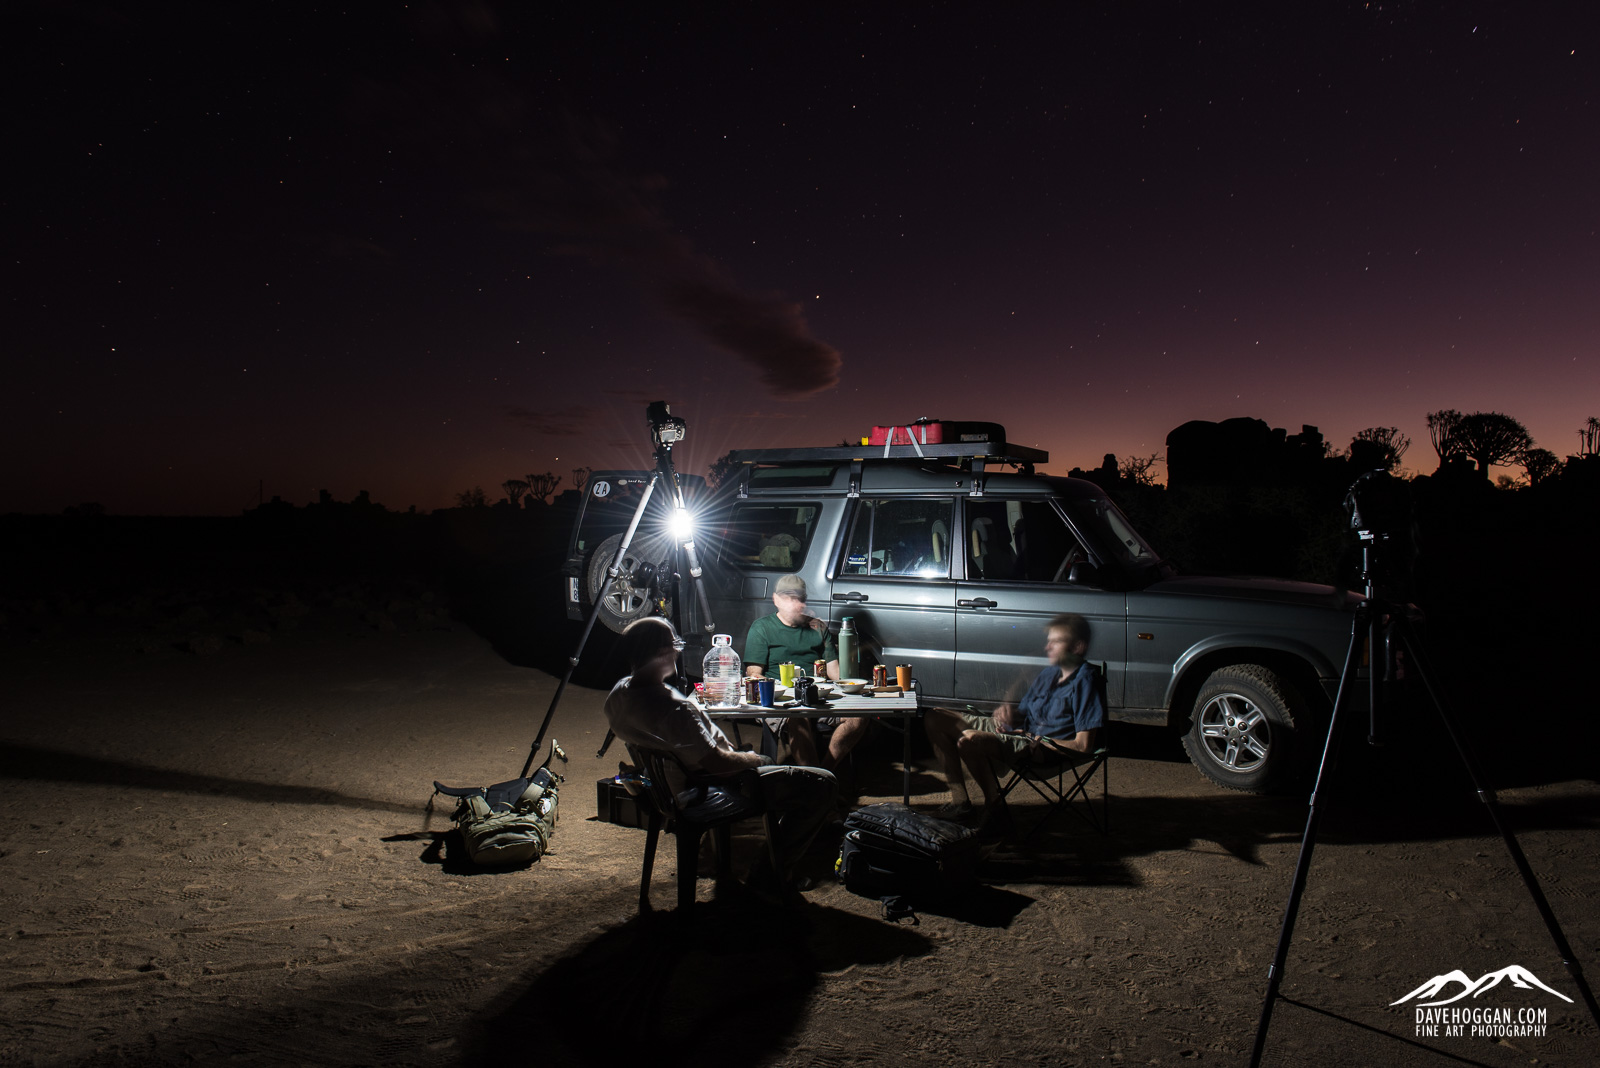
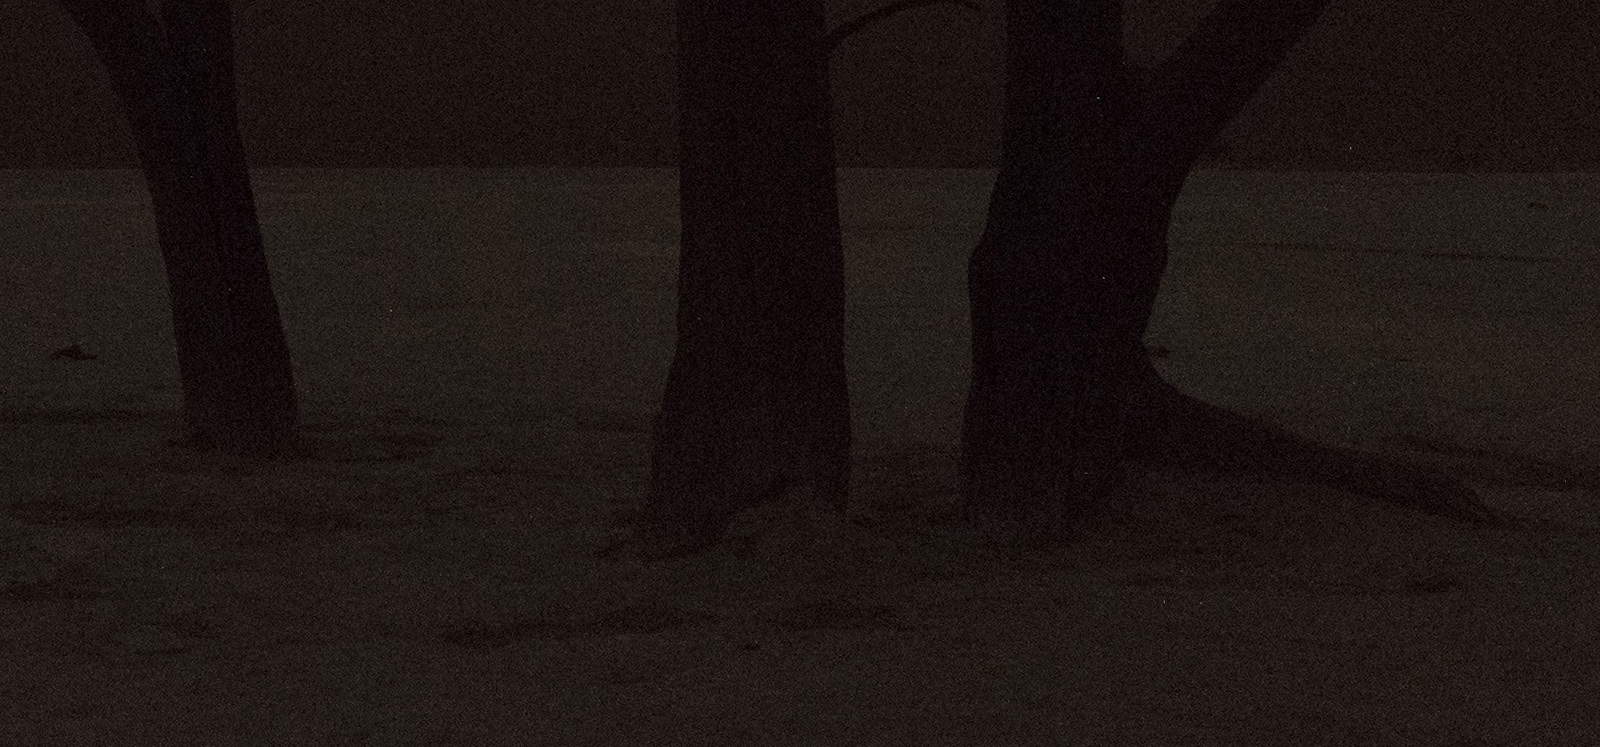
But we were lucky enough to be there for some night shoots – something not typically possible due to the national park gates closing at dusk and opening at dawn – and so we were the first people to see Deadvlei at the start of a new day. In fact if you look very closely at the photograph you’ll notice something odd about the foot prints: They are leaving the vlei. Despite the apparent silence we experienced from our arrival at 3AM the wind had quietly blown our footprints away leaving us a blank canvas when we departed at 7AM.

Dawn at Deadvlei

Posted in Frame by Frame Tagged , , , , |

Kjalvegur, Iceland.

Meet my Icelandic nemesis, the Kjalvegur route that winds its way through the central Highland plateau.

Shortly after taking this image the razor-sharp lava at the side of the road eviscerated a tyre when I pulled in to let a speeding 4WD past. When I managed to fit the spare – a job made more difficult due to the freezing rain, biting wind and the hire company not including all the tools in the toolkit – I soon discovered that it wobbled in a worrying fashion. It was only when I took the car to a garage that I found out that the spare wheel had a twist in it and I was lucky to have made it as far as I had.

So, round one goes to Kjalvegur but I will be returning for a rematch in 2016!

Kjölur 1600px


Posted in Frame by Frame Tagged , , , |

Composing the Dunes Namibia Workshop Review: Part 1

Sossusvlei 1600px

The kind of traveller that you bump in to on a trip to Antarctica is, perhaps unsurprisingly, the well-travelled one and so when relaxing in the bar each evening there were plenty of stories being swapped of the various destinations that people had visited.  So it was that I first received a recommendation for Namibia back in 2012.  Skip forward to the 2014 trip to Ethiopia and another recommendation, this time from a pair of photographers. Upon my return from Ethiopia I had already decided that I wanted to see Namibia for myself.

I didn’t realise just how much there was to write when beginning this review and it ended up being a little longer than expected. In itself that says something about the trip but since it is far too much to read in one sitting I’ve divided the review into three parts: Introduction and days 1-4, days 5-8 and finally days 9-13 and the conclusion.

Picking the Trip

Planning a trip to Namibia is likely one of the easier trips to Africa you can make. It is financially and politically stable and a number of tour operators have offerings to suit most people’s ideas of a “holiday”, photographic or otherwise. The photographer is well catered for with a number of different options and a lazy afternoon with Google saw me with a number of different options for a photographic workshop in Namibia. Because I didn’t fancy spending countless hours deciding on the small differences between each offering I picked three based on a range of costs, locations visited and the description on their respective web sites.

It is worth mentioning that this was my first photography-specific expedition. Ethiopia was described as a photography/geology trip, but most people on that were not photographers and as a result we ended up missing a lot of good opportunities through a variety of frustrations. As such I really have nothing to compare this trip to Namibia with.

The reason that I decided on a photographic workshop was two-fold. First, the missed opportunities in Ethiopia meant I really wanted to be on a trip dedicated to photography, visiting locations of interest to photographers and being with other people who knew not to walk into your composition. The second reason is that there are some countries that are better to travel with local knowledge. Namibia is a safe country – as safe as most destinations and definitely one of the safest in Africa (in fact probably only second to Botswana) – but I had already been forewarned about the high risk of blown tyres when driving the roads there and I really didn’t want to have to plan the logistics of hotels, hire cars, permits and all the other myriad requirements.


The Company

Of the three shortlisted options I decided upon the South African company Tailor Made Safaris who were advertising their “Composing the Dunes” photographic trip for five reasons:

  1. They visited the skeleton forest of Deadvlei and the neighbouring Sossusvlei , the ghost town of Kolmanskop and the quiver tree forest at Keetmanshoop – all on my shortlist.
  2. The trip was scheduled for November which is more-or-less my preferred travelling time. It was also the only trip I could find in this timeframe so that helped the decision!
  3. Small groups.
  4. They made a point that it was a landscape workshop (as opposed to a wildlife one).
  5. They were considerably cheaper that the competition – around 30% cheaper.

To be honest, they pretty much had me with the “focus on landscape” point – I have no interest in wildlife photography and any workshop that includes that would be taking time away from landscape work. Plus it is an refreshingly honest statement to make: There will be people who dismiss them as an option because they want ‘a bit of everything’.

The only concern that was nagging me was the fact that they were a lot cheaper than the alternatives. Perhaps I am jaded but whenever I see something at a significantly lower price than the alternatives alarm bells usually go off in my head. It was a bit of a gamble but I put the cost down to three things. First off, the workshop is run ‘off season’ having the benefit of cheaper accommodation and less tourists. Second, the company is based in South Africa where wages are lower than Europe or, to put this in a simpler context, had the photographer been a European photographer he would have cost more to hire. The final potential reason I could see for the lower cost is that Tailor Made Safaris is a (very) small company, the husband and wife team of Nick and Freya to be exact.

After reading a lot of independent feedback about Tailor Made Safaris’ other (non-photographic) offerings and a couple of reviews by previous workshop guests I decided to take a gamble.

Likely the most confusing aspect for anyone currently interested in the “Composing the Dunes” workshop is that the name of the company responsible has recently changed making Googling reviews of the workshop more difficult . At the time of my first becoming interested in the trip it was being offered by Tailor Made Safaris. By the time I arrived in Namibia I was greeted by someone holding a “Nature’s Light” sign.

The reason for moving the Namibia photographic workshop under the Nature’s Light brand was explained by Nick van de Wiel, owner of Tailor Made Safaris:

Nature’s Light is basically a Joint Venture between Emil from Limephoto and Nick from Tailor Made Safaris, bringing together great photographic expertise and reputable travel logistics. Although initially we both marketed our tours each on our own websites, we have discovered this year that it wasn’t working from a marketing point of view. The Limephoto website is optimised to attract commercial clients, and the Tailor Made Safaris website to attract ‘general tourists’, and hence we were ‘missing out’ on serious photography enthusiasts. These simply didn’t find out websites and thus didn’t know what we had to offer. We like to believe that was the reason we had so few people on our Namibia Tour, as we still feel the tour itself is good and offers good value for money. Our new website is designed purely for photographers, and we hope it will list better, and attract more serious people.

The Emil mentioned in Nick’s description is Emil von Maltitz, a Durban-based photographer and our expedition lead. Despite being a commercial photographer Emil’s landscape credentials include being included in the 2016 Nikon calendar and shortlisted in the International Landscape Photographer of the Year 2015 book.

For the rest of the review I’ll refer to it as the Nature’s Light workshop as, if you’re interested in it for the 2016 season, that’ll be who runs it.


Accommodation

Accommodation was generally to a very high standard.

Accommodation was generally to a very high standard.

The accommodation throughout the trip was excellent. The published itinerary gives a sense of what to expect in terms of rest time and realising that good sleep when I could get it would be essential if I were to last the two weeks, I had opted for the single person upgrade essentially meaning that I had a double room to myself wherever we stopped and in one case I had a choice of four beds to sleep in! Even the most rustic of the accommodation at Spitzkoppe was more than acceptable and, despite being the odd one out in that they had external toilets and separate external showers these were in good condition.


The Itinerary

The 2015 workshop ran between November 5th and November 17th with 12 days ‘in the field’. The first day was set aside for guests to arrive and meet each other over dinner and so the actual workshop really started on the following day. According to the brochure, the workshop concentrates on the Quiver Tree forest near Keetmanshoop, Fish River Canyon, the ghost town of Kolmanskop, Dead Vlei and Sossus Vlei and finally the Spitskoppe Mountains. Both Nick and Emil have run the workshop a few times and, being photographers running a photography workshop, have a good idea as to where guest’s interests will lie. From talking to Emil I got the impression that the itinerary is being reviewed based on the comments made by previous guests and so what the itinerary will look like in 2016 may well be different. That being said I’m pretty sure that the only location mentioned above that would potentially be missing is Fish River Canyon as the other locations are too visually impressive to miss. Fish River Canyon has been included as people have asked for it but the logistics of the trip (discussed later) and the fact that for many asking it is a “tick in a box” location means that the time could be better spent elsewhere.


Day 1: Arrival

As mentioned above the first day is for inbound guests to arrive off international flights, rest up after what would have been a restless sleep on the plane and meet each other and the workshop leaders. There are a couple of ways to get to the international airport in Namibia’s capital Windhoek and I chose to fly via Johannesburg. I must admit to not really having thought about the flights as best I should have: Had I done so I would have realised that buying the London to Johannesburg and Johannesburg to Windhoek flights separately (to save money) meant that I needed to clear immigration and customs and collect my luggage in Johannesburg in order to check in for the second flight. Having only allowed two hours between landing and the next flight – which would have been fine as a transit passenger – was worryingly tight.

Arrival in Windhoek was probably the only major issue I encountered on the trip and I’m still debating where the blame should lie. Upon entry non-Namibian nationals need to fill out an immigration card with the usual details, including an address at which you’ll be staying. The problem is: I hadn’t been given one. The only instruction I had was to look for a person carrying a Nature’s Light placard once I had cleared immigration and customs. The immigration officer wasn’t going to be helpful either, flatly refusing to point me in the direction of who to talk to about this and eventually refusing to return my passport to me. I did have Emil’s (South African) mobile number but that wasn’t working as he was about 60 metres away on the other side of Namibian immigration waiting for me.

In the end it was only the fact that another immigration officer read the introduction email I had been sent and, realising that I may be telling the truth, told me to go through (without my passport) to get the address. It was a lot of unnecessary stress.

So who is to blame for this? Well, to be fair I should have known better. I travel a lot and had I paid more attention I would have picked up on not having an accommodation address before I travelled. But not everyone travels as much as I do and so I have to say that this should have been communicated by Nature’s Light ahead of the trip.

Once we arrived at the Ondekaremba Lodge there was time to relax and freshen up before dinner. On this expedition there were only two guests; myself and a Croatian named Romeo. Because of this there was only one Nature’s Light photographer, Emil and due to the rather small group we were in a single 4WD, with plenty of room and, as I discovered as the trip went on, all the benefits of small group travel.

We also discovered what was to become a constant when staying at various locations throughout the country: Wi-fi that didn’t really work too well. Not that it bothered me all that much as it was quite nice to be ‘off the grid’ but if you’re planning on staying in contact with folks back home, you may want to consider a local SIM card on the MTC network – you’ll get the chance to buy this tomorrow.

Day 2: Windhoek to Keetmanshoop and the Quiver Tree Forest

The start of the 12 day workshop proper and a day with an awful lot of driving – just under 500 kilometres. The aim was to travel south from Windhoek and get to Keetmanshoop by late afternoon so we could be at our first location for sunset.

After breakfast there is a stop in town to visit an ATM/bank to exchange money, pick up groceries and for those interested, a SIM card for the local network. It is worth getting the SIM as it does not cost too much and will without question be cheaper than any roaming plan you may have. The SIM I opted for had 30 minutes of international calls and 500MB of data for something like US$10.

Driving days are inevitable on trips like this and the usual aim is to complete the journey with as little delay as possible. That said, put three photographers in a car travelling through a changing landscape and you’re bound to make several random stops to photograph something interesting. The only main stop was for lunch at a Wimpy roadside cafe. In the past I have noticed that people can be a bit funny about things like lunch venue but my view on these trips is that I’m not there to waste time in restaurants; as long as the food is reasonably tasty – and all the places we stopped at served a good selection of food – then the less time we spent eating meant the more time we would spend shooting. You’re also experiencing more of daily life in Namibia than you would in an actual restaurant.

We arrived at the Mesosaurus Fossil Site near Keetmanshoop and checked in to the lodge – home for the next two nights. After unloading our kit into the rooms we were back out and heading towards the first location of the trip, the Quiver Tree forest. I wrote a small piece on the forest and whilst it isn’t a forest in the traditional sense, the trees (which aren’t technically trees) are striking and so I could see why there were four separate shoots planned here. Also, I usually take a couple of shoots to get into the swing of things so having several shoots meant I could treat this first one more as a “warm up” session. After sunset we returned to the lodge for dinner – homemade food from the local farm – which was very tasty before heading back out for the first of the astrophotography shoots.

I have never really tried astrophotography before so this was one part of the workshop that I was quite interested in. I had emailed Emil before the trip to ask if we covered everything we needed to know and the simple answer is yes; despite having no real knowledge of how to capture astrophotography images before the workshop, I left with the knowledge and skills required to capture and process my own images. I wrote a more detailed piece on this, but the image below is taken from this very first evening session on the workshop.

16mm, f/2.8, 20 seconds, ISO 3200.

16mm, f/2.8, 20 seconds, ISO 3200.

I think that the astrophotography part of the workshop highlights a couple of important aspects of the trip. First, through the repetitive process of shooting images for astrophotography and then post-processing them, by the end of the two weeks I had a good basic understanding on the process and one that I have subsequently been able to replicate on my own. In other words the workshop has taught me a skill that I will be able to use on every trip I take from now on and to me, that is very valuable. The second aspect is that, up until this trip, I steered clear of using Photoshop as I really didn’t understand it. The post-processing sessions we had throughout the trip have helped me become more familiar with how Photoshop can help me produce an image that is in line with my vision. In fact, the image above is a case-in-point: It was actually taken as a test shot for a star trail time-lapse that we were looking at. Through using Photoshop’s masks and layers I’ve been able to turn the test shot into a very presentable image. So, the workshop has also given me familiarity with Photoshop.

After the shoot we headed back to the lodge to freshen up, transfer images onto backup storage and sleep. Tomorrow will be the first pre-dawn start.


Day 3: Quiver Tree Forest

4:45AM is not my favourite time of day – any time pre-coffee is eyed with disdain – but we wanted to be in the forest before dawn and one of the nice things about being out of season was that we would likely have the place to ourselves, which we did. We spent the early morning shooting the trees and sunrise and Emil was on hand to give advice. By 8AM the sun was getting hot and the light was becoming increasingly harsh so we finished up and headed back to the 4WD for coffee in the shade of a communal weaver bird nest, an experience only slightly diminished by the knowledge that there are likely several snakes in the nest too.

Examining a social weaver nest over coffee.

Examining a social weaver nest over coffee.

For those days not spending travelling the third day exemplifies the general structure of the workshop: a dawn shoot, coffee on site before heading back for breakfast, lessons/processing/sleep with lunch at some point, then out again for a sunset/night shoot.

Back at the lodge with breakfast out of the way we sat down for the only structured lesson of the workshop – a slideshow on frame, elements and relationships. It is not something new to me, having read this in many other places, and I’m guessing that anyone looking to attend a photographic workshop will have seen similar articles too. Of course a reminder of these aspects is always good – especially as I have difficulty in putting them into practice – but I do wish that I will one day find someone who covers “why photographs fail” – for example, show a scene shot in different ways and then explain why the ones that fail, well, fail.

But the slideshow did show one thing: if there were ever a question about Emil’s credentials to run a landscape workshop, it disappeared with the images shown then. I’ll come back to this at the end of the review but nothing in the marketing information shows this side of Emil’s work.

Like many places throughout the country the lodge is at least partially dependent upon solar energy and here power and hot water is provided by a solar array. Being out of season, we pretty much had the place to ourselves but still managed to overload the batteries of the array with three MacBooks connected to it. So, as always, have plenty of spare batteries. I took along my Voltaic solar charger as a backup.

After an hour-long snooze we headed back out to the forest – the same place as the morning but different to the previous day. The aim was to spend the sunset hours shooting, eat a light meal on site and then continue with some astrophotography.

The Quiver Tree forest is just dense enough to make subject isolation tricky…

The Quiver Tree forest is just dense enough to make subject isolation tricky…

I made the decision to head off by myself and see if I could improve on yesterday’s lacklustre start and I appreciated the fact that I could do so. In fact the only inconvenience I could have faced is that, had I wanted Emil to look over a composition or a shot I had taken, it would have meant a bit of trek to the other part of the forest.

One thing to be aware of in Namibia is that, despite your very best efforts, you will get sensor dust. Namibia is a very, very dusty country and so you should just assume that it will happen to you. The question is really what you do about it. The answer, of course, is clean your sensors and luckily having shot multiple times in these conditions Emil knew how to clean the sensors and had the kit with him. Back in the UK, a full frame sensor clean from a reputable dealer can cost around £100 by the time you factor in shipping and so having this service performed as needed was a bit of a boon. But, never being one to take a back seat, Emil was happy to show me how to clean my own sensors. Another skill that I can use whenever required which, aside from saving me a lot of money, more importantly means that I can clean sensors whilst on location. Never having been on another workshop I do not know if sensor cleaning lessons are a common thing, but I suspect not.

Dinner on location whilst waiting for sunset to become night…

Dinner on location whilst waiting for sunset to become night…

After sunset we waited by the 4WD as the sun fell far below the horizon and the sky darkened to reveal the canopy of stars. If you’ve never been to a region free of light pollution then the African night sky will be a bit of a shock. It is, simply, magical and if you’re looking at learning astrophotography then you’re in the right place. Another nice thing about out-of-season Namibia is that with no people around for miles it is perfectly safe to set up your cameras and walk off, so after setting up one camera each to take the necessary shots for a time-lapse, we headed back to the 4WD with the aim of using the other cameras to shoot some standard astrophotography. Unfortunately we took the scenic route (OK, we got lost!) and spent an hour trying to get our bearings by which time the time-lapse had finished. In the end we only had enough time to capture a couple of standards shots which doesn’t sound like much but bear in mind that each ‘standard’ shot required three 240 second exposures and an addition 30 second exposure – basically around 15 minutes each. Then it was back to the lodge for the end-of-day image backup, showers and to pack the contents of our international luggage into big plastic boxes so that we could put clothing on the 4WD roof giving room for the camera gear to go in the 4WD. Make sure that you have a big dry bag (or similar) to put your items in as, starting tomorrow, things will get really dusty.


Day 4: Keetmanshoop to Seeheim via Fish River Canyon

Another pre-5AM start for a dawn shoot at a third location in the Quiver tree forest followed by coffee and breakfast back at the lodge. After breakfast we were driving to Fish River Canyon which isn’t a particularly long drive – approximately 125 kilometres – but it did introduce us to the more common type of road surface in Namibia: crushed rock.

Other than a stop for lunch at an American-style roadside diner – complete with American sized portions – we didn’t hang around and made good time arriving early afternoon.

I can see why Fish River Canyon is the one location that may not make it into future workshops. Without doubt the canyon is impressive and a quick look at the Wikipedia article shows that there is a popular 90 kilometre hiking trail and a yearly ultra marathon that attracts visitors to the canyon floor. Speaking of which, the high canyon walls must mean that there is some impressive light and shadow down there – not that you’ll get to see it. Due to the high risk of flash floods (and no way to get out quickly) the trails down to the canyon floor are closed between September and April and although you could ignore the signs and get down, no responsible workshop is going to ignore official warnings.

As impressive as Fish River Canyon is, it will be the light that matters…

Fish River Canyon is definitely impressive, but it will be the light down in the canyon that matters…

Being confined to the top where the light is harsh leads to somewhat flat images and aside from the option to zoom in and focus on details you’d probably have a tough time producing something for the portfolio. Still we spent a couple of hours at a few places and grabbed a couple of shots that could potentially make it into a stock library.

We had passed the hotel on the way to the canyon and so had to drive back the same way we had come. On the way back we stopped at a tree we had spotted on the drive to the canyon, a lone tree in the middle of nowhere and we spent a pleasant half hour or so attempting to get an interesting composition out of it. It was here that we were introduced to the concept of focus stacking, something I had heard about about but never really paid much attention to (as Photoshop was involved), which essentially involves taking a series of shots of the same scene only varying the point of focus. These shots can be combined in Photoshop later to produce pin-sharp images from foreground to infinity. It is worth mentioning that we tried focus stacks a few times throughout the trip but I have since found that none have really worked out for me as the lens I used suffers from focus breathing. So if you are going to try this technique it could be worth testing to see if your lens suffers from focus breathing too as it is a pain to correct – if you can at all – later on.

By the end of the trip tress were being described using adjectives such as ‘attractive’. A ‘sexy’ may have even slipped out once…

By the end of the trip trees were being described using adjectives such as ‘attractive’. A ‘sexy’ may have even slipped out once…

The evening was a leisurely affair at the Seeheim hotel which is about the only remaining structure in the town and a curiously cobbled-together place reminding me of an Escher drawing. The bar is curious in itself looking like a colonial retreat complete with stuffed and mounted animal heads. But the highlight of the evening was a waitress whose humour was drier than the surrounding desert and whose sarcasm was delivered in such a deadpan fashion that you didn’t know whether it really was sarcasm or her simply speaking her mind. Even Romeo, who had hitherto been the master of dry wit, was impressed.


In part two, we continue the trip and look at the wonderfully photogenic Kolmanskop, a perfect film set for a horror movie!

Posted in Review Tagged , , , , , |

Kung Fu

There is a scene in the 1999 film The Matrix in which the protagonist Neo awakens from a virtual reality training session and states, simply “I know Kung fu”. It is an important moment as it is the point where the character understands that he can control the World around him and is the catalyst for his growth.

Thanks to Emil von Maltitz, lead photographer on the recent Nature’s Light “Composing the Dunes” Namibian workshop, I too can say: I know Kung fu. At least of the photographic variety.

The review of that trip is being written so I’m not going to talk about it here in detail but my hopes for it were simple: That they show me show great photographic locations and that I could photograph them without people getting in the way. I had no expectations other than that.

It is worth mentioning that I primarily use Adobe Lightroom for cataloguing and image processing as I find it simple and it has all the features I need to post process images without having too many to be cluttered. I have used Photoshop in the past – and have it as part of the Adobe Creative Cloud package – but I’ve never really liked it due to its complexity and over-engineering for my needs. If truth be told, I knew the Photoshop could do some clever things but even with online videos and tutorials I always struggled to use it – so much so that I simply avoided it.

I’ve also never tried astrophotography before. Well, I made an attempt in Iceland earlier this year, but the results were decidedly underwhelming. I knew from the itinerary that the Nature’s Light workshop made a bit of a feature of astrophotography and was keen to try it, but didn’t have high hopes as it would be my first real attempt.

In short, the best I could have hoped for a month ago was this:

Despite the eye-catching sky in the past this image would have not made first pick as I lacked the skill to process it.

Despite the eye-catching sky in the past this image would have not made first pick as I lacked the skill to process it.

A quick glance and it all looks reasonable. As you can see the stars, well, look like stars, the Milky Way is distinct and the Large and Small Magellanic Clouds look suitably like galaxies. In fact, if this image were only to be looked at on a phone display or even a tablet then the image looks perfectly fine.

The problems become apparent when you zoom in and look at the foreground. In the 100% crop of the image below we can see the graininess of the tree trunks, the dried earth ground and the sand dunes behind.

ISO 6400. The noise present in the foreground is obvious. Dropping to a lower ISO, say 3200, would improve this require a longer exposure, blurring the stars.

At ISO 6400 the noise present in the foreground is obvious. Dropping to a lower ISO, say 3200, would improve this but also require a longer exposure, blurring the stars.

In the past my only option would have been to use Imagenomic’s Noiseware plugin so let’s see if that helps.

Noise can be removed via tools, but they remove detail too leaving an unnatural smoothness.

Noise can be removed via tools, but they remove detail too leaving an unnatural smoothness.

The noise has definitely gone but so too has all the detail. Unnatural and, again, unprintable. Of course I could drop the ISO speed to something more sensible, say ISO 400, and then compensate for the lower sensitivity to light by increasing the exposure time.

Showing the shutter to 240 seconds and lowering the ISO gives us low noise detail.

Showing the shutter to 240 seconds and lowering the ISO gives us low noise detail.

That’s much better! Very little noise and lots of detail. But with a four minute exposure the stars, well, they’re not stars anymore – they’re streaks!

This image looks unusable but the foreground is low noise and detailed.

This image looks unusable but the foreground is low noise and detailed.

The answer is course simple: Take two images – one high ISO, short exposure for the stars and one low ISO, long exposure for the foreground – and merge them together using the masks feature of Photoshop. The issue is how do you create an accurate mask that separates the foreground from the sky when the trees are such an irregular shape. The lasso tool would be one option but it’d be a real pain to build a mask with additive lasso selections. You could manually create a mask using the brush tool and white and black ink, but that would take ages and never be truly accurate. And just to highlight a point I made above: I didn’t know Photoshop a month ago – I didn’t know that selections could be additive, I didn’t know how the different lasso tools worked. In other words I would have been stuck with an uninspiring image of a stunning location.

The Kung Fu

What Emil and the workshop gave me is two things. The first is an idea of how to photograph a scene for astrophotography – and the number of shots needed. The second is how to compile these individual images into the final shot.

Once you know the process it is easy to capture the individual images needed, of which there are actually four. The exact settings will vary depending upon location and the brightness of objects in the sky and foreground but as a starting point:

  1. An ISO 3200 (or ISO 6400), 20-30 second image at f/4 for the stars.
  2. An ISO 400, 240 second image at f/4 for the foreground with no light painting.
  3. An ISO 400, 240 second image at f/4 for the foreground with the trees painted by a torch.
  4. An ISO 400, 240 second image at f/4 with the lens cap on.

Of these four images, (1) and (3) appear in the final result and (2) and (4) are there to help build the final image. Image 1 is, as mentioned, taken to capture the stars as pin-pricks. Image 3 is the ‘foreground interest’ shot: low noise and good detail with some light painting to pull the eyes to aspects on the image and make it less flat. Image 2 is essentially the same as image 3 but not lit so that the foreground is dark to separate it from the sky. You could perhaps use image 2, but the light painting would bring the brightness of the foreground up to that of the stars which would hamper the next step. Image 4 – the one of the lens cap – is a dark frame. Any camera sensor running a long exposure will produce pixel glitches usually as coloured pixels. The dark frame captures just these glitches and can be used to remove them from the final result through subtractive masking.

The Kung fu that stitches these separate images together into the final result is Photoshop’s luminosity masks. Luminosity masks are difficult for me to explain simply as I don’t fully understand them, but in essence they allow you to create a mask not based on a shape (like the brush tool or lasso tool would) but on the brightness (or darkness) of the image. This is where image (2) is useful; the sky is bright due to the stars, but the foreground is dark. Here’s an example luminosity mask that is looking at the darkest parts of the image:

luminosity mask 1 1600px

It is perhaps counter-intuitive but white shows the dark bits here simply because white shows the selection we are making and the selection in this case is the dark components of the image. Because image (2) purposely had no lighting on the foreground, it is in darkness and so it is added to the mask, but so too are parts of the sky because they are dark too. The mask is too detailed but it is easy to fix; once created a combination of a curves adjustment, the paint bucket tool and the brush tool allowed me to create a simpler – and more useful mask.

luminosity mask 2 1600px

I wanted the sky from one image and the foreground from another and I now have a very accurate mask that makes a distinction between the two. It is a simple procedure to load the images (1) and (3) as layers in Photoshop and apply the mask to image (3). Voilà – pin-prick stars and low noise, detailed foreground.

Once you understand luminosity masks, everything becomes possible. Want to brighten just the stars? Create a ‘brights’ luminosity mask? Want to make the night sky cooler, more blue? Invert the foreground mask we created and apply it to a blue photo filter. The result?

The final result. almost. Despite all the apparent Photoshop trickery, this is what my eyes were seeing on the night.

The final result. almost. Despite all the apparent Photoshop trickery, this is what my eyes were seeing on the night.

What impresses me most as I write this article is that, less than a month ago, I would have had no idea about any of the steps mentioned. I avoided Photoshop as I did not understand it, barely understanding the concept of layers and masks, but certainly not enough to use them properly. Could I have learnt this online? Maybe. I have tried in the past, but I don’t learn by listening; I learn by asking and doing. Now I know how to shoot the raw images and how to merge them into a single vision.

So, like Neo I now see that I can control the (photographic) World around me. It is a new skill and one with plenty of room to improve and develop. It’ll be a long road.

But isn’t that the fun part?


Posted in Frame by Frame, Process Tagged , , , , |