Monthly Archives: August 2013

Prometheus’ Engineer, Moby Dick and I.

With a long weekend here in the UK there’s been some time to look into some of the specifics for the Iceland road trip. Over the past few weeks I’ve spent a lot of time reading blogs on the Internet, seeing what people recommend, what problems they encountered and what hidden gems they found that might not be in the usual travel guides. Many hours of reading and note taking with Evernote has resulted in a lot of information that now has to be sorted into some kind of plan.

One of the nice things about urban photography is the your options are necessarily limited. Opening times dictate when you can get interior shots, built up areas dictate the angles you can shoot from and in metropolitan areas the times that see the highest population movements – rush hour – dictate at what times you can shoot if you want to capture a specific interaction between people and architecture. Another nice thing about urban photography is that things are usually quite close together.

Not so on a road trip. Of course it shouldn’t have come as a surprise to me – after all I’m circumnavigating a country – but it’s the little things that soon add up.

One of the places I’m off to is Dettifoss, a waterfall in the north-eastern part of Iceland. If you’ve seen the film Prometheus, its the one at the beginning of the film. Many sources state that it’s Europe’s largest waterfall (in volume of water, not height or width) and so for those who venture out of the capital Reykjavik it’s usually high up on the ‘Top 10’ list. Researching this apparently simple destination started out as straightforward, soon became confusing and finally ended up as my own personal Moby Dick. And here’s why.

Using Google very quickly showed that Dettifoss sits, roughly equidistant, between the self-drive tourist’s dream road, route 1 and the north-eastern spur, route 85. I already have plans to stay for a couple of nights just off route 85 and so it is a simple decision: wake up, check out head east of route 85 until the turning for Dettifoss. As it turns out, there are two roads leading to Dettifoss and that is where it all started to get complex.

Iceland has a three-tier road structure. In Reykjavik and other population centres they’re tarmac surfaces. This is also true of arterial roads such as route 1. The second tier are gravel roads – usually less frequently travelled roads although parts of route 1 are still gravel. Then there’s the F, or mountain roads. Perhaps less ‘road’ and more ‘track’ these are impassable during the winter months and suitable only for 4×4 vehicles the rest of the time. Many of the wonders of Iceland’s interior are only accessible via F roads.

So, going back to Dettifoss. The two roads take you to the east and west banks and the bank you are standing on radically changes the view and the feel you will get. My first thought was “Duh! Just shoot from both banks” but this then highlighted the other issue when travelling through Iceland: There’s never a convenient bridge when you need one. With Dettifoss, to get from one bank to the other – a linear distance of approximately 120 metres, involves a 65km detour.


Dettifoss has two banks, each with a different photographic feel.

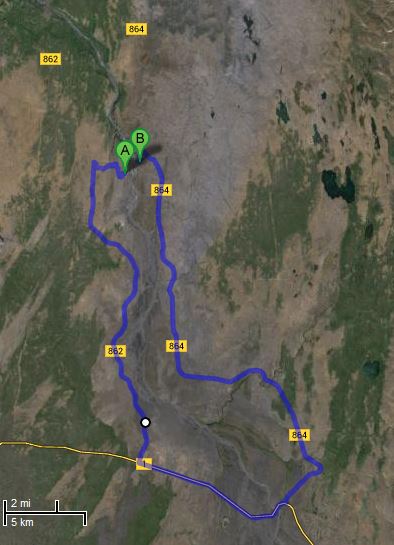
It may be only 120 metres from the east bank to the west, but it takes a 65km journey to get there…

Things became confusing when I started to look at the roads themselves, something you need to do if you’re not in a 4×4. Originally the road leading to the west bank was classified as the F862 denoting it as unsuitable for non 4×4 vehicles. As a result the east road – the 864 – became the road of choice. It was still a track, but in much better shape than the F862. Then in 2010 the F862 was replaced with a paved route and it became simply the 862, instantly making it the better route to travel. As I read around on the Internet and at people’s experiences it was frequently not clear as to which version of the 864 they were referring as dates were missing, or they were writing after 2010 about a ‘previous’ trip etc.

After a few hours of searching around on the Internet in frustration I dropped an email over to Peter of the Iceland blog site Iceland24 (iceland24.blogspot.co.uk) asking him if he could clarify the current status of roads (F)862 and 864. I was impressed when, shortly over an hour later, a reply came back. I was seriously impressed when the reply was that there would be an article on the website dedicated to visiting Dettifoss – within the hour! Which there was. Looking around Iceland24 reveals a good amount of information for the visitor and Peter seems to be very approachable.

As mentioned above the other factor is the type of shot you want to get. If you are after the ‘Prometheus shot’ where the falls recess away into the frame, then you want the east bank. As the film shows, the east bank is a barren, rocky expanse and you get a clear view of the falls and, unobscured by mist, of the west bank, a green carpet of moss and plant life  But, from the west bank, you have a completely different experience; the falls are face on to you dominating the frame with a wall of water. There’s plenty of mist in the air too and you’ll likely need lens wipes if you want a clear shot of the barren east bank.

If that were not enough to be contending with I also want to hike the kilometre or so up to Selfoss, a wide waterfall upstream of Dettifoss. But again, which bank would give the best shots?

And, of course, which bank is best for a dawn or dusk shot?

At some point over the past two days, it has become a mission and, much like Ahab’s quest of revenge on Moby Dick, I must work out the perfect combination of which bank at which time for which shot. I think I’m almost there…

Posted in Travel, Trip Planning Tagged , , , , |

Iceland 2013 Custom Itinerary

The itinerary for the forthcoming trip to Iceland is now pretty much decided, in as far as I now know where I’ll be staying and for how long. During the early stages of planning for the trip I accepted that it was going to be expensive and so made a mental note to not under allocate time. Of course, I don’t know yet if I have erred the other way and over allocated time at each spot, but I suspect not.  I have also taken the step of allowing a full day for travel between each base camp. In some cases the actual travel time between each camp is only a couple of hours, but I’ve read that there is always something along the way to see and anyway, it’s a holiday – I’m meant to be taking it easy!

I know many of you will have Iceland on your agenda too and so I thought I’d share my itinerary and why I picked the stops and durations. Of course, the important bit will be the post-trip report but, right now, the itinerary looks like this:

Day 1

Arrive in Reykjavik. Check in and then a leisurely evening looking around the city.

Days 2-4

Reykjavik. There’s some wonderful architecture and sculpture in the city. It’s also a convenient starting point for the Blue Lagoon as well as the popular ‘Golden Circle’ daytrip that covers the tourist magnets of Geysir, Pingvellir and the waterfall Gullfoss.

Day 5

Travel to Vik. It’s a 185Km journey that should take between two and three hours, but there’s plenty to see along the way. It will also be the first day of driving in Iceland and the 4×4 so it seems a good chance to take it easy and get to know the roads and car.

Days 6-8

Based in Vik. From here, there’s easy access to the waterfalls of Skogafoss, Seljalandfoss, Glufrafoss, and the Southern Fjallaback Nature Reserve, as well as being right on the doorstep for a very photogenic black ash beach. There’s also a downed aircraft not too far away that could prove an interesting subject.

Day 9

Travel to Jokulsarlon. Much as the first travel day, Vik to Jokulsarlon is a 185Km journey so should provide ample stopping and exploring time.

Days 10-12

Based in Jokulsarlon. Jokulsarlon is an enormously popular stop as it is famous for the glacial lake where icebergs calve off Vatnajokull, Europe’s largest glacier and drift off into the Atlantic Ocean. But it is also conveniently located for the less well-known Fjallsarlon and Svartifoss.

Day 13

Travel to Thorshofn. This is a more substantial 415Km journey and likely to take six to seven hours. So, still some time to explore, but I’ll have to watch the clock.

Day 14

Around Thorshofn. I actually picked this destination based on a single photograph I have seen, but there are some great costal shots as well as more general landscapes.

Day 15

Travel to Akureyri. A 250Km, three hour journey. I’ll be passing by Dettifoss, Europe’s largest waterfall and Myvatn, a very picturesque lake area.

Day 16 – 17

Around Akureyri and Myvatn. I’m not so interested in Iceland’s second  ‘city’ but more so in some of the surrounding landscapes. I’ll have time to head back to Myvatn, but also head west of the town along the northern coast.

Day 18

Return to Reykjavik. 384Km and five hours of driving again means that I’m not going to have too much time for detours before returning the rental 4×4 at 4PM.

Day 19

AM relaxing in Reykjavik then PM flight home. It will be my birthday and so I may treat myself to a nice soak in the Blue Lagoon.

Posted in Travel, Trip Planning Tagged , , , |

Site Update

Just to let people know that over the next couple of days there will be some minor changes to the web site as I play around with the social media and comments options.

All the galleries should be unaffected.

Posted in Site News

Keeping Warm in Antarctica: What and How Much to Take…

With the start of August comes the point of no return for those lucky enough to be heading for Antarctica this season. Most expedition operators require the final balance to be paid three months before the expedition and as the season opens in November, those who haven’t already paid the remaining balance will be making plans to do so now.

Once you’ve committed all that money at some point you’ll need to turn your mind to some of the other logistics such as how to travel between the international and domestic airports in Buenos Aires, differences in baggage allowances between different airlines and so on. However, at some point the same question is likely to crop up: Just what does a fashionable Antarctic-bound traveller wear this season?

Zodiac propellers break several times a season due to ice. When they do and you're on-board, being warm can be quite nice...

Zodiac propellers break several times a season due to ice. When they do and you’re on-board, being warm can be quite nice…

Keeping warm and dry is such an obvious requirement that I don’t see many people talking about it which can be a bit frustrating if you’ve just spent upwards of GBP £5000 on a trip and are not sure what or how much to prepare. Mention Antarctica and most people will reasonably imagine blizzards, breath that freezes as you exhale and the kind of cold that results in frostbite if skin is left exposed more than a few seconds. Which is all true, of course – just not when and where you’ll be going. First of all, expeditions only run from late Spring to late Summer when the sea ice surrounding the continent has melted sufficiently for an approach to be made. Second, even on the ‘Below the Antarctic Circle’ trips, you’re not really venturing that far onto the continent itself. In fact, look on a map of Antarctica and you may be forgiven for feeling a little let down. Don’t be – it’s stunning. In fact, were you to venture inland, without very specialist equipment and a lot of physical and mental expertise you really would end up a permanent resident. But, up on the Antarctic Peninsula, expect daily temperatures in the range of about -5C to +2C. This might be an inconvenient fact that you want to omit when telling friends of your Ranulph Fiennes-like exploration of Terra Incognita, but it does at least lend some reassurance as to not having to spend another vast sum of money on specialist clothing.

OK, your expedition leader is trained to ensure you don't join these unfortunate souls on Deception Island, but being cold can really ruin your experience...

Your expedition leader is trained to ensure you don’t join these unfortunate souls on Deception Island, but being cold can really ruin your experience…

That’s not to say that you shouldn’t prepare. I didn’t want to be so cold that I hated the thought of venturing off the ship. Indeed, one of the other travellers on the trip I made was so visibly cold on one Zodiac cruise that we had to return to the ship to let him off. That would have both annoyed and depressed me had I been him as for me, like many others travelling to Antarctica, it is a one-time journey and missing out on any of it would be awful.

I spent ages reading blogs and travel sites looking for clues on the ideal wardrobe to take. It was all a bit frustrating really as many sites talked about following the layered approach to clothing, but none really got specific. For example, using base layers rich in merino wool seemed a consistently popular suggestion, but with prices ranging from GBP £35 to GBP £150 per garment, it didn’t narrow down the options much. I could go ‘cheap’ and risk the garments being not warm enough, or I could go expensive’ at the risk of needing a second mortgage. What I needed was a nice summary of items that someone on a budget had used when in Antarctic, how they had used them and what they thought of their effectiveness. That would have helped me a lot.

With the benefit of hindsight, you don’t have to go mad; many people wear ski clothing – which is fundamentally designed for a cold weather climate – and they do just fine. Others, like myself, checked out reviews on Amazon on clothing and asked friends who have an outdoorsy life if they could recommend items based on experience. So, here is the type of article that would have helped me this time last year when beginning to look for clothing.

The Outer Layers

These are designed with one purpose; to keep the rain and wind off you. They will not keep you warm. That is important as most expedition operators will offer (sometimes free) a hire of a outer jacket and trousers. Take the offer, but remember you’ll still need the mid- and base layers.

  • Berghaus Gortex Jacket – I’ve had this jacket for almost twenty years and it’s been everywhere with me. It, and the equivalents from North Face and the like will be perfectly fine, but if you do not have one do not worry as the one offered by the expedition operator was perfectly fine and no one had any complaints of them.
  • Thinsulate Beanie Hat – invaluable for warmth when under the jacket hood, especially on the Zodiac journeys.
  • Outdoor Research Meteor Mitts – wonderful photographer gloves. In essence these are an outer layer and a mid layer in a set. As the name suggests, these are mitts as opposed to gloves which has the benefit of allowing your fingers to stay together for warmth. In situations where wind or rain could be an issue, such as the Zodiac journeys to and from landing sites, I’d keep the outer water- and windproof layer on. Other than this I’d take the outer layer off. The beauty of these mitts for photographers is that the finger and thumb sections of the fleece mid layer fold back revealing the top half of your digits and allowing you to operate fiddly camera settings. I also wore merino wool glove liners so my fingers were never totally exposed. This combination allowed me to keep shooting for hours with no discomfort. There’s even a pouch on the mitt for a chemical heat sachet such as the Little Hotties brand. I love these gloves, but had to buy them on eBay as, at the time, there were no UK distributors.
  • Insulated Gum Boots – provided by the expedition operator. Others had their own boots, and for those who went skiing , ski boots were an option. I just took the standard, free offering was toasty warm when combined with my mid and base layers.
  • Waterproof Salopettes – provided by the expedition operator. I did actually purchase a pair of waterproof trousers prior to the trip, but the provided ones were really quite good and so my pair never got used.

I would just re-iterate the need keeping your head warm as much as everything else. Woollen ski hats were worn by many and they were just fine. Again, the weather conditions will be similar to the average ski resort, just you’ll be travelling on the sea several times a day.


The Mid Layers

These add additional warmth control to the base layers and usually come with a zip to allow control over how much heat escapes. Mid layers are (usually) worn as a single item on each part of the body. If you’re worried about keeping warm, just double up on the base layers in the next section.

  • Berghaus Polartec 100 Fleece – Most fleeces you’ll find in this category are pretty much similar and so I bought one could zip into my outer layer effectively creating a dual-layer item. I never used it this way as I’d keep the fleece on when on-board. So, any decent fleece will do, just not one designed more for fashion than function.
  • Jeans – Yep, normal jeans. To be honest, so good were the base layers and the provided waterproof outer layer that when out-and-about off the ship I didn’t bother with these on excursions and simply wore two base layers and the salopettes and changed out of the salopettes into jeans upon my return to the ship.


The Base Layers

These are designed to provide basic warmth and to quickly wick sweat away from the body before it can cool down and cause problems. In truth I doubt you’ll be sweating much in Antarctica – aside from the coolness of the climate, you don’t really exert yourself too much.

  • 2 Endura BaaBaa Merino Base Layer – recommended by an mountain biking fanatic at work with the added attraction the these merino wool tops come in on the lower end of the price scale (around GBP £40 at the time). They did a fine job of keeping my upper body warm. In fairness I usually wore one of these Endura base layers, with the Tog 24 zipped top as an additional base layer. How may you wear will depend on how easily you feel the cold.
  • 2 Tog 24 Arctic Zip Neck Base Layer – Costing about GBP £10 each on Amazon and quite well rated I purchased these to wear when the merino wool tops needed to be washed. In the end I wore them on top just to add warmth. This way I was able to lie motionless for thirty minute or so on ice and snow with no discomfort. So that has to be a recommendation!
  • 2 Trekmates Merino Long Johns – Wore both pairs at once and never felt cold – sometimes cool maybe – but not cold.
  • 2 EDZ Merino Liner Gloves – These are thin gloves that work really well under bigger, bulkier gloves. For me they were bought to keep the chill off my fingers when photographing and coupled with the fold-back OR Meteor Mitts above they did a really good job.
  • 4 Sealskinz Thermal Liner Socks – I wore these merino wool socks under the walking socks below and did they keep the provided gumboots fitting comfortably, they kept me toasty.
  • 4 Kirkland Merino Wool Blend Walking Socks – At GBP £20 for four pairs these border on sounding too cheap to be any good – certainly compared to the prices I’ve seen in outdoor sporting goods stores. Obviously, a two week trip is not going to test their build quality, but from the warmth perspective, they did just fine.
  • Sub Zero Meraklon Thermal Neck Tube – This was much appreciated on some of the Zodiac cruises as it allowed me to my neck warm and added another layer below my beanie. I could have lived without this, but it wasn’t expensive and certainly didn’t make me uncomfortable.

The other issue I had was just how much clothing to take. The average Antarctic voyage is between 10 and 14 days and so I started with the notion of a change of clothes for each day. This idea very quickly disappeared when I adding up the cost. Luckily all the ships have an on-board laundry and so you can quite easily get items washed with a good turnaround time – on the Akademik Ioffe it was under a day, but larger vessels may take slightly longer.

The idea of taking less clothing will appear even more when you look into the practicalities of travelling down to Ushuaia – namely that the domestic airlines that carry you between Buenos Aires and Ushuaia (where you board the ship) officially has a 15Kg per person baggage allowance. They often waive that, but be prepared to have to pay extra.

Don't worry, you don't eat outside every night, but you simply cannot go to Antarctica and not have a BBQ...

Don’t worry, you don’t eat outside every night, but you simply cannot go to Antarctica and not have a BBQ…

At this point, it’s worth mentioning that one of the benefits of natural fibres such as merino wool is that they’re very good at avoiding odours and this, coupled with the fact that I didn’t sweat when out and about meant that I could wear the same layers two or three times with no issue whatsoever. With a typical voyage to Antarctica of 12 days, this option, coupled with the on-board laundry, means that you can get away with three outfits. If you are in the same situation that I was and have no suitable clothing, the thought of only having to buy three outfits really is appealing.

I do hope that the above helps someone looking to travel to Antarctica, or maybe the Arctic, and who is trying to work out what and how much clothing they need to take. If you have ski clothing already then that’ll be fine, but if you do not, the above is field-tested by me 🙂

PS: If you are going, when you are given the chance to send postcards home, send one to yourself. You’ll regret it if you don’t!

Posted in Hints and Tips, Travel, Trip Planning Tagged , , , , |

Gearing Up for Iceland #2

One of the plans for the Iceland trip is to spend more time at the extremes of the day – dawn and dusk. I’m used to dusk photography and ‘blue hour’ photography – so-called due to the colour of the sky between full daylight and the total black of night – has been something that I have captured on every trip I’ve made.  But, to be honest, I’m no fan of early starts.

However, I’m going to make an effort on the trip and that leads me to a new consideration: In order to get to a location to take photographs at dawn, I have to leave wherever I am staying pre-dawn. Aside from the unholy thought of that, it’s going to be dark. Very dark. I’m going to be away from population centres and much of Iceland’s beauty stems from the almost total lack of invasive civilisation and so any pre-dawn activity is going to require some kind of illumination.

After an experience in the Falkland Islands in 2010 getting a torch was a must. I was out on Cape Pembroke – a peninsula on East Falkland – at the long since retired lighthouse. The lighthouse is not too far outside of the capital Stanley – around five kilometres – but it is uneven, boggy ground with no roads or paths and so I had a local 4×4 taxi drop me off with specific instructions on how to head back; “Head for the radio antenna and when you get there head right until you find the path.” Simple.  Anyway, it began to get dark and so I started to head back whilst I could still see the antenna. Then I got totally side-tracked by a stunning sunset. For half an hour. By which time it was dark – the kind of stormy night, cloud covered with no lighting for miles, dark. So there I was on a peninsula in the middle of winter on one of the southern most points of land in the World in the dark. The only thing separating me from the warm comfort of the hotel was several kilometres of boggy, uneven, ankle-twisting ground. In the dark. And it was at that point that I decided it would have been really nice to have a torch.


Getting distracted by an amazing sunset is easy. It's what happens next than can be a problem....

Getting distracted by an amazing sunset is easy. It’s what happens next that can be a problem….


Since then most of my travels have been urban and so the need for a decent torch has not come up, but Iceland now requires me to address that.

Well, it’s probably no surprise that there are literally thousands of choices. However, I did have some requirements:

  • Weight. It had to be lightweight as (1) it has to get to Iceland and back in a 23Kg allowance and (2) I have to carry it all day.
  • Battery Lifetime. I may need to depend on the torch for a variety of reasons, not least of which would be to see where I am going.
  •  Bright. Whilst the main purpose of the torch is to be able to see well enough to avoid the perils of an uneven ground, I may need to use it go get the attention of a passing car. In Iceland, that passing car may be a long way off.

Google ‘lightweight torch’ and one brand pretty much dominates the search result: Lenser. Now, I’m not going to declare Lenser to be the best, or the only brand, but I really did not want to spend days researching torches and the reviews I did read were all very positive so they seemed to be a good bet. One of the things I like about them is the use of LEDs as the light source which tend to be far more resilient to drops and knocks. They also tend to be far more battery friendly. Reading around  there appears to be a couple of different ranges on offer; the L series being lightweight polycarbonate, the H series being head torches and the P series being a professional, or police, range. There were other ranges too, but at that point price started increasing quite dramatically and so I discounted them.  In the end I decided on the Lenser P7 which provides 200 lumens of illumination or, in terms I can understand, about a 200 metre range. I also like the ability to go from narrow beam, handy for attracting the attention of distant cars, to wide beam which will be a great asset in seeing where I’m going. I’ve used four lightweight but long-lasting Energizer lithium AAA batteries and the total weight comes in at 174g. Very nice.

So, the second of the new purchases has been made. Next, keeping warm…

Posted in Travel, Trip Planning Tagged , , , , |

The Lighthouse on Cape Pembroke

Cape Pembroke Lighthouse, East Falkland.

Cape Pembroke Lighthouse, East Falkland.


If you have a few hours to spare whilst in Port Stanley, it’s worth talking a trip out to the lighthouse. I was told that I needed to pick the key at the museum in Stanley before heading out, which I duly did. It was a surprised to find that the ‘key’ was, in reality, a 20 inch long bent iron rod which would be useful as an offensive weapon should the need arise – you won’t forget you’re carrying it, that’s for sure! The lighthouse has been at Cape Pembroke since 1855, although it was moved in 1906 due to subsidence. It’s primary aim was to warn passing vessels off Billy Rock, a notorious reef about 800 metres out. Originally powered by 18 rapeseed oil lamps which cast a beam an impressive 14 miles, after the refit in 1906, a new paraffin light source was fitted generating a whopping 105,000 candle power casting light out to 16 miles. Alas It was damaged in the conflict and has now been replaced by a modern solar-powered light with nowhere near the character of the original…
Posted in Frame by Frame Tagged |

Gearing Up for Iceland #1

Planning for Iceland continues and the current tasks revolve around making sure that I have the right equipment to stay safe.

Travelling alone always means taking a few additional steps to ensure a safe journey as a single pair of eyes can only look in one direction at once, and so I usually make sure that I know the basics such as which parts of a city to avoid roaming around at night by myself, where pick pockets most frequently operate and always ensure that any flashy jewellery, such as watches, are either left at home or kept well covered.

Still Iceland presents a different challenge as my usual planning doesn’t really apply. It’s one of the safest cities on the planet, certainly one of the safest countries and so, aside from some minor pick pocketing in Reykjavik the country’s 320,000 or so inhabitants are generally a friendly bunch. The problems I’m likely to face come from a far less discriminatory source: The weather.

Travelling around the country, even when sticking mainly to route 1, the circular route that provides the island’s main artery, means spending a lot of time alone. Only 10% of visitors arrive outside of the May to August peak season and even if you’re one of them you’d still be one of only 10% of those that make it out of Reykjavik. Reports from others travelling at a similar time of year report of only seeing a handful of cars a day and this, combined with lots of alone time makes for a great photography trip. Of course, if things should go wrong, it is a different story.

The biggest worry is that the 4×4 will break down, leaving me stranded until recovery arrives, which in the worst case scenario, that could mean an overnight stay in the car. Whilst Iceland’s weather is unlikely to live up to its name during September,  it’ll still be cold at night and, as everybody knows from this year, freak weather does occur.

To that end I decided to mitigate any issues with being stranded by purchasing a sleeping bag. With hundreds of choices available and not having been camping for 20 or so years,  it took a while but research, combined with a requirements list narrowed the options down considerably. Here’s what I was after:

  • Compact and light. It’ll be left in the 4×4 whilst I’m there, but I have to get it to Iceland and back in a suitcase with a 23Kg limit.
  • Warm. The 4×4 will acts as the wind and rain barrier, but it needed to be able to cope with projected temperatures – ideally to -5C.
  • Inexpensive. I’m avoiding the word ‘cheap’ as that isn’t what I was after – when safety is concerned, cheap can mean dangerous – but I was buying the sleeping bag as a fix for a specific issue, so I wanted to minimise the investment.

It very quickly became apparent that my three requirements represented the holy trinity of sleeping bags. It also became apparent that you could quite easily have any two of the three: Light and inexpensive;  warm and inexpensive; compact and warm. All the combinations were possible and several options existed in each category. The problem was, I found, to get all three.


Warm, lightweight and inexpensive: The Holy Grail for sleeping bags. Alpkit's SkyeHigh 600 may be a contender...

Warm, lightweight and inexpensive: The Holy Grail for sleeping bags. Alpkit’s SkyeHigh 600 may be a contender…


As I carried on reading the forums the general advice was to go for a goose down bag as they tend to have a high thermal rating to weight ratio, but their main issues were cost and they suffer badly when wet. For me, wet was not likely to be an issue and so I largely ignored that aspect and concentrated on finding a good value goose down bag. There are not that many options, but I did find a lot of recommendations for the SkyeHigh 600 bag from UK manufacturer Alpkit and after much debate decided to get one. Alas, the Alpkit website was showing out-of-stock (and still is) but I luckily managed to pick up a barely used one on eBay. I would have preferred to have bought a new one, but it would appear that the SkyeHigh range is popular due to it appearing to meet all three attributes mentioned above and comments on various forums show frequent stock issues.

I must admit to being initially rather impressed at the size and weight when inside the provided compression sack – 1.345Kg and it even compresses down to a bit smaller than the billed 23x25cm which is easily light enough and small enough for the suitcase. Of course, the acid test will be to actually use the bag but for now it does seem promising.

So  the first contingency plan is now in place. Hopefully I’ll not need to use it, but I may just try it out just for fun one suitably cold evening…


Posted in Travel, Trip Planning Tagged , , , |

Looking After Your Camera Gear in Antarctica

Before travelling to Antarctica I spent countless hours researching on the Internet looking for advice on what camera kit and accessories would be useful. There’s a lot of advice out there; some good, some not so good and much that is contradictory. Even after all the research I still arrived a little apprehensive about how my gear would cope. So hopefully this article, written with the benefit of hindsight, will help anyone thinking of going to Antarctica or a similar region arrive prepared.


Harsh weather can cause photographic misery...

Harsh weather can cause photographic misery, so be prepared…


The Cold

Antarctica presents a number of challenges for photographic equipment. Of these the most obvious is perhaps the cold. Not that it is really that cold. On an average day out-and-about the temperature is likely going to be anywhere between -5C and +2C which is far warmer than people may have thought it would be. Checking manufacturer’s specifications is always worthwhile, and Canon rate the 5D MK2 body as having an operating temperature of 0C – 40C which means that in reality the conditions in Antarctica are not too far outside of this.

The problem is less to do with the cold and more to do with condensation. After several hours off the ship in the cold ambient air the camera body and lenses end up being the same temperature. And, much like taking a cold beer or bottle of wine from the fridge, as soon as you get back to the ship and the toasty warm interior, condensation is going to form pretty quickly. It is this that will be your real problem.

I tried a couple of ways to reduce the risk of condensation damage. First I had a number of large zip-loc bags that I purchased on eBay and a collection of those silica gel sachets you find in boxes containing electronic equipment. Before getting back on the zodiac, or when back on ship, but before going inside, I’d simply put the cameras in the bags, squeeze out as much air as possible and then seal them. The theory being that as the cameras warmed up, any condensation would form on the bags, not the camera and that the silica gel would cope with what air was still inside the bag.

After a few days, I largely abandoned this practice in favour of a simpler one. Not because it wasn’t working, but simply because it was such a pain. The simpler approach was to let the gear acclimatise in stages. The ship had a wet room where we put on the gumboots and lifejackets or wetsuits. Despite the room being unheated and the bulkhead door almost constantly open the surrounding warmth of the ship meant the room was never truly cold, and so represented a good halfway house between the cold of the outdoors and the warmth of the rest of the ship.

Additionally, most of the Antarctic expeditions aim to get you out-and-about twice a day. What I would do is after the morning trip, I’d simply leave the camera bag in the wet room unopened. The camera bag  still had silica gel sachets in it, just not the zip-loc bags. When the second trip started a couple of hours later, the camera kit was already pretty much acclimatised and when returning at the end of the day, I just left the camera bag in the wet room until after dinner – giving the contents a good couple of hours to warm up slowly. It does mean that you need patience, but I used the downtime to review the previous day’s shooting and keyword the shots.

This approach also meant that the camera was in a good state for the inevitable shooting when on deck – there’s always something to see and it was easy to grab the camera and go on deck.


The Dust

Antarctica is dusty. Surprisingly so in fact. Despite having the sensor on the Canon 1Ds3 fully cleaned just prior to the trip, it took less than a day for sensor dust to show up. The 1Ds3 seems very prone to sensor dust anyway but the conditions in Antarctica just meant it was a losing battle to keep it clean. The Canon 5D2 seemed to fare much better, but it too gained sensor dust over time. I tried to minimise the effects of dust in two ways: First I tried not to swap lenses. After all, if you don’t take the lens off then you’re far less likely to get dust inside the camera. Second, if I did have to swap lenses, then I turned the camera off first in an effort to reduce the static charge of the camera sensor.

I had the luxury of two camera bodies which meant I could have a wide angle lens on one body whilst a zoom lens on the other. This worked well and is something I would recommend, not least as, especially when in the zodiacs, events can happen so quickly that you do not have time to change lenses. However,  if you can’t hire or borrow a second body for the trip and so have no choice but to  swap lenses I do recommend turning the camera off and also making you that you can shield the camera from the wind, say inside a camera bag, when you do so. I would also strongly recommend a Giottos Rocket Air Blower or similar as dust WILL get in and on the mirror and sensor.  My rocket air blower earned it’s keep!


The Wet

Antarctica is, perhaps  unsurprising, wet. Depending when you travel it’ll likely snow at least once per day and you have at least one zodiac cruise around icebergs. Snow and sea-spray will become part of your camera’s daily routine and trying to avoid these will mean you’ll end up missing a lot of good opportunities. I’m not suggesting that you throw all caution and good sense to the wind, but a few basic extras are worth having  to hand.

I had a number of Op-Tech Rain Shields with me – essentially plastic bags that go over your camera and lens. For years I’ve kept one in the bag just in case and for Antarctica I purchased a few more. In the end I  never used them. It’s a good product, but really better used in a less hectic environment. A lot of what you see in Antarctica happens fast – or rather you’ll be moving fast. Getting your hands inside the protective covering is a bit of a faff and they would soon become annoying. I’ve also read that keeping you hands inside them for any length of time in a cold environment can cause condensation to form on the inside and actually creates the problem you’re trying to avoid. I cannot attest to that so  whether it is true or not I cannot say.  I’m not saying the Op-Tech are bad; they very good. It’s just that they are perhaps better suited for more static shoots such as landscape.


The 5D's weather sealing has been much maligned. Mine had no issues and even survived the attentions of a  curious Sheathbill. (Image courtesy of Daisy Gilardini).

The 5D’s weather sealing has been much maligned. Mine had no issues and even survived the attentions of a curious Sheathbill. (Image courtesy of Daisy Gilardini).


Instead I decided to go naked. The Canon 1-series has renowned weather sealing and all my lenses are from Canon’s L-series, also known for their whether sealing. But after the horror stories on the Internet about how many Canon 5D MK2 camera have died in Antarctica, I feared the worst for my 5D MK2 and sealed the battery compartment, memory card slot and lens mount with gaffer tape.  That stopped after a couple of days as water still got in and the tape simply appeared to be preventing it from leaving.  In the end I decided that I was being over cautious and that the report from 2009 detailing the high failure rate of the Canon 5D MK2 was making me paranoid. Both the 5D MK2 and the 1Ds MK3 ended up being left lying on the snow and ice for extended periods, used whilst snowing on a moving zodiac and the 5D MK2 even survived a wave, although I did dry it off pretty quickly. In short, both camera bodies survived intact, although I would strongly suggest that you follow the recommendation regarding temperature above: Damp and condensation can both cause mould inside the camera body and lens.

I also has a copious supply of Pec Pad lens wipes and Eclipse cleaning fluid. The lenses got cleaned after every trip once back in the wet room and I and kept a stash of wipes in the camera bag. I needed them too – snow on the front element of the lens and sea spray when out zodiac cruising were constant challenges.

I also recommend three or four decent-sized microfibre clothes. I picked up a pack of four 50cm square clothes off eBay or Amazon for under £10. These were very useful in wiping excess moisture off the camera before it had a chance to seep into any seals. Remember, too, that sea water is corrosive.

It’s probably also worth mentioning the UV filter at this point. Despite whether you think they are a good idea or not, I would strongly recommend that you use one in Antarctica. As mentioned you’ll spend a lot of time close to the sea and spray is going to play a big part in your life. Cleaning the front of your lens is going to also massage salt crystals into the coatings on the front of your expensive lens. The UV filter acts as a convenient barrier that can be replaced cheaply. One of the crew had just bought herself a nice Canon 70-200mm F4 lens but had no protective filter on it. I do wonder what it will look like after four months of constant exposure.


Hopefully the above tips will help take some of the guesswork out of how to look after photographic gear in Antarctic, or other similar, environments.  All the items mentioned can be purchased easily and cheaply and I would really recommend that you do so. You cannot help but get some wonderful shots – but only if the camera is clean and working!

Posted in Hints and Tips, Travel, Trip Planning Tagged , , , , |
Nebraska shipping keflex 250mg Madison diflucan shipping Buy trazodone from Raleigh Vancouver allopurinol shipping Buy alphagan online from Frankfort What is xtandi Generic caverta from Alberta Where to buy caverta online in Delaware Singulair heavy heartbeat