Milky Way Over Spitzkoppe, Namibia

Despite my dubbing it "a big rock", Spitzkoppe offers some beautiful scenery and one well worth spending time at.

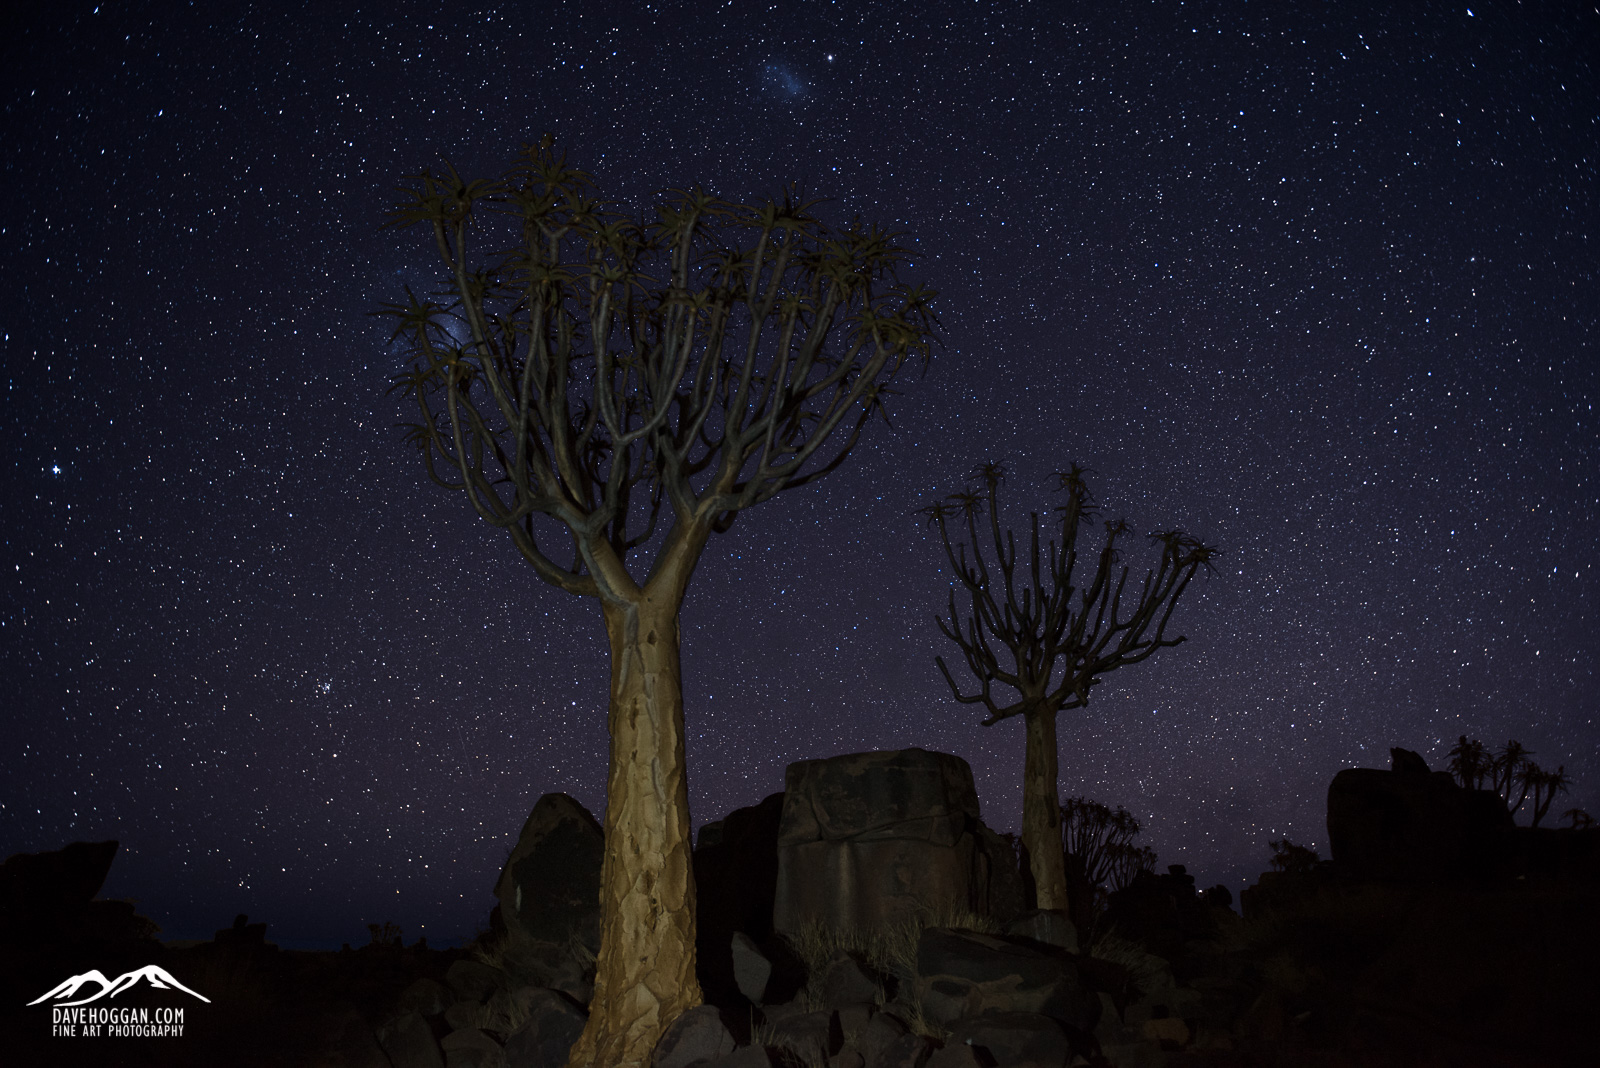
Despite my dubbing it “a big rock”, Spitzkoppe offers some beautiful scenery and one well worth spending time at.

Some things just take time, like this image taken at the Spitzkoppe range in Namibia.

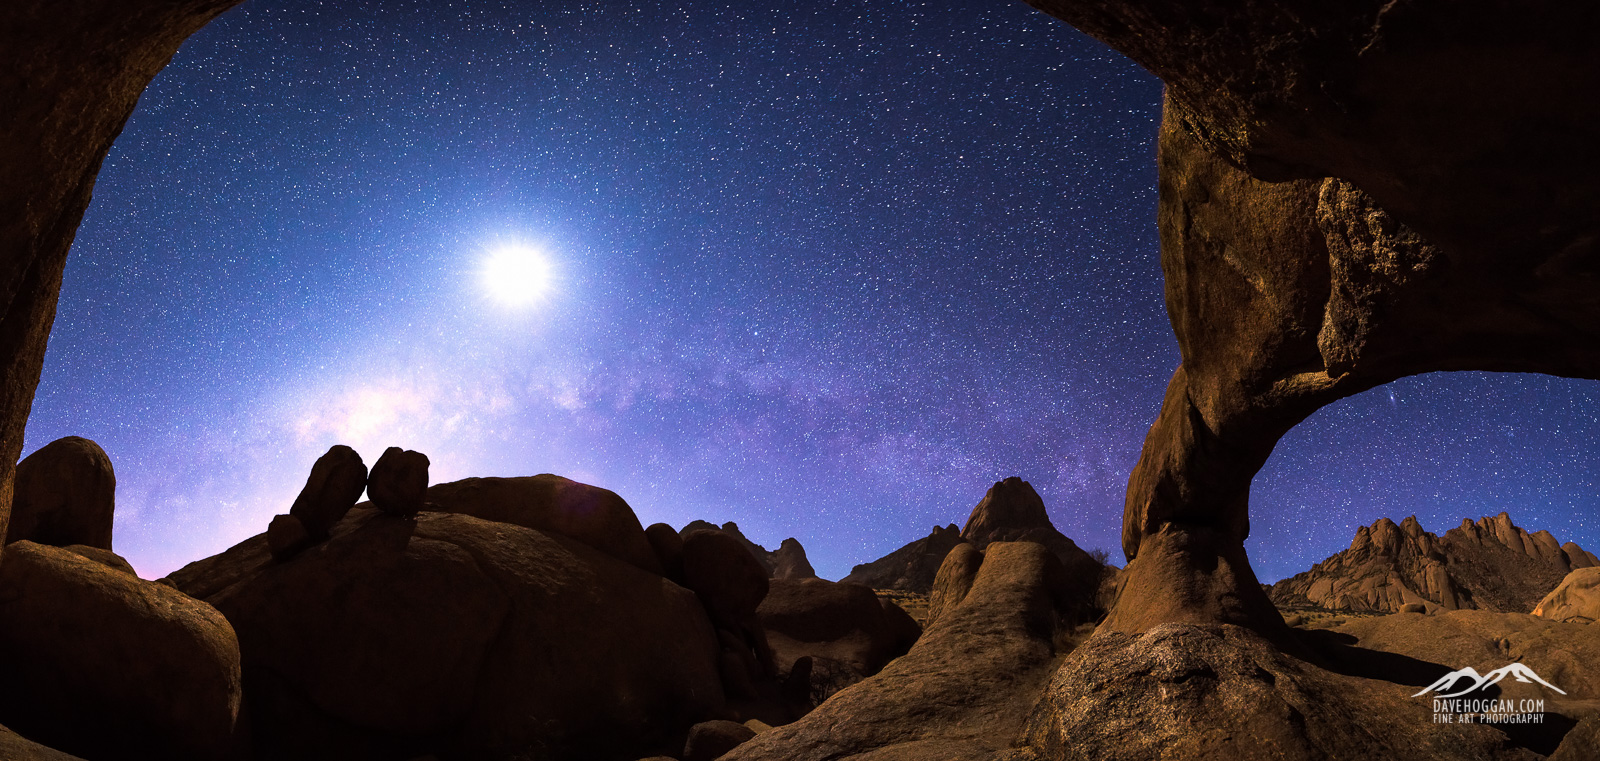
By the time we reached Spitzkoppe on our journey through Namibia we were finding our own feet when it came to understanding how to take night-sky images. Emil from Nature’s Light had patiently and repeatedly taken us through the process of capturing and subsequently processing images and we were finally getting to a place where we were less concerned about the process and more concerned about the composition. Even so, the first night we spent at the rock arch seen above was difficult for me.

I am not a fast photographer. As I look at a scene it takes time for the image to become clear in my mind. Until then all I see is a discordant jumble of elements all demanding attention. As so it was the first evening of shooting: the sky; the Milky Way; the arch; the boulders; the distant peaks. I spent a couple of hours shooting but left feeling deflated and frustrated.

The second day was spent doing not a lot of anything; the daytime temperature was creeping up to 40°C and the rock landscape was being bathed in harsh direct sunlight with no shade. But my mind was ticking over and as I worked through the previous night’s images I could see a shot  in my mind. Spitzkoppe is a big landscape but using a wide focal length to fit it all in would reduce features to tiny dots. So a panorama might work. The problem with panoramas – especially at night – is that they take time to shoot and it was not until I started night-sky photography a few days previously that I realised just how quickly stars move. They’re surprisingly fast! The speed issue was compounded by the fact that I was trying to shoot the Milky Way and if I took too long shooting the individual images then the panorama would end up with the Milky Way in steps across the sky. The final challenge was that the moon was out in force and it would be all but impossible to stop it blowing the highlights sky high (yes, pun intended).

I like this image for a number of reasons. First it appeals to my inner geek as it is probably the most technically challenging shot I have taken consisting of several 30-second exposures whilst trying to keep foreground detail interesting and the Milky Way in one piece. Second, I like the repeated use of upward curves; the curve of the rock arch in disappearing off the top of the frame in the foreground; the curve of the secondary arch to the right; the curve of the Milky Way; the boulders in the mid-ground and curve of the mountains in the distance. And third, I like the fact that, if you look closely, you can see Emil and Romeo in the distance having a beer!

Photographs serve many different purposes from reporting events in a factual way to providing that 500pix “WOW” factor. I prefer those images that I find myself returning to time and again and igniting memories of spending time with kindred spirits under magical skies.


Posted in Frame by Frame Tagged , , , , , |

Power on Location: Part 3 – Battery Packs

Every time I see a photographer using an old film camera it makes me smile. It doesn’t happen often – seeing a film camera that is, not smiling – but it does make me wonder about their reasons. The love of the art of photography perhaps, or maybe they’re after some ‘feel’ to the image without reverting to Photoshop? Perhaps one day I should stop and ask. Film cameras are, of course, extremely limited when compared to the capabilities of today’s DSLRs in virtually every respect. Except one: they don’t need to be constantly fed power.

Of course, depending upon the style of photography you pursue power may not be an issue. A healthy DSLR battery in normal conditions can usually cope with 700-1000 shutter operations and as long as you don’t make heavy use of live view, picture review or image stabilisation then a single battery may easily cope with a day’s shooting. Carry a spare or two and charge them back in the hotel room overnight and power will not be on your shoot’s “risk register”. But what if you don’t have a room to go back to – have no mains power at all? What if you do need to shoot video, use live view and stabilisation? What if you are not shooting in ‘normal’ conditions? How do you keep a ready supply of power then?

Power on location has become a bit of a crusade for me and I have written about it before when first looking at the Voltaic Systems’ Solar Charger and in my detailed Voltaic Systems’ 17W Solar Charger Field Review. But as I prepare for two upcoming trips – the uninhabited island of Batu Tara, Indonesia and central Siberia – I’ve been spending more time researching my holy grail – a reliable, capable, easily transportable power source. And I have learnt some interesting facts which may be worth sharing as they help demystify the confusing world choosing a battery pack.

Whilst this article does have a slight photographic angle it is equally applicable to choosing a battery pack for any purpose.

Identify Your Needs

My two primary use cases for power on location; charging the laptop and charging my camera batteries.

My two primary use cases for power on location; charging the laptop and charging my camera batteries.

Perhaps obvious but worth mentioning is that what you want to keep powered on location will dictate the kind of solution you will need. Before travelling to Ethiopia I knew that I wanted to be able to charge not only my DSLR batteries but also my travel laptop and so the solution that I needed had to have the ability to provide 12V for the DSLR and 16V for the laptop. But once on location other requirements were discovered; my smart phone (for quick videos) and someone’s drone batteries, meaning that the more standard 5V USB port was needed. Given that most battery packs are USB only I could eliminate a lot of options very quickly.

If you have ever looked at battery packs on Amazon or similar web sites you’ll notice that they are almost always rated by their “mAh” or milliampre-hour value and it is human nature to assume that the bigger the mAh, the more you can charge with the battery pack. And if you are only looking at charging USB devices then you would be right. Well, that 26000mAh battery pack still won’t really be 26000mAH, but at least it will still be more than the 20000mAh one – which will also not really be 20000mAh. But, if you are looking at charging more than USB devices, for example camera batteries and laptops, mAh suddenly becomes far less useful and even downright misleading.

The Science Bit: The Watering Can

In simple terms any battery has three aspects that are relevant to us: the output voltage it can supply (measured in volts), the electrical current (measured in amps) and total power capacity (measured in watts). Like the relationship between ISO, stutter and aperture, volts, amps and watts are linked such that a change in one has to be reflected by a change in (at least) one of the other two. The equation that links watts, volts and current is very simple:

Watts (W) = Current (I) * Volts (V)

Equations tend to put people off, as does talking about current, volts and watts so a typical analogy may help: a garden watering can.

Every watering can has a capacity – it may be large or small but it can only hold a finite amount of water. In the same fashion a battery pack has a finite capacity for storing electricity. The capacity of a watering can is usually measured in litres (or pints); the capacity of a battery pack is measured in watts (W), or more specifically watt-hours (Wh).

The flow rate at which the water leaves the watering can’s spout represents electrical current. If you were to fill a cup from the watering can, it would take a long time if the water only dripped out but be very quick if the water gushed out. In the same way, electrical circuits require an amount of power to be supplied to them; just how much is their flow rate and delicate electronics usually require very low flow rates. The battery pack’s flow rate is termed its “current” and is measured in ampres per hour (Ah), or thousandths of an ampre per hour – mAh.

Voltage is a like the force or pressure of the flowing water. Imagine water pouring out of the watering can’s spout onto the earth. If the spout is simply the open end of a tube then the water is concentrated in one spot and it hits the earth with some force likely pushing the earth aside making a small hole. If you attach a sprinkler head to the water spout the water is spread over a larger area and it hits the earth with less force. In the same way a lot of water in one spot can make a dent in the ground, too much voltage can damage electrical circuits.

Ultimately what is important to us is the capacity of the battery pack as this directly determines just how much stored power we have for charging our camera batteries, phones, drones and laptops. And, as mentioned, stored power is measured in watt-hours. So when choosing a battery pack the value we are really interested in is not amps or millamps, but watts.

Now I promise this is the last of the watering can analogy. A full can could be emptied in one go or gently poured out – in other words how long the stored water lasts depends upon how quickly you use it. Power stored in battery packs is usually given in watt hours (Wh) meaning a 72Wh battery can provide 72 watts for one hour, 144 watts for 30 minutes or 1 watt for 72 hours. So how long it lasts depends upon how much power the connected device is using and that is a function of the voltage the device requires and the current it is drawing.

In the same way that watts can be expressed as watts per hour, amps can be expressed as amps per hours. So 10000mAh means that over a one-hour period 10 amps will flow; equivalent to five amps per hour for two hours and so on. But there is one crucial difference between watt-hours and ampre-hours: ampre-hours only measure the flow of power, not how much power has flowed. Knowing the mAh rating is all well and good but it does not tell us the actual capacity of the battery.

So, why then, when shopping for battery packs do manufacturers almost always rate their products in amps?

Lies, Damned Lies and Advertising

The best way to demonstrate why using the mAh can be misleading is by an example. I have picked the Maxoak battery pack below only because it is in my Amazon shopping basket and it actually – if perhaps inadvertently – attempts to be somewhat honest about the battery’s true capacity.

Some battery pack manufacturers provide the watt-hour capacity of their product which is much more useful than the mAh value.

Some battery pack manufacturers provide the watt-hour capacity of their product which is much more useful than the mAh value.

The obvious selling point of this battery pack is its 50,000mAh rating. If you were looking for a high capacity pack, this would be very hard to ignore. My Macbook Retina Pro 13” laptop has a rating of 6559mAh so in theory I can charge it about eight times from this battery pack. The maths is simple but do you really believe the result?

From the equation above we know that the actual capacity of a battery is the current – here 50 amps – multiplied by the voltage. The problem is this battery pack lists three voltages, so which one do we use?

Unlike many advertisers Maxoak actually provide the watt-hours capacity, here highlighted in yellow, but now things get a bit more interesting. It states a watt-hour capacity of 185Wh; if you put these values into the equation we get:

185Wh = 50000mAh * 3.7V

So, where did 3.7V come from? The advertised voltages are 5V, 12V and 20V. Something does not add up.

Single Cell Equivalency: A Universal Standard

As I am no expert on battery technology I will defer to Wikipedia:

A “cell” is a basic electrochemical unit that contains the basic components, such as electrodes, separator, and electrolyte. In the case of lithium-ion cells, this is the single cylindrical, prismatic or pouch unit, that provides an average potential difference at its terminals of 3.7 V for LiCoO and 3.3 V for LiFePO. A “battery” or “battery pack” is a collection of cells or cell assemblies which are ready for use, as it contains an appropriate housing, electrical interconnections, and possibly electronics to control and protect the cells from failure. In this regard, the simplest “battery” is a single cell with perhaps a small electronic circuit for protection.

So it appears that the Maxoak battery pack is using the voltage rating of a single cell, not of the voltage output by the battery. If it were possible to task the Maxoak battery pack with providing 3.7V to a device then it could (theoretically) provide 50 amps for one hour, or a more realistic 0.5 amps for 100 hours. The problem is of course that you can’t attach a 3.7V device; it provides 5V, 12V or 20V. Given that the capacity of the battery at 185Wh is fixed then using the rated voltages (and ignoring internal losses due to voltage conversion) we get:

185Wh = 37000mAh * 5V

185Wh = 15417mAh * 12V

185Wh = 9250mAh * 20V

Which is a big difference. Suddenly the mAh figure used by so many battery pack manufacturers is a little less meaningful as it depends upon the voltage requirement of the device being powered. What the manufacturer is doing is stating the theoretical current output of their battery pack as if it were a single cell. This is called Single Cell Equivalency, or simply SCE, and is very common.

Unless a manufacturer of a battery pack states otherwise then it is probably wise to assume that the mAh value they proudly claim for their product is based upon supplying a 3.7V load – the SCE. And, given that the vast majority of battery packs aim to provide a 5V USB for phones, tablets and, well, anything else USB, then you can see that the advertised mAh value is already a little meaningless as that 20000mAh (at 3.7V) battery pack is now only 14800mAh (20Ah * 3.7V = 74Wh / 5V = 14.8Ah).

Knowing about the SCE is really quite useful as it allows you to get a better idea as to the true capacity – the watt-hours – of a given battery pack.

Real World Examples

Above I mentioned that, even for USB-only battery packs, the advertised mAh is probably not what you will end up getting. This is simply as the USB port provides a 5V supply and the mAh rating is likely based on the SCE voltage of 3.7V. If we assume that there are no losses from the process of voltage conversion then we get:

The Intocircuit battery pack specifies a 'capacity' of 26000mAh, but this isn't really what you get. It is not a lie, but, like most other manufacturers, they are using an industry standard that you won't be.

The Intocircuit battery pack specifies a ‘capacity’ of 26000mAh, but this isn’t really what you get. It is not a lie, but, like most other manufacturers, they are using an industry standard that you won’t be.

Our 26000mAH pack is now only 19240mAh. But there will be energy losses due to conversion. Depending upon the internal design of the battery pack its native voltage will be a multiple of 3.7V and the process of turning the native voltage into USB’s 5V requires some kind of circuitry such as a boost convertor. This type of conversion is inefficient and whilst I have no concrete evidence I have seen a figure used in a couple of articles: 30%. If we use this figure then we get a 5V USB mAh of 13468mAH, enough to charge an iPhone 6 (SCE 1810mAh) about seven times.

Going back to my Macbook and its 6559mAh capacity we now know that we really need is the watt-hours capacity of its battery which, according to Apple’s web site is 74.9Wh.

Apple are helpful in that they specify the watt-hour (Wh) of their devices.

Apple are helpful in that they specify the watt-hour (Wh) of their devices.

The Maxoak could therefore theoretically charge the MacBook twice with a bit left over, although again this is just the raw arithmetic without accounting for internal losses due to voltage conversion and other considerations. Assuming a 30% for conversion reduces this to approximately 1.7x charges for the MacBook.

More relevant to photographers is the camera battery which, in my case, is the Nikon EN-EL15. Like Apple, Nikon helpfully provide the watt-hours value on the battery casing itself:

Here the Nikon EN-El15 specifies the watt-hour capacity from which we can calculate the single cell equivalency as 3780mAh.

Here the Nikon EN-El15 specifies the watt-hour capacity from which we can calculate the single cell equivalency as 3780mAh.

This is a more tricky example as, whilst the Nikon battery is a 7V battery pack the Hahnel battery charger I use for it specifies a 12V input. But I was curious to find out anyway.

So what does the 7V Nikon EN-EL15 battery draw when charging from a 12V Hahnel charger? 8V at 1.2 amps. apparently.

So what does the 7V Nikon EN-EL15 battery draw when charging from a 12V Hahnel charger? 8V at 1.2 amps. apparently.

When charging a single Nikon battery I measured a 8V draw at 1.2 – 1.3 amps. I would not put any emphasis on these values as “intelligent” battery chargers vary the supplied current throughout the charging process. So let’s try our basic equation:

Allow for Conversion Loss:               26000mAh * 0.7 = 18200mAH

Nikon EN-EL15 SCE:                         14Wh/3.7V = 3780mAh

Theoretical Number of Charges:     18200/3780 = 4.8

If we believe the rudimentary maths my 26000mAh battery pack should charge 4.8 EN-EL15 batteries. I have so far managed just under three charges from the battery pack and there are still 2/5 LEDs lit so we might be in the right ballpark.

One final note is that all the above is assuming that the environment is not a factor. If the surrounding ambient temperature is significantly higher or lower then this will also have an effect of the number of charges as it affects the battery chemistry.

There’s Just One More Thing

Remember the 50000mAh (SCE) Maxoak battery pack above? It is attractive and despite the 50000mAh not really being what we have available it is has more capacity than a 26000mAh (SCE) battery. But there is a reason it is still in my Amazon shopping basket and not in the camera bag.

After a few incidents involving lithium batteries on aircraft the International Airline Travel Association – IATA have issued an advisory on the passenger transport of lithium batteries, both in cabin and hold luggage. The jist of the advisory is that the maximum capacity lithium battery that can be carried is 150Wh. The Maxoak is 185Wh.

Could I get away with it? Yes, probably. Do I want to risk losing the one power source I will be depending upon when on location and nowhere near mains electricity?. No.

Conclusion

A lot to consider when making what should be a simple decision:

  • That battery pack rated at 26000mAh (or whatever) is, unless stated otherwise, most likely the SCE value, not what you actually will get.
  • The battery pack will also have to do some internal voltage conversion which incurs power losses due to inefficiency. The loss may be about 30%.
  • If you want to approximate how much you can charge with a given battery pack, you will need to know its watt-hours (Wh) rating and the single cell equivalency (SCE) of both it and the device being charged.
  • Airlines tend to follow IATA’s guidelines permitting a maximum battery capacity of 150Wh, so bigger might not be better for you.
Posted in Hints and Tips, Review Tagged , |

Airline Cabin Baggage: A Photographer’s Minefield

As a photographer every international destination always brings its own unique logistical challenges, but one constant amongst them all is the dread of being forced to check my cabin baggage full of valuable and delicate camera gear into the hold.

Like many photographers I carry my camera gear in my cabin baggage or, more accurately, my cabin luggage is a camera bag with a minority of essentials, such as passport, ear plugs, eye mask and overnight toiletries. It represents not only a sizeable financial investment but also is the very reason I travel. It would not matter whether it was lost, damaged or stolen; all would have a disastrous impact on my trip. So it stays with me, come what may. But as any airline traveller will tell you, assuring that your cabin baggage does not get checked into the hold is a bit of a black art. But why?

Double Standards

For as long as I can remember the cabin baggage size allowance was set at 56 x 45 x 25cm. This size was suggested by IATA, the International Air Transport Association – an association comprising the majority of the world’s commercial airlines. This was not a requirement; it was a recommendation and an effort to clarify for all parties what was permissible cabin baggage. Airlines were ultimately free to choose a maximum size allowance and whilst some did, many simply adopted the IATA recommendation. An industry for cabin baggage grew up around this recommendation including camera bags and many camera bag manufacturers help by clearly stating whether the bag meets the IATA recommendation, such as the example from Lowepro’s site below.

Many manufacturers provide helpful guidance on cabin compatibility but beware, they may not be using the same standard size as your airline.

Many manufacturers provide helpful guidance on cabin compatibility but beware, they may not be using the same standard size as your airline.

The rapid rise of the “no frills” airlines – the ones that charge you for every extra, such as hold luggage – led to a rise in passengers trying to cram everything in their cabin allowance. The result was increased abuse of the cabin baggage allowance, overcrowding of the storage bins, passengers increasingly being told to check their baggage into the hold, arguments, fights and most importantly of all to the airline, delayed flights. Airlines increasingly began to impose their own, more restrictive cabin allowance resulting in cabin-compatible luggage suddenly not being as compatible as it once was.

In order to bring some order to this chaos in 2015 IATA introduced an initiative (http://www.iata.org/pressroom/pr/Pages/2015-06-09-02.aspx) which initially found acceptance with airline companies to standardise a new cabin baggage size that would, at least in theory, guarantee that cabin baggage would not become hold baggage. The size, 55 x 35 x 20cm was important for two reasons. First, it meant that on aircraft with 120 seats or more every passenger could fit their cabin baggage in the overhead bins. Second, it was smaller than most airlines’ maximum cabin baggage allowance and so was pretty easy for airlines to implement. Unfortunately, the rollout of the initiative was suspended a few months later after concerns from North American airlines about it being too restrictive. Quite how they came to that conclusion is a mystery as I’ve read the initiative and it is very clear that it in no way defines a recommended maximum size – it defines a size at which a passenger could expect that, in an overcrowded aircraft their bag would not be checked into the hold, whereas a larger one might. In any event, the initiative was suspended but not before some airlines adopted it as a new maximum; again not really understanding the point that IATA was trying to address.

If this were not already complex enough the US Federal Aviation Authority (FAA) have their own recommendation – 55.8cm x 36.8cm x 22.9cm and US manufacturers of cabin compliant luggage are likely to adhere to this standard before IATA.

So, why is this relevant to me now? Well at least that has a simple answer: An upcoming trip sees me make part of the journey on regional ATR42 twin propeller aircraft that is going to be a lot more restrictive on cabin baggage than the international Qatar flight on the first leg of my journey. In the past I have always had a bit of stress regarding the size of my current camera backpack, but the regional flight is a clear case of having it checked into the hold. Something had to be done.

Old, Not Obsolete

Like many photographers I’ve had my fair share of camera bags. For years I was a Lowepro user and I’ve worked my way through a number of their backpacks as my kit and travel patterns changed. But more than once I have returned from a week-long trip with aching shoulders after hefting my gear around all day, every day. It seems a common problem – for me at least – with Lowepro backpacks and so it was time to change brands.

Then I discovered the Think Tank Airport Accelerator v2.0 (https://www.thinktankphoto.com/) and fell in love. Capacious to the point of decadence but still within the FAA and IATA (original) recommendations at 35.6 × 52.1 × 22cm. I’ve used it for a couple of years now and find it to be extremely comfortable when hiking for long periods, even with 12kg of camera gear. The backpack straps are very well padded, the zips rugged and lockable and Think Tank’s customer service is unfailingly good.

But it isn’t the perfect bag. It almost is, and maybe it once was, but as I travel to ever more remote places and airlines continue to clamp down on passengers abusing cabin baggage limits I am finding it more difficult to have that guarantee – that peace-of-mind – that I won’t be asked to check my camera gear into the hold. For although it fits within FAA and the original IATA guidelines it (1) only does so when empty and (2) they’re only guidelines, which airlines are increasingly ignoring.

The Think Tank Airport Accelerator may have a depth of the FAA recommended 22.9cm but that is without the anything in the front pockets. Adding another 2-3cm for a laptop makes this bag much less cabin-friendly.

The Think Tank Airport Accelerator may have a depth of the FAA recommended 22.9cm but that is without the anything in the front pockets. Adding another 2-3cm for a laptop makes this bag much less cabin-friendly.

So began a search for a travel backpack and as I was playing ‘fantasy camera bag’ I might as well assemble my dream team of features!

  1. It had to meet IATA’s 2015 size recommendation of 55 x 35 x 20cm as this would meet pretty much any airline’s cabin baggage allowance.
  2. It had to accommodate two DSLRs each with a lens attached, specifically a D810 with 24-70 f/2.8 and a D750 with 70-200 f/4. My photography is increasingly in hostile environments – saltwater, deserts, volcanoes and snow – and changing lenses is to be avoided wherever possible. So I need to be able to swap between wide and zoom without exposing the camera sensor to contaminants.
  3. It had to be a backpack. Most of the things I photograph require a bit of a trek to get to and I want the gear strapped to my back in comfort, leaving both hands free to clamber up rocky paths and over uneven ground.
  4. It had to allow easy and fast access to all of my gear. Landscapes tend not to move that fast but in hostile environments, conditions do. The ability to pack up quickly is an important as unpacking.

Think Tank were my first choice but whilst they have a smaller camera backpack that satisfies requirement (1), it definitely wasn’t not going to accommodate requirement (2). I looked at other brands – Lowepro, Gura Gear, F-stop, Tenba, Manfrotto etc. – but nothing that met my needs. Things were not looking good.

Then during one of my Google searches I found the Think Tank Airport Antidote v2.0. Not listed on their web site it appears that this is an older model in their Airport series but one that showed promise. With nothing else presenting a viable option I took a gamble on a second-hand one.

The difference between the Think Tank Airport Accelerator and Airport Antidote v2.0 is immediate and noticeable.

The difference between the Think Tank Airport Accelerator and Airport Antidote v2.0 is immediate and noticeable.

The size difference is obvious. At 43 x 30 x 18 cm its external dimensions are smaller than even the most punitive airline restrictions and it even fits inside the Airport Accelerator. So, it meets requirements (1), (3) and (4) but what about the all-important requirement (2)?

"Old, not obsolete." Despite its diminutive size the Think Tank Airport Antidote v2.0 manages to fit a in impressive amount of gear without comprising ease of access.

“Old, not obsolete.” Despite its diminutive size the Think Tank Airport Antidote v2.0 manages to fit a in impressive amount of gear without comprising ease of access.

Yes, although tight I can get two DSLRs with lenses attached in the bag, along with a full complement of filters, two additional lenses, batteries and cleaning gear. Had I needed a longer zoom lens then this have been an issue but (my) photography rarely needs much above 200mm.

A Crash Diet

Of course, size is only one issue when to comes to cabin baggage; the weight allowance is the other and, as any photographer will attest, your camera gear always weighs more than the allowance. I’m planning on handling this in a couple of ways.

First, simple psychology. People assume that small bags are lighter than big bags so the mere fact that the Airport Antidote v2.0 is quite compact gives it a perception of lightness, especially if it looks less like a camera backpack and more like a day backpack. Coupled with the time-honoured technique of casually carrying it on only one shoulder and it shouldn’t invite a check-in or gate assistant to look more closely.

There is always a chance that it might get weighed and at that point you’re pretty much stuck. One tactic is to keep an eye on the check-in queue ahead of you and, if you see cabin baggage being weight-checked it may be time to discretely get out of the queue and move to plan B. There are plenty of photographer gilets that provide innumerable pockets but they are almost universally expensive. A fisherman’s gilet will do exactly the same thing (and be much cheaper) or camera belt can be used to carry enough extra gear to get the cabin bag down to the right weight – at least until you’re sure it won’t be checked into the hold (i.e., when you’re on board the plane). Of course being discrete is the key here and so wearing it under a fleece or – in hot climates – a somewhat oversized shirt can go a long way to not bring attention to your sudden gain in weight.

Including laptop, my Airport Antidote is 11.5kg against Qatar’s 7kg allowance so I potentially need to shift 4.5kg to my person. Tough, but just about possible. Yes, it is a pain to have to go through this, but there are not really many options.

The other thing is to keep the weight of the hold luggage down below the maximum allowed. I’ve been stopped at check-in in the past, but as the hold luggage was under the 23kg maximum the additional weight of the cabin baggage was tolerated.

So, here are some guidelines for maximising your chances of getting your beloved camera gear in the cabin with you:

  • Aim for a size of 55 x 35 x 20cm or less.
  • Aim for a weight of 7kg and, if you can’t, have a plan B for how to deal with the excess weight as you pass through check-in.
  • Do not blindly believe the manufacturers “cabin friendly” label on their web site. It may be an old or different definition to the one your airline uses.

In the end there will never really be a guarantee that a cabin bag won’t be checked, but keeping it as small and light as possible certainly helps. For photographer’s the challenge is finding that balance between size, weight and usability. Hopefully this article shows that it is possible to get a significant amount of camera gear into a lowest common denominator size allowance of 55 x 35 x 20cm; that such camera bags do exist and that there are creative options for making cabin baggage temporarily lighter than they actually are.

Good luck!

Posted in Travel Tagged , , |

Quiver Trees, Namibia.

Silhouetted against an impossibly starry sky, quiver tress watch as the Large and Small Magellanic Clouds galaxies pass overhead.

Silhouetted against an impossibly starry sky, quiver trees watch as the Large and Small Magellanic Cloud galaxies pass overhead.

Of the many ‘firsts’ I experienced in 2015 one of the most memorable was trying astrophotography for the first time. It is very different to low-light or night-time photography in urban areas and requires different techniques and post-processing. However, with a good teacher in the form of Emil from Nature’s Light by the second night we were turning in worthy shots like the one of Namibia’s quiver trees above. One of the other firsts was that, for the first time in my travels, we got lost.

The evening started out in what was to be an ongoing theme during the trip: a late afternoon shoot followed by relaxed on-location snacks and beer, waiting as the twilight turned to darkness and the canopy of starts made their appearance. If you’ve never experienced what a truly light-polution-free sky looks like then be ready for a shock. Human eyes a far more sensitive and for every star you see in photographs and movies, the eye sees a dozen more. It is, quite simply, both staggering and humbling.

But we were there with a purpose and so the aim was to head away from the 4WD, set up one camera on a tripod with an intervalometer to take the 12-15 four-minute shots needed for a star trail and then walk away to another location to take the more standard astrophotography shots. We couldn’t do both near each other as the light painting we would be doing for the standard shots would ruin the star trails. A simple plan. The problem was that, despite only walking around 200 metres from the 4WD, we got lost on the way back.

To be fair it was easy to do. The quiver tree forest was on a gently undulating hill with no extensive line-of-sight and consisted mainly of trees and rocks. The usual ‘turn left at the tree’ directions weren’t really much help and as it was only a couple of hundred metres in an almost straight line we didn’t bother using GPS or a compass. After an hour of trying to get back to the 4WD, we perhaps were regretting that decision.

We were never in any real danger of course. We were, quite literally the only people for miles around and the only animals we may have come across would have been jackals, which would have to have been monumentally desperate to attack three humans. The temperature was not going to drop below a very comfortable 20°C or so and rain was absolutely not going to happen. The worst would have been a sprained ankle but at the speed we were going that would have been bad luck. Still, we were losing photography time!

Eventually we made it back to the 4WD (having never being more than a few hundred metres from it) by which time the star trail shots had completed. By the time we returned from collecting the cameras we had 30 minutes or so of actual photography time left so it was a bit of a mad dash to find a decent composition set up and take the necessary shots, of which the photograph above is the result.

Every time I see this shot it takes me back to the aimless wandering in that quiver tree forest and palpable feeling of relief as the 4WD finally came into view. And I smile at the memory.

Posted in Frame by Frame Tagged , , , , |

Feeling the Heat

The ever-changing surface of the lava lake at Erta Ale guarantees that you'll never take the same shot twice. But be warned; staring at the lake's surface can become almost hypnotic.

The ever-changing surface of the lava lake at Erta Ale guarantees that you’ll never take the same shot twice. But be warned; staring at the lake’s surface can become almost hypnotic.

It has been very quiet around here for a few weeks simply because work has been insanely busy. I’m an IT security professional by day and right now I’m currently managing two projects that are well underway and all my time is split between them with the thousand different technical and operational queries that clients raise during the deployment phase. All my other work therefore has to fit into the gaps and the evenings.

Of course there is always a benefit to being so busy and one is that I have been working on one client’s site or another over the past few weekends and the travel fund has slowly been growing! So, despite feeling a little weary right now I do have something to look forward to: the next photography trip!

As mentioned in a previous post, Siberia is planned for 2017. The photographer running that – Alexey Trofimov – has suggested dates around the end of February and so whilst I’m really excited about working alongside him I need something a bit sooner.

The next option is to return to Iceland. I have an image in my head that I can’t get rid of and so I can see a week or two spent driving along the southern coast. Iceland is an easy trip; one I really do not have to think about but again, I want to go late in the year, when it is colder – perhaps November or early December. Again, I can’t wait.

So, the current plan is 18 days travelling through Java on a volcano hunt. The people who organised the trip to Ethiopia, Volcano Discovery, have a photographer-centric trip in September and over the past few weeks I’ve been talking to them about adding a custom extension. If all goes well I should be climbing Krakatoa in just under 80 days!

After the heat of Java's volcanoes Iceland will be a nice halfway-house before the -25°C expected in Siberia.

After the heat of Java’s volcanoes Iceland will be a nice halfway-house before the -25°C expected in Siberia.

Posted in Trip Planning, Uncategorized Tagged , , , , , |

Gitzo Maintenance

The Jigsaw 1600px

There are certain sounds – blood curdling sounds – that should only ever be heard on the soundtrack of a horror movie. Certainly never from a tripod. But, after two weeks in the majestic sand dunes of the Namib desert, I’ve managed to turn the silky smooth, whisper-quiet operation of the leg locks on my Gitzo into an unholy grinding noise that make me wince every time I even think about using the tripod.

Now, I am a firm believer in the “Don’t buy it if you’re afraid to use it” philosophy. A tripod is a tool and if the means it gets soaked in the salty waters of the Greenland Sea, covered in Pele’s Hair from a volcano or sand from the Namib desert, well so be it. But there is a price to pay and, as any photographer will tell you, a good tripod is not a casual purchase. So, faced with the choice of ruining an excellent tripod, or not using it at all, it’s time to clean the tripod!

Now ordinarily I wouldn’t have bothered writing an article about this but a recent conversation on Facebook suggested that some may be apprehensive about pulling apart their beloved and costly tripod for fear of breaking it. As not maintaining a tripod will have worse consequences my hope is that this article will provide some reassurance that it is a fairly simple process.  Of course, if you have any doubts then it would be best to seek a professional: Or, in other words, I’m not responsible it you break it.

Disassembly

Upon unscrewing the first leg lock things don’t look too bad. There is some sand in the grease but no damage to the thread, which is the real concern:

Minor Grit 900px

But as I work my way through each leg lock, things do get worse. Here sand is in the threads themselves and has already started grinding the black anodised coating away:

Major Grit 900px


Luckily Gitzo tripods are pretty easy to disassemble. The first thing is to make a note of which bits go where (and this is where a smartphone camera is really useful):

Leg section 1600px

[Top Left] You can see that each leg is topped by two white, half circular, plastic shims – the anti-twist sleeves – that fit in the gap between the leg sections and which form a snug, but not overly tight fit. [Top Right] Once you take the leg section out completely you’ll see that the plastic shims are not physically attached to the leg at all but simply rest on it and the only thing that stops them from ending up rattling around inside the parent leg section is a raised circular node on the inside of each one. This raised node fits inside a cut-out on the top of the leg and it is this combination of node, hole and snug fit that keeps the shims in place. [Bottom Left] The shims don’t extend all the way around the circumference of the leg and leave a small gap on each side. [Bottom Right] The raised channel that fits in the gap left between the shims of the lower leg section. It is this that stops the leg blindly rotating – it is the anti-twist mechanism. It is a snug fit, but nothing more;

Whilst this seems like a basic way to secure the leg section, I presume that is also its benefit; it is very easy to replace parts when needed, and very easy to do this on location.

The final part of disassembly that you’ll need to do is to remove the plastic clips from within the locking nuts. This is probably the part the requires the most delicacy as the clips are connected by thin plastic links and so they have to be teased out. The best approach that I found is to get a fingernail in the gap between the metal outer and the plastic inner sections and to gently try and push the plastic part in. If there is no ‘give’ then rotate the locking nut a bit and try again. If you keep doing this, you eventually get to a section that gives a bit – see below:

Delicate 900px

The idea is to gently pull this section away from the metal and ever so slightly down which will have the effect of taking the plastic (which has a groove) off the metal (which has a lip). Once the first section is off the lip, slowly work backwards along the plastic, easing it inwards and downwards. Eventually the plastic will drop off the metal nut completely and expose its threaded section.

You’ll eventually end up with the tripod disassembled and ready for the cleaning. You may want to take the top leg sections off the spider (i.e., the top plate) but unless you’ve seriously abused the tripod it likely won’t be necessary.

Ready to Clean 900px


Originally I followed the advice gleaned from a number of guides and ‘how-to’ documents on the Internet, where the general advice was to use isopropanol alcohol or WD-40. Neither worked really well and a ‘test twisting’ of a locking nut on a leg section still made horrid crunching noises. So now I use citrus degreaser which has several domestic applications including cleaning bike chains and gear systems and cleaning thermally conductive paste off computer CPUs. Citrus degreaser is awesome stuff, and makes cleaning the old grease and gunk off the legs very easy.

TIM Clean

All you need is a few drops on the thread, gently spread it around (don’t scrub) with the toothbrush so that it gets in the nooks and crannies and leave for a couple of minutes. Repeat the process with the locking nuts.

After a couple of minutes – it doesn’t need more than that – remove the degreaser and gunk with warm water mixed with some household dishwashing detergent. Again I use the toothbrush – this time gently scrubbing – to get right into the grooves on both the leg sections and locking nuts. Once thoroughly cleaned I give it a thorough wash under a shower head although a kitchen tap would be just as good. Then, with all nice and clean, it is time to leave in the air to dry.

Threads Clean 900px


Reassembly

Reassembly is simply a case of reversing the disassembly process. I’m trying an experiment and using a different type of grease on one leg – Super Lube Synthetic Grease – and the normal Gitzo tripod grease on the others, simply as Super Lube is a lot cheaper. If you’re only cleaning your tripod once a year then it is probably not worth using anything other than the Gitzo grease, but if your tripod is likely to see repeated abuse in the field then a cheaper option is handy, as long as it works just as well. Only time will tell whether Super Lube is a viable option.

When reassembling the tripod it is important to get the gap between the shims lined up with the raised channel in the parent leg;  if you meet a lot of resistance upon reassembly, double check the plastic shims are correctly seated on the leg section and that the gap lines up with the raised channel.

The other thing is to not overdo the amount of grease used. You only need to cover the threaded section – any more than that and you’ll risk having grease leaking out of the locking nut and acting as a magnet for any dust and grit in the air, and if you were heading back out in the desert with grease on leaking out that would be a quick way to cause problems. Also, I find it easier to put the locking nut on the leg, put the anti-rotation shims in place and slide it all into the parent leg section before applying the grease. Once you’ve evenly spread the grease over the thread you can screw the locking nut back on and then tighten and untighten it a dozen times to spread the grease around on the leg and the locking nut itself. Note, you don’t have to completely undo the locking nut, just a couple of turns back and forth.


Regreasing 1600px

If things are really bad, you may need to take the top leg sections off the spider, but usually this is not necessary – only if the tripod had fallen in the sea and become completely submerged for example. Even sand storms won’t penetrate into the upper mechanism. That said, sand, salt and grit do accumulate on the outside of the legs but brushing this off with a firm bristle paint brush should be sufficient.


Spider 900px


Hopefully this article shows how easy it can be to strip down, clean and reassemble your tripod. Other tripods have different mechanisms – my Feisol for example doesn’t have an anti rotation mechanism and so no channel in the leg section to worry about and the shims are in three sections – but in essence a tripod is a blissfully simple part of the photographer’s arsenal. And whilst maintenance can be a pain it is even more painful when you’re trying to take a long exposure on a tripod with leg wobble due to a worn leg lock. It may be the difference between a usable and unusable shot.


Posted in Hints and Tips Tagged , |

Icelandic Horse

Even when I first became interested in photography and I was in my ‘photograph anything and everything’ phase there is one subject that I’ve never been particularly bothered about: wildlife photography. But, you can’t visit Iceland and not realise that there is something unusual about the Icelandic horse; they look, well, different.

Before arriving in Iceland I had used Google image search to get an idea of the various sights worth seeing and there were quite a few of the Icelandic horses, including one particular one of a white horse. It was a head-on shot of the horse with parts of the surrounding field and its tail in the background. But it was too noisy for my minimalism-craving brain – too many visual distractions – and I found myself recomposing the image in my head.

This horse was found just west of one of my most favourite places along the southern coast, Vik; the only white horse in a field of chestnut ones. It wasn’t difficult to get the horses to come close, presumably as they were curious to see if I had any food. What was difficult was to get this white one to come close and then stay interested long enough for me to lie down and capture him against the white sky.

Icelandic Horse


Posted in Frame by Frame Tagged , , |

Dallol, Ethiopia.

Dallol Geyser 1

Volcanic regions do not need to be full of big, imposing mountains that threaten to rain lava down on the land. They can be small and delicate – more fragile than an eggshell. One such region is Dallol, Ethipoia.

Dallol is a hot spring region where super-heated steam saturated with dissolved minerals explosively vents from cracks in the Earth’s crust. As the steam cools the minerals crystalise out and form beautiful – and exceptionally fragile – crusts. The crusts at Dallol are less than a millimetre thick and less than 15cm in diameter.

Dallol Geyser 2


Posted in Frame by Frame Tagged , , , |

Deception Island, Antarctica.

Whaler's Bay, Deception Island, Antarctica.

Deception Island: Even the name sounds mysterious.

You can’t be a proper movie super villain without having a secret base and if I were ever to become a super villain Deception Island would be mine. It sounds like a place straight out of fiction and already you may be thinking of pirates or smugglers or some other ne’er-do-wells. But no, it is a real place and one that happens to be one of my most favourite places on Earth.

Whilst it is real, having been first discovered in 1820, it is hard to shake the thoughts of make believe, especially when you read more about it. First what we see as an island is really the top of an active underwater volcano with high cliffs on the shores making any attempt to anchor dangerous. At 12 kilometres in diameter you may even ignore it altogether but if you did you would miss Neptune’s Bellows, the only gap in the high cliff walls at a mere 230 metres across, created by a previous eruption, and leading to a secluded bay which, at 9km by 6km, occupies most of the inside of the island. Of the land that remains, over half is covered by glacial ice. Oh, and most of the entrance is filled by Ravn Rock that sits a mere 2.5 metres below the surface, waiting to wreak havoc on the hull of any passing ship. Yes, as a naturally fortified, evil-super-villian secret lair it will do very nicely indeed.

Whilst I could have happily spent two or three days just wandering around you’ll likely only get about 90 minutes and so thankfully it is one of those places where you do not have to work hard to get good compositions, especially if you like working with minimalism and negative space. Even colour seems optional in a landscape dominated by black volcanic rocks and white ice and snow.

You can read more about this wonderful island over on Wikipedia.

Posted in Frame by Frame Tagged , , , |

Siberia’s Lake Baikal: 2017

The World is full of wonder and this map is my reminder to not waste the one thing we all have in short supply: Time.

The map responsible for many of my trips. I’m sure my bank manager would prefer me to have wallpaper instead…

Here in the UK we are on the last day of the four-day Easter weekend and whist for many it is a busy time for me it is a time to rest and catch up with all those “I really must do that someday” jobs.

One such job was to clean fingerprints off the glass cover of the map in my study, fingerprints that covered most of Indonesia, China and well into Mongolia – so in the end I just decided to clean the whole map. A particularly stubborn mark over Mongolia had me scrubbing away and I was caught by the striking gash of blue in the otherwise orange expanse of Russia. Although not really obvious in the picture of the map above, you cannot miss it when looking at Google Earth, a deep blue against the green.

GoogleMaps - Russia 1600px

Anything that piques my interest is worth a quick Google, especially if it may lead me somewhere new and so the rest of the day became an increasingly interesting search about Lake Baikal.

Lake Baikal has a lot of ‘firsts’ to its name. It is considered the oldest lake at approx. 25 million years, the deepest at just over 1600 metres, the largest freshwater lake in the World by volume of water and one of the clearest. If you took all the water from the five Great Lakes in the USA, Lake Baikal still has more.

However, it was when I looked at some example images taken of the lake in winter that idle curiosity became a “What would be involved in getting there” train of thought. The best images range from stunning landscapes through to downright other-Worldly and it is an area relatively untouched by mankind. Siberia has long been on my list of extreme environments and now Lake Baikal has given me a focus.

So, as Easter comes to an end, I have narrowed the photographic expeditions down to three possibilities and some have already replied to my email. There is one expedition that stands out although all three represent the best on offer that I could find. The only thing is that I’m too late for 2016 as all the expeditions are in the February/March timeframe and so it means a long wait until the 2017 season.

But, it is always nice to have something to look forward to…


Posted in Trip Planning Tagged , , |
Where to buy lamisil online in Illinois Generic advair from Colorado Nebraska shipping keflex 250mg Richmond shipping pravachol How long does it take for methocarbamol to work Generic caverta from Alberta Pregabalin 5 0mg and nortriptyline 10mg tablets Estrace brand name Online doctor caverta Buy sustiva online from Victoria