As a photographer every international destination always brings its own unique logistical challenges, but one constant amongst them all is the dread of being forced to check my cabin baggage full of valuable and delicate camera gear into the hold.
Like many photographers I carry my camera gear in my cabin baggage or, more accurately, my cabin luggage is a camera bag with a minority of essentials, such as passport, ear plugs, eye mask and overnight toiletries. It represents not only a sizeable financial investment but also is the very reason I travel. It would not matter whether it was lost, damaged or stolen; all would have a disastrous impact on my trip. So it stays with me, come what may. But as any airline traveller will tell you, assuring that your cabin baggage does not get checked into the hold is a bit of a black art. But why?
Double Standards
For as long as I can remember the cabin baggage size allowance was set at 56 x 45 x 25cm. This size was suggested by IATA, the International Air Transport Association – an association comprising the majority of the world’s commercial airlines. This was not a requirement; it was a recommendation and an effort to clarify for all parties what was permissible cabin baggage. Airlines were ultimately free to choose a maximum size allowance and whilst some did, many simply adopted the IATA recommendation. An industry for cabin baggage grew up around this recommendation including camera bags and many camera bag manufacturers help by clearly stating whether the bag meets the IATA recommendation, such as the example from Lowepro’s site below.
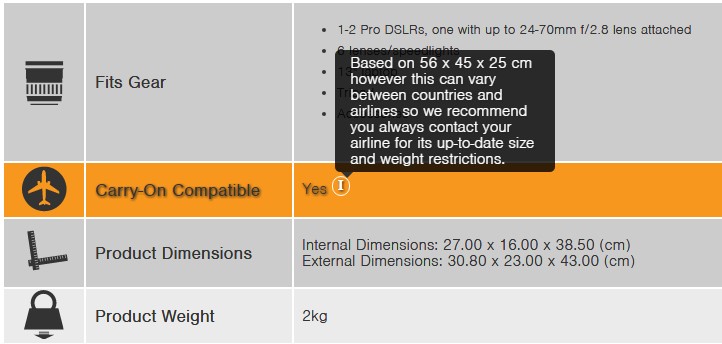
Many manufacturers provide helpful guidance on cabin compatibility but beware, they may not be using the same standard size as your airline.
The rapid rise of the “no frills” airlines – the ones that charge you for every extra, such as hold luggage – led to a rise in passengers trying to cram everything in their cabin allowance. The result was increased abuse of the cabin baggage allowance, overcrowding of the storage bins, passengers increasingly being told to check their baggage into the hold, arguments, fights and most importantly of all to the airline, delayed flights. Airlines increasingly began to impose their own, more restrictive cabin allowance resulting in cabin-compatible luggage suddenly not being as compatible as it once was.
In order to bring some order to this chaos in 2015 IATA introduced an initiative (http://www.iata.org/pressroom/pr/Pages/2015-06-09-02.aspx) which initially found acceptance with airline companies to standardise a new cabin baggage size that would, at least in theory, guarantee that cabin baggage would not become hold baggage. The size, 55 x 35 x 20cm was important for two reasons. First, it meant that on aircraft with 120 seats or more every passenger could fit their cabin baggage in the overhead bins. Second, it was smaller than most airlines’ maximum cabin baggage allowance and so was pretty easy for airlines to implement. Unfortunately, the rollout of the initiative was suspended a few months later after concerns from North American airlines about it being too restrictive. Quite how they came to that conclusion is a mystery as I’ve read the initiative and it is very clear that it in no way defines a recommended maximum size – it defines a size at which a passenger could expect that, in an overcrowded aircraft their bag would not be checked into the hold, whereas a larger one might. In any event, the initiative was suspended but not before some airlines adopted it as a new maximum; again not really understanding the point that IATA was trying to address.
If this were not already complex enough the US Federal Aviation Authority (FAA) have their own recommendation – 55.8cm x 36.8cm x 22.9cm and US manufacturers of cabin compliant luggage are likely to adhere to this standard before IATA.
So, why is this relevant to me now? Well at least that has a simple answer: An upcoming trip sees me make part of the journey on regional ATR42 twin propeller aircraft that is going to be a lot more restrictive on cabin baggage than the international Qatar flight on the first leg of my journey. In the past I have always had a bit of stress regarding the size of my current camera backpack, but the regional flight is a clear case of having it checked into the hold. Something had to be done.
Old, Not Obsolete
Like many photographers I’ve had my fair share of camera bags. For years I was a Lowepro user and I’ve worked my way through a number of their backpacks as my kit and travel patterns changed. But more than once I have returned from a week-long trip with aching shoulders after hefting my gear around all day, every day. It seems a common problem – for me at least – with Lowepro backpacks and so it was time to change brands.
Then I discovered the Think Tank Airport Accelerator v2.0 (https://www.thinktankphoto.com/) and fell in love. Capacious to the point of decadence but still within the FAA and IATA (original) recommendations at 35.6 × 52.1 × 22cm. I’ve used it for a couple of years now and find it to be extremely comfortable when hiking for long periods, even with 12kg of camera gear. The backpack straps are very well padded, the zips rugged and lockable and Think Tank’s customer service is unfailingly good.
But it isn’t the perfect bag. It almost is, and maybe it once was, but as I travel to ever more remote places and airlines continue to clamp down on passengers abusing cabin baggage limits I am finding it more difficult to have that guarantee – that peace-of-mind – that I won’t be asked to check my camera gear into the hold. For although it fits within FAA and the original IATA guidelines it (1) only does so when empty and (2) they’re only guidelines, which airlines are increasingly ignoring.
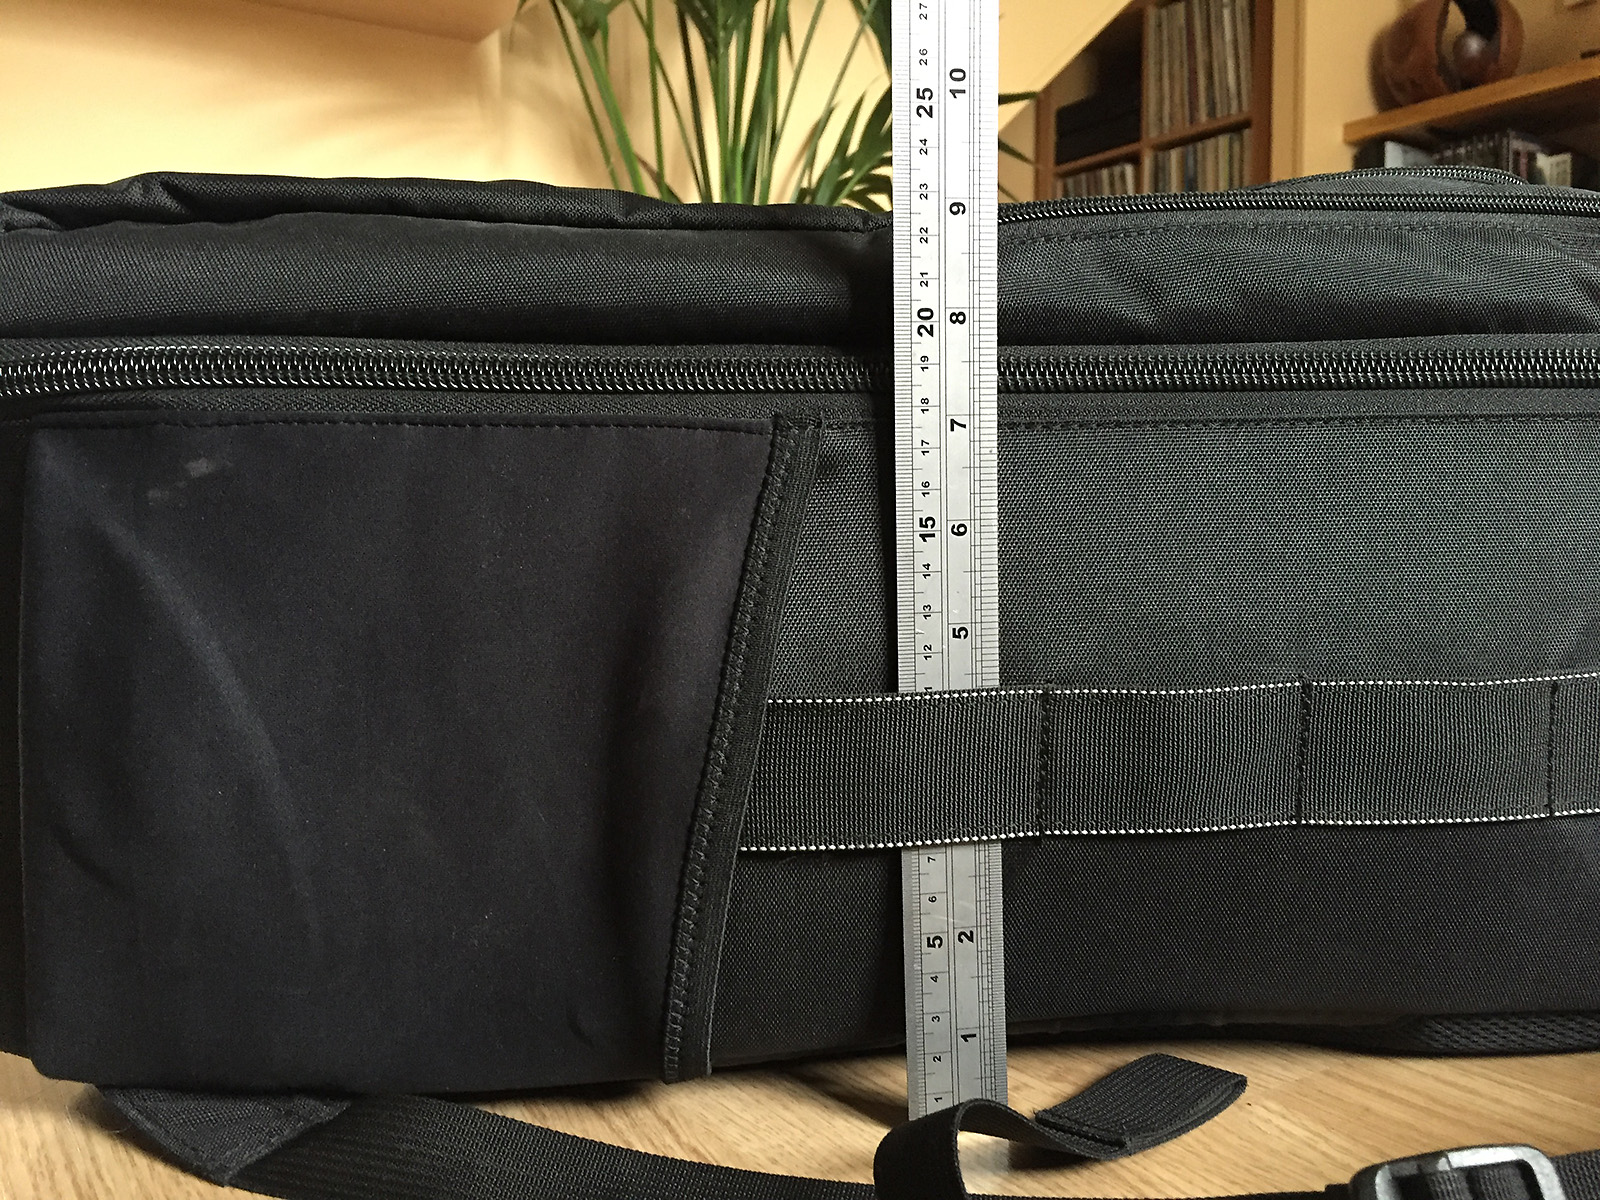
The Think Tank Airport Accelerator may have a depth of the FAA recommended 22.9cm but that is without the anything in the front pockets. Adding another 2-3cm for a laptop makes this bag much less cabin-friendly.
So began a search for a travel backpack and as I was playing ‘fantasy camera bag’ I might as well assemble my dream team of features!
- It had to meet IATA’s 2015 size recommendation of 55 x 35 x 20cm as this would meet pretty much any airline’s cabin baggage allowance.
- It had to accommodate two DSLRs each with a lens attached, specifically a D810 with 24-70 f/2.8 and a D750 with 70-200 f/4. My photography is increasingly in hostile environments – saltwater, deserts, volcanoes and snow – and changing lenses is to be avoided wherever possible. So I need to be able to swap between wide and zoom without exposing the camera sensor to contaminants.
- It had to be a backpack. Most of the things I photograph require a bit of a trek to get to and I want the gear strapped to my back in comfort, leaving both hands free to clamber up rocky paths and over uneven ground.
- It had to allow easy and fast access to all of my gear. Landscapes tend not to move that fast but in hostile environments, conditions do. The ability to pack up quickly is an important as unpacking.
Think Tank were my first choice but whilst they have a smaller camera backpack that satisfies requirement (1), it definitely wasn’t not going to accommodate requirement (2). I looked at other brands – Lowepro, Gura Gear, F-stop, Tenba, Manfrotto etc. – but nothing that met my needs. Things were not looking good.
Then during one of my Google searches I found the Think Tank Airport Antidote v2.0. Not listed on their web site it appears that this is an older model in their Airport series but one that showed promise. With nothing else presenting a viable option I took a gamble on a second-hand one.
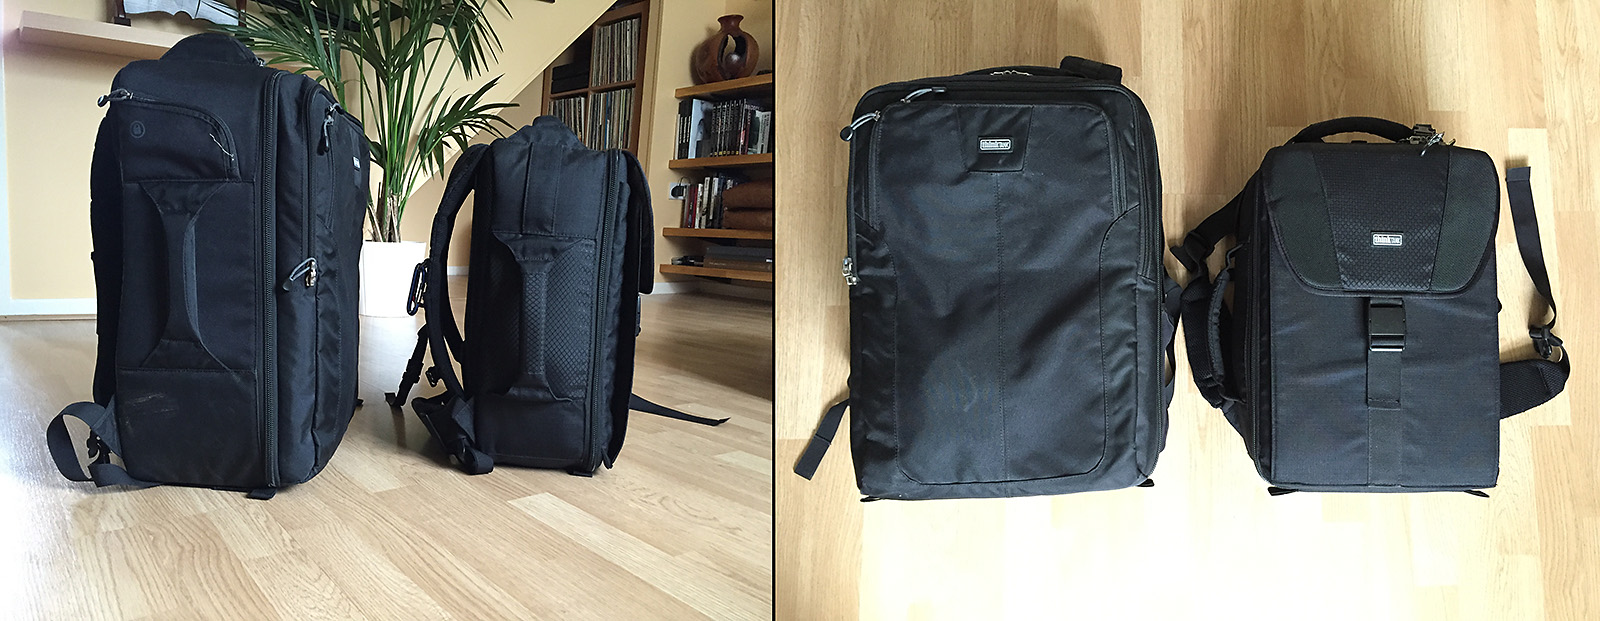
The difference between the Think Tank Airport Accelerator and Airport Antidote v2.0 is immediate and noticeable.
The size difference is obvious. At 43 x 30 x 18 cm its external dimensions are smaller than even the most punitive airline restrictions and it even fits inside the Airport Accelerator. So, it meets requirements (1), (3) and (4) but what about the all-important requirement (2)?
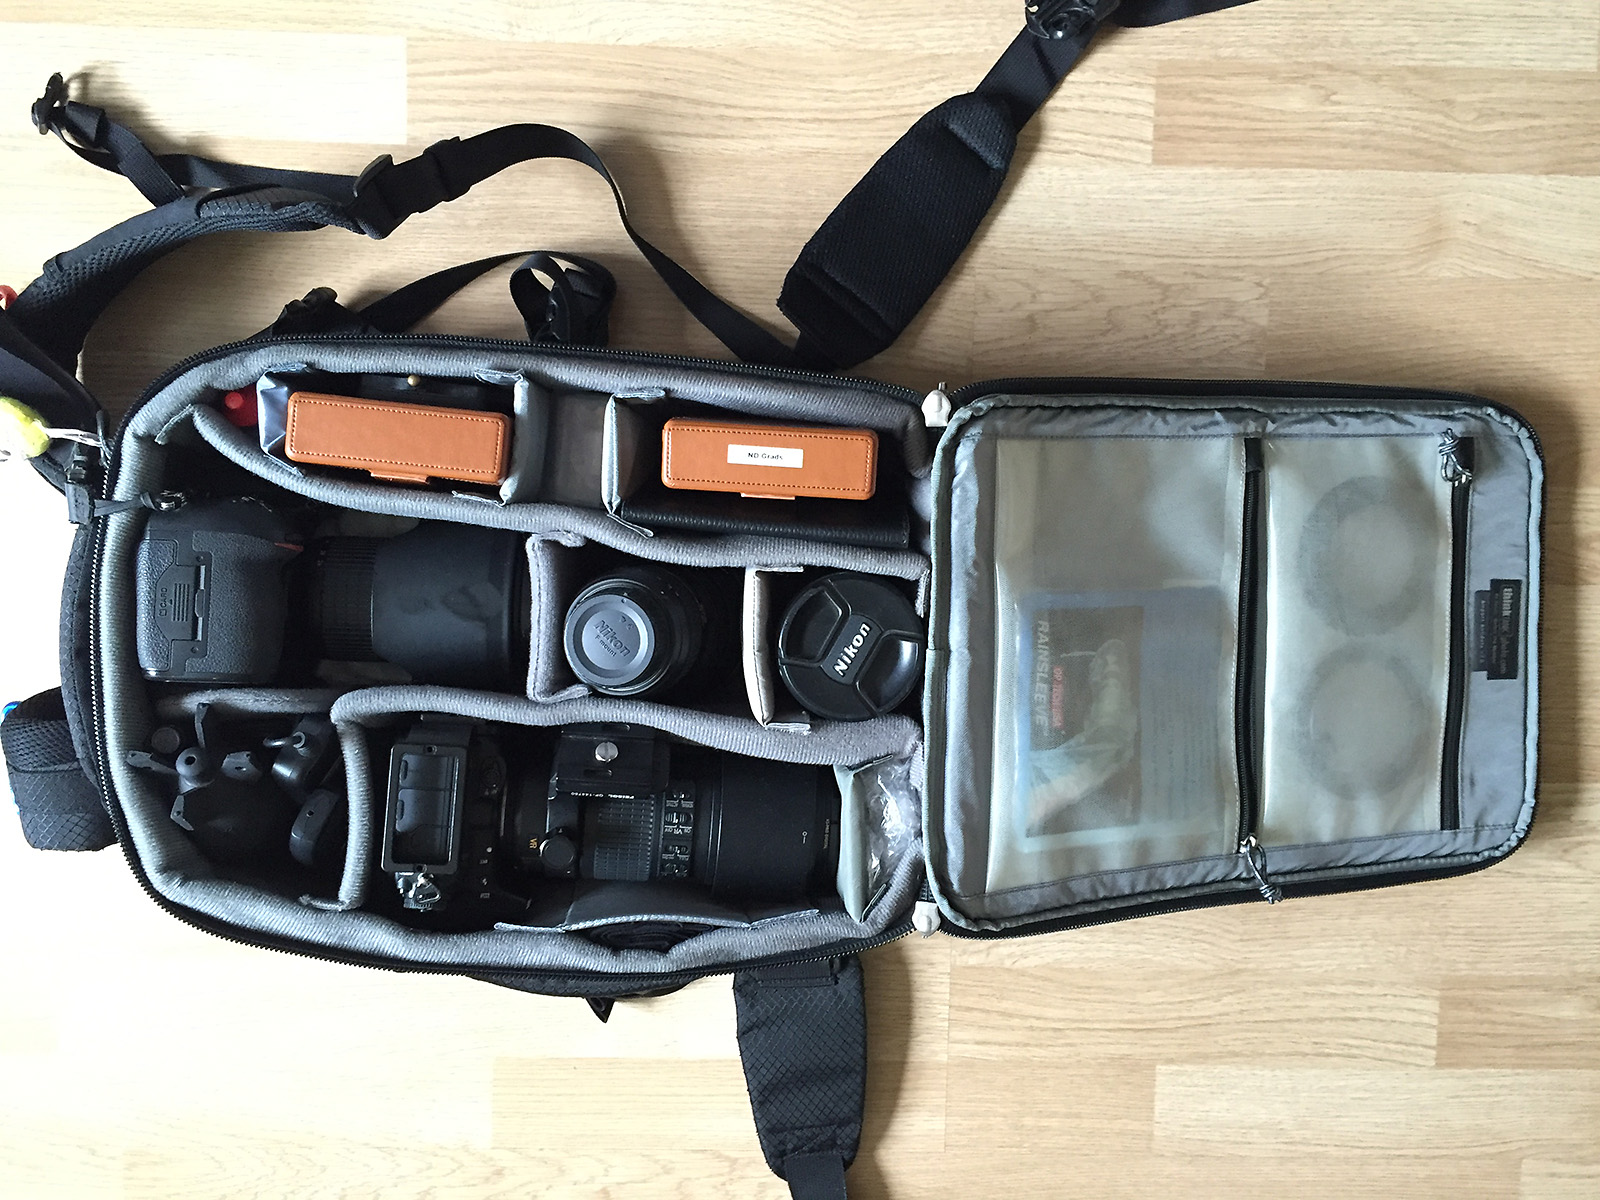
“Old, not obsolete.” Despite its diminutive size the Think Tank Airport Antidote v2.0 manages to fit a in impressive amount of gear without comprising ease of access.
Yes, although tight I can get two DSLRs with lenses attached in the bag, along with a full complement of filters, two additional lenses, batteries and cleaning gear. Had I needed a longer zoom lens then this have been an issue but (my) photography rarely needs much above 200mm.
A Crash Diet
Of course, size is only one issue when to comes to cabin baggage; the weight allowance is the other and, as any photographer will attest, your camera gear always weighs more than the allowance. I’m planning on handling this in a couple of ways.
First, simple psychology. People assume that small bags are lighter than big bags so the mere fact that the Airport Antidote v2.0 is quite compact gives it a perception of lightness, especially if it looks less like a camera backpack and more like a day backpack. Coupled with the time-honoured technique of casually carrying it on only one shoulder and it shouldn’t invite a check-in or gate assistant to look more closely.
There is always a chance that it might get weighed and at that point you’re pretty much stuck. One tactic is to keep an eye on the check-in queue ahead of you and, if you see cabin baggage being weight-checked it may be time to discretely get out of the queue and move to plan B. There are plenty of photographer gilets that provide innumerable pockets but they are almost universally expensive. A fisherman’s gilet will do exactly the same thing (and be much cheaper) or camera belt can be used to carry enough extra gear to get the cabin bag down to the right weight – at least until you’re sure it won’t be checked into the hold (i.e., when you’re on board the plane). Of course being discrete is the key here and so wearing it under a fleece or – in hot climates – a somewhat oversized shirt can go a long way to not bring attention to your sudden gain in weight.
Including laptop, my Airport Antidote is 11.5kg against Qatar’s 7kg allowance so I potentially need to shift 4.5kg to my person. Tough, but just about possible. Yes, it is a pain to have to go through this, but there are not really many options.
The other thing is to keep the weight of the hold luggage down below the maximum allowed. I’ve been stopped at check-in in the past, but as the hold luggage was under the 23kg maximum the additional weight of the cabin baggage was tolerated.
So, here are some guidelines for maximising your chances of getting your beloved camera gear in the cabin with you:
- Aim for a size of 55 x 35 x 20cm or less.
- Aim for a weight of 7kg and, if you can’t, have a plan B for how to deal with the excess weight as you pass through check-in.
- Do not blindly believe the manufacturers “cabin friendly” label on their web site. It may be an old or different definition to the one your airline uses.
In the end there will never really be a guarantee that a cabin bag won’t be checked, but keeping it as small and light as possible certainly helps. For photographer’s the challenge is finding that balance between size, weight and usability. Hopefully this article shows that it is possible to get a significant amount of camera gear into a lowest common denominator size allowance of 55 x 35 x 20cm; that such camera bags do exist and that there are creative options for making cabin baggage temporarily lighter than they actually are.
Good luck!


![Seljalandsfoss is extremely popular due to its close proximity to Reykjavik and the fact that you can walk behind it. Oh, and it’s a waterfall – everybody loves a waterfall… [Click to enlarge!]](http://davehoggan.com/wp-content/uploads/2015/07/MG_7185.jpg)
![Glufrafoss is only a short walk from Seljalandsfoss but for the number of tourists it sees, it could be a million miles away… [Click to enlarge!]](http://davehoggan.com/wp-content/uploads/2015/07/MG_6344.jpg)
![As a picturesque setting there may be better waterfalls, but as a private table for two having a picnic it will be an experience few others will have had. [Click to enlarge!]](http://davehoggan.com/wp-content/uploads/2015/07/MG_6335.jpg)
![Skogafoss, a truly magnificent sight by any standards, is usually hidden by a mass of tourists. [Click to enlarge!]](http://davehoggan.com/wp-content/uploads/2015/07/MG_5942.jpg)
![With plenty of slack in the schedule you can afford to wait until you are, quite literally, alone with nature. [Click to enlarge!]](http://davehoggan.com/wp-content/uploads/2015/07/MG_6254.jpg)

![As pretty as Cape Pembroke was at sunset, hiking back wasn’t a fun experience. [Click to enlarge!]](http://davehoggan.com/wp-content/uploads/2015/05/2010-FAL-440.jpg)
![Much of the day will be spent on the highland road F35 - not something you would want to attempt without a 4WD. [Click to enlarge!]](http://davehoggan.com/wp-content/uploads/2015/05/Thingvellir-Hveravellir-1600px.jpg)
![Google Maps chose the blue line as the 'best' route between Kerlingarfjoll and Grundarfjordur, but best for whom? Reseach and local knowledge suggests the longer, but safer route in blue/white. [Click to enlarge!]](http://davehoggan.com/wp-content/uploads/2015/05/Kerlingarfjoll-Grundarfjordur-Routes-1600px.jpg)
![Snaefellsnes may be a relatively small peninsula but it offers a wide range of landscapes to photograph. I struggled to limit myself to the dozen points of interest above. [Click to enlarge!]](http://davehoggan.com/wp-content/uploads/2015/05/Snaefellsnes-POI-1600px.jpg)


![A lump of three million year-old coral - one among many just found lying around the landscape. [Click to enlarge!]](http://davehoggan.com/wp-content/uploads/2015/02/MG_2209.jpg)
![At the end of the two-day camel caravan is Berhale, a town whose growth is due to the traditional salt industry. Here the salt is loaded onto trucks for country-wide distribution. [Click to enlarge!]](http://davehoggan.com/wp-content/uploads/2015/02/MG_2232.jpg)
![Concrete and stone buildings replace the nomadic Afar's tent-like structures. [Click to enlarge!]](http://davehoggan.com/wp-content/uploads/2015/02/MG_2228.jpg)
![The iPhone 6 made taking panoramic shots so easy that I never used the panoramic head on my tripod. [Click to enlarge!]](http://davehoggan.com/wp-content/uploads/2015/02/IMG_0228.jpg)
![One of the oldest of the Tigray rock-hewn churches is Abrahat Atsebah. [Click to enlarge!]](http://davehoggan.com/wp-content/uploads/2015/02/MG_2343.jpg)
![A priest at the Wukro Cherkos rock church. [Click to enlarge!]](http://davehoggan.com/wp-content/uploads/2015/02/MG_1418.jpg)
![The signs of agriculture can be seen everywhere in Tigray. [Click to enlarge!]](http://davehoggan.com/wp-content/uploads/2015/02/MG_2309.jpg)
![It is hard not to take portraits when there are so many eager volunteers! [Click to enlarge!]](http://davehoggan.com/wp-content/uploads/2015/02/MG_2323.jpg)
![Waiting. And watching. [Click to enlarge!]](http://davehoggan.com/wp-content/uploads/2015/02/MG_1415.jpg)
![A stall at the Wukro market selling spices and, of course, salt. [Click to enlarge!]](http://davehoggan.com/wp-content/uploads/2015/02/MG_2381.jpg)
![The markings of an Orthodox Christain women. [Click to enlarge!]](http://davehoggan.com/wp-content/uploads/2015/02/MG_2380.jpg)

![Dawn approaches as we descend from Erta Ale. [Click to enlarge!]](http://davehoggan.com/wp-content/uploads/2015/02/MG_1593_cs.jpg)
![Camels are a critical part of the Afar way-of-life and so get treated with love and care. [Click to enlarge!]](http://davehoggan.com/wp-content/uploads/2015/02/MG_1610.jpg)
![The sun literally bakes the ground. [Click to enlarge!]](http://davehoggan.com/wp-content/uploads/2015/02/MG_1652.jpg)
![Ash, as far as the eye can see [Click to enlarge!]](http://davehoggan.com/wp-content/uploads/2015/02/MG_1675.jpg)
![Luxury is relative. After four days without a toilet the sanitary facilities at Hamed Ale were a step up. Toilet is on the left; bucket-shower on the right. [Click to enlarge!]](http://davehoggan.com/wp-content/uploads/2015/02/MG_2208.jpg)
![En route from the salt plains to Berhale [Click to enlarge!]](http://davehoggan.com/wp-content/uploads/2015/02/MG_1731.jpg)
![Our temporary home at Hamed Ale and a testament to the fact that travelling with the right people makes everything fun! [Click to enlarge!]](http://davehoggan.com/wp-content/uploads/2015/02/IMG_0224.jpg)
![Dallol was once described by National Geographic as being one of the most remote places on Earth. [Click to enlarge!]](http://davehoggan.com/wp-content/uploads/2015/02/MG_2018.jpg)
![A bizarre landscape that is sadly now but a shadow of what it once was. [Click to enlarge!]](http://davehoggan.com/wp-content/uploads/2015/02/MG_1987.jpg)
![This is what the stunning, other-worldly landscape of Dallol is becoming due to potash mining. [Click to enlarge!]](http://davehoggan.com/wp-content/uploads/2015/02/MG_2014.jpg)
![The area was once a riot of vivid yellows, green, blues and white. buy nearby potash mining has had a devastating effect. [Click to enlarge!]](http://davehoggan.com/wp-content/uploads/2015/02/IMG_0215.jpg)
![The daily camel train heading out to the salt flats to pick up their cargo of white gold. [Click to enlarge!]](http://davehoggan.com/wp-content/uploads/2015/02/MG_2036.jpg)
![Cliffs of salt dominate the landscape and provide some excellent landscape to work with. [Click to enlarge!]](http://davehoggan.com/wp-content/uploads/2015/02/MG_2090.jpg)
![More evidence of the destruction of a continent. This fault has only appeared in the last year and mirrors the 6500km fault that is pushing eastern Africa away from the rest of the continent. [Click to enlarge!]](http://davehoggan.com/wp-content/uploads/2015/02/MG_2108.jpg)
![Getting ready to load the camel for the two-day journey back to Berhale. [Click to enlarge!]](http://davehoggan.com/wp-content/uploads/2015/02/MG_2189.jpg)
![Descending from Erta Ale. [Click to enlarge!]](http://davehoggan.com/wp-content/uploads/2015/02/MG_1583.jpg)
![An Afar military guard watches the only road in to the area. [Click to enlarge!]](http://davehoggan.com/wp-content/uploads/2015/02/MG_1635.jpg)
![Life survives in even the harshest environment. [Click to enlarge!]](http://davehoggan.com/wp-content/uploads/2015/02/MG_1651.jpg)
![Dunes of volcanic ash [Click to enlarge!]](http://davehoggan.com/wp-content/uploads/2015/02/MG_1678.jpg)
![Years of use has produced a polished salt track across the land. [Click to enlarge!]](http://davehoggan.com/wp-content/uploads/2015/02/MG_1819.jpg)

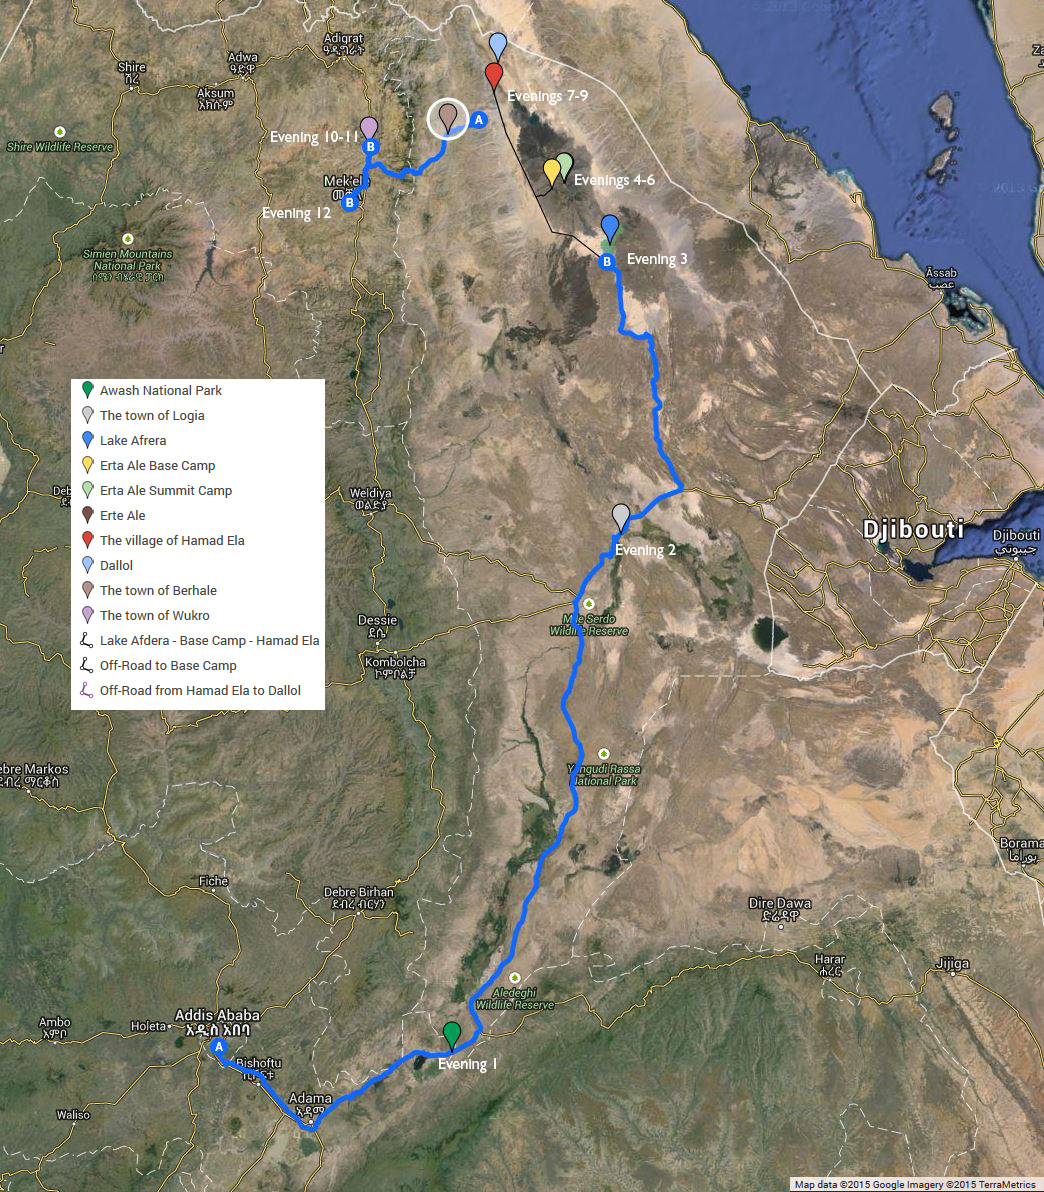
![One of the many short stops you'll make over the next 13 days. The trip is all about volcanoes and geology and with a trained geologist for a guide you'll certainly learn about geology... [Click to enlarge!]](http://davehoggan.com/wp-content/uploads/2015/01/MG_9702.jpg)
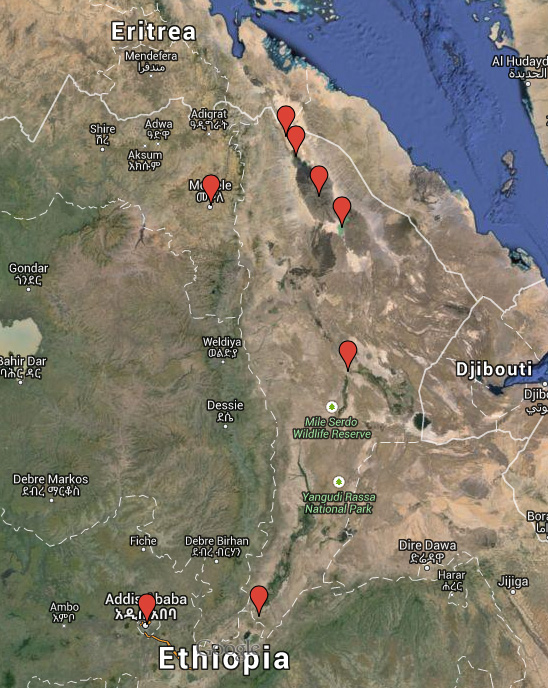
![The first day's travel was along route 4 to Awash National Park covering a stretch of approximately 200km... [Click to enlarge!]](http://davehoggan.com/wp-content/uploads/2015/01/Day-1-Route.jpg)
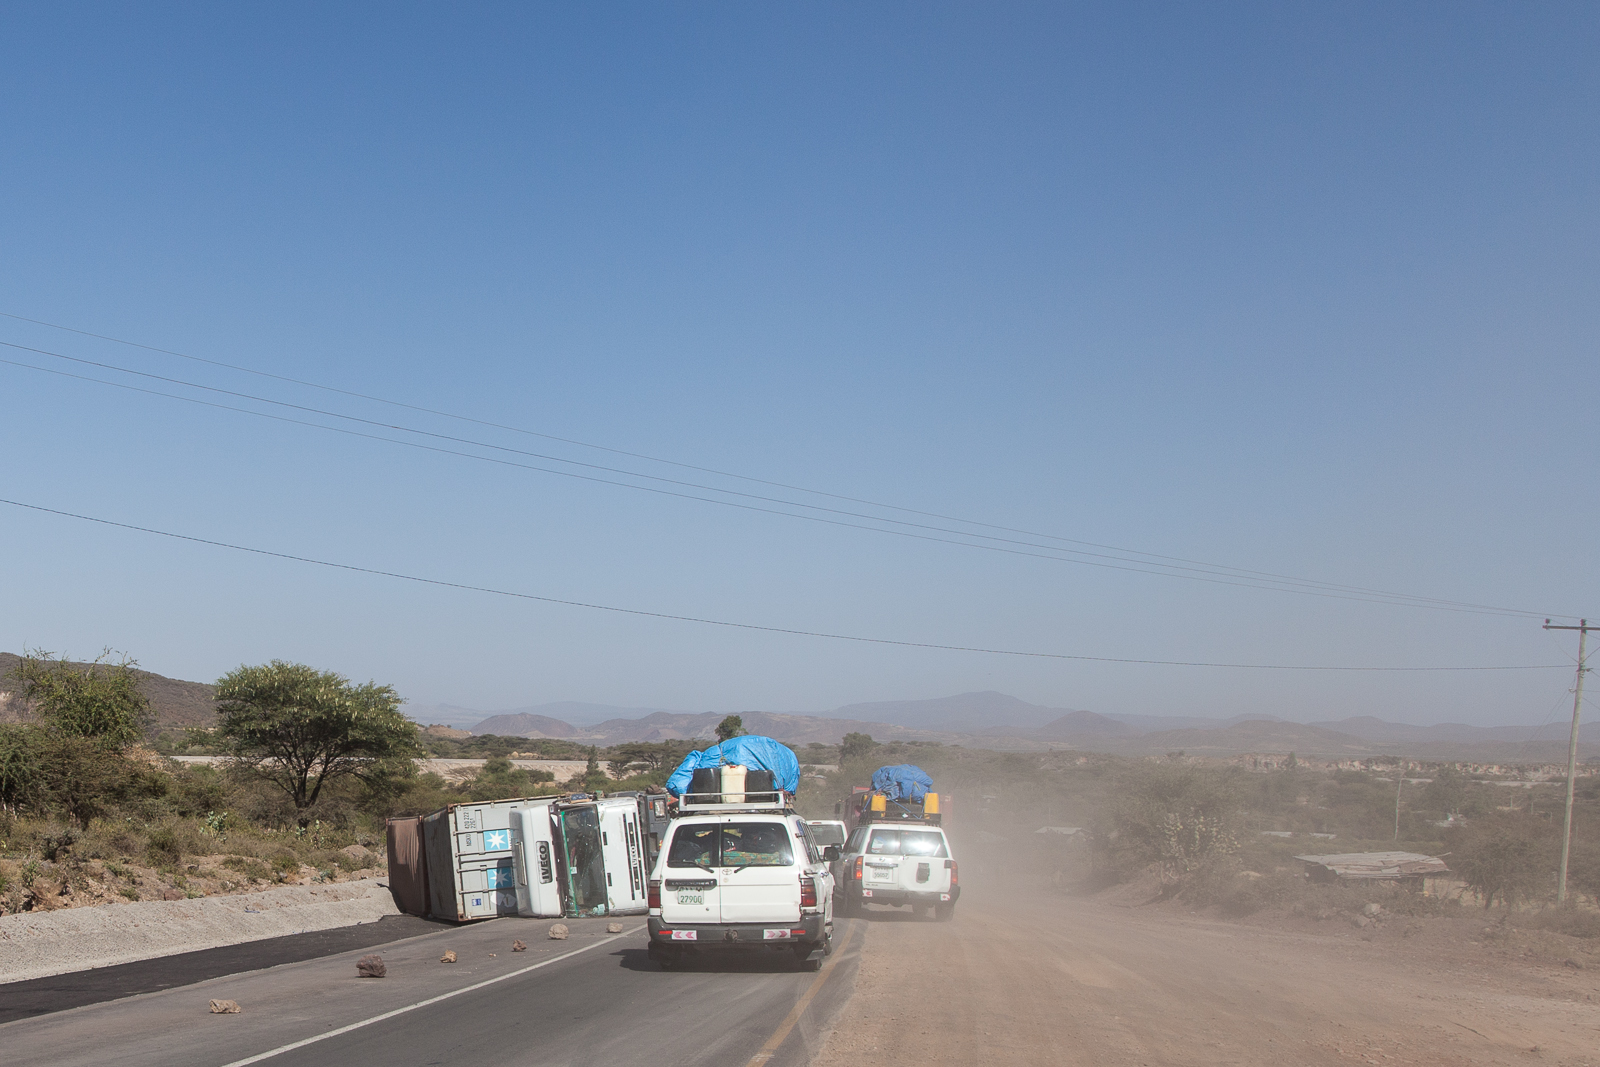
![On the first day of driving we saw in the region of 20 overturned trucks. [Click to enlarge]](http://davehoggan.com/wp-content/uploads/2015/01/MG_9700.jpg)
![Day two is more time in the 4WD vehicles covering distance... [Click to enlarge!]](http://davehoggan.com/wp-content/uploads/2015/01/Day-2-Route.jpg)
![If you're looking to get some quality wildlife photography this may not be the trip for you. We spent a couple of hours in Awash national Park and saw relatively few animals... [Click to enlarge!]](http://davehoggan.com/wp-content/uploads/2015/01/MG_0816.jpg)
![Today you'll get to stop in one of the road-side towns that have grown around the busy transport link between Addis and Djibouti [Click to enlarge!]](http://davehoggan.com/wp-content/uploads/2015/01/MG_0878.jpg)
![The second day begins to show just how empty Ethiopia can be... {Click to enlarge!]](http://davehoggan.com/wp-content/uploads/2015/01/IMG_0102.jpg)

![The kit I took to Ethiopia consisting of the panel (top), the red cable connecting the panel and V72 battery, the black cable to connect the V72 to the camera charger and the white/black cable to connect to my MacBook Air. The car charger (bottom) also came in useful. The camera charger is not shown as it did not survive... [Click to enlarge]](http://davehoggan.com/wp-content/uploads/2015/01/IMG_0173.jpg)
![Although not part of the provided system the magnetic mount really made a huge difference - and one I recommend Voltaic Systems consider adding... [Click to enlarge]](http://davehoggan.com/wp-content/uploads/2015/01/MG_0190.jpg)
![A close-up of the panel on the 4WD showing the (home-made) silver metal magnetic mounts and the (provided) plastic loops in each corner for cable-tie mounting. The panel happily survived repeated bumps and knocks as well as being covered in dust and volcanic ash... [Click to enlarge]](http://davehoggan.com/wp-content/uploads/2015/01/IMG_0136.jpg)
![Using the ten foot cable I had a lot of flexibility as to where I put the V72 in the 4WD. All I then had to do was wait for the sun to work its magic... [Click to enlarge]](http://davehoggan.com/wp-content/uploads/2015/01/IMG_0130-2.jpg)
![Home at Erta Ale. "A compact, fully air-conditioned, one bedroom apartment backing on to a stunning panoramic landscape." it said in the brochure. It even came with free mice... [Click to enlarge]](http://davehoggan.com/wp-content/uploads/2015/01/IMG_0166.jpg)
![We relied on the Voltaic charger. Several Canons, a Fuji, two iPhones and even the quadracopter were all kept alive by the solar charger... [Click to enlarge]](http://davehoggan.com/wp-content/uploads/2015/01/MG_0701.jpg)
![The provided plastic attachments allowed the panel to be cable-tied to the shack and the cable fed inside via one of the many, many holes. The next nearest source of power was a 4WD somewhere in the distance... [Click to enlarge]](http://davehoggan.com/wp-content/uploads/2015/01/IMG_0162.jpg)
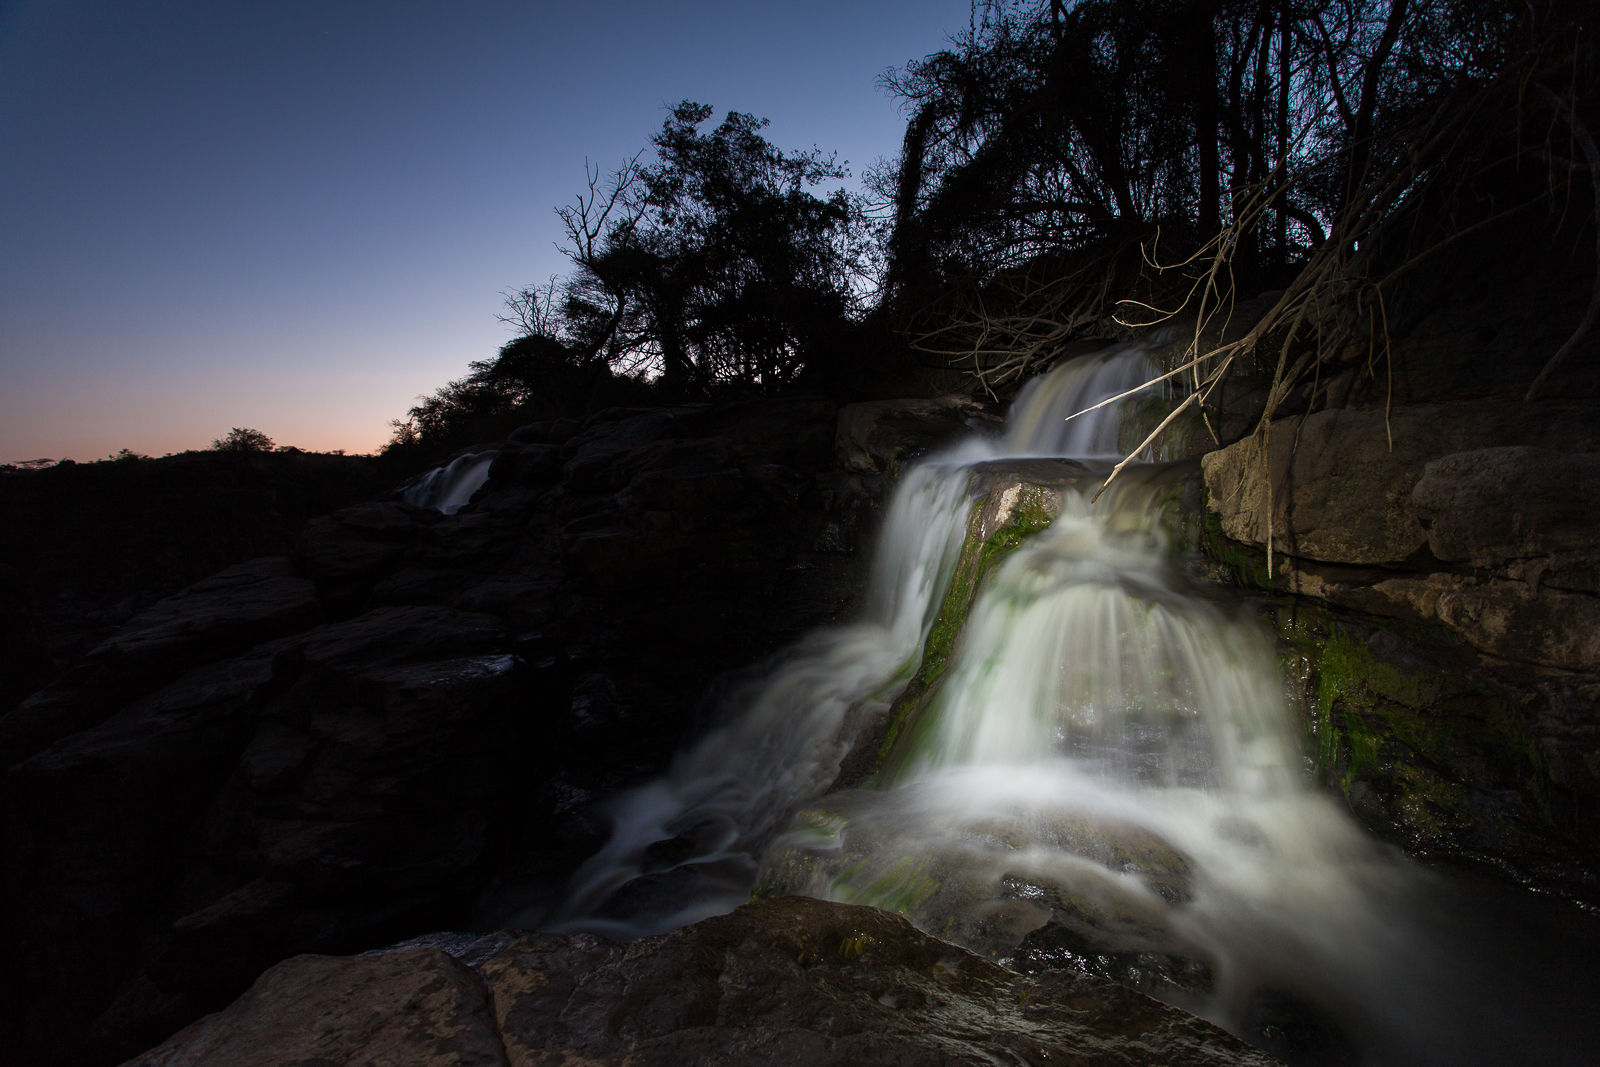
![By day three the lack of camera battery charger would have been catastrophic to the shoot and shots like this would have been missed... [Click to enlarge]](http://davehoggan.com/wp-content/uploads/2015/01/MG_1353.jpg)