Tag Archives: gear

Power on Location: Part 3 – Battery Packs

Every time I see a photographer using an old film camera it makes me smile. It doesn’t happen often – seeing a film camera that is, not smiling – but it does make me wonder about their reasons. The love of the art of photography perhaps, or maybe they’re after some ‘feel’ to the image without reverting to Photoshop? Perhaps one day I should stop and ask. Film cameras are, of course, extremely limited when compared to the capabilities of today’s DSLRs in virtually every respect. Except one: they don’t need to be constantly fed power.

Of course, depending upon the style of photography you pursue power may not be an issue. A healthy DSLR battery in normal conditions can usually cope with 700-1000 shutter operations and as long as you don’t make heavy use of live view, picture review or image stabilisation then a single battery may easily cope with a day’s shooting. Carry a spare or two and charge them back in the hotel room overnight and power will not be on your shoot’s “risk register”. But what if you don’t have a room to go back to – have no mains power at all? What if you do need to shoot video, use live view and stabilisation? What if you are not shooting in ‘normal’ conditions? How do you keep a ready supply of power then?

Power on location has become a bit of a crusade for me and I have written about it before when first looking at the Voltaic Systems’ Solar Charger and in my detailed Voltaic Systems’ 17W Solar Charger Field Review. But as I prepare for two upcoming trips – the uninhabited island of Batu Tara, Indonesia and central Siberia – I’ve been spending more time researching my holy grail – a reliable, capable, easily transportable power source. And I have learnt some interesting facts which may be worth sharing as they help demystify the confusing world choosing a battery pack.

Whilst this article does have a slight photographic angle it is equally applicable to choosing a battery pack for any purpose.

Identify Your Needs
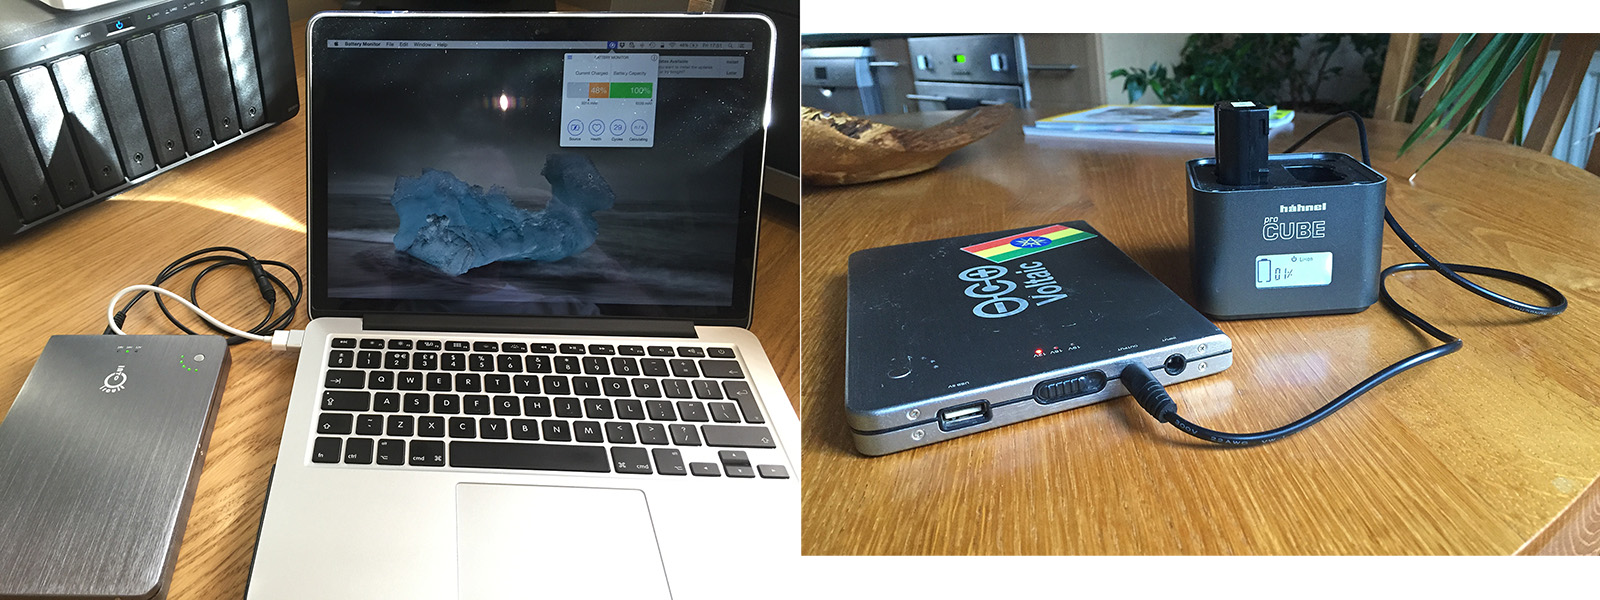
My two primary use cases for power on location; charging the laptop and charging my camera batteries.

My two primary use cases for power on location; charging the laptop and charging my camera batteries.

Perhaps obvious but worth mentioning is that what you want to keep powered on location will dictate the kind of solution you will need. Before travelling to Ethiopia I knew that I wanted to be able to charge not only my DSLR batteries but also my travel laptop and so the solution that I needed had to have the ability to provide 12V for the DSLR and 16V for the laptop. But once on location other requirements were discovered; my smart phone (for quick videos) and someone’s drone batteries, meaning that the more standard 5V USB port was needed. Given that most battery packs are USB only I could eliminate a lot of options very quickly.

If you have ever looked at battery packs on Amazon or similar web sites you’ll notice that they are almost always rated by their “mAh” or milliampre-hour value and it is human nature to assume that the bigger the mAh, the more you can charge with the battery pack. And if you are only looking at charging USB devices then you would be right. Well, that 26000mAh battery pack still won’t really be 26000mAH, but at least it will still be more than the 20000mAh one – which will also not really be 20000mAh. But, if you are looking at charging more than USB devices, for example camera batteries and laptops, mAh suddenly becomes far less useful and even downright misleading.

The Science Bit: The Watering Can

In simple terms any battery has three aspects that are relevant to us: the output voltage it can supply (measured in volts), the electrical current (measured in amps) and total power capacity (measured in watts). Like the relationship between ISO, stutter and aperture, volts, amps and watts are linked such that a change in one has to be reflected by a change in (at least) one of the other two. The equation that links watts, volts and current is very simple:

Watts (W) = Current (I) * Volts (V)

Equations tend to put people off, as does talking about current, volts and watts so a typical analogy may help: a garden watering can.

Every watering can has a capacity – it may be large or small but it can only hold a finite amount of water. In the same fashion a battery pack has a finite capacity for storing electricity. The capacity of a watering can is usually measured in litres (or pints); the capacity of a battery pack is measured in watts (W), or more specifically watt-hours (Wh).

The flow rate at which the water leaves the watering can’s spout represents electrical current. If you were to fill a cup from the watering can, it would take a long time if the water only dripped out but be very quick if the water gushed out. In the same way, electrical circuits require an amount of power to be supplied to them; just how much is their flow rate and delicate electronics usually require very low flow rates. The battery pack’s flow rate is termed its “current” and is measured in ampres per hour (Ah), or thousandths of an ampre per hour – mAh.

Voltage is a like the force or pressure of the flowing water. Imagine water pouring out of the watering can’s spout onto the earth. If the spout is simply the open end of a tube then the water is concentrated in one spot and it hits the earth with some force likely pushing the earth aside making a small hole. If you attach a sprinkler head to the water spout the water is spread over a larger area and it hits the earth with less force. In the same way a lot of water in one spot can make a dent in the ground, too much voltage can damage electrical circuits.

Ultimately what is important to us is the capacity of the battery pack as this directly determines just how much stored power we have for charging our camera batteries, phones, drones and laptops. And, as mentioned, stored power is measured in watt-hours. So when choosing a battery pack the value we are really interested in is not amps or millamps, but watts.

Now I promise this is the last of the watering can analogy. A full can could be emptied in one go or gently poured out – in other words how long the stored water lasts depends upon how quickly you use it. Power stored in battery packs is usually given in watt hours (Wh) meaning a 72Wh battery can provide 72 watts for one hour, 144 watts for 30 minutes or 1 watt for 72 hours. So how long it lasts depends upon how much power the connected device is using and that is a function of the voltage the device requires and the current it is drawing.

In the same way that watts can be expressed as watts per hour, amps can be expressed as amps per hours. So 10000mAh means that over a one-hour period 10 amps will flow; equivalent to five amps per hour for two hours and so on. But there is one crucial difference between watt-hours and ampre-hours: ampre-hours only measure the flow of power, not how much power has flowed. Knowing the mAh rating is all well and good but it does not tell us the actual capacity of the battery.

So, why then, when shopping for battery packs do manufacturers almost always rate their products in amps?

Lies, Damned Lies and Advertising

The best way to demonstrate why using the mAh can be misleading is by an example. I have picked the Maxoak battery pack below only because it is in my Amazon shopping basket and it actually – if perhaps inadvertently – attempts to be somewhat honest about the battery’s true capacity.
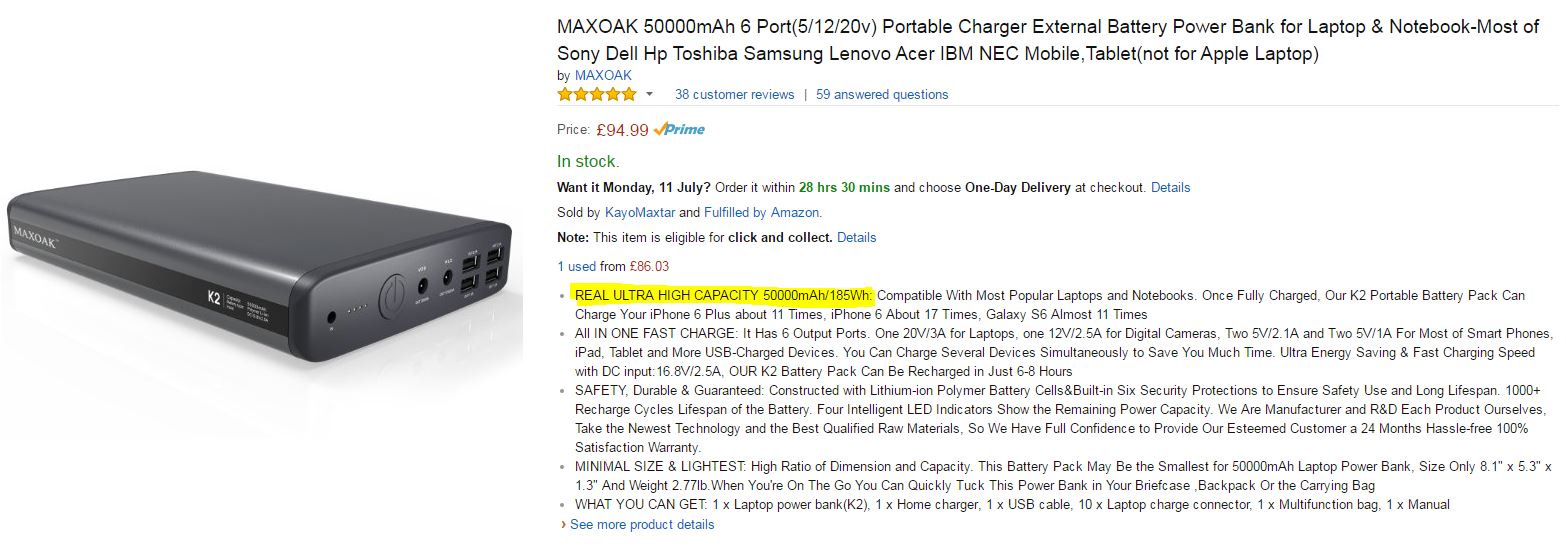
Some battery pack manufacturers provide the watt-hour capacity of their product which is much more useful than the mAh value.

Some battery pack manufacturers provide the watt-hour capacity of their product which is much more useful than the mAh value.

The obvious selling point of this battery pack is its 50,000mAh rating. If you were looking for a high capacity pack, this would be very hard to ignore. My Macbook Retina Pro 13” laptop has a rating of 6559mAh so in theory I can charge it about eight times from this battery pack. The maths is simple but do you really believe the result?

From the equation above we know that the actual capacity of a battery is the current – here 50 amps – multiplied by the voltage. The problem is this battery pack lists three voltages, so which one do we use?

Unlike many advertisers Maxoak actually provide the watt-hours capacity, here highlighted in yellow, but now things get a bit more interesting. It states a watt-hour capacity of 185Wh; if you put these values into the equation we get:

185Wh = 50000mAh * 3.7V

So, where did 3.7V come from? The advertised voltages are 5V, 12V and 20V. Something does not add up.

Single Cell Equivalency: A Universal Standard

As I am no expert on battery technology I will defer to Wikipedia:

A “cell” is a basic electrochemical unit that contains the basic components, such as electrodes, separator, and electrolyte. In the case of lithium-ion cells, this is the single cylindrical, prismatic or pouch unit, that provides an average potential difference at its terminals of 3.7 V for LiCoO and 3.3 V for LiFePO. A “battery” or “battery pack” is a collection of cells or cell assemblies which are ready for use, as it contains an appropriate housing, electrical interconnections, and possibly electronics to control and protect the cells from failure. In this regard, the simplest “battery” is a single cell with perhaps a small electronic circuit for protection.

So it appears that the Maxoak battery pack is using the voltage rating of a single cell, not of the voltage output by the battery. If it were possible to task the Maxoak battery pack with providing 3.7V to a device then it could (theoretically) provide 50 amps for one hour, or a more realistic 0.5 amps for 100 hours. The problem is of course that you can’t attach a 3.7V device; it provides 5V, 12V or 20V. Given that the capacity of the battery at 185Wh is fixed then using the rated voltages (and ignoring internal losses due to voltage conversion) we get:

185Wh = 37000mAh * 5V

185Wh = 15417mAh * 12V

185Wh = 9250mAh * 20V

Which is a big difference. Suddenly the mAh figure used by so many battery pack manufacturers is a little less meaningful as it depends upon the voltage requirement of the device being powered. What the manufacturer is doing is stating the theoretical current output of their battery pack as if it were a single cell. This is called Single Cell Equivalency, or simply SCE, and is very common.

Unless a manufacturer of a battery pack states otherwise then it is probably wise to assume that the mAh value they proudly claim for their product is based upon supplying a 3.7V load – the SCE. And, given that the vast majority of battery packs aim to provide a 5V USB for phones, tablets and, well, anything else USB, then you can see that the advertised mAh value is already a little meaningless as that 20000mAh (at 3.7V) battery pack is now only 14800mAh (20Ah * 3.7V = 74Wh / 5V = 14.8Ah).

Knowing about the SCE is really quite useful as it allows you to get a better idea as to the true capacity – the watt-hours – of a given battery pack.

Real World Examples

Above I mentioned that, even for USB-only battery packs, the advertised mAh is probably not what you will end up getting. This is simply as the USB port provides a 5V supply and the mAh rating is likely based on the SCE voltage of 3.7V. If we assume that there are no losses from the process of voltage conversion then we get:
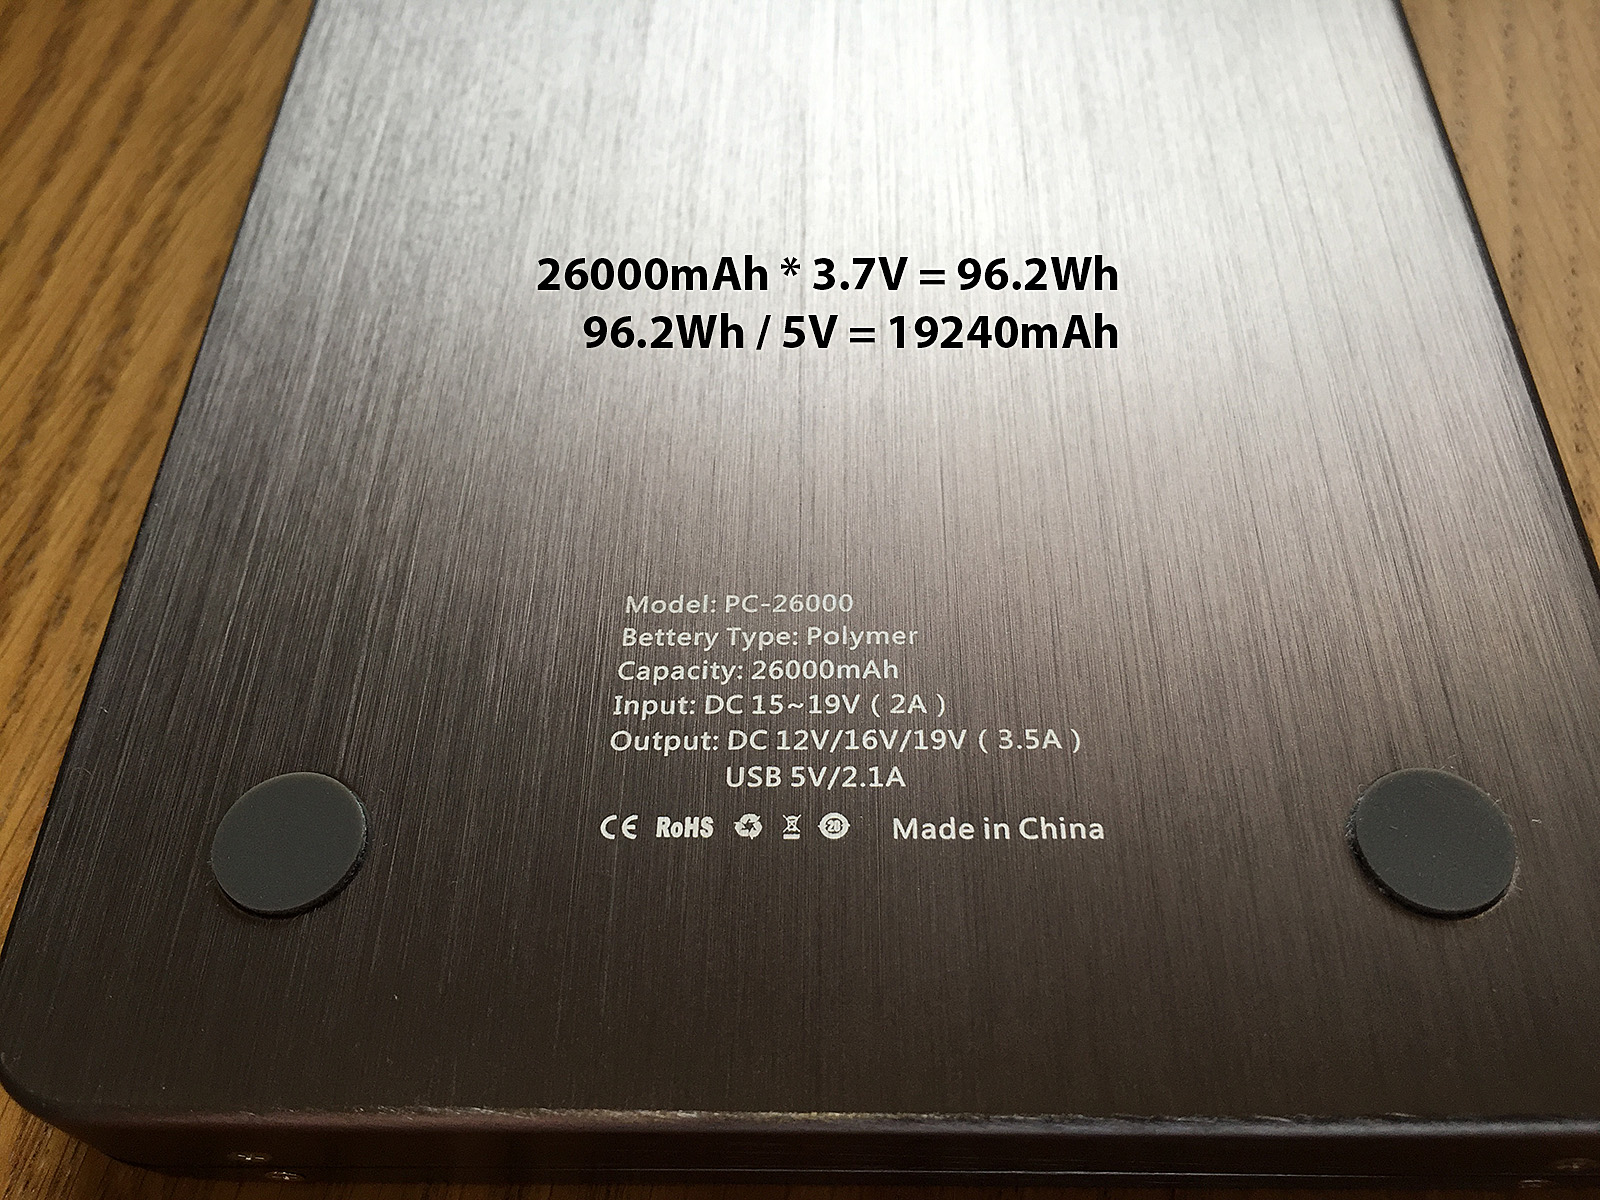
The Intocircuit battery pack specifies a 'capacity' of 26000mAh, but this isn't really what you get. It is not a lie, but, like most other manufacturers, they are using an industry standard that you won't be.

The Intocircuit battery pack specifies a ‘capacity’ of 26000mAh, but this isn’t really what you get. It is not a lie, but, like most other manufacturers, they are using an industry standard that you won’t be.

Our 26000mAH pack is now only 19240mAh. But there will be energy losses due to conversion. Depending upon the internal design of the battery pack its native voltage will be a multiple of 3.7V and the process of turning the native voltage into USB’s 5V requires some kind of circuitry such as a boost convertor. This type of conversion is inefficient and whilst I have no concrete evidence I have seen a figure used in a couple of articles: 30%. If we use this figure then we get a 5V USB mAh of 13468mAH, enough to charge an iPhone 6 (SCE 1810mAh) about seven times.

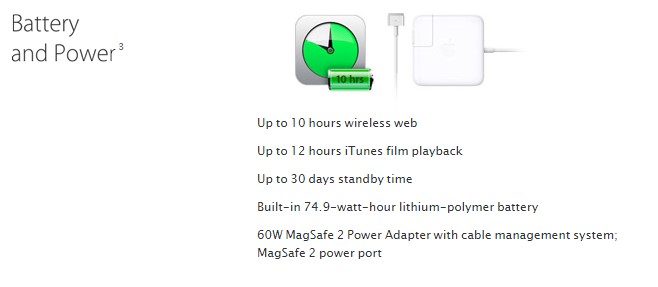
Going back to my Macbook and its 6559mAh capacity we now know that we really need is the watt-hours capacity of its battery which, according to Apple’s web site is 74.9Wh.

Apple are helpful in that they specify the watt-hour (Wh) of their devices.

Apple are helpful in that they specify the watt-hour (Wh) of their devices.

The Maxoak could therefore theoretically charge the MacBook twice with a bit left over, although again this is just the raw arithmetic without accounting for internal losses due to voltage conversion and other considerations. Assuming a 30% for conversion reduces this to approximately 1.7x charges for the MacBook.

More relevant to photographers is the camera battery which, in my case, is the Nikon EN-EL15. Like Apple, Nikon helpfully provide the watt-hours value on the battery casing itself:
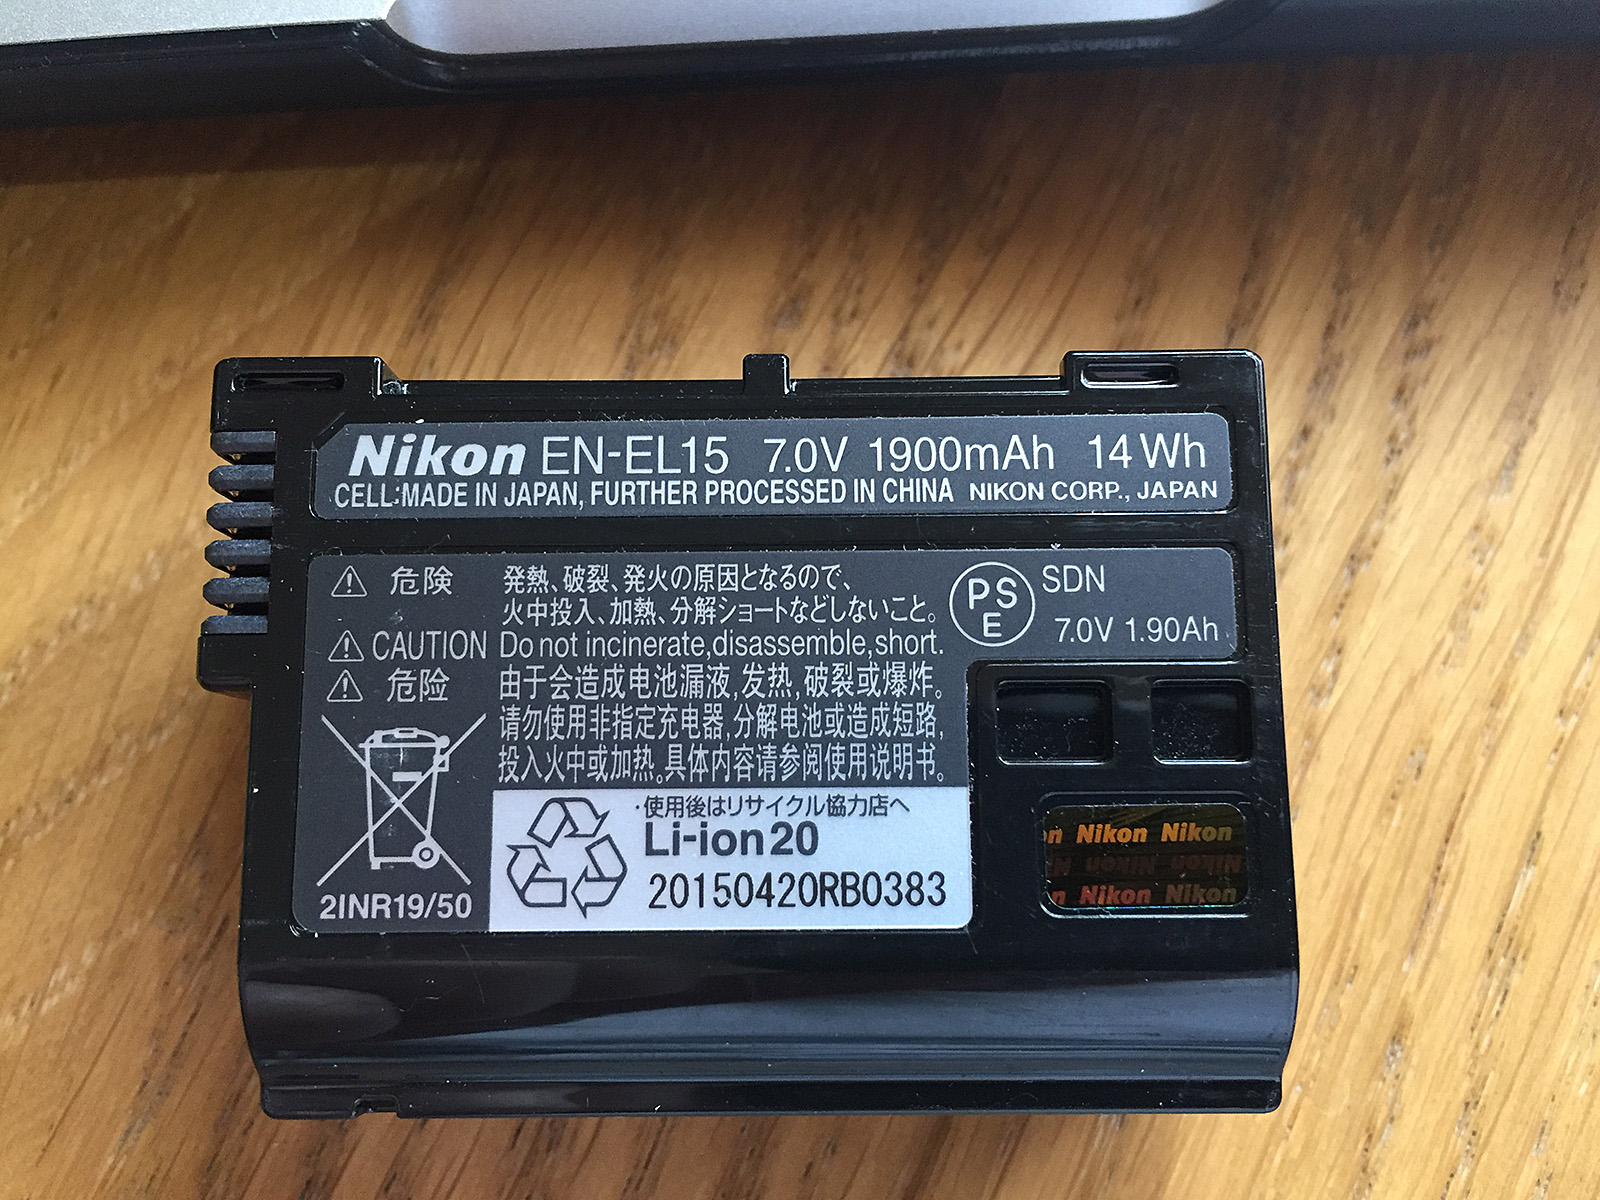
Here the Nikon EN-El15 specifies the watt-hour capacity from which we can calculate the single cell equivalency as 3780mAh.

Here the Nikon EN-El15 specifies the watt-hour capacity from which we can calculate the single cell equivalency as 3780mAh.

This is a more tricky example as, whilst the Nikon battery is a 7V battery pack the Hahnel battery charger I use for it specifies a 12V input. But I was curious to find out anyway.
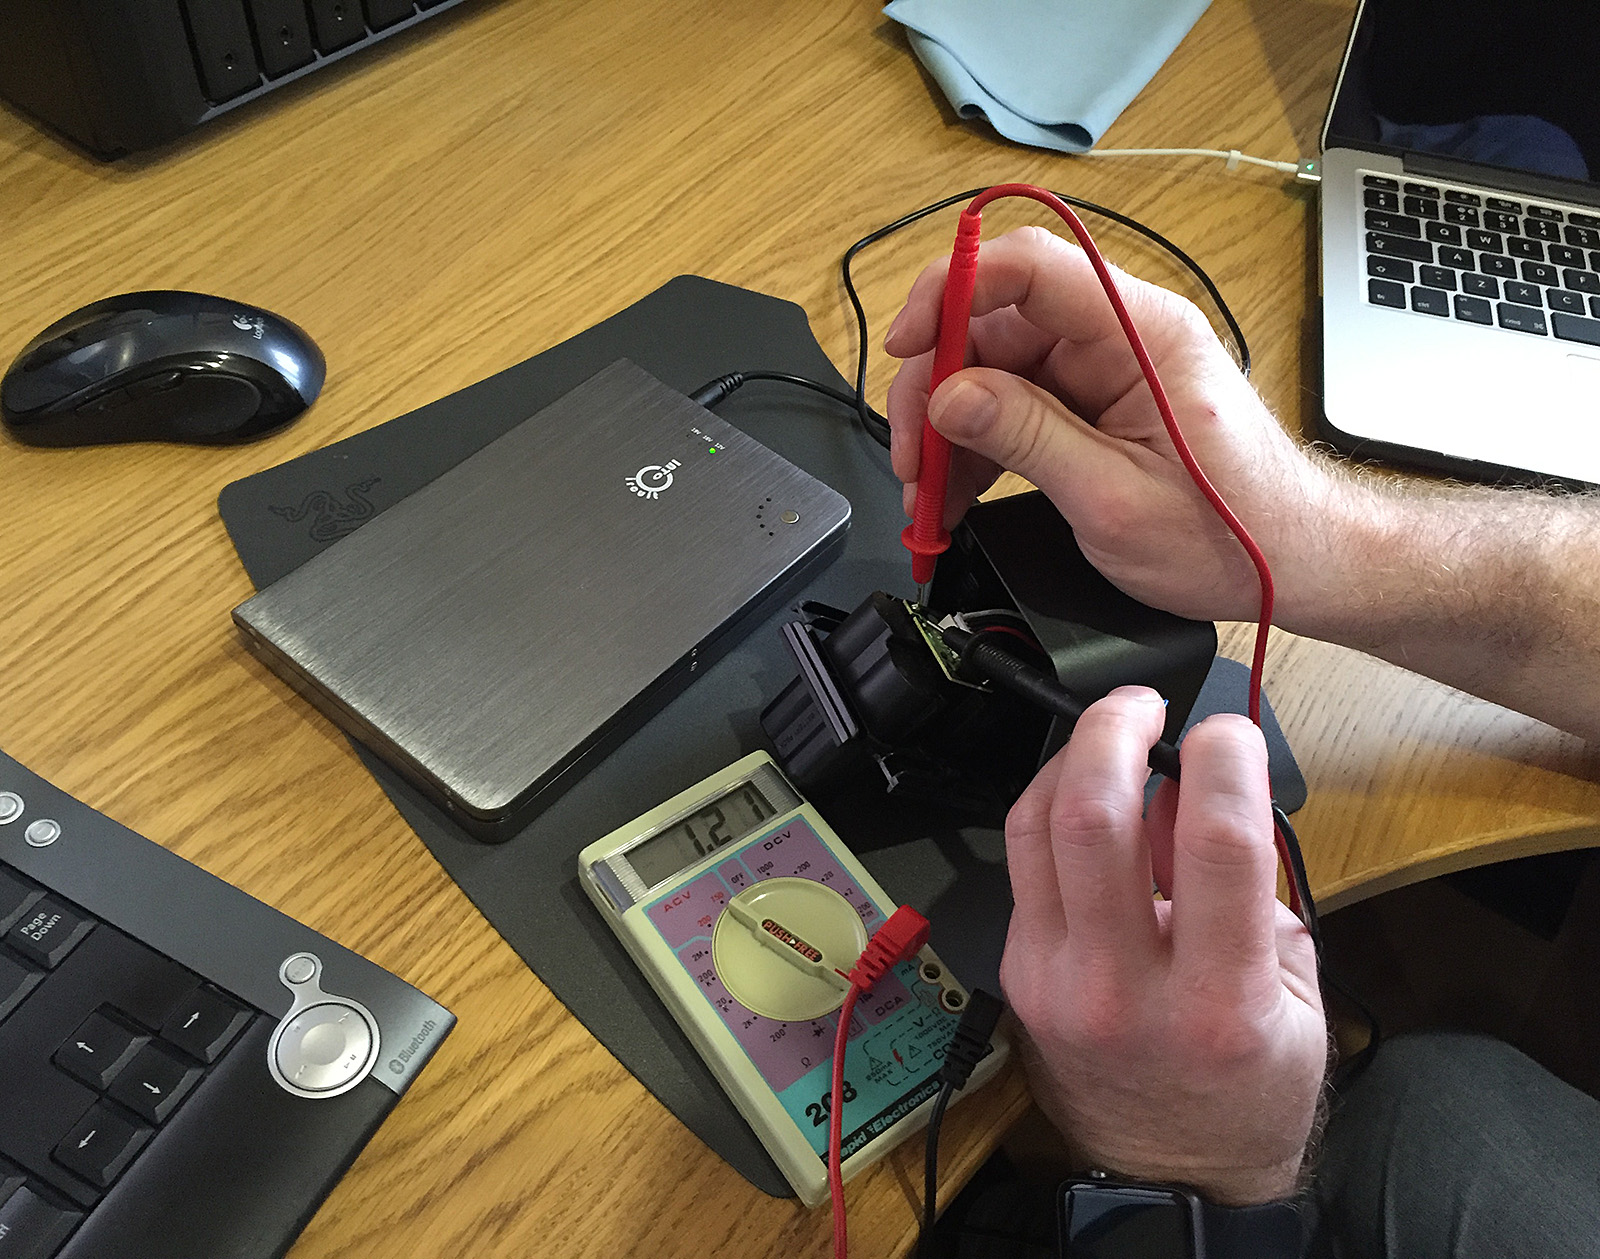
So what does the 7V Nikon EN-EL15 battery draw when charging from a 12V Hahnel charger? 8V at 1.2 amps. apparently.

So what does the 7V Nikon EN-EL15 battery draw when charging from a 12V Hahnel charger? 8V at 1.2 amps. apparently.

When charging a single Nikon battery I measured a 8V draw at 1.2 – 1.3 amps. I would not put any emphasis on these values as “intelligent” battery chargers vary the supplied current throughout the charging process. So let’s try our basic equation:

Allow for Conversion Loss:               26000mAh * 0.7 = 18200mAH

Nikon EN-EL15 SCE:                         14Wh/3.7V = 3780mAh

Theoretical Number of Charges:     18200/3780 = 4.8

If we believe the rudimentary maths my 26000mAh battery pack should charge 4.8 EN-EL15 batteries. I have so far managed just under three charges from the battery pack and there are still 2/5 LEDs lit so we might be in the right ballpark.

One final note is that all the above is assuming that the environment is not a factor. If the surrounding ambient temperature is significantly higher or lower then this will also have an effect of the number of charges as it affects the battery chemistry.

There’s Just One More Thing

Remember the 50000mAh (SCE) Maxoak battery pack above? It is attractive and despite the 50000mAh not really being what we have available it is has more capacity than a 26000mAh (SCE) battery. But there is a reason it is still in my Amazon shopping basket and not in the camera bag.

After a few incidents involving lithium batteries on aircraft the International Airline Travel Association – IATA have issued an advisory on the passenger transport of lithium batteries, both in cabin and hold luggage. The jist of the advisory is that the maximum capacity lithium battery that can be carried is 150Wh. The Maxoak is 185Wh.

Could I get away with it? Yes, probably. Do I want to risk losing the one power source I will be depending upon when on location and nowhere near mains electricity?. No.

Conclusion

A lot to consider when making what should be a simple decision:

  • That battery pack rated at 26000mAh (or whatever) is, unless stated otherwise, most likely the SCE value, not what you actually will get.
  • The battery pack will also have to do some internal voltage conversion which incurs power losses due to inefficiency. The loss may be about 30%.
  • If you want to approximate how much you can charge with a given battery pack, you will need to know its watt-hours (Wh) rating and the single cell equivalency (SCE) of both it and the device being charged.
  • Airlines tend to follow IATA’s guidelines permitting a maximum battery capacity of 150Wh, so bigger might not be better for you.
Posted in Hints and Tips, Review Also tagged |

Airline Cabin Baggage: A Photographer’s Minefield

As a photographer every international destination always brings its own unique logistical challenges, but one constant amongst them all is the dread of being forced to check my cabin baggage full of valuable and delicate camera gear into the hold.

Like many photographers I carry my camera gear in my cabin baggage or, more accurately, my cabin luggage is a camera bag with a minority of essentials, such as passport, ear plugs, eye mask and overnight toiletries. It represents not only a sizeable financial investment but also is the very reason I travel. It would not matter whether it was lost, damaged or stolen; all would have a disastrous impact on my trip. So it stays with me, come what may. But as any airline traveller will tell you, assuring that your cabin baggage does not get checked into the hold is a bit of a black art. But why?

Double Standards

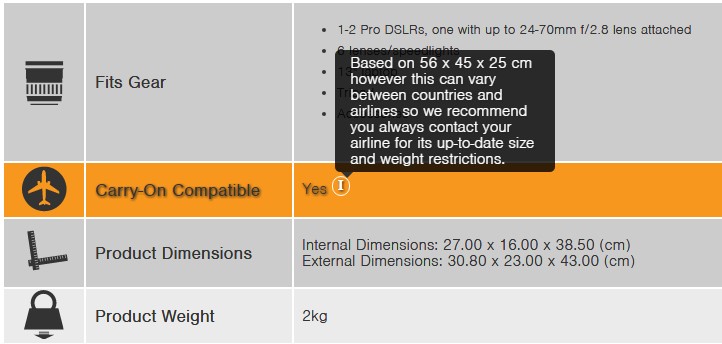
For as long as I can remember the cabin baggage size allowance was set at 56 x 45 x 25cm. This size was suggested by IATA, the International Air Transport Association – an association comprising the majority of the world’s commercial airlines. This was not a requirement; it was a recommendation and an effort to clarify for all parties what was permissible cabin baggage. Airlines were ultimately free to choose a maximum size allowance and whilst some did, many simply adopted the IATA recommendation. An industry for cabin baggage grew up around this recommendation including camera bags and many camera bag manufacturers help by clearly stating whether the bag meets the IATA recommendation, such as the example from Lowepro’s site below.

Many manufacturers provide helpful guidance on cabin compatibility but beware, they may not be using the same standard size as your airline.

Many manufacturers provide helpful guidance on cabin compatibility but beware, they may not be using the same standard size as your airline.

The rapid rise of the “no frills” airlines – the ones that charge you for every extra, such as hold luggage – led to a rise in passengers trying to cram everything in their cabin allowance. The result was increased abuse of the cabin baggage allowance, overcrowding of the storage bins, passengers increasingly being told to check their baggage into the hold, arguments, fights and most importantly of all to the airline, delayed flights. Airlines increasingly began to impose their own, more restrictive cabin allowance resulting in cabin-compatible luggage suddenly not being as compatible as it once was.

In order to bring some order to this chaos in 2015 IATA introduced an initiative (http://www.iata.org/pressroom/pr/Pages/2015-06-09-02.aspx) which initially found acceptance with airline companies to standardise a new cabin baggage size that would, at least in theory, guarantee that cabin baggage would not become hold baggage. The size, 55 x 35 x 20cm was important for two reasons. First, it meant that on aircraft with 120 seats or more every passenger could fit their cabin baggage in the overhead bins. Second, it was smaller than most airlines’ maximum cabin baggage allowance and so was pretty easy for airlines to implement. Unfortunately, the rollout of the initiative was suspended a few months later after concerns from North American airlines about it being too restrictive. Quite how they came to that conclusion is a mystery as I’ve read the initiative and it is very clear that it in no way defines a recommended maximum size – it defines a size at which a passenger could expect that, in an overcrowded aircraft their bag would not be checked into the hold, whereas a larger one might. In any event, the initiative was suspended but not before some airlines adopted it as a new maximum; again not really understanding the point that IATA was trying to address.

If this were not already complex enough the US Federal Aviation Authority (FAA) have their own recommendation – 55.8cm x 36.8cm x 22.9cm and US manufacturers of cabin compliant luggage are likely to adhere to this standard before IATA.

So, why is this relevant to me now? Well at least that has a simple answer: An upcoming trip sees me make part of the journey on regional ATR42 twin propeller aircraft that is going to be a lot more restrictive on cabin baggage than the international Qatar flight on the first leg of my journey. In the past I have always had a bit of stress regarding the size of my current camera backpack, but the regional flight is a clear case of having it checked into the hold. Something had to be done.

Old, Not Obsolete

Like many photographers I’ve had my fair share of camera bags. For years I was a Lowepro user and I’ve worked my way through a number of their backpacks as my kit and travel patterns changed. But more than once I have returned from a week-long trip with aching shoulders after hefting my gear around all day, every day. It seems a common problem – for me at least – with Lowepro backpacks and so it was time to change brands.

Then I discovered the Think Tank Airport Accelerator v2.0 (https://www.thinktankphoto.com/) and fell in love. Capacious to the point of decadence but still within the FAA and IATA (original) recommendations at 35.6 × 52.1 × 22cm. I’ve used it for a couple of years now and find it to be extremely comfortable when hiking for long periods, even with 12kg of camera gear. The backpack straps are very well padded, the zips rugged and lockable and Think Tank’s customer service is unfailingly good.

But it isn’t the perfect bag. It almost is, and maybe it once was, but as I travel to ever more remote places and airlines continue to clamp down on passengers abusing cabin baggage limits I am finding it more difficult to have that guarantee – that peace-of-mind – that I won’t be asked to check my camera gear into the hold. For although it fits within FAA and the original IATA guidelines it (1) only does so when empty and (2) they’re only guidelines, which airlines are increasingly ignoring.

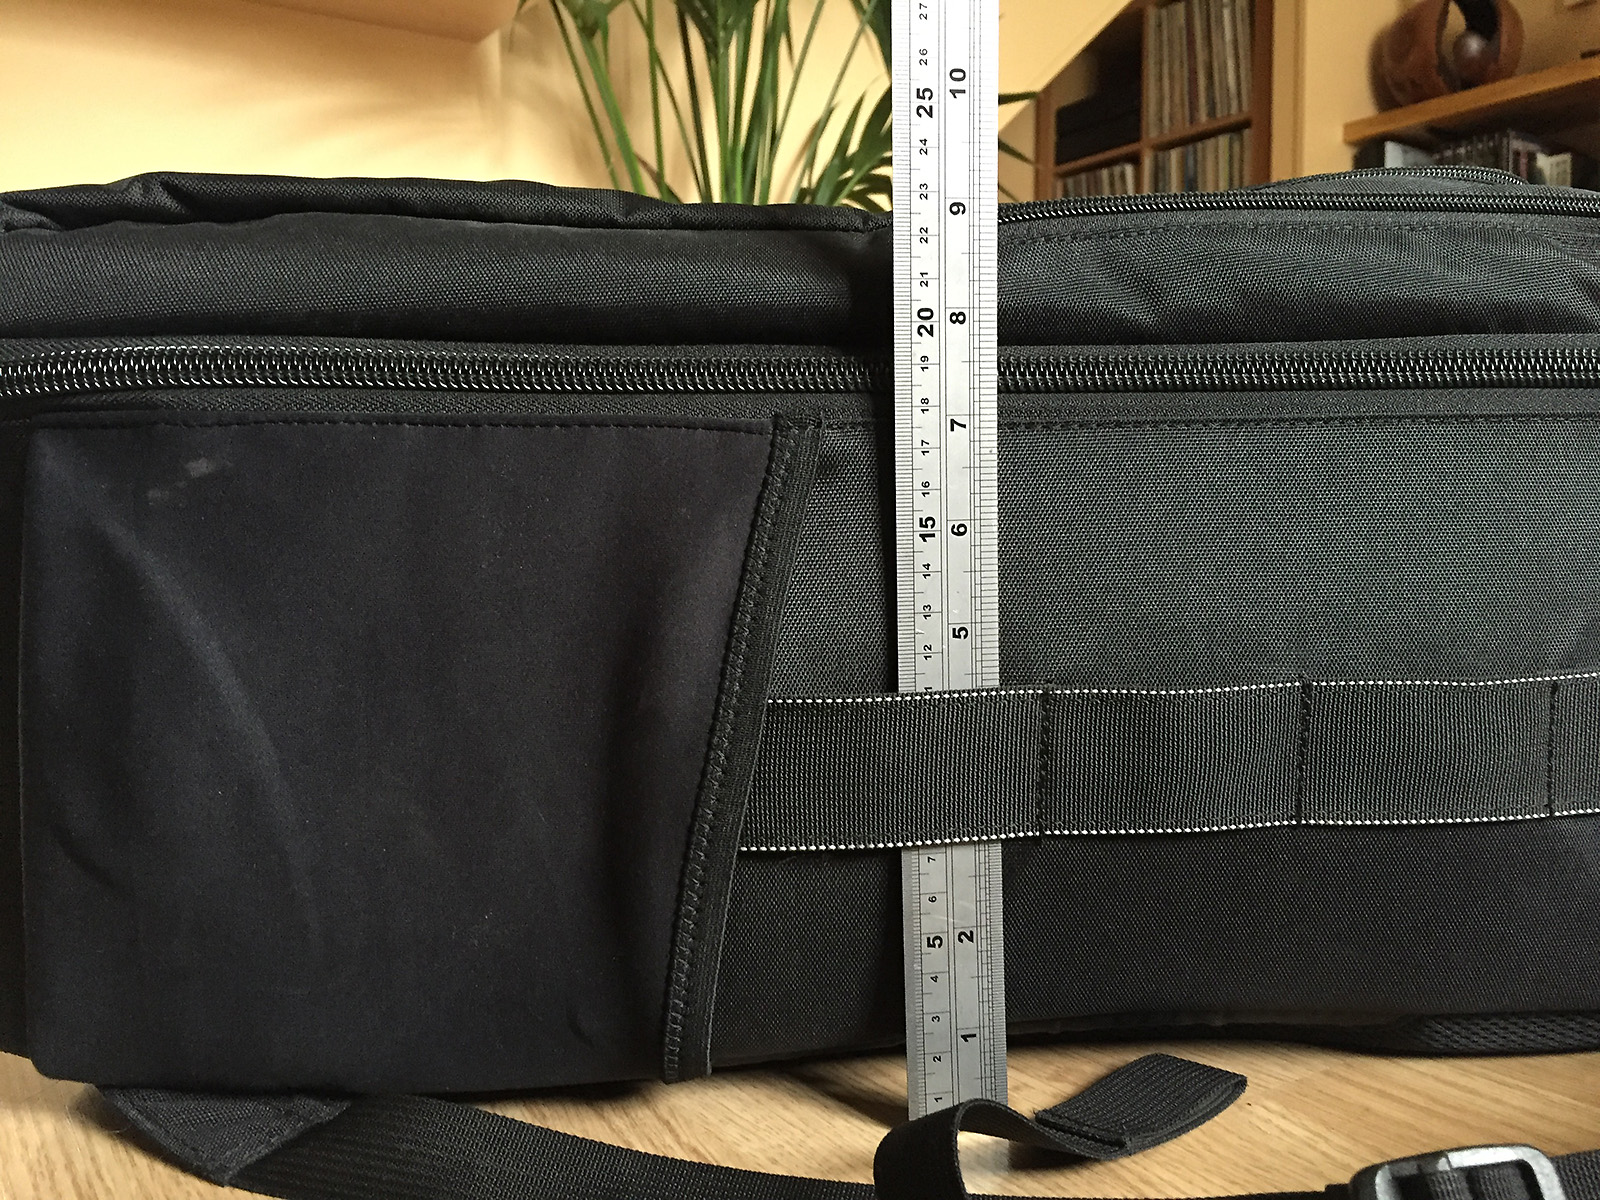
The Think Tank Airport Accelerator may have a depth of the FAA recommended 22.9cm but that is without the anything in the front pockets. Adding another 2-3cm for a laptop makes this bag much less cabin-friendly.

The Think Tank Airport Accelerator may have a depth of the FAA recommended 22.9cm but that is without the anything in the front pockets. Adding another 2-3cm for a laptop makes this bag much less cabin-friendly.

So began a search for a travel backpack and as I was playing ‘fantasy camera bag’ I might as well assemble my dream team of features!

  1. It had to meet IATA’s 2015 size recommendation of 55 x 35 x 20cm as this would meet pretty much any airline’s cabin baggage allowance.
  2. It had to accommodate two DSLRs each with a lens attached, specifically a D810 with 24-70 f/2.8 and a D750 with 70-200 f/4. My photography is increasingly in hostile environments – saltwater, deserts, volcanoes and snow – and changing lenses is to be avoided wherever possible. So I need to be able to swap between wide and zoom without exposing the camera sensor to contaminants.
  3. It had to be a backpack. Most of the things I photograph require a bit of a trek to get to and I want the gear strapped to my back in comfort, leaving both hands free to clamber up rocky paths and over uneven ground.
  4. It had to allow easy and fast access to all of my gear. Landscapes tend not to move that fast but in hostile environments, conditions do. The ability to pack up quickly is an important as unpacking.

Think Tank were my first choice but whilst they have a smaller camera backpack that satisfies requirement (1), it definitely wasn’t not going to accommodate requirement (2). I looked at other brands – Lowepro, Gura Gear, F-stop, Tenba, Manfrotto etc. – but nothing that met my needs. Things were not looking good.

Then during one of my Google searches I found the Think Tank Airport Antidote v2.0. Not listed on their web site it appears that this is an older model in their Airport series but one that showed promise. With nothing else presenting a viable option I took a gamble on a second-hand one.

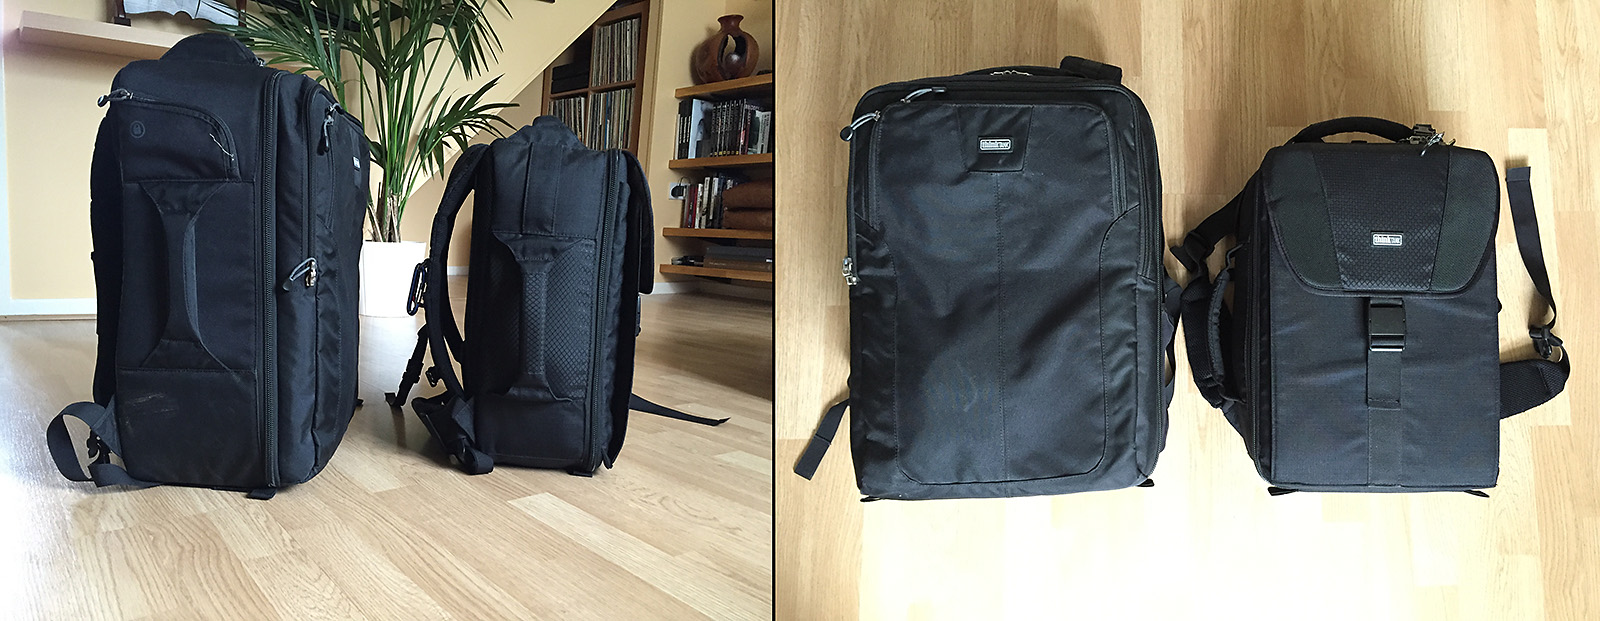
The difference between the Think Tank Airport Accelerator and Airport Antidote v2.0 is immediate and noticeable.

The difference between the Think Tank Airport Accelerator and Airport Antidote v2.0 is immediate and noticeable.

The size difference is obvious. At 43 x 30 x 18 cm its external dimensions are smaller than even the most punitive airline restrictions and it even fits inside the Airport Accelerator. So, it meets requirements (1), (3) and (4) but what about the all-important requirement (2)?

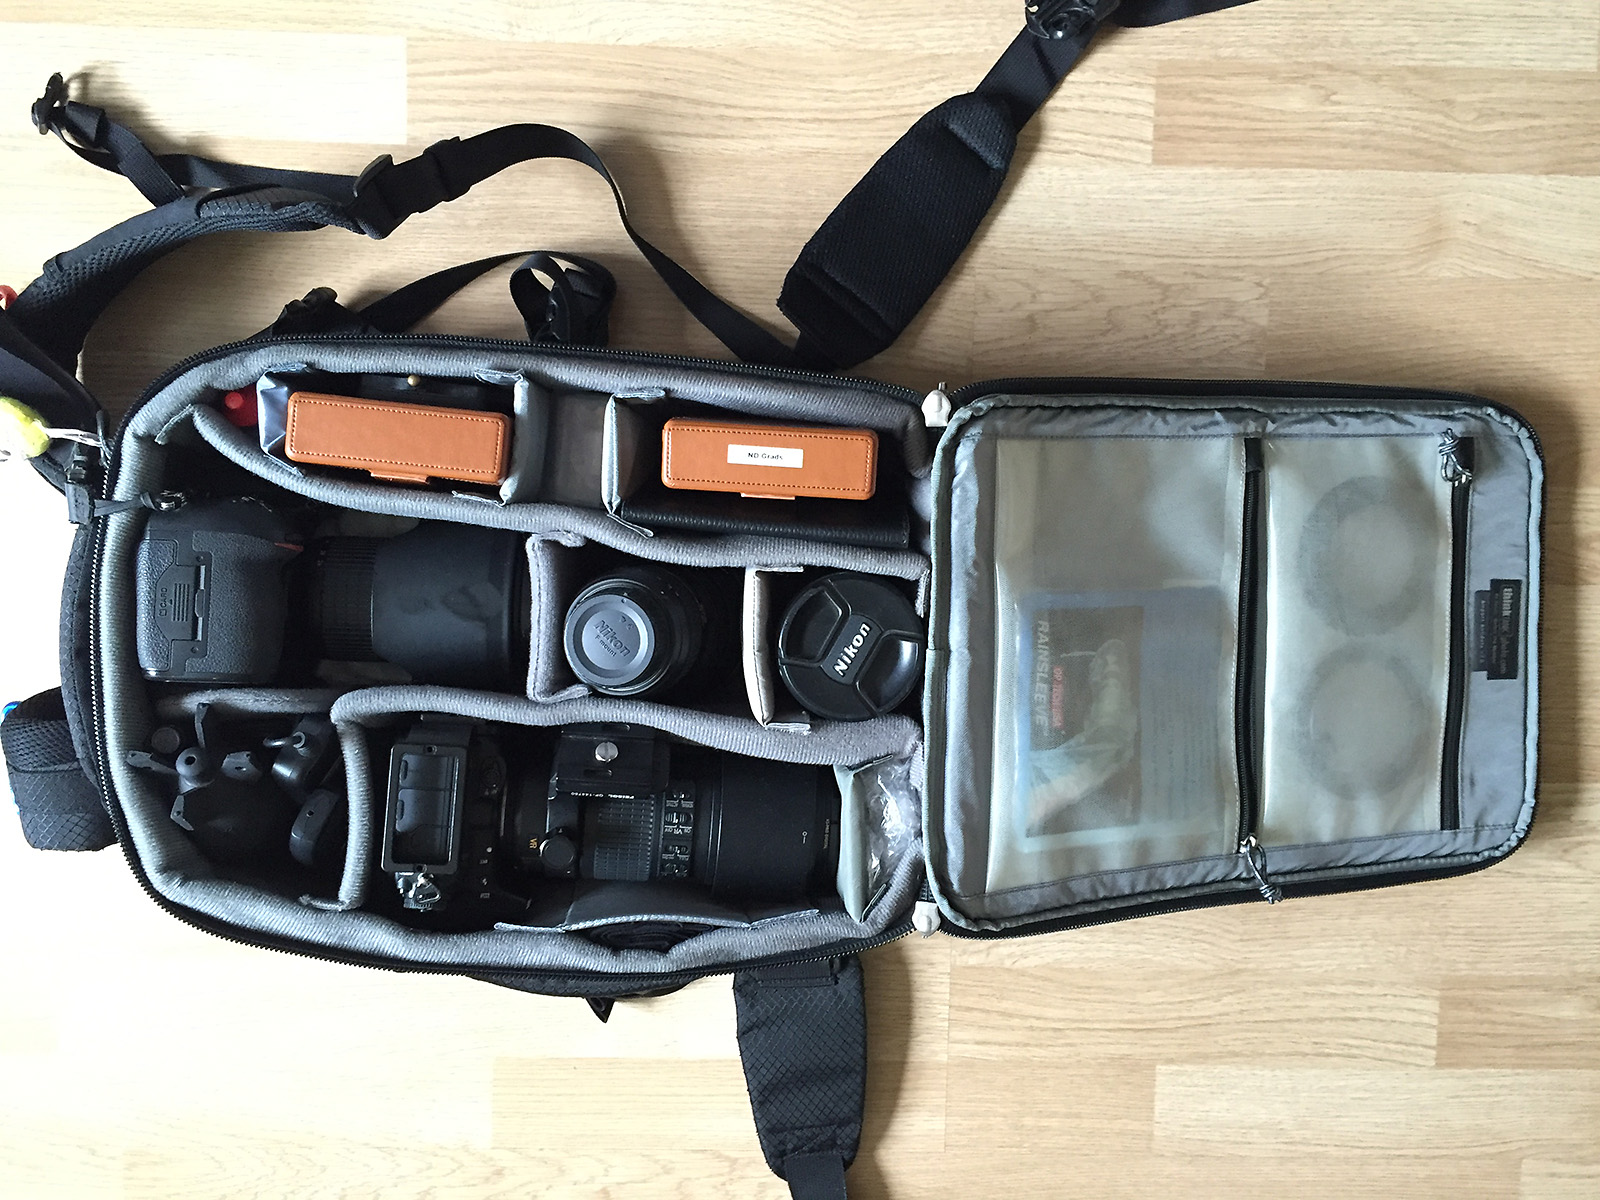
"Old, not obsolete." Despite its diminutive size the Think Tank Airport Antidote v2.0 manages to fit a in impressive amount of gear without comprising ease of access.

“Old, not obsolete.” Despite its diminutive size the Think Tank Airport Antidote v2.0 manages to fit a in impressive amount of gear without comprising ease of access.

Yes, although tight I can get two DSLRs with lenses attached in the bag, along with a full complement of filters, two additional lenses, batteries and cleaning gear. Had I needed a longer zoom lens then this have been an issue but (my) photography rarely needs much above 200mm.

A Crash Diet

Of course, size is only one issue when to comes to cabin baggage; the weight allowance is the other and, as any photographer will attest, your camera gear always weighs more than the allowance. I’m planning on handling this in a couple of ways.

First, simple psychology. People assume that small bags are lighter than big bags so the mere fact that the Airport Antidote v2.0 is quite compact gives it a perception of lightness, especially if it looks less like a camera backpack and more like a day backpack. Coupled with the time-honoured technique of casually carrying it on only one shoulder and it shouldn’t invite a check-in or gate assistant to look more closely.

There is always a chance that it might get weighed and at that point you’re pretty much stuck. One tactic is to keep an eye on the check-in queue ahead of you and, if you see cabin baggage being weight-checked it may be time to discretely get out of the queue and move to plan B. There are plenty of photographer gilets that provide innumerable pockets but they are almost universally expensive. A fisherman’s gilet will do exactly the same thing (and be much cheaper) or camera belt can be used to carry enough extra gear to get the cabin bag down to the right weight – at least until you’re sure it won’t be checked into the hold (i.e., when you’re on board the plane). Of course being discrete is the key here and so wearing it under a fleece or – in hot climates – a somewhat oversized shirt can go a long way to not bring attention to your sudden gain in weight.

Including laptop, my Airport Antidote is 11.5kg against Qatar’s 7kg allowance so I potentially need to shift 4.5kg to my person. Tough, but just about possible. Yes, it is a pain to have to go through this, but there are not really many options.

The other thing is to keep the weight of the hold luggage down below the maximum allowed. I’ve been stopped at check-in in the past, but as the hold luggage was under the 23kg maximum the additional weight of the cabin baggage was tolerated.

So, here are some guidelines for maximising your chances of getting your beloved camera gear in the cabin with you:

  • Aim for a size of 55 x 35 x 20cm or less.
  • Aim for a weight of 7kg and, if you can’t, have a plan B for how to deal with the excess weight as you pass through check-in.
  • Do not blindly believe the manufacturers “cabin friendly” label on their web site. It may be an old or different definition to the one your airline uses.

In the end there will never really be a guarantee that a cabin bag won’t be checked, but keeping it as small and light as possible certainly helps. For photographer’s the challenge is finding that balance between size, weight and usability. Hopefully this article shows that it is possible to get a significant amount of camera gear into a lowest common denominator size allowance of 55 x 35 x 20cm; that such camera bags do exist and that there are creative options for making cabin baggage temporarily lighter than they actually are.

Good luck!

Posted in Travel Also tagged , |

Gitzo Maintenance

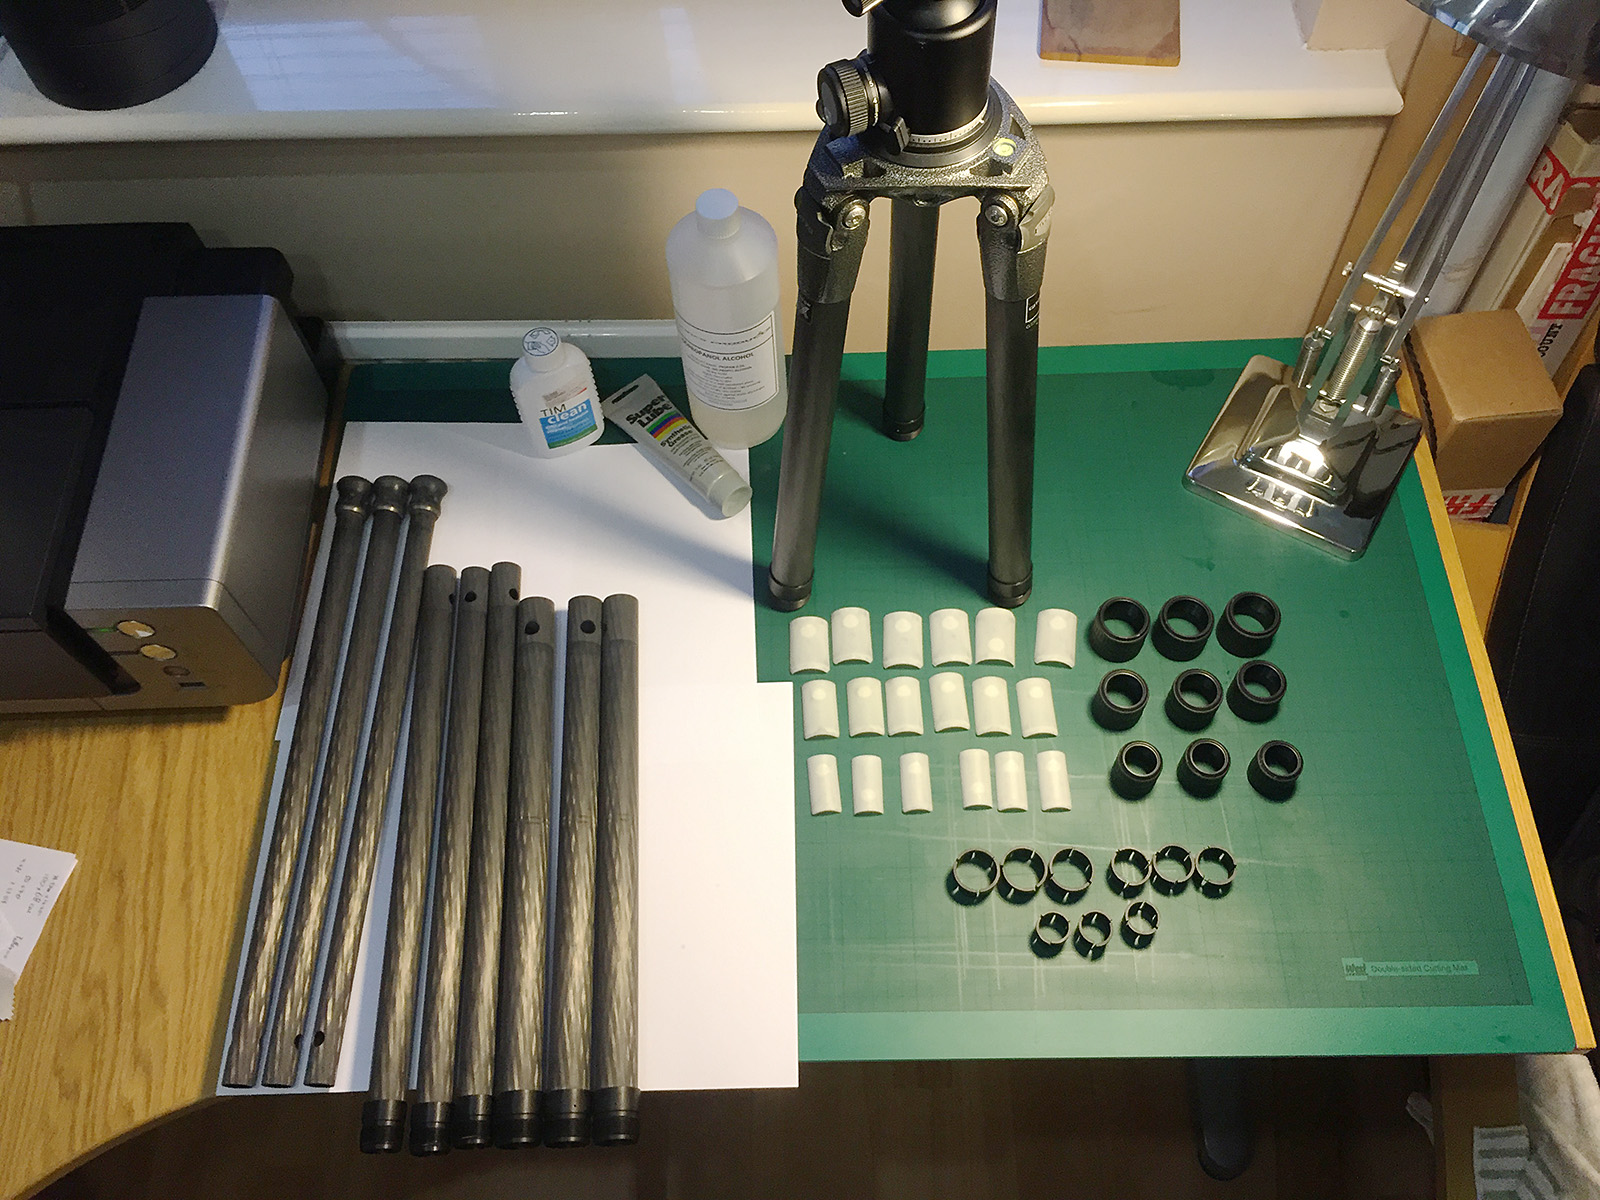
The Jigsaw 1600px

There are certain sounds – blood curdling sounds – that should only ever be heard on the soundtrack of a horror movie. Certainly never from a tripod. But, after two weeks in the majestic sand dunes of the Namib desert, I’ve managed to turn the silky smooth, whisper-quiet operation of the leg locks on my Gitzo into an unholy grinding noise that make me wince every time I even think about using the tripod.

Now, I am a firm believer in the “Don’t buy it if you’re afraid to use it” philosophy. A tripod is a tool and if the means it gets soaked in the salty waters of the Greenland Sea, covered in Pele’s Hair from a volcano or sand from the Namib desert, well so be it. But there is a price to pay and, as any photographer will tell you, a good tripod is not a casual purchase. So, faced with the choice of ruining an excellent tripod, or not using it at all, it’s time to clean the tripod!

Now ordinarily I wouldn’t have bothered writing an article about this but a recent conversation on Facebook suggested that some may be apprehensive about pulling apart their beloved and costly tripod for fear of breaking it. As not maintaining a tripod will have worse consequences my hope is that this article will provide some reassurance that it is a fairly simple process.  Of course, if you have any doubts then it would be best to seek a professional: Or, in other words, I’m not responsible it you break it.

Disassembly

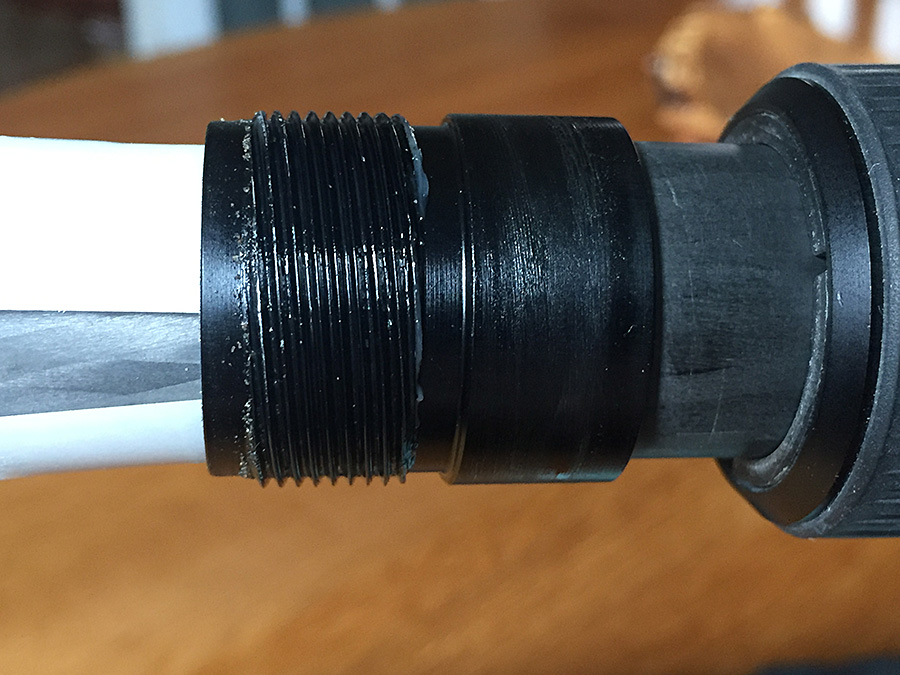
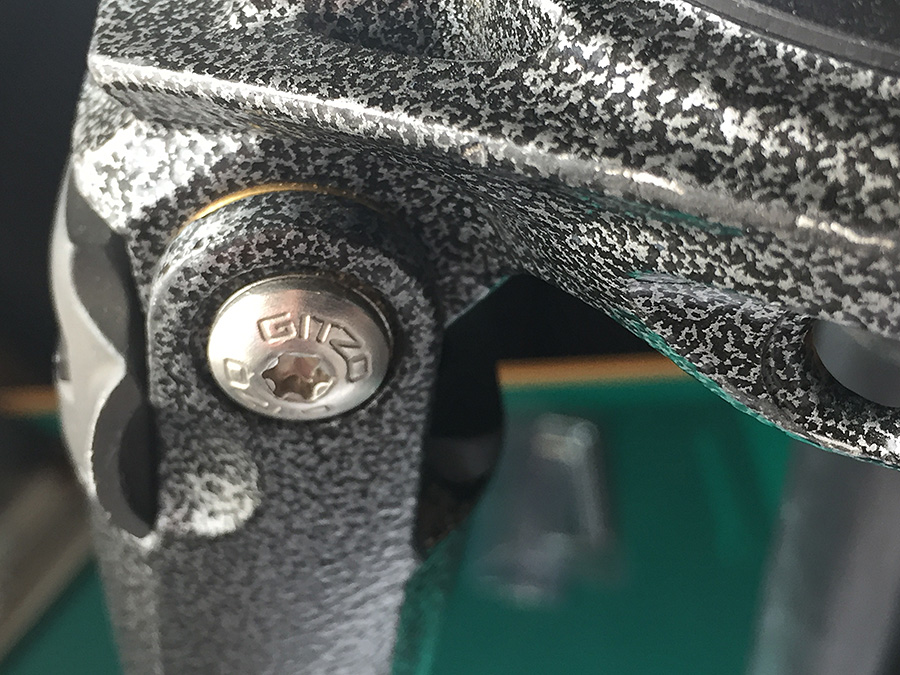
Upon unscrewing the first leg lock things don’t look too bad. There is some sand in the grease but no damage to the thread, which is the real concern:

Minor Grit 900px

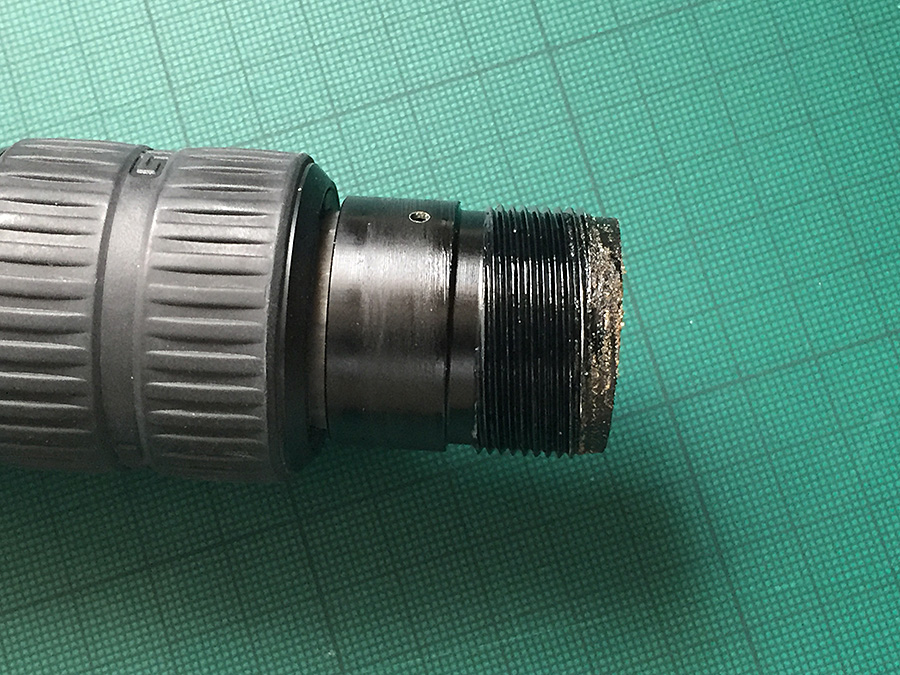
But as I work my way through each leg lock, things do get worse. Here sand is in the threads themselves and has already started grinding the black anodised coating away:

Major Grit 900px


Luckily Gitzo tripods are pretty easy to disassemble. The first thing is to make a note of which bits go where (and this is where a smartphone camera is really useful):

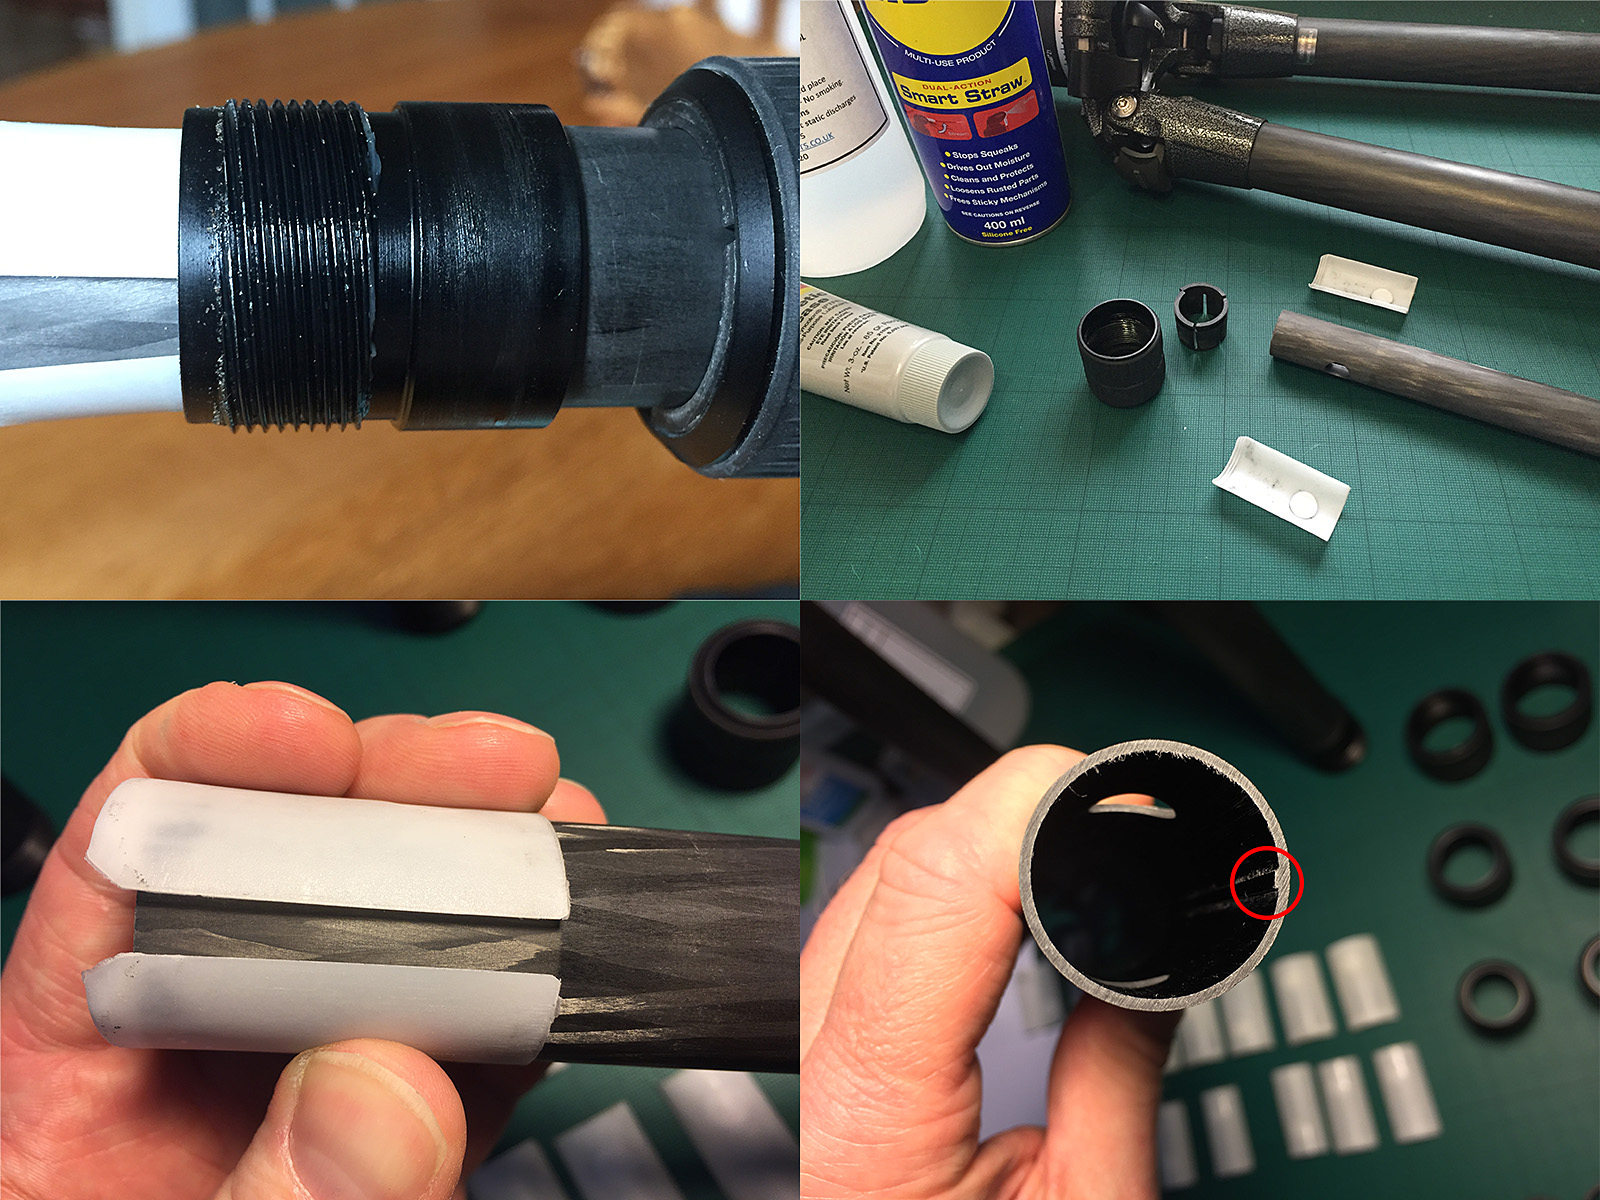
Leg section 1600px

[Top Left] You can see that each leg is topped by two white, half circular, plastic shims – the anti-twist sleeves – that fit in the gap between the leg sections and which form a snug, but not overly tight fit. [Top Right] Once you take the leg section out completely you’ll see that the plastic shims are not physically attached to the leg at all but simply rest on it and the only thing that stops them from ending up rattling around inside the parent leg section is a raised circular node on the inside of each one. This raised node fits inside a cut-out on the top of the leg and it is this combination of node, hole and snug fit that keeps the shims in place. [Bottom Left] The shims don’t extend all the way around the circumference of the leg and leave a small gap on each side. [Bottom Right] The raised channel that fits in the gap left between the shims of the lower leg section. It is this that stops the leg blindly rotating – it is the anti-twist mechanism. It is a snug fit, but nothing more;

Whilst this seems like a basic way to secure the leg section, I presume that is also its benefit; it is very easy to replace parts when needed, and very easy to do this on location.

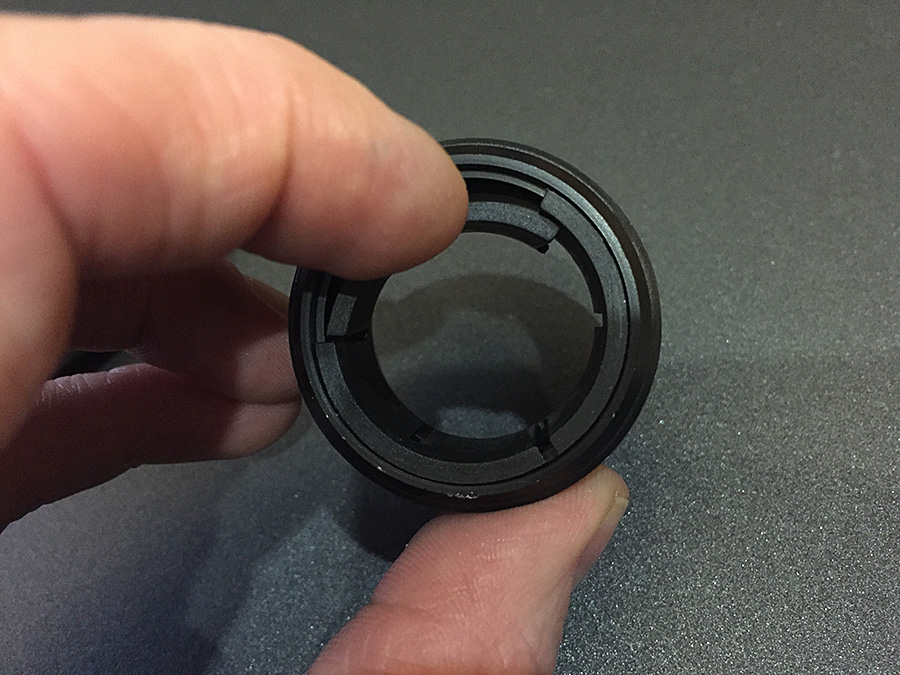
The final part of disassembly that you’ll need to do is to remove the plastic clips from within the locking nuts. This is probably the part the requires the most delicacy as the clips are connected by thin plastic links and so they have to be teased out. The best approach that I found is to get a fingernail in the gap between the metal outer and the plastic inner sections and to gently try and push the plastic part in. If there is no ‘give’ then rotate the locking nut a bit and try again. If you keep doing this, you eventually get to a section that gives a bit – see below:

Delicate 900px

The idea is to gently pull this section away from the metal and ever so slightly down which will have the effect of taking the plastic (which has a groove) off the metal (which has a lip). Once the first section is off the lip, slowly work backwards along the plastic, easing it inwards and downwards. Eventually the plastic will drop off the metal nut completely and expose its threaded section.

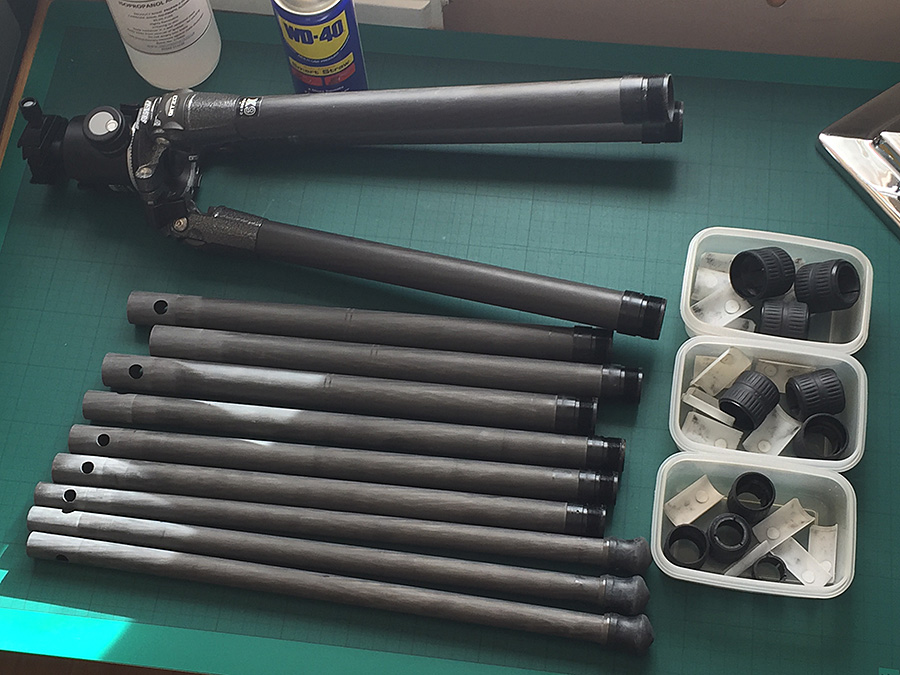
You’ll eventually end up with the tripod disassembled and ready for the cleaning. You may want to take the top leg sections off the spider (i.e., the top plate) but unless you’ve seriously abused the tripod it likely won’t be necessary.

Ready to Clean 900px


Originally I followed the advice gleaned from a number of guides and ‘how-to’ documents on the Internet, where the general advice was to use isopropanol alcohol or WD-40. Neither worked really well and a ‘test twisting’ of a locking nut on a leg section still made horrid crunching noises. So now I use citrus degreaser which has several domestic applications including cleaning bike chains and gear systems and cleaning thermally conductive paste off computer CPUs. Citrus degreaser is awesome stuff, and makes cleaning the old grease and gunk off the legs very easy.

TIM Clean

All you need is a few drops on the thread, gently spread it around (don’t scrub) with the toothbrush so that it gets in the nooks and crannies and leave for a couple of minutes. Repeat the process with the locking nuts.

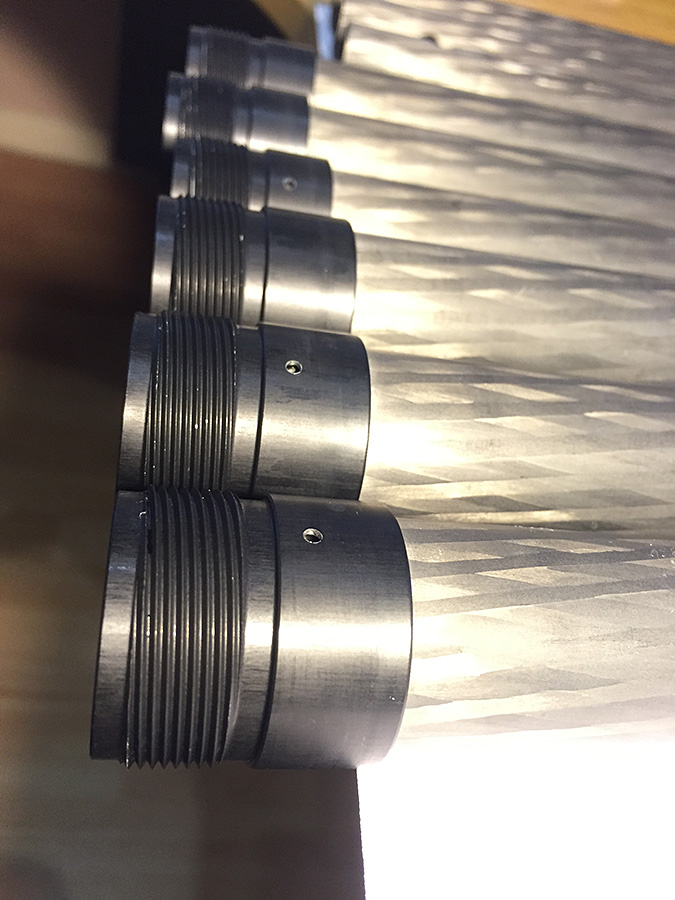
After a couple of minutes – it doesn’t need more than that – remove the degreaser and gunk with warm water mixed with some household dishwashing detergent. Again I use the toothbrush – this time gently scrubbing – to get right into the grooves on both the leg sections and locking nuts. Once thoroughly cleaned I give it a thorough wash under a shower head although a kitchen tap would be just as good. Then, with all nice and clean, it is time to leave in the air to dry.

Threads Clean 900px


Reassembly

Reassembly is simply a case of reversing the disassembly process. I’m trying an experiment and using a different type of grease on one leg – Super Lube Synthetic Grease – and the normal Gitzo tripod grease on the others, simply as Super Lube is a lot cheaper. If you’re only cleaning your tripod once a year then it is probably not worth using anything other than the Gitzo grease, but if your tripod is likely to see repeated abuse in the field then a cheaper option is handy, as long as it works just as well. Only time will tell whether Super Lube is a viable option.

When reassembling the tripod it is important to get the gap between the shims lined up with the raised channel in the parent leg;  if you meet a lot of resistance upon reassembly, double check the plastic shims are correctly seated on the leg section and that the gap lines up with the raised channel.

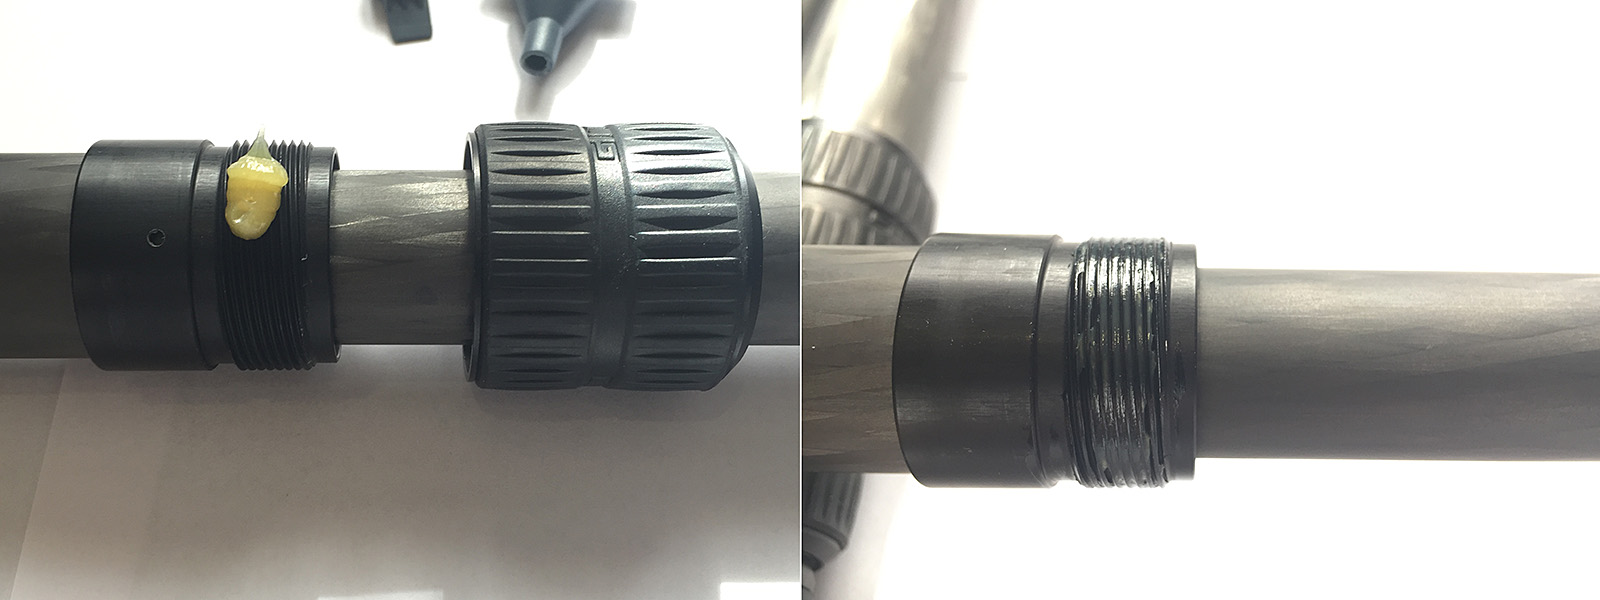
The other thing is to not overdo the amount of grease used. You only need to cover the threaded section – any more than that and you’ll risk having grease leaking out of the locking nut and acting as a magnet for any dust and grit in the air, and if you were heading back out in the desert with grease on leaking out that would be a quick way to cause problems. Also, I find it easier to put the locking nut on the leg, put the anti-rotation shims in place and slide it all into the parent leg section before applying the grease. Once you’ve evenly spread the grease over the thread you can screw the locking nut back on and then tighten and untighten it a dozen times to spread the grease around on the leg and the locking nut itself. Note, you don’t have to completely undo the locking nut, just a couple of turns back and forth.


Regreasing 1600px

If things are really bad, you may need to take the top leg sections off the spider, but usually this is not necessary – only if the tripod had fallen in the sea and become completely submerged for example. Even sand storms won’t penetrate into the upper mechanism. That said, sand, salt and grit do accumulate on the outside of the legs but brushing this off with a firm bristle paint brush should be sufficient.


Spider 900px


Hopefully this article shows how easy it can be to strip down, clean and reassemble your tripod. Other tripods have different mechanisms – my Feisol for example doesn’t have an anti rotation mechanism and so no channel in the leg section to worry about and the shims are in three sections – but in essence a tripod is a blissfully simple part of the photographer’s arsenal. And whilst maintenance can be a pain it is even more painful when you’re trying to take a long exposure on a tripod with leg wobble due to a worn leg lock. It may be the difference between a usable and unusable shot.


Posted in Hints and Tips Also tagged |

How to Choose a Compact Flash (CF) or SD Card For Your Camera

Buying the right memory card for your needs should be simple, but it isn't. The sales staff will convince you that only the fastest, biggest card will do, but that's far from the truth...

Buying the right memory card for your needs should be simple, but it isn’t. The sales staff will convince you that only the fastest, biggest card will do, but that’s far from the truth…

It’s a tense moment when you’re on location in the middle of nowhere about to shoot that “killer shot” and you suddenly realise that you’re very quickly running out of storage. It happened to me, for the first time ever, on the last trip and had it not been for one of the other guys very kindly donating a spare card I would have been faced with a nasty decision: stop shooting or re-use a card full of unbacked-up images.

Now, in my defence I should point out that I do have a pretty good strategy for image storage. For a start I have four 32GB and two ‘emergency’ 4GB memory cards that can handle approximately 4,500 images, usually more than enough capacity. I also perform, religiously, an end-of-day backup of all images to my trusty MacBook Air and a 500GB portable hard drive. So, should the worst happen and I do fill up all the cards, I can at least reformat one and use it again.

But the recent trip saw a number of factors conspire against me. First, we were in a location that did not have any electricity and had been there for a few days. Power was at a premium and as impressive as the Voltaic Systems’ solar charger (reviewed here)that I was carrying was, it was struggling to keep up with charging everyone’s camera batteries. Using it to recharge the laptop would have resulted in someone losing camera power. So no end-of-day backup.

Second, I was shooting a lot more video than expected on both the Canon 5D2 and 7D cameras and this was chewing its way through the memory cards. Third I was shooting a demanding scene – a moving landscape of lava in this case – where virtually every image was ruined by heat haze and so a lot of the shooting was using burst mode to try and capture the dancing lava in a pleasing and undistorted shape. In the course of two days I shot over a thousand images of lava and could have shot more.

So, with my excuses out of the way, I’m I the market for some more memory cards. Now I’m all for the idea of buying the best that you can afford and firmly believe the “you get what you pay for” mantra. But I don’t see the point in throwing money needlessly away, especially as I have two trips coming up (and still wondering how I’m going to pay for them) and so, rather than simply blindly buy the most expensive, I decided to do some research. What I discovered was that making an educated purchase was harder than it looks.

Hundreds of images were very nearly harmed in the making of this shot... [Click to enlarge]

Hundreds of images were very nearly harmed in the making of this shot… [Click to enlarge]

Depending upon the make and model of your camera you’ll either be in the market for a compact flash (CF) or Secure Digital (SD) memory card. Whilst there are some technical differences between the two standards most people won’t have a choice, although if your camera does support both, the general advice seems to be use CF due to slightly more advanced control circuitry and wear-levelling to prolong the card’s life.

But, irrespective of which format you use you’ll likely be judging the hundreds of available choices on the criteria of reliability, capacity, speed and cost.

Reliability

In a recent – and completely unscientific – poll I ran on Facebook reliability was the one common requirement. Not that this is surprising as, no matter whether the images are of a volcano, your child’s birthday, your wedding or you and the lads on holiday, no-one is going entrust their images to something unreliable.

Now it doesn’t take very long with Google to discover that a few brand names keep getting mentioned when the subject of reliability comes up. SanDisk is by far and away the most popular choice although Lexar and Transend also have a loyal following. Dig deep enough and you will always find a one-star review stating that the card failed, but sticking to any of the big name brands is usually a safe bet.

One argument that could be raised is that the memory market is so commoditised that a memory card is simply a standard memory chip inside a standardised case – in buying a brand name you’re simply paying for the name. Whilst there is undoubtedly an element of paying a brand premium, a well-made memory card is much more than a “chip in a box”. I look for brands with anti-shock gel (because it’s easy to drop these little things when wearing thick gloves), and also those that have a good working temperature range. If you’re a diver or passionate yachtsman some form of water resistance (or all-out water proof) will be important.

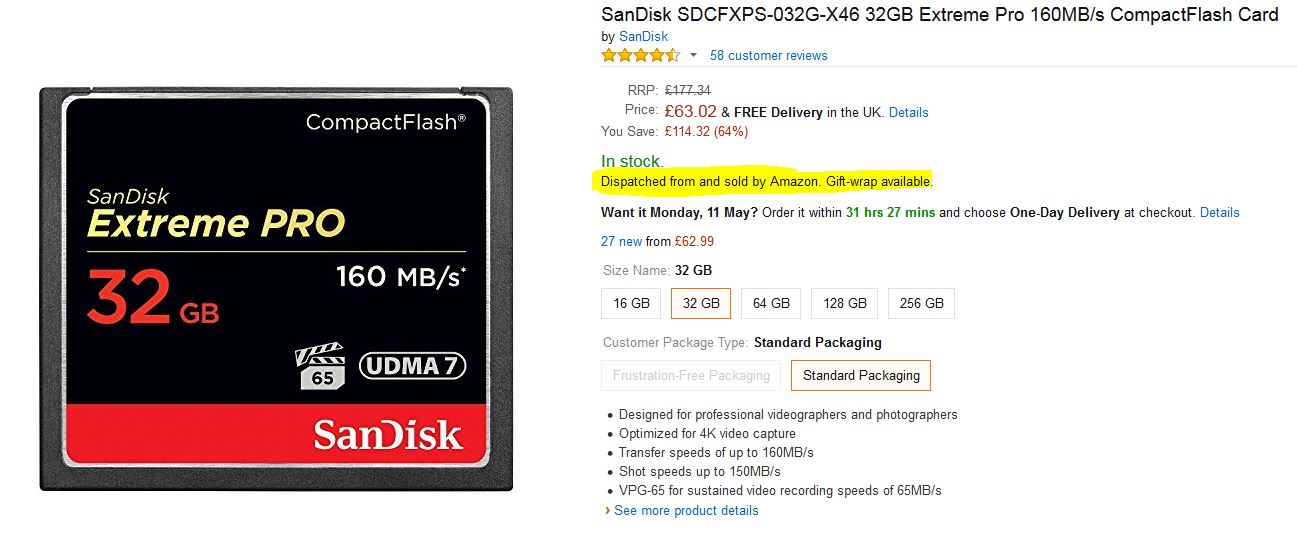
Be warned though: These days where you buy is just as important as what you buy. The memory card market is rife with counterfeits and it is worryingly easy to buy a counterfeit card on eBay, on Amazon and even on the high street. Avoid eBay altogether. With Amazon, look for the “Dispatched and sold by Amazon”. Amazon are an official reseller for most major memory card providers and so you’re going to get the real deal, but Amazon can also dispatch goods on behalf of other sellers who may be less legitimate.

Buying from Amazon falls inside most people's comfort zone, but for peace of mind you should check that it is sold by Amazon and not one of their 'authorised'' sellers.

Buying from Amazon falls inside most people’s comfort zone, but for peace of mind you should check that it is sold by Amazon and not one of their ‘authorised” sellers.

Amazon isn’t the only official source, of course and here are some links to find authorised resellers in your country:

http://www.lexar.com/where/

http://www.sandisk.com/about-sandisk/find-a-retailer/

http://ca.transcend-info.com/support/buy

Yes, an official card from an authorised reseller will cost more, and no one likes paying more, but when the temperature is so hot that the glue holding the soft grip on your camera has melted – and you’re still shooting – you’ll be glad of paying extra.

Capacity

Contrary to popular myth, bigger (capacity in this case) is not better. My 32GB cards hold approximately 1000 images from my 21 megapixel cameras and you don’t need a maths degree to work out that a 64GB memory card will hold 2000. If the card fails I lose, potentially, all images on that card. One thousand images may sound like a lot, but whilst I shot that in two days on my last trip a sports photographer can shoot that in an afternoon and cards always fill up just as that crucial photographic moment is about to occur. Memory cards – CF and SD – are now readily available in capacities up to 256GB and modern camera firmware is capable of handling such large capacity cards. So, why not make use of them?

First off, memory cards fail. It is not “if” but rather “when”. Most manufacturers publish a mean time between failure, or MTBF, figure that can be used to gauge the average expected life of the card, but it is only an average. A card can fail a long time before or a long time after the ‘average’ and when the card fails, you have to assume that the data will not be recoverable, or at least recoverable in a financially acceptable way. The big brand names offer recovery software, for example SanDisk’s Recovery Pro, that may recover some or all of the images in a failed card but you have to assume that a dead card cannot have its contents salvaged.

Second, you can lose the card. They are small and lightweight and one falling out of a bag or shirt pocket won’t make a lot of noise hitting the ground. Whilst I’m sure that most photographers have checklist when wrapping up on location to make sure they have everything, sometimes circumstance forces you to head off in a rush. On the last trip we were quite happily camped out on some high ground, camera bags open and gear laid out ready for use when the call came in that the snipers had seem something in the DMZ and we had to leave. Immediately. In the seconds it took us to throw everything in the bags and go, a loose memory card would have been easy to miss. Perhaps less melodramatic, but equally final, is dropping one in the sea when swapping a full one for a fresh one.

Or it could simply be stolen.

So, the size of the card you choose will be a therefore be a trade-off off between the inconvenience of having to frequently replace full cards against the effects of a lost, damaged or stolen card full of images.

Speed

Whilst both CF and SD cards are beginning to show their speed rating in megabytes per second (MB/s) many still use more cryptic means.

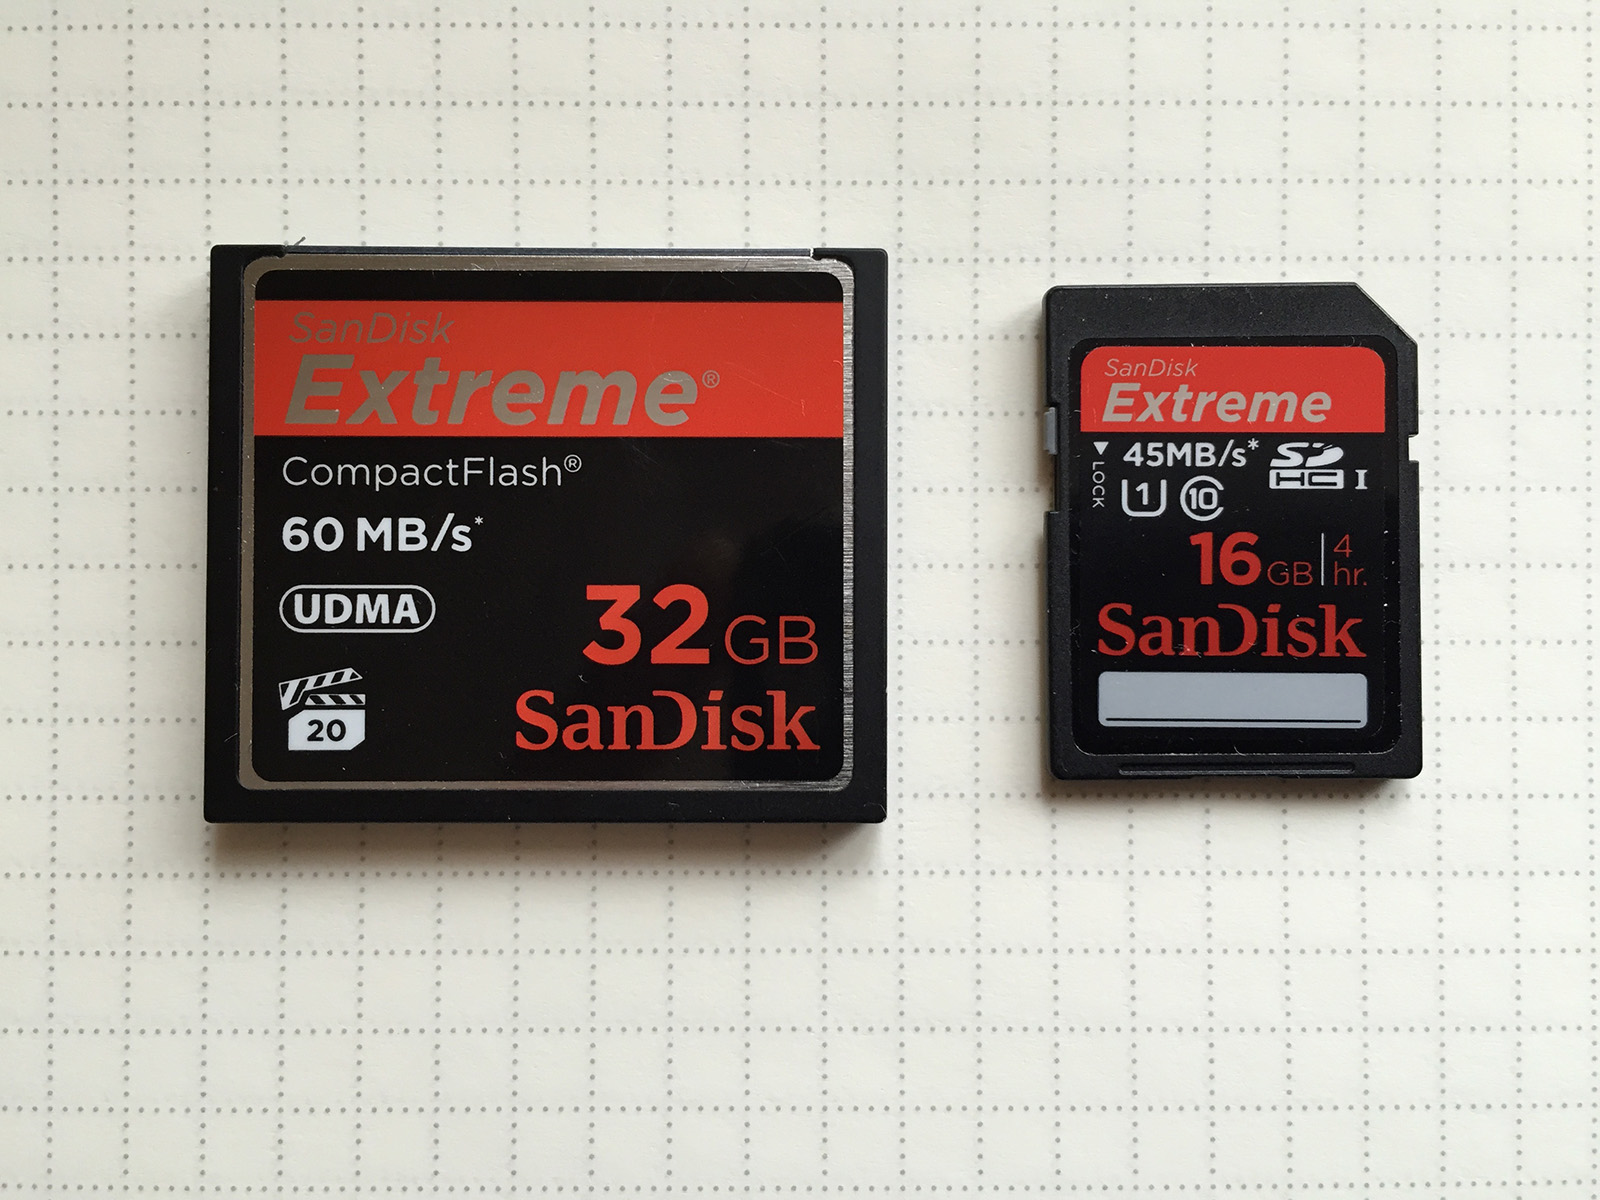
CF cards are a great example of this. The image below shows two cards from brand name manufacturers. But, which is faster?

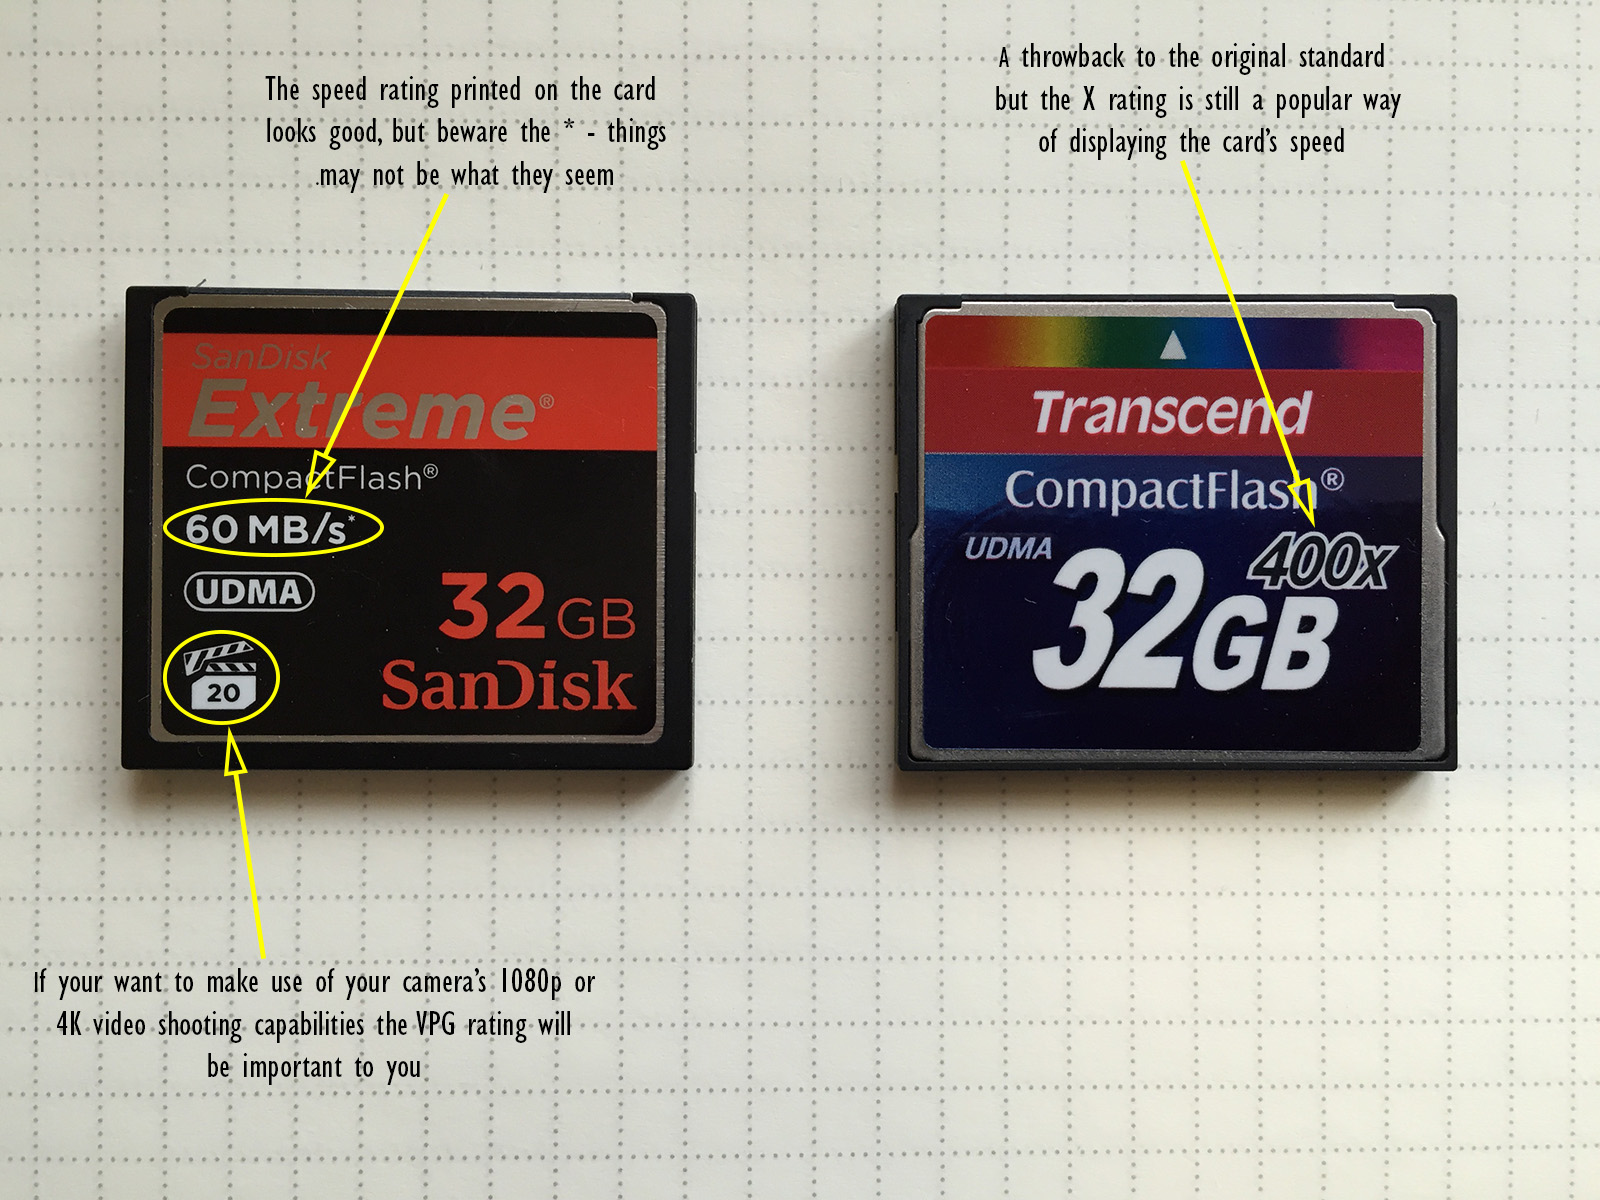
No standard ways of indicating speed and lots of symbols can be confusing, especially when all you need to know is the card's speed in MB/s.

No standard way of indicating speed and lots of symbols can be confusing, especially when all you need to know is the card’s speed in MB/s.

Compact Flash is a standard, created by SanDisk, at a time when CD-ROM reigned supreme in the computer world. The CD-ROM standard defined a transfer speed of 150KB/s (approx. 0.146 MB/s) and so it was natural to express the speed of Compact Flash relative to this. So in the above image the Transcend CF card has a rated speed of 0.146 x 400, or 58.4 MB/s. On the face of it, the two cards are the same speed.

But it is a trick question, and the answer should be “Faster for reading, or faster for writing?”

The speed of a memory card will affect you in two important ways: How fast you can write images from the camera to the card and how fast you can transfer these to images to your computer. Whilst a slow transfer speed can be irritating, a slow write speed can result in lost shots or ruined video.

All cameras have an on-board memory buffer that allows you to hold the shutter down and take a rapid burst of images in quick succession. But at some point that buffer fills up and the camera has to move the images to the memory card before more can be taken. Cameras are clever enough to be writing images to card whilst adding new ones to the buffer, but the write speed of the card will play a key role in keeping the on-board buffer empty enough to accept incoming images.

In the above photograph the SanDisk is rated at 60MB/s, but note the *. This is the theoretical maximum speed of the card and actual read and write speed will depend upon the make and model of your camera, and even the specific firmware your camera is running.

It is a minefield as essentially you could buy an older generation 60MB/s card and a newer 160MB/s card (for double the cost) but both may give the same performance. Or, as I see it, I could spend the same amount of money for twice the storage.

Luckily, there are web sites that run “real-world” tests of memory cards in various devices and cameras and one that holds a great deal of information is http://www.cameramemoryspeed.com/. For me it didn’t have any tests of memory cards in my cameras but the (no longer updated) http://www.robgalbraith.com/camera_wb_multi_paged527.html?cid=6007-9784 did and it lists the burst mode test of my 60MB/s card at 35.6 MB/s on my Canon 5D2 and 40.1 MB/s on my Canon 7D. By comparison the same site lists the SanDisk Extreme Pro (90MB/s card) at 40.7MB/s on the 5D2 and 45.1MB/s on the 7D, not a huge increase in actual performance.

The issue gets more complex when looking at faster memory cards as the camera’s firmware begins to have an effect. Take a quick look on Amazon and you’ll see speeds of 160MB/s or 1000x – fantastic speeds but of no use to you if your camera doesn’t support the UDMA7 standard these memory cards employ. My 5D2 and 7D did not until I updated the firmware. But the average consumer should never get to the point where they’re considering firmware limitations.

If you’re shooting video – and 1080p is the standard here – you need a minimum write speed of around 20MB/s to ensure that you don’t get pauses in the recording. You can go lower – down to around 8MB/s – but it isn’t recommended. The SanDisk CF card shown above clearly states its suitability for video by showing the Video Performance Guarantee (VPG) logo, but the Transcend would be equally capable.

And we haven’t even mentioned SD card speed rating yet.

SD labels

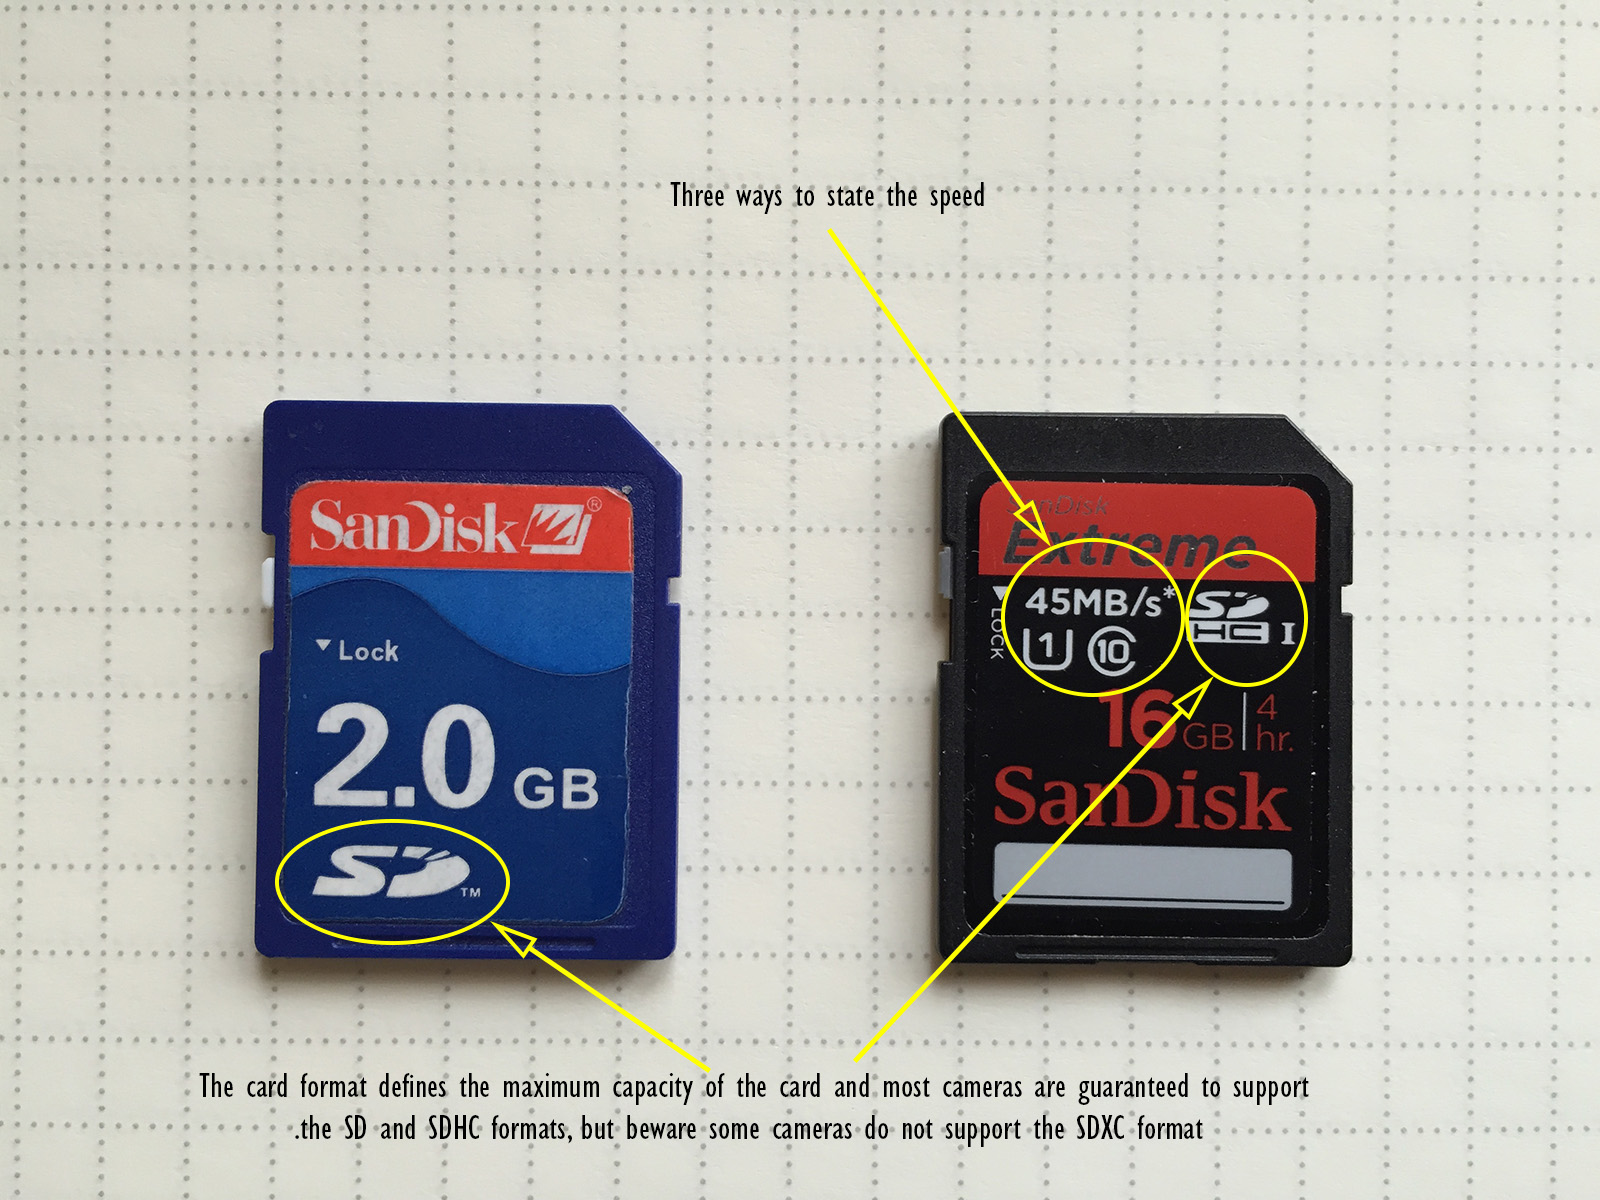
SD cards complicate the issue slightly by not using a multiplier, but rather the class system, although this is being replaced by the newer UHS speed class system, simply as it is no longer relevant to today’s high-speed cards. Still if the black SanDisk card in the image above didn’t clearly state its speed in MB/s, you wouldn’t know if this UHS class 1 card could reliably support 1080p video.

SD classes and UHS speed classes decoded into MB/s. Courtesy of Wikipedia.

SD classes and UHS speed classes decoded into MB/s. Courtesy of Wikipedia.

Like Compact Flash the maximum speed you actually get will depend upon the camera and firmware but unless burst mode photography is important to you any card with a guaranteed speed of 20MB/s or above will be fine and even cope with 1080p video recording.

Cost

The final consideration is cost and thankfully and easy point to address. No matter what your budget is, the sales staff will convince you it isn’t enough. But if you’ve read the above you’ll have a better understanding of what factors are important to you and there’ll likely be a couple of options to choose from. If that is the case and you have a choice of, say, a 16GB card at 160MB/s and 32GB at 60MB/s – within your budget – get the 32GB card as you’ll not notice the difference when taking photographs and video, or buy the cheaper card and save the money.

Summary

Buying anything on a budget means that compromises have to be made, but hopefully the above gives some help in deciding how to choose a memory card for your budget. It is another big article, and so I’ll summarise the key points here:

  1. Buy a reputable brand name and to avoid counterfeits ensure the seller is an authorised reseller. For example, buy from Amazon as a seller and not simply one of Amazon’s retailers.
  2. Don’t worry about speed unless you’re doing something very specific, such as shooting 1080p video whilst simultaneously taking photographs or shooting a very long series of burst mode photographs (or lots of bursts in quick succession). As long as the card has a write speed of 20MB/s you’ll be able to shoot 1080p video.
  3. For most people the only thing a faster memory card will give is better transfer times to their computer, not better in-camera performance.
  4. It is better to buy four 16GB cards than it is to buy a single 64GB card. That way loss, theft or damage to the card won’t have such a devastating effect.
Posted in Hints and Tips Also tagged |

There’s Big Money in Battery Packs

After the heat of a lava lake caused a couple of my Canon LP-E6 batteries to begin show issues when charging it is time to replace them. Better now than forget about it until two days before I head off on the next expedition and then panic ensues. In any event, as the recent Ethiopian trip proved, you can never have too many batteries.

Up until now I have been using a mixture of official Canon LP-E6 – which came with the camera bodies – and aftermarket batteries. Without actually looking at them I would be hard pushed to tell the difference between the official and aftermarket cells; both appear to last a for a high shutter count and the Canon 5D MkII body happily shows the charge left on both.

But, as both battery packs that have now developed issues are the aftermarket ones, I have decided to replace them with the official Canon ones. It was not an easy decision to make: £79 for an official battery pack versus £20 for a good quality aftermarket one. But as my work takes me to more extreme and remote locations, I do have to rely on the kit I take. As the old proverb goes “For want of a nail” – the nail in this instance being the battery pack the powers the camera and lens.

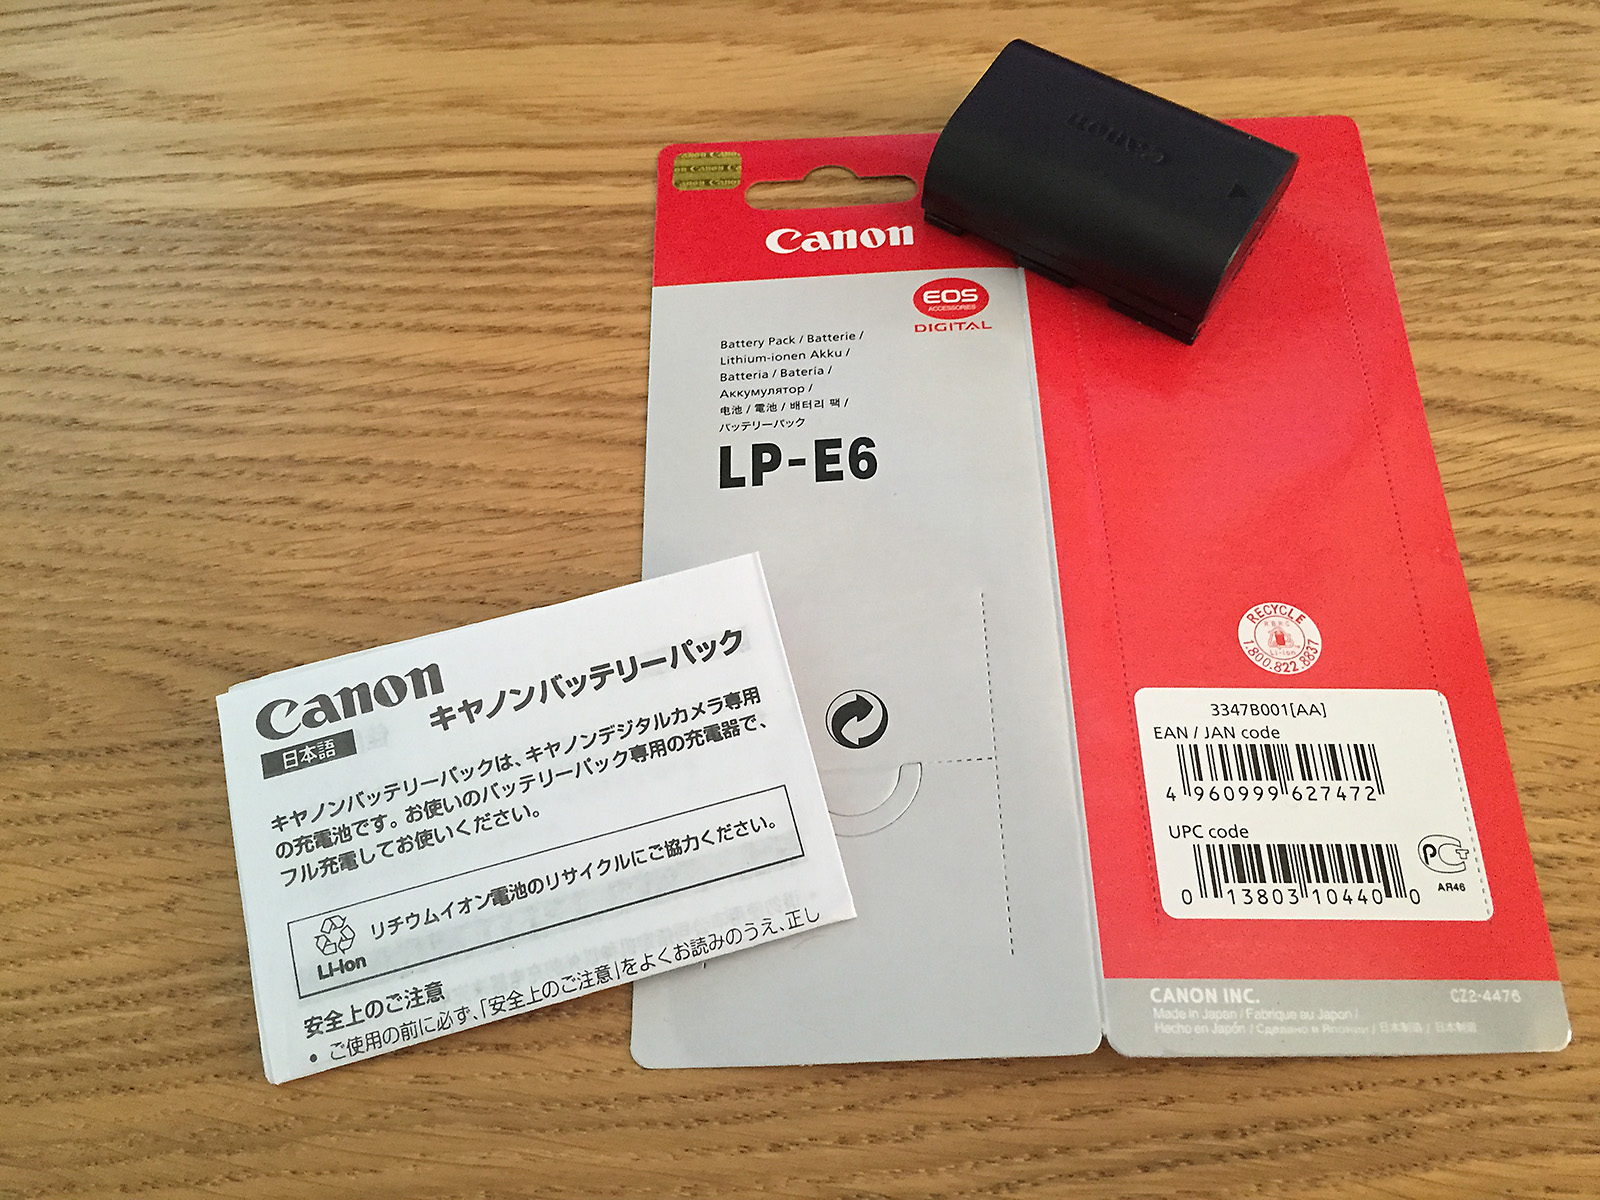
Now, whilst I didn’t buy the battery pack because of the packaging, I do have to say that I’m impressed. A lot of time and effort and been spent on the whole presentation. It oozes quality. In fact, had I not actually been examining every detail I would have never known.

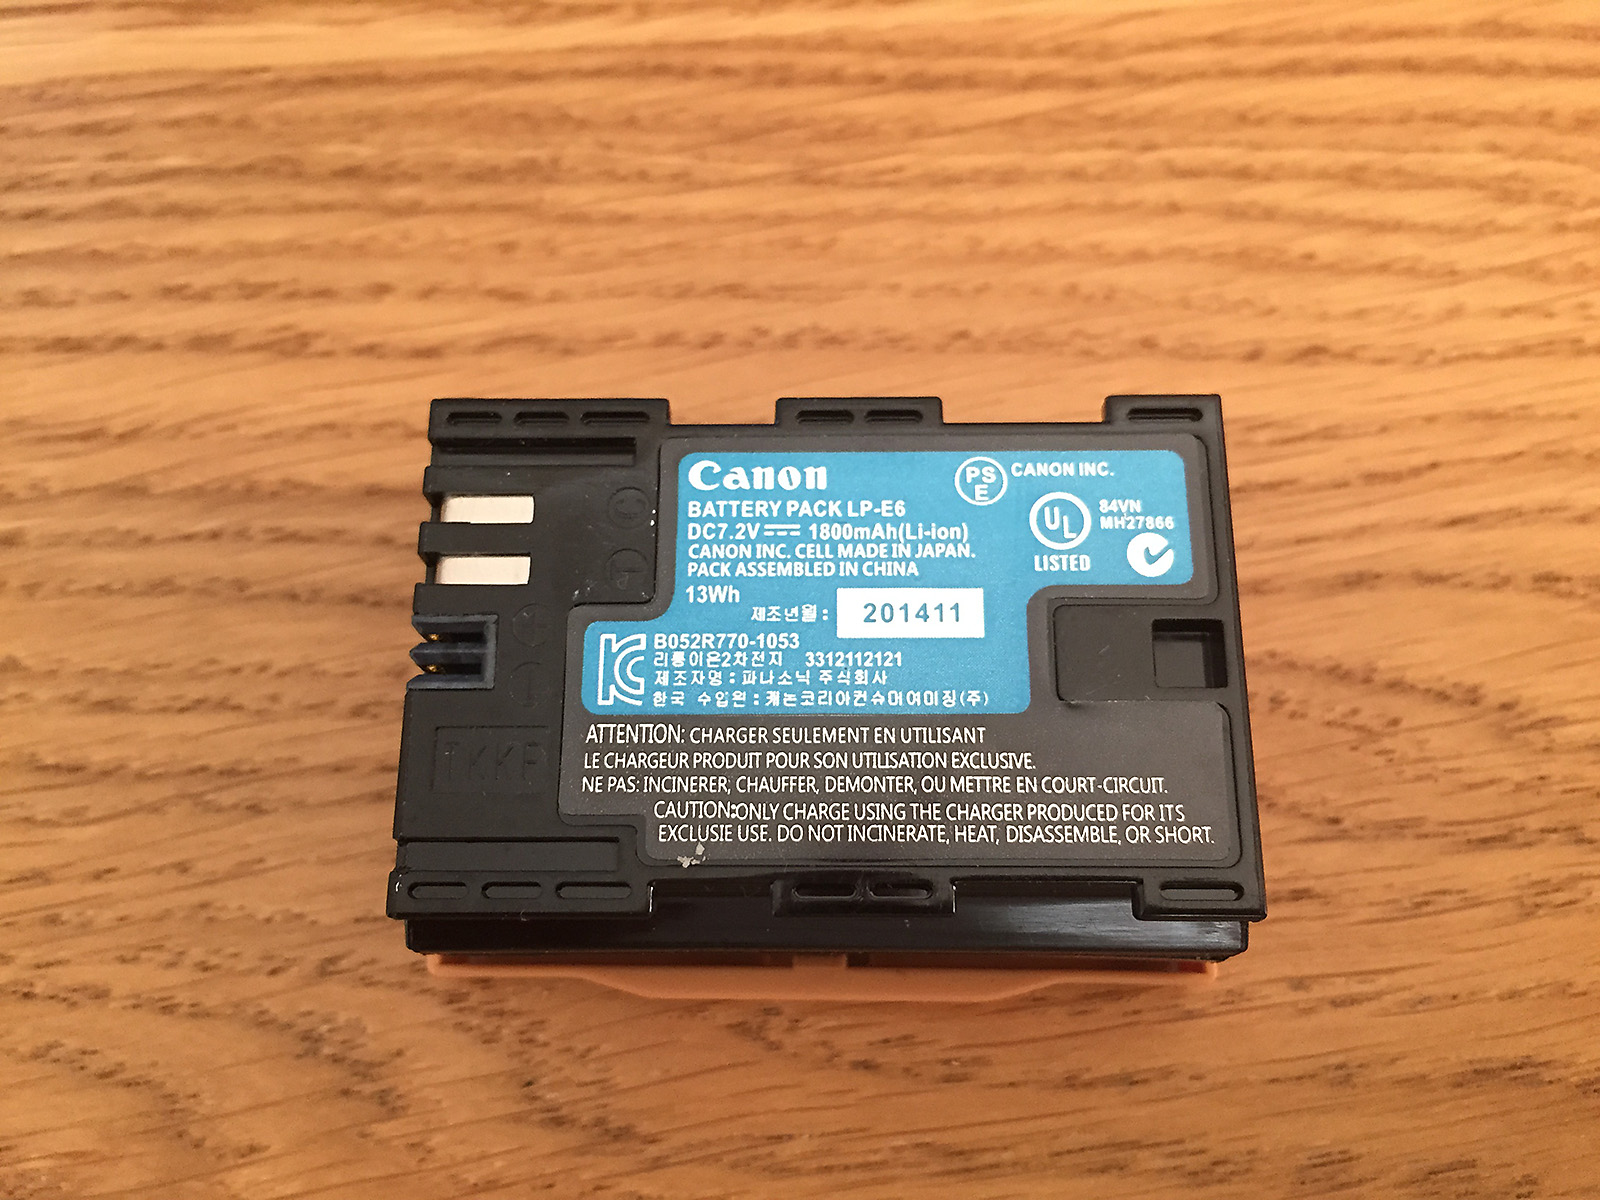
But it is definitely a fake. Can you spot why?

Can you spot why this Canon battery pack is not the real thing...?

Can you spot why this Canon battery pack is not the real thing…?

Here’s some more shots of the very detailed packaging.

Convincing, and high quality, packaging...

Convincing, and high quality, packaging…

The hologram is a nice touch...

The hologram is a nice touch…

Needless to say that this was bought off eBay so it is very much caveat emptor, but this was being sold as “genuine and original” with a price high enough that made me think that it could well be precisely that. It could have been any number of legitimate sellers: unwanted present, Christmas cost more than expected unused items being sold off, someone no longer interested in photography to name but three.

But for someone to go to all this trouble to make a fake look and feel like the genuine battery pack does make me wonder just how much money there is in the fake market.

Now the point of this is not to suggest than battery packs from a source other than the original manufacturer are bad: there is a big difference between aftermarket batteries and fake ones. For many years I have been quite happy with aftermarket batteries (on my current 5D2, and 7D and well as my previous 40D) and before they went bust Diamondback batteries were my favoured option. I also own a Hahnel battery pack and they too are another well regarded manufacturer. Well made aftermarket battery packs from reputable manufacturers include all the require protection circuitry to stop overheating and potential fires. But if a seller is masquerading a battery pack as an original then it is going to be for profit. In that case you can probably forget the niceties such as protection circuits.

So, what are your options?

First, buy from a reputable source and official Canon resellers. If it appears to a ‘too good to be true’ deal, it probably is. That said, you still have to exercise caution. Amazon is a good example:


Don't blindly buy just because the order is 'fulfilled by Amazon'...

Don’t blindly buy just because the order is ‘fulfilled by Amazon’…

Amazon is a reputable company, but there is a big difference between ‘sold by’ and ‘fulfilled by’. The best option here is the £46.48 option as that is sold and fulfilled by Amazon, who incidently are an authorised Canon reseller.

Second, take some time to learn about some of the obvious signs of counterfeiting. Canon have a link off their US site (http://usa.canon.com/cusa/about_canon/standard_display/aboutcounterfeits) although Canon’s images are too small to be of use. A well written and clearly documented article for Canon LP-E6 counterfeits can be found at http://tazintosh.com/en/canon-batteries-watch-out-for-counterfeits/

Third, simply accept that, after spending £1500 on a camera body and sticking a lens costing in the region of £1000 on it, trying to save money by buying cheap batteries to power the whole thing isn’t going to be your greatest decision. Frankly, put in those terms, it really make no sense at all. Even at the full retail price, the Canon LP-E6 is less than 3% of the average camera/lens combination it powers.

But back to my story. The seller has refunded me and I’ve decided not to name-and-shame, primarily as there is no real point. There are too many counterfeits out there and highlighting a single seller will not achieve much. Better to cut the problem off at the source and accept that a reliable and good quality battery pack is going to cost.

Of course, I could go cheap and save £40 but given that my average trip these days costs at least one hundred times that, if the battery pack stopped charging on my next expedition and I missed the shots I was after I had better be near another lava lake – that would give me something to throw myself in…


Posted in Hints and Tips

Voltaic Systems’ 17W Solar Charger Field Review

Back in November I gave my initial impressions of the Voltaic Systems solar charging kit and its applicability to photographers in the field. At the time I also mentioned that, as with many things, the real test would be in an actual field trial. Well, after two weeks on location in northern Ethiopia it is safe to say that it has been put through its paces and its strengths and weaknesses revealed.

The kit I took to Ethiopia consisting of the panel (top), the red cable connecting the panel and V72 battery, the black cable to connect the V72 to the camera charger and the white/black cable to connect to my MacBook Air. The car charger (bottom) also came in useful. The camera charger is not shown as it did not survive... [Click to enlarge]

The kit I took to Ethiopia consisting of the panel (top), the red cable connecting the panel and V72 battery, the black cable to connect the V72 to the camera charger and the white/black cable to connect to my MacBook Air. The car charger (bottom) also came in useful. The camera charger is not shown as it did not survive… [Click to enlarge]

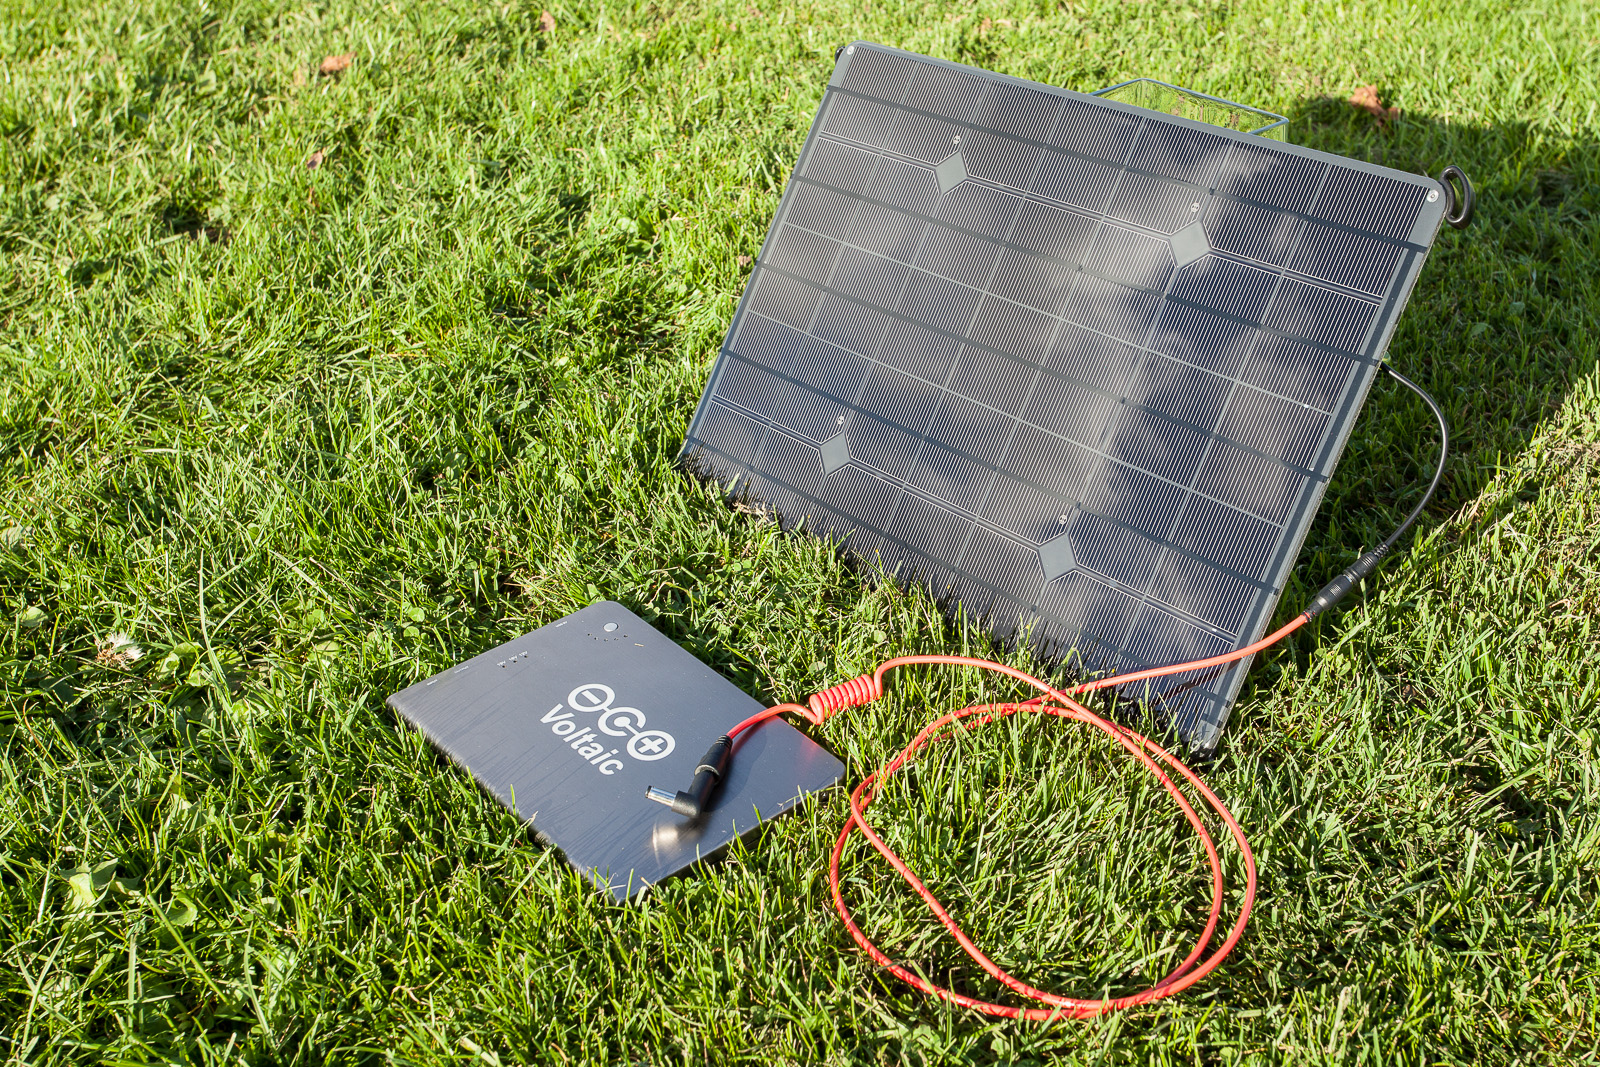
The kit in question is the 17W single-panel kit consisting of the panel, the V72 20,000mAh lithium polymer battery and a number of connecting cables and adapters. In addition to the base kit I ordered the Canon LP-E6 battery charger and an Apple MagSafe power adapter for a 2011 model MacBook Air. It is hard to tell whether the panel and V72 are designed by Voltaic or merely off-the-shelf items but the advantage to me as a photographer was that I didn’t have to spent inordinate amounts of time trying to work out which items were required, which were not and whether they would work together. The Canon battery charger was definitely a third-party item (more on that later) whilst the MagSafe adapter was definitely hand-crafted by Voltaic.


PREPARING FOR THE TRIP

Before heading out I knew that, given our location, there would be no chance of a power source during critical parts of the journey. There are some stunning landscapes in the north of the country, but they are far from civilisation. So, whatever power requirements I had needed to be met by the kit that I carried. In the original article I outlined what I considered to be fairly simple needs: I needed a means to charge the LP-E6 batteries for the 5D Mk II and 7D bodies and also my MacBook Air that would be used for the end-of-day review and image backup. It was a simple requirement and one that the Voltaic web site suggested fell well within the capabilities of the kit.

I had also given a fair amount of consideration to how – and when – I would need to charge my equipment and I anticipated two basic scenarios. First, when moving between locations in the 4WD vehicles. Second, when on location. In the first scenario, we’d be spending a lot of time sitting around and not doing much shooting. According to the itinerary, these would be long days driving and arriving at the destination after sunset. In the second scenario, we’d be out-and-about but with a fixed camp to return to at the end of the day.

The issue that I could see, however, was that there was no easy way to attach the solar panel to the vehicle. Voltaic Systems had very kindly included a set of plastic attachments that would allow the panel to be tied to something (for example with velcro or cable ties), but they weren’t too much use on a vehicle. Luckily a good friend of mine has a mechanical aptitude and a comprehensive workshop, after a few conversations, he created a magnetic mounting kit for the panel. Now I could attach the panel to any magnetic surface – such as the roof of a 4WD – and simply run the connecting cable to the V72 safely inside the cabin. So now I was ready: I could mount the panel on a vehicle, a camel or any other fixed structure.

Although not part of the provided system the magnetic mount really made a huge difference - and one I recommend Voltaic Systems consider adding... [Click to enlarge]

Although not part of the provided system the magnetic mount really made a huge difference – and one I recommend Voltaic Systems consider adding… [Click to enlarge]

A close-up of the panel on the 4WD showing the (home-made) silver metal magnetic mounts and the (provided) plastic loops in each corner for cable-tie mounting. The panel happily survived repeated bumps and knocks as well as being covered in dust and volcanic ash... [Click to enlarge]

A close-up of the panel on the 4WD showing the (home-made) silver metal magnetic mounts and the (provided) plastic loops in each corner for cable-tie mounting. The panel happily survived repeated bumps and knocks as well as being covered in dust and volcanic ash… [Click to enlarge]

One of the nice things about the V72 battery is that you do not have to use the solar panel to charge it. The recommended input is a 14-20V DC input and the kit came with an appropriate mains adapter for this purpose. Initial tests in the UK (and shown in the original article) also showed the solar panel happily generated around the 20V mark. Voltaic also include a cigarette lighter lead suggesting that even a 12V DC supply can charge the battery. This was especially convenient as, for the first few days as we covered the 700km from the capital to the north of the Rift Valley, we would have access to cigarette lighters in the 4WD vehicles. Once at the Erta Ale base camp however, where we swapped transport to camels, we would be on our own.

One of the things that separates Voltaic’s solar kit apart from the other ones I researched is the capacity of the V72. At 20,000mAh it has, in theory, enough reserve for ten of Canon’s 1,800mAh LP-E6 batteries although Voltaic’s web site suggests a more conservative 3.5 times reserve. Voltaic also suggested that a single, full, charge of the V72 would be enough to replenish the Air’s own internal cells.

Using the ten foot cable I had a lot of flexibility as to where I put the V72 in the 4WD. All I then had to do was wait for the sun to work its magic... [Click to enlarge]

Using the ten foot cable I had a lot of flexibility as to where I put the V72 in the 4WD. All I then had to do was wait for the sun to work its magic… [Click to enlarge]

The charging process can work in one of two ways, depending upon what you are charging. Voltaic’s web site suggests that camera batteries can be charged directly from the panel, presumably relying on the battery charger’s regulation circuitry to ensure the battery is not over-cooked. However, smart phone and laptop charging should be performed via the V72 battery. In the end everything was charged via the V72 battery although it was here that I hit a bit of an inconvenience. Voltaic offer two cables (the red cables in the photographs) to connect the panel to the V72, one at 4 feet and one at 10 feet in length. In both cases they are terminated in a 3.5mm male DC plug. This is fine for the camera charger but for the V72 – which takes a 5.5mm input – a small (provided) adapter had to be used. One thing I have learnt is that when moving about at some point during the various unpackings and repackings, you lose small stuff. It is inevitable. Given that Voltaic only recommend direct charging for camera batteries, this seems an odd choice of connector. In the end I replaced the provided 3.5mm plug with a 5.5mm plug before heading out.

The other reason that I ended up always charging the V72 is one of convenience. At 12° north of the equator we were still in winter and so daylight hours were limited. Sunrise was around 6:30AM and sunset around 6:30PM. The activities of the day meant that direct charging was almost always impractical until we came to a halt in the evening.


IN USE

The first few days were spent covering distance as we moved up country. Long hours in the 4WD interspersed with stops to examine some interesting geologic phenomenon. It was a light draw upon the camera batteries but in the evening it was still worth topping them up from the V72. An unexpected power drain, however, was the iPhone 6. Quite by accident I began to use it to record video clips and take those panoramas that didn’t quite seem worth setting up the panoramic tripod head for. The iPhone turns out some quite reasonable results, but its video capabilities have a heavy drain on the battery.

With the added load of the iPhone battery using the long hours of driving to keep the V72 fully charged turned out to be very useful. Even so, the first few days were a gentle introduction for the charging kit.

Home at Erta Ale. "A compact, fully air-conditioned, one bedroom apartment backing on to a stunning panoramic landscape." it said in the brochure. It even came with free mice... [Click to enlarge]

Home at Erta Ale. “A compact, fully air-conditioned, one bedroom apartment backing on to a stunning panoramic landscape.” it said in the brochure. It even came with free mice… [Click to enlarge]

Once we arrived at the Erta Ale base camp and headed up the volcano, the solar charging kit panel took a more fundamental role. A few of the other travellers also had Canon 5D MkII and/or 7D bodies, one had a quadracopter and the rest had their own cameras form different manufacturers. With three days at the edge of a lava lake we all became a little shutter-happy. I managed, with no real effort, to take over a 1000 shots as well as a large number of video clips and I was not alone. The quadracopter was set free and captured some stunning footage although you could literally watch the batteries drain. The problem was that we had zero access to power. The 4WD vehicles were three hours away and as the journey would require a military escort to be organised, short of a medical emergency, we weren’t going to be making it. Only one other person had a solar kit – a $60 affair off eBay – and that was so ineffective as to be useless. Suddenly I had become a popular guy to know.

We relied on the Voltaic charger. Several Canons, a Fuji, two iPhones and even the quadracopter were all kept alive by the solar charger... [Click to enlarge]

We relied on the Voltaic charger. Several Canons, a Fuji, two iPhones and even the quadracopter were all kept alive by the solar charger… [Click to enlarge]

Due to the number of videos I was taking and a lot of use of image stabilisation I was getting through around two of the Canon LP-E6 batteries a day, some of the other serious photogs were too. The iPhone battery also required daily attention and the end-of-day upload to Adobe Lightroom on the Air drained its battery at an unholy rate. A queue formed. The Voltaic charger simply could not keep up with it all. This is in no way a criticism: It is intended vey much as a personal charging solution and we were asking it to keep up with four people each placing a heavy demand upon it. In truth it actually coped better than I expected and the ability of the V72 to output as USB and simultaneously one of 12,16 or 19V really shone; there were a couple of instances where charging the iPhone and a camera battery simultaneously was a real benefit.

It was whilst camped up on the crater of Erta Ale that the provided ‘tie-attachments’ came in useful as they allowed me to cable tie the panel to the wooden branches of the hut I was it. It was unlikely to be stolen, but we were exposed and the wind did pick up every now and then. As my hut backed on to a sheer drop to the old, razor-sharp lava, caldera floor, had the wind decided to get too playful then panel would have met a very quick end.

The provided plastic attachments allowed the panel to be cable-tied to the shack and the cable fed inside via one of the many, many holes. The next nearest source of power was a 4WD somewhere in the distance... [Click to enlarge]

The provided plastic attachments allowed the panel to be cable-tied to the shack and the cable fed inside via one of the many, many holes. The next nearest source of power was a 4WD somewhere in the distance… [Click to enlarge]

Disaster almost struck. The Canon battery charger provided by Voltaic broke. After disassembling it I discovered that the DC input socket had a snapped solder joint and had lifted the solder tracks off the circuit board. In other words it was definitely not repairable in the field. Had it not been for one of the guys having a USB Canon charger I, and the other Canon users would have been in dire straits. It is worth pointing out that I was not trying to be overly rough with any part of the provided kit, but I was in the field. Things do get knocked about, repeatedly plugged and unplugged otherwise moved and I would expect the elements of the charging kit to withstand this level of abuse. If I am blunt about it, the supplied battery charger is (or rather was) a rather cheap-and-cheerful piece of kit. But to balance that negative, the solar panel and V72 stood up to field work admirably. The V72 may have a few scratches now and a dent or two, but it continues to be rock-solid. The panel itself has a few surface scratches but these have no effect upon its operation. The only let-down is the provided third-party battery charger.

By day three the lack of camera battery charger would have been catastrophic to the shoot and shots like this would have been missed... [Click to enlarge]

By day three the lack of camera battery charger would have been catastrophic to the shoot and shots like this would have been missed… [Click to enlarge]

After descending from Erta Ale we moved further north to Dalol (or Dallol, depending upon which map you read) and close to the DMZ between Ethiopia and Ertitrea. Here the accommodation improved as we swapped the crude huts with volcanic ash floors and mice for crude beds under the stars. We did have one structure available to use and this doubled as a kitchen and storage area for our bags. It’s roof also server as a convenient high place to mount the panel out of the reach of the local children. Whilst we again had access to the 4WD vehicle as so everyone returned to charging their batteries that way, continuing to use the panel meant that I did not have to wait in line – and took some strain off the vehicles.

Eventually we returned to civilisation and for the last couple of days found ourselves in hotel rooms. Aside from the joy of now actually having toilets and showers, everyone rejoiced in the concept of electricity that came from sockets in the walls! Except me. I had left all my mains chargers back in the UK and so I still relied on the solar kit to provide me with power. In the first hotel $5 bought me access to the roof; in the second there was a rooftop bar.


CONCLUSION

So, the bottom line is whether I can recommend the Voltaic offering or not. The answer is an almost definite yes but I would like to suggest to Voltaic Systems the following changes:

  • Include a magnetic mounting system for vehicles.
  • Change, or at least offer an alternative cable to connect the panel to the V72 battery terminating in a 5.5mm DC plug thereby removing the need for an adapter.
  • Offer a more resilient camera battery charger.

In addition to the suggestions to Voltaic Systems I recommend having a second V72 to hand. I’m not totally sure how keeping two charged would work given that the panel couldn’t charge a single V72 in one day, but heading out to location with two fully charged 20,000mAh batteries certainly would not hurt.

In spite of these suggestions, and even without my modifications, the bottom line is that the kit not only worked, it worked well. Despite being asked to perform far beyond it’s intended use it helped all of us keep power to our cameras and get shots from a location we’ll likely never see again. And since that was the whole point of having a solar charging kit in the first place, I can only say that it was well worth the price of purchase and import costs to the UK, the extra luggage weight and the need for me to modify it. Next time I head out to a location where power will be scarce, it is definitely on my packing list.


UPDATE: 30 JAN 2015

After posting this review Jeff over at Voltaic responded pretty much immediately (which seems to be normal for their customer service) to the points I raised. I’ve then sat on the interesting replies until now (although in my defence I have been busy).

Voltaic now link to an US-based web site that provide off-the-shelf magnets that can be purchased and fit directly to the panel’s threads. For USA customers this is a great solution although I would just point out that (1) shipping to the UK (and presumably anywhere else outside of the US) was prohibitively expensive when I sent Voltaic the link last year, and (2) the magnets have no protection and so may scratch the surface they are attached to.

Not mentioned elsewhere on their site but they have now changed the style of adapter that I was so concerned over losing (as it would prevent solar charging) that I discarded it and soldered on my own connector. Apparently Voltaic now provide an adaptor that clips over the cable coming from the solar panel. If this is anything like the one they already use on the red connecting cable then you’re probably not going to lose it – it needed a serious amount of pulling to detach the cable from the panel.

As for the failed battery charger, right now it seems that they are still being sold and I guess that my experience was not-so-common. Voltaic are interested in alternatives and I’m testing a German-made one right now. But my advice would be to take at least one spare charger – they’re critical yet very lightweight and only a few dollars.

Voltaic have posted highlights of my review on their web site here.

Posted in Travel Also tagged , , , , |

Power on Location: Part 1

Whilst every trip that I have embarked upon has had its own unique character and challenges, they have all had their similarities too, so much so that I just simply accept their existence. So, when beginning to think about the practicalities of the forthcoming trip to the Danakil Depression, it was a bit of a surprise to be hit by a rather obvious fact: There’ll be no electricity. Now really, this should be of no surprise whatsoever as we will be, quite literally, in one of the most desolate and inhospitable places on the face of the planet but still, up until this trip it is not a problem I have had to face before.

Now to call this a problem may seem a little melodramatic – Mankind had lived quite happily without electricity for millennia and so I’m sure I can cope for a mere two weeks. It’ll even be fun. No, Man does not need electricity to survive. But camera batteries do.

A few years ago I was up in the Andes on a four-day trip between San Pedro de Atacama in northern Chile and Uyuni in Southern Bolivia. We travelled in jeeps, slept in refuges and ate fried spam for dinner. In many ways it was the forerunner to the Ethiopia trip; a barren wilderness unscathed by humans. And no electricity. I managed to survive on the five camera batteries I had, but did run most of them down. That was four days without being ‘connected’. Now I have two camera bodies, invariably forget to turn off battery-sucking image stablisation and am shooting more video – and 13 days of power to provide.

To make matters worse, I’ll be taking my trusty 13” MacBook Air with me which serves the dual purpose raw file backup and Adobe Lightroom viewer. I did spend a while thinking that I could just do without the laptop – a luxury after all – but I have increasingly found the ability to look at images on a big screen at the end of each day invaluable. After all, I’ll not be going back and so I want to make sure that those killer shots on the camera’s LCD display are equally killer when viewed at a more normal size. And just like the camera batteries, the Air is not solar powered.

But it could be.

I know basically how solar charging works but I also know that the theory does not always translate into a practical solution, or at least an affordable and portable practical solution. And Google was throwing many, many options my way. In the end I found the interesting web site of Voltaic Systems a company based in the USA who stood out for two reasons. First, they offered a complete charging kit; the panel, the lithium ion battery and all the cables and adapters. Second, they offered the right cables and adapters. They had a charging adapter suitable for my Canon 5D2 and 7D cameras batteries and they had an adapter cable for my 2011 model MacBookAir. In short they were a one-stop shop for exactly what I was after.

A few emails were exchanged over the weekend and later that week a package turned up on my desk, followed a few days later by a smaller one containing some adapters to allow the solar panel to be strapped to a backpack. And so I was sorted. If it works, that is.

The core elements of the solar charging kit: The panel, the battery and a cable to connect the two...

The core elements of the solar charging kit: The panel, the battery and a cable to connect the two…

The kit looks to be essentially very straightforward to use: You use the panel to charge the 20,000mAh lithium polymer battery and then use the battery to charge the laptop or camera batteries. You can charge the batteries directly from the solar panel, but Voltaic Systems strongly advise against connecting a laptop direct, presumably due to voltage regulation issues. The V72 battery in the kit is estimated to provide a MacBook Air with a single full charge. So, at the end of the day I could be charging the Air whilst charging a battery. For my Canon LP-E6 batteries, the estimate is six hours charge time.

Initial tests were, frankly, disappointing. I spent a few hours in my study with the panel facing the window and eagerly watched the provided battery show signs of charging by the miracle of harnessing the power of nature. Except that it didn’t. Being the geek that I am, I adopted the nuclear approach and immediately reached for the voltmeter – 15.9V. It is rated as an 18V panel and so at least something was working. It was only then that I did what a normal person would have done and read the copious instructions on the website.

So, rule number one: Perhaps the clue is in the name – solar charging kit –  but it doesn’t work very well when indoors. Even window glass will reduce the amount of light reaching the panel. Once I opened the window and gave the panel a more direct view of the sky, the voltage jumped up to a more usable 17.9V. And more importantly the indicators on the battery sprang into life. I had finally mastered nature!

And then they died again.

This happened several times over the next hour and no amount of cable-wiggling or repositioning of the panel helped. But the voltmeter did show the voltage coming off the panel was intermittently fluctuating and then I worked out why. So, rule number 2: Clouds passing in front of the sun can cause the voltage to drop enough to stop charging.

This was all way back in August and having some time I today went out into a bright British November afternoon for more testing. So, how did it do?

If the panel can generate 21.2 volts on a November afternoon in the UK, I'm hoping it will drink up the African sun...

If the panel can generate 21.2 volts on a November afternoon in the UK, I’m hoping it will drink up the African sun…

Whilst 21 volts may not seem like much it is worth remembering that a car battery generates 12 volts and most mobile phone and tablets require a mere 5 volts. But, does it charge the all-important V72 battery?


Now it may not be the most exciting movie but to me those LEDs lighting up in sequence is pure action-adventure because it means that, just like the movie guns with an endless supply of bullets, I’ll be able to keep on shooting all day long…


Posted in Travel Also tagged , , |

Keeping Warm in Antarctica: What and How Much to Take…

With the start of August comes the point of no return for those lucky enough to be heading for Antarctica this season. Most expedition operators require the final balance to be paid three months before the expedition and as the season opens in November, those who haven’t already paid the remaining balance will be making plans to do so now.

Once you’ve committed all that money at some point you’ll need to turn your mind to some of the other logistics such as how to travel between the international and domestic airports in Buenos Aires, differences in baggage allowances between different airlines and so on. However, at some point the same question is likely to crop up: Just what does a fashionable Antarctic-bound traveller wear this season?

Zodiac propellers break several times a season due to ice. When they do and you're on-board, being warm can be quite nice...

Zodiac propellers break several times a season due to ice. When they do and you’re on-board, being warm can be quite nice…

Keeping warm and dry is such an obvious requirement that I don’t see many people talking about it which can be a bit frustrating if you’ve just spent upwards of GBP £5000 on a trip and are not sure what or how much to prepare. Mention Antarctica and most people will reasonably imagine blizzards, breath that freezes as you exhale and the kind of cold that results in frostbite if skin is left exposed more than a few seconds. Which is all true, of course – just not when and where you’ll be going. First of all, expeditions only run from late Spring to late Summer when the sea ice surrounding the continent has melted sufficiently for an approach to be made. Second, even on the ‘Below the Antarctic Circle’ trips, you’re not really venturing that far onto the continent itself. In fact, look on a map of Antarctica and you may be forgiven for feeling a little let down. Don’t be – it’s stunning. In fact, were you to venture inland, without very specialist equipment and a lot of physical and mental expertise you really would end up a permanent resident. But, up on the Antarctic Peninsula, expect daily temperatures in the range of about -5C to +2C. This might be an inconvenient fact that you want to omit when telling friends of your Ranulph Fiennes-like exploration of Terra Incognita, but it does at least lend some reassurance as to not having to spend another vast sum of money on specialist clothing.

OK, your expedition leader is trained to ensure you don't join these unfortunate souls on Deception Island, but being cold can really ruin your experience...

Your expedition leader is trained to ensure you don’t join these unfortunate souls on Deception Island, but being cold can really ruin your experience…

That’s not to say that you shouldn’t prepare. I didn’t want to be so cold that I hated the thought of venturing off the ship. Indeed, one of the other travellers on the trip I made was so visibly cold on one Zodiac cruise that we had to return to the ship to let him off. That would have both annoyed and depressed me had I been him as for me, like many others travelling to Antarctica, it is a one-time journey and missing out on any of it would be awful.

I spent ages reading blogs and travel sites looking for clues on the ideal wardrobe to take. It was all a bit frustrating really as many sites talked about following the layered approach to clothing, but none really got specific. For example, using base layers rich in merino wool seemed a consistently popular suggestion, but with prices ranging from GBP £35 to GBP £150 per garment, it didn’t narrow down the options much. I could go ‘cheap’ and risk the garments being not warm enough, or I could go expensive’ at the risk of needing a second mortgage. What I needed was a nice summary of items that someone on a budget had used when in Antarctic, how they had used them and what they thought of their effectiveness. That would have helped me a lot.

With the benefit of hindsight, you don’t have to go mad; many people wear ski clothing – which is fundamentally designed for a cold weather climate – and they do just fine. Others, like myself, checked out reviews on Amazon on clothing and asked friends who have an outdoorsy life if they could recommend items based on experience. So, here is the type of article that would have helped me this time last year when beginning to look for clothing.

The Outer Layers

These are designed with one purpose; to keep the rain and wind off you. They will not keep you warm. That is important as most expedition operators will offer (sometimes free) a hire of a outer jacket and trousers. Take the offer, but remember you’ll still need the mid- and base layers.

  • Berghaus Gortex Jacket – I’ve had this jacket for almost twenty years and it’s been everywhere with me. It, and the equivalents from North Face and the like will be perfectly fine, but if you do not have one do not worry as the one offered by the expedition operator was perfectly fine and no one had any complaints of them.
  • Thinsulate Beanie Hat – invaluable for warmth when under the jacket hood, especially on the Zodiac journeys.
  • Outdoor Research Meteor Mitts – wonderful photographer gloves. In essence these are an outer layer and a mid layer in a set. As the name suggests, these are mitts as opposed to gloves which has the benefit of allowing your fingers to stay together for warmth. In situations where wind or rain could be an issue, such as the Zodiac journeys to and from landing sites, I’d keep the outer water- and windproof layer on. Other than this I’d take the outer layer off. The beauty of these mitts for photographers is that the finger and thumb sections of the fleece mid layer fold back revealing the top half of your digits and allowing you to operate fiddly camera settings. I also wore merino wool glove liners so my fingers were never totally exposed. This combination allowed me to keep shooting for hours with no discomfort. There’s even a pouch on the mitt for a chemical heat sachet such as the Little Hotties brand. I love these gloves, but had to buy them on eBay as, at the time, there were no UK distributors.
  • Insulated Gum Boots – provided by the expedition operator. Others had their own boots, and for those who went skiing , ski boots were an option. I just took the standard, free offering was toasty warm when combined with my mid and base layers.
  • Waterproof Salopettes – provided by the expedition operator. I did actually purchase a pair of waterproof trousers prior to the trip, but the provided ones were really quite good and so my pair never got used.

I would just re-iterate the need keeping your head warm as much as everything else. Woollen ski hats were worn by many and they were just fine. Again, the weather conditions will be similar to the average ski resort, just you’ll be travelling on the sea several times a day.


The Mid Layers

These add additional warmth control to the base layers and usually come with a zip to allow control over how much heat escapes. Mid layers are (usually) worn as a single item on each part of the body. If you’re worried about keeping warm, just double up on the base layers in the next section.

  • Berghaus Polartec 100 Fleece – Most fleeces you’ll find in this category are pretty much similar and so I bought one could zip into my outer layer effectively creating a dual-layer item. I never used it this way as I’d keep the fleece on when on-board. So, any decent fleece will do, just not one designed more for fashion than function.
  • Jeans – Yep, normal jeans. To be honest, so good were the base layers and the provided waterproof outer layer that when out-and-about off the ship I didn’t bother with these on excursions and simply wore two base layers and the salopettes and changed out of the salopettes into jeans upon my return to the ship.


The Base Layers

These are designed to provide basic warmth and to quickly wick sweat away from the body before it can cool down and cause problems. In truth I doubt you’ll be sweating much in Antarctica – aside from the coolness of the climate, you don’t really exert yourself too much.

  • 2 Endura BaaBaa Merino Base Layer – recommended by an mountain biking fanatic at work with the added attraction the these merino wool tops come in on the lower end of the price scale (around GBP £40 at the time). They did a fine job of keeping my upper body warm. In fairness I usually wore one of these Endura base layers, with the Tog 24 zipped top as an additional base layer. How may you wear will depend on how easily you feel the cold.
  • 2 Tog 24 Arctic Zip Neck Base Layer – Costing about GBP £10 each on Amazon and quite well rated I purchased these to wear when the merino wool tops needed to be washed. In the end I wore them on top just to add warmth. This way I was able to lie motionless for thirty minute or so on ice and snow with no discomfort. So that has to be a recommendation!
  • 2 Trekmates Merino Long Johns – Wore both pairs at once and never felt cold – sometimes cool maybe – but not cold.
  • 2 EDZ Merino Liner Gloves – These are thin gloves that work really well under bigger, bulkier gloves. For me they were bought to keep the chill off my fingers when photographing and coupled with the fold-back OR Meteor Mitts above they did a really good job.
  • 4 Sealskinz Thermal Liner Socks – I wore these merino wool socks under the walking socks below and did they keep the provided gumboots fitting comfortably, they kept me toasty.
  • 4 Kirkland Merino Wool Blend Walking Socks – At GBP £20 for four pairs these border on sounding too cheap to be any good – certainly compared to the prices I’ve seen in outdoor sporting goods stores. Obviously, a two week trip is not going to test their build quality, but from the warmth perspective, they did just fine.
  • Sub Zero Meraklon Thermal Neck Tube – This was much appreciated on some of the Zodiac cruises as it allowed me to my neck warm and added another layer below my beanie. I could have lived without this, but it wasn’t expensive and certainly didn’t make me uncomfortable.

The other issue I had was just how much clothing to take. The average Antarctic voyage is between 10 and 14 days and so I started with the notion of a change of clothes for each day. This idea very quickly disappeared when I adding up the cost. Luckily all the ships have an on-board laundry and so you can quite easily get items washed with a good turnaround time – on the Akademik Ioffe it was under a day, but larger vessels may take slightly longer.

The idea of taking less clothing will appear even more when you look into the practicalities of travelling down to Ushuaia – namely that the domestic airlines that carry you between Buenos Aires and Ushuaia (where you board the ship) officially has a 15Kg per person baggage allowance. They often waive that, but be prepared to have to pay extra.

Don't worry, you don't eat outside every night, but you simply cannot go to Antarctica and not have a BBQ...

Don’t worry, you don’t eat outside every night, but you simply cannot go to Antarctica and not have a BBQ…

At this point, it’s worth mentioning that one of the benefits of natural fibres such as merino wool is that they’re very good at avoiding odours and this, coupled with the fact that I didn’t sweat when out and about meant that I could wear the same layers two or three times with no issue whatsoever. With a typical voyage to Antarctica of 12 days, this option, coupled with the on-board laundry, means that you can get away with three outfits. If you are in the same situation that I was and have no suitable clothing, the thought of only having to buy three outfits really is appealing.

I do hope that the above helps someone looking to travel to Antarctica, or maybe the Arctic, and who is trying to work out what and how much clothing they need to take. If you have ski clothing already then that’ll be fine, but if you do not, the above is field-tested by me 🙂

PS: If you are going, when you are given the chance to send postcards home, send one to yourself. You’ll regret it if you don’t!

Posted in Hints and Tips, Travel, Trip Planning Also tagged , , , |

Gearing Up for Iceland #2

One of the plans for the Iceland trip is to spend more time at the extremes of the day – dawn and dusk. I’m used to dusk photography and ‘blue hour’ photography – so-called due to the colour of the sky between full daylight and the total black of night – has been something that I have captured on every trip I’ve made.  But, to be honest, I’m no fan of early starts.

However, I’m going to make an effort on the trip and that leads me to a new consideration: In order to get to a location to take photographs at dawn, I have to leave wherever I am staying pre-dawn. Aside from the unholy thought of that, it’s going to be dark. Very dark. I’m going to be away from population centres and much of Iceland’s beauty stems from the almost total lack of invasive civilisation and so any pre-dawn activity is going to require some kind of illumination.

After an experience in the Falkland Islands in 2010 getting a torch was a must. I was out on Cape Pembroke – a peninsula on East Falkland – at the long since retired lighthouse. The lighthouse is not too far outside of the capital Stanley – around five kilometres – but it is uneven, boggy ground with no roads or paths and so I had a local 4×4 taxi drop me off with specific instructions on how to head back; “Head for the radio antenna and when you get there head right until you find the path.” Simple.  Anyway, it began to get dark and so I started to head back whilst I could still see the antenna. Then I got totally side-tracked by a stunning sunset. For half an hour. By which time it was dark – the kind of stormy night, cloud covered with no lighting for miles, dark. So there I was on a peninsula in the middle of winter on one of the southern most points of land in the World in the dark. The only thing separating me from the warm comfort of the hotel was several kilometres of boggy, uneven, ankle-twisting ground. In the dark. And it was at that point that I decided it would have been really nice to have a torch.


Getting distracted by an amazing sunset is easy. It's what happens next than can be a problem....

Getting distracted by an amazing sunset is easy. It’s what happens next that can be a problem….


Since then most of my travels have been urban and so the need for a decent torch has not come up, but Iceland now requires me to address that.

Well, it’s probably no surprise that there are literally thousands of choices. However, I did have some requirements:

  • Weight. It had to be lightweight as (1) it has to get to Iceland and back in a 23Kg allowance and (2) I have to carry it all day.
  • Battery Lifetime. I may need to depend on the torch for a variety of reasons, not least of which would be to see where I am going.
  •  Bright. Whilst the main purpose of the torch is to be able to see well enough to avoid the perils of an uneven ground, I may need to use it go get the attention of a passing car. In Iceland, that passing car may be a long way off.

Google ‘lightweight torch’ and one brand pretty much dominates the search result: Lenser. Now, I’m not going to declare Lenser to be the best, or the only brand, but I really did not want to spend days researching torches and the reviews I did read were all very positive so they seemed to be a good bet. One of the things I like about them is the use of LEDs as the light source which tend to be far more resilient to drops and knocks. They also tend to be far more battery friendly. Reading around  there appears to be a couple of different ranges on offer; the L series being lightweight polycarbonate, the H series being head torches and the P series being a professional, or police, range. There were other ranges too, but at that point price started increasing quite dramatically and so I discounted them.  In the end I decided on the Lenser P7 which provides 200 lumens of illumination or, in terms I can understand, about a 200 metre range. I also like the ability to go from narrow beam, handy for attracting the attention of distant cars, to wide beam which will be a great asset in seeing where I’m going. I’ve used four lightweight but long-lasting Energizer lithium AAA batteries and the total weight comes in at 174g. Very nice.

So, the second of the new purchases has been made. Next, keeping warm…

Posted in Travel, Trip Planning Also tagged , , , |

Gearing Up for Iceland #1

Planning for Iceland continues and the current tasks revolve around making sure that I have the right equipment to stay safe.

Travelling alone always means taking a few additional steps to ensure a safe journey as a single pair of eyes can only look in one direction at once, and so I usually make sure that I know the basics such as which parts of a city to avoid roaming around at night by myself, where pick pockets most frequently operate and always ensure that any flashy jewellery, such as watches, are either left at home or kept well covered.

Still Iceland presents a different challenge as my usual planning doesn’t really apply. It’s one of the safest cities on the planet, certainly one of the safest countries and so, aside from some minor pick pocketing in Reykjavik the country’s 320,000 or so inhabitants are generally a friendly bunch. The problems I’m likely to face come from a far less discriminatory source: The weather.

Travelling around the country, even when sticking mainly to route 1, the circular route that provides the island’s main artery, means spending a lot of time alone. Only 10% of visitors arrive outside of the May to August peak season and even if you’re one of them you’d still be one of only 10% of those that make it out of Reykjavik. Reports from others travelling at a similar time of year report of only seeing a handful of cars a day and this, combined with lots of alone time makes for a great photography trip. Of course, if things should go wrong, it is a different story.

The biggest worry is that the 4×4 will break down, leaving me stranded until recovery arrives, which in the worst case scenario, that could mean an overnight stay in the car. Whilst Iceland’s weather is unlikely to live up to its name during September,  it’ll still be cold at night and, as everybody knows from this year, freak weather does occur.

To that end I decided to mitigate any issues with being stranded by purchasing a sleeping bag. With hundreds of choices available and not having been camping for 20 or so years,  it took a while but research, combined with a requirements list narrowed the options down considerably. Here’s what I was after:

  • Compact and light. It’ll be left in the 4×4 whilst I’m there, but I have to get it to Iceland and back in a suitcase with a 23Kg limit.
  • Warm. The 4×4 will acts as the wind and rain barrier, but it needed to be able to cope with projected temperatures – ideally to -5C.
  • Inexpensive. I’m avoiding the word ‘cheap’ as that isn’t what I was after – when safety is concerned, cheap can mean dangerous – but I was buying the sleeping bag as a fix for a specific issue, so I wanted to minimise the investment.

It very quickly became apparent that my three requirements represented the holy trinity of sleeping bags. It also became apparent that you could quite easily have any two of the three: Light and inexpensive;  warm and inexpensive; compact and warm. All the combinations were possible and several options existed in each category. The problem was, I found, to get all three.


Warm, lightweight and inexpensive: The Holy Grail for sleeping bags. Alpkit's SkyeHigh 600 may be a contender...

Warm, lightweight and inexpensive: The Holy Grail for sleeping bags. Alpkit’s SkyeHigh 600 may be a contender…


As I carried on reading the forums the general advice was to go for a goose down bag as they tend to have a high thermal rating to weight ratio, but their main issues were cost and they suffer badly when wet. For me, wet was not likely to be an issue and so I largely ignored that aspect and concentrated on finding a good value goose down bag. There are not that many options, but I did find a lot of recommendations for the SkyeHigh 600 bag from UK manufacturer Alpkit and after much debate decided to get one. Alas, the Alpkit website was showing out-of-stock (and still is) but I luckily managed to pick up a barely used one on eBay. I would have preferred to have bought a new one, but it would appear that the SkyeHigh range is popular due to it appearing to meet all three attributes mentioned above and comments on various forums show frequent stock issues.

I must admit to being initially rather impressed at the size and weight when inside the provided compression sack – 1.345Kg and it even compresses down to a bit smaller than the billed 23x25cm which is easily light enough and small enough for the suitcase. Of course, the acid test will be to actually use the bag but for now it does seem promising.

So  the first contingency plan is now in place. Hopefully I’ll not need to use it, but I may just try it out just for fun one suitably cold evening…


Posted in Travel, Trip Planning Also tagged , , |