Monthly Archives: January 2015

Up Close & Personal With the Erta Ale Volcano


It’s beginning to get chilly here in the UK and so the annual panic over snow is about to start. With that in mind I thought it would be nice to post an image that embodied warmth.

I’m in the middle of writing up the third part of the review (days 4 through 6) of the trip to Ethiopia – the days where we were at the Erta Ale lava lake – and so I’m not going into details today but it is essentially it is a hole 47 kilometres deep and full of molten lava. The level of the lava can rise or fall a few metres but not enough to make a difference to the temperature when you stand close of the rim, which is hot. Very hot. The fun starts when there’s gas in the upwell as it turns the usually gently bubbling, boiling rock surface into something even more spectacular: A Stombolian eruption.

There’s a convenient, but easily climbable peak not too far back from the lake and this gives a great downward view of not only the lake but the whole caldera. This was the third and last day that we were at the lake before heading further north to Dalol and nature had been kind by putting on frequent displays of Stombolian eruptions, lasting up to two minutes at a time. After spending much of the day at ground level trying to capture video and time lapses of the activity, I and one of the other photographers on the trip decided to head up here to gain a different perspective. I was up here with the intent of setting up a panoramic shot but when looking down one of the eruptions started.

This was very much an opportunistic shot. I didn’t have time to frame the shot nor to zoom in so the resulting image captured the moment, but not ideally. In fact I initially dismissed the image as unusable in the forthcoming gallery, but then realised that whilst it may not make it into the final 25 images it still tells a story and gives a great idea of just how ‘up close and personal’ you can get with a volcano.

There has been a significant amount of cropping of the original image – enough that this wouldn’t print well at A3+. Other that that I have only made clarity and vibrance adjustments.

Oh, definitely click the image to enlarge!

Erta Ale can have moments of breath-taking wonder... [Click to enlarge!]

Erta Ale can have moments of breath-taking wonder… [Click to enlarge!]

Posted in Frame by Frame Tagged , , , , |

The Danakil Depression: Trip Review Part 1

Back in the middle of last year, once I had begun take the idea of going to Ethiopia seriously I started to read around on what options I had. I knew that I wanted to see the Erta Ale volcano and the bizarre landscape at Dallol – both conveniently close to each other in the Danakil Depression – but, other than that, I was open to suggestions.

There were many options for four and five day trips that covered the Danakil region but I just knew that, from a photographic standpoint, these were going to be too rushed. There was one trip I found that was 13 days in length and, more importantly, billed as a photographic expedition, but I could find very little independent review on this. To be honest, there wasn’t really too much more describing the shorter trips either.

One of the main reasons that I was more keen than usual to read the experiences of other travellers was that the Danakil region is listed by the UK government as being an area to which you should not travel for any reason, a fact that makes it very difficult to get any form of travel insurance from a UK company. I did ask for advice on one of the photography forums explaining that I couldn’t find much about these trips on the web to which the replies were generally unhelpful stating “that should tell me something”. So in the end my trip was really a result of a bit of a leap of faith. Because of my inability to find anything useful to help me know what to expect – both as photographer and simply as a curious traveller – I have decided to describe the trip I took – in general and its usefulness to photographers – in the hope that, if you too are thinking of going, I can answer some of your questions.

Before continuing I just want to clear up a few of so-called “facts” that you’ll see mentioned time and again as you read various web sites:

  1. “The Danakil Depression is the hottest place on the planet.” No, it is not. It currently has the title of ‘place with the highest average temperature’ which is not the same thing. In fact the measurements upon which this record is based were taken at the (now) ghost town of Dalol (often written Dallol) back in the 1960s. It does get hot of course, but when I was there in December the temperature really only reaches the early 40’s centigrade. The thing that you’ll notice is that even once the sun goes down, the temperature remains in the high 20’s throughout the night. Keep covered up and drink plenty of water mixed with rehydration salts.
  2. “It is a seriously dangerous region for tourists.” At the most northerly point of where you’ll travel you’ll be very close – about 8km – from the highly disputed border with Eritrea. The short story is that Ethiopia tried to annex Eritrea in the 1960’s which lead to the 30 year Eritrean War of Independence that Eritrea finally ‘won’ in 1991. Since then relations have been cool, but with the exception of a couple of clashes – the  1998 – 2000 Ethiopian/Eritrean War being the most notable – the border is generally stable.
  3. “There is a risk from terrorism.” Well, yes. But there is in most major western cities too. What this refers to is the 2012 attack at Erta Ale that killed five tourists, injured two and kidnapped four (later released). The attack was carried out by the Afar Revolutionary Democratic Unity Front, the Afar being the nomadic tribes that live in the Danakil region. There was also a kidnap in 2007  with an attempted one in 2008. So yes, there is a risk that you have to consider. However, the Ethiopian government, and perhaps more importantly, the Afar themselves, understand just how much money tourism brings in to the region and they have moved a long way to providing security for guests. Both Erta Ale and Dalol have military bases and you have military and police escorts from when you enter the region until when you leave.
  4. “The Afar are known to castrate foreigners”. Oh please. Yes, back in the 1930s there was custom that, as a rite of passage into manhood, a boy had to castrate a member of a neighbouring tribe. But that over 80 years ago. Women had barely been given the right to vote in the UK at that point, we’ve had World War 2, nearly had World War 3 and the word ‘minging’ regrettably has entered the Oxford English dictionary. A lot has changed since the 1930s and the Afar have too. So, don’t worry; you’re going to leave Ethiopia with all the bits you arrived with.

The reason I want to highlight – and rebuff – these oft made comments is that they can cause people to not travel to one of the most stunning places on Earth. It is OK if you decide not to travel, but it is important to do it based on facts.


Trip Options

Most of the shorter trips start and end in the Tigray capital town of Mek’ele. This has the benefit of being significantly closer to the Danakil Depression – and where you really want to be – but it does mean that international visitors will need to factor in time to get from the international airport in Addis Ababa to Mek’ele – this most likely being via an internal flight. At around US $600 the shorter trips are a lot cheaper but, from a photography perspective, pretty much pointless. Whilst some will likely disagree, the whole point for me was to spend time at the lava lake at Erta Ale and walk away with images I was happy with. Looking at the itineraries of all the four-to-five day trips I could find and they all had the same basic approach: Begin the three-hour ascent to the lava lake in the early evening, head over to the lava lake and then descend in the early morning. So all you get is a few hours in the dark at the lava lake. For this reason alone, I would not recommend them, but there are other reasons I’ll cover in the later posts looking at days 4 to 6.

At the time of looking at my options there were really only two other choice available. The first would have been to arrange a custom tour, but given the complex geography, harsh climate and political instability (both with neighbouring Eritrea and within the Afar clans themselves) this would have resulted in a serious financial outlay. The second option was the 13-day trip offered by the German company Volcano Discovery. As it turns out the actual trip is handled by Addis-based Origins Ethiopia and it is they that provided the vehicles and drivers, the cook, and the guide as well as organising the police and military escorts required in parts of the Danakil Depression. You will pay a lot more than $600 – it was $4700 in 2014 – but if you are travelling with the aim of landscape photography, or even just to understand the region a bit more then the shorter trips are really going to leave you disappointed. That said, I am not saying that the trip I took was perfect and I’ll cover the strengths and weaknesses (for me) in a later blog entry.

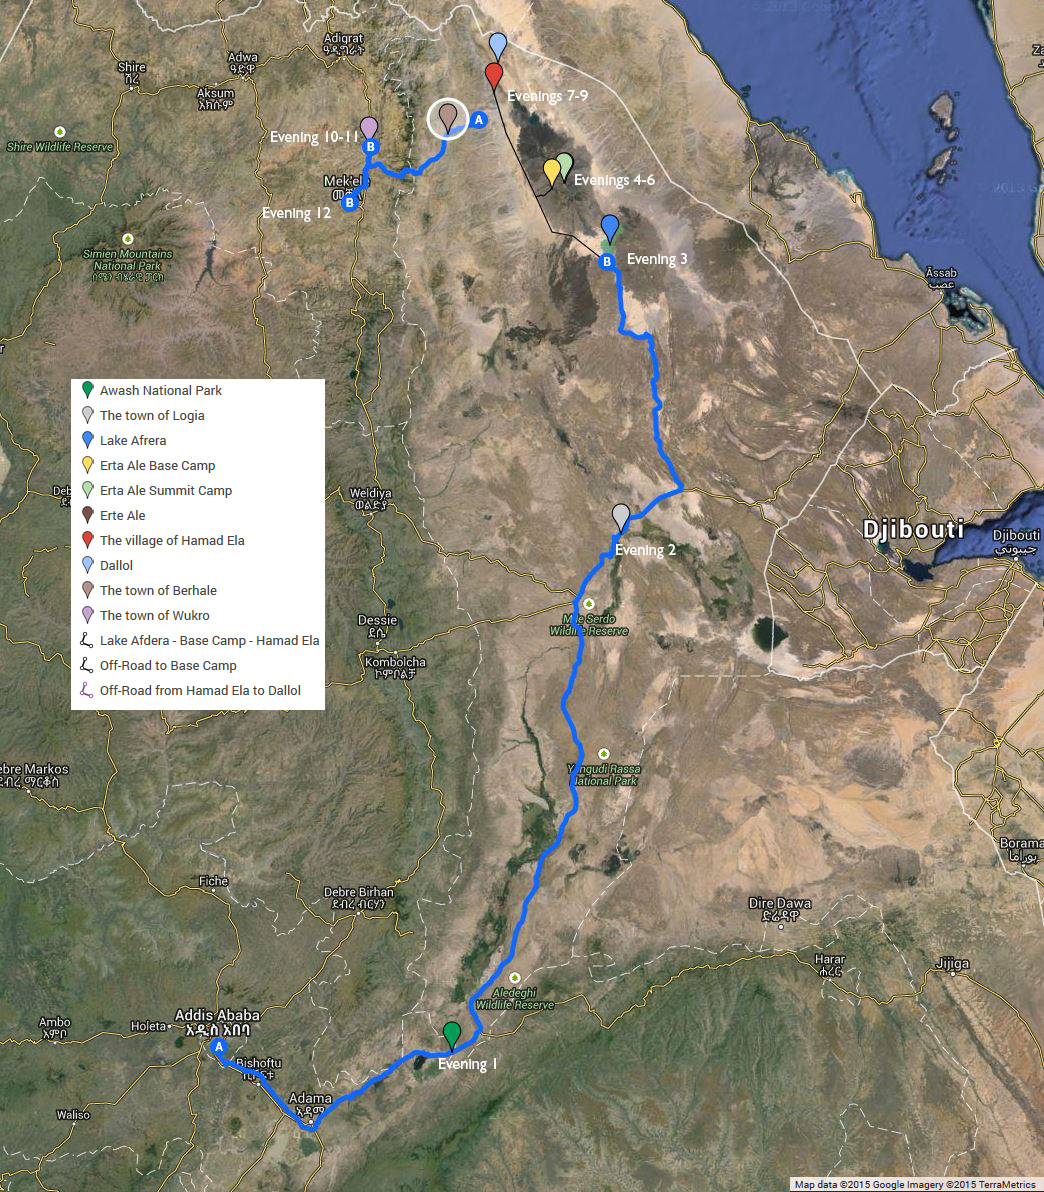
An overview of the route taken on the 13 trip.

An overview of the route taken on the 13 day trip. The lines in blue show the sections where you’re mostly sitting in the 4WD vehicles. The real fun happens between evenings 3 and 9…

Despite the trip being advertised as a 13 day tour of the Danakil Depression you are not going to be spend 13 days behind the camera. This is in no way a criticism of the tour’s itinerary but it does reflect the fact that it is a big country and it takes time to get from one location to the next, especially as Erta Ale and Dallol have been described by National Geographic as being in one of the most remote places on Earth. In the end you will have about five days of solid landscape photography time, quite a few 30 minute blocks when you stop at some of the other points of interest (such as the rock churches in Tigray) and lots of quick five minute stops. You’ll probably be shooting a lot from a moving vehicle too.

One of the many short stops you'll make over the next 13 days. The trip is all about volcanoes and geology and with a trained geologist for a guide you'll certainly learn about geology... [Click to enlarge!]

One of the many short stops you’ll make over the next 13 days. The trip is all about volcanoes and geology and with a trained geologist for a guide you’ll certainly learn about geology… [Click to enlarge!]

I’ll divide the review into several parts over the next couple of weeks simply because the overall thing is quite large. I’ve written this is referring to “you” an awful lot so I better explain why. Simply I am working on the basis that, if you do decide to travel to the region, you’ll bypass the shorter trips and opt for the longer one – of which Volcano Discover/Origins Ethiopia seem to be the only one who really focus on Erta Ale. As this is an expedition they have run a number of times now it is pretty much a set schedule and the trip I had will most likely be the one you have. I do refer to “I” every so often – usually to voice some personal feeling, or simply because I forgot to say “you”!


Day 1

The first day's travel was along route 4 to Awash National Park covering a stretch of approximately 200km... [Click to enlarge!]

The first day’s travel was along route 4 to Awash National Park covering a stretch of approximately 200km… [Click to enlarge!]

Depending upon how you organise your international flights you’ll likely arrive early morning on a red-eye flight. The international airport is surprisingly close to the heart of Addis and so this gives you a couple of hours to have breakfast at the hotel, freshen up and, in my case, transfer everything I needed from a suitcase to a backpack before the expedition officially begins. You spend the rest of the day driving the 200km to Awash National Park where the first night is spent. How much photography you get done is largely dependent upon your interests – and your ability to shoot from a moving vehicle. There are stops, of course, for lunch and a couple of volcanic craters, but it could be difficult to get a decent composition from them given the short time you stop at them. As there are few stops I did end up shooting from the 4WD as it made its way across the landscape but I’m not a “shoot from the hip” photographer. One of the other guys produced some great shots this way so you may be lucky and is something I would definitely practise before you arrive as you will pass some interesting sights. Perhaps of more interest would be the frequent road-side villages that have developed that you see as you drive. You will only get to see these villages today and tomorrow as they are a result of being on the main route  (routes 4, 18 and 2) between Addis and the port cities in neighbouring Djibouti and so there’s a lot -and I mean a LOT – of transportation along the route.

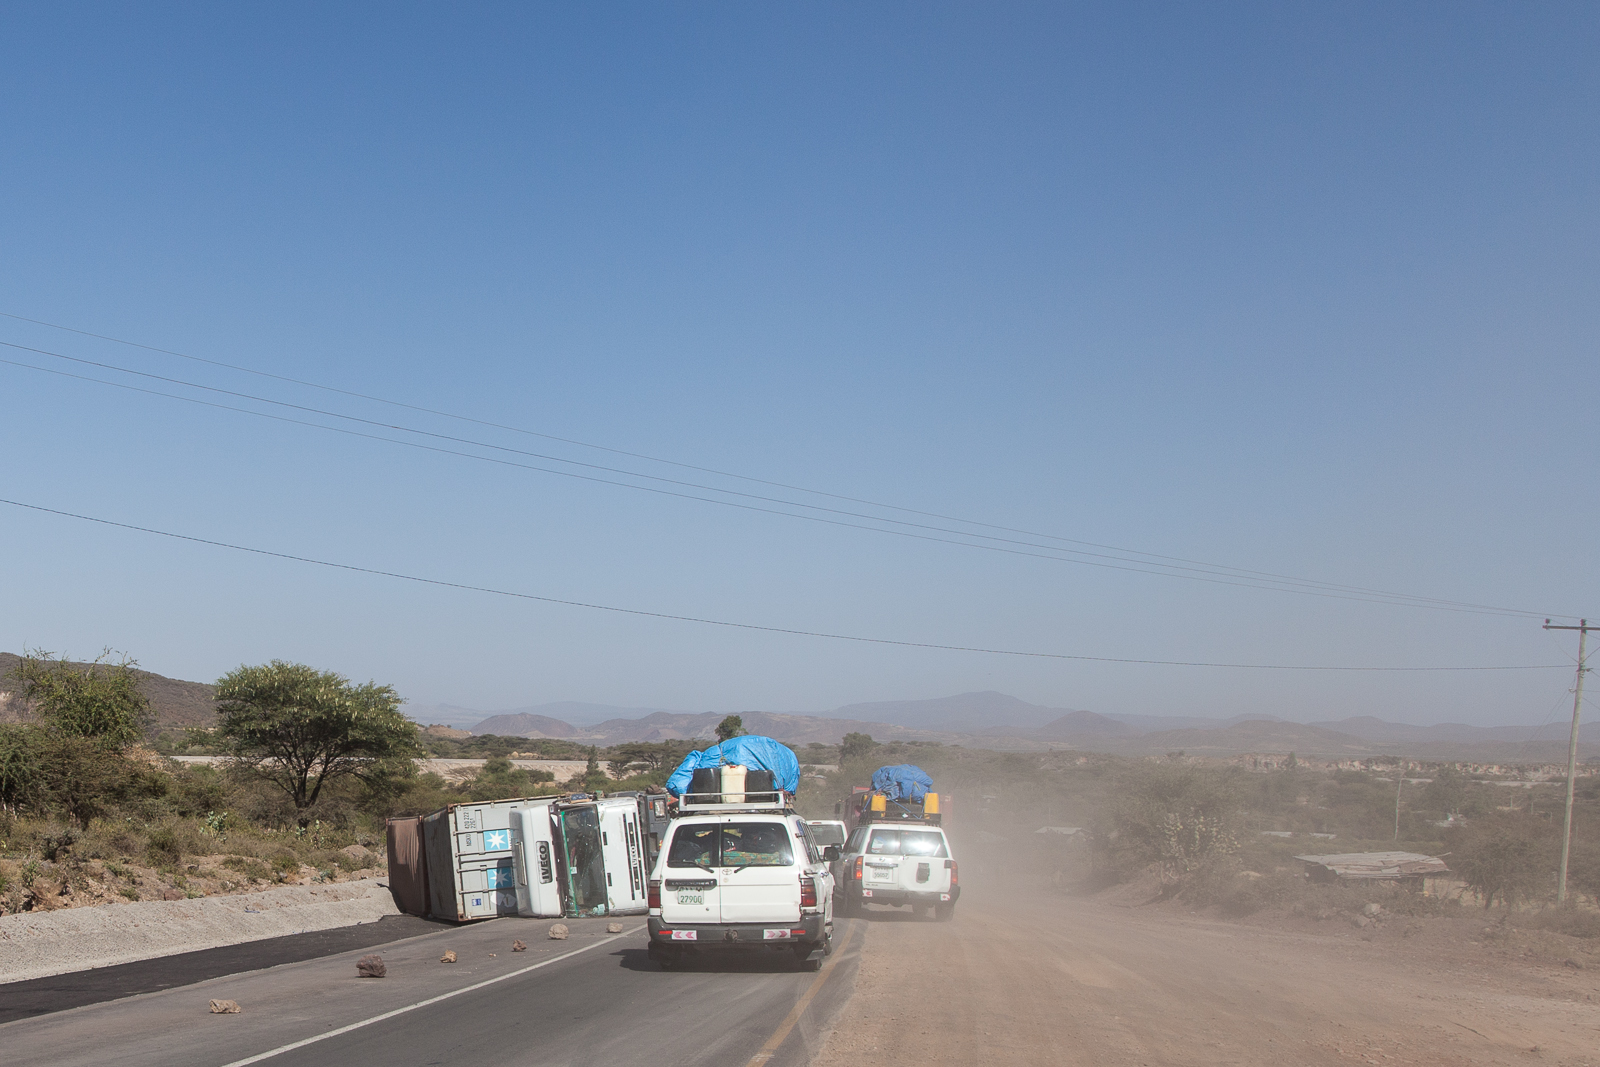
On the first day of driving we saw in the region of 20 overturned trucks. [Click to enlarge]

On the first day of driving we saw in the region of 20 overturned trucks. [Click to enlarge!]

And another one...

And another one… [Click to enlarge!]

Speaking of the transportation another thing you’ll see is a lot of accidents. It is hard to give an exact figure – simply as we didn’t start counting until after we had seen the first few – but a good guesstimate would be around 20. That is 20 articulated lorries – some with the 40 foot freight containers on them. As grim as it sounds, one of the first we saw still had blood dripping out of the crushed cabin. It is a long road from Djibouti to Addis and there are no maximum hours for driving.

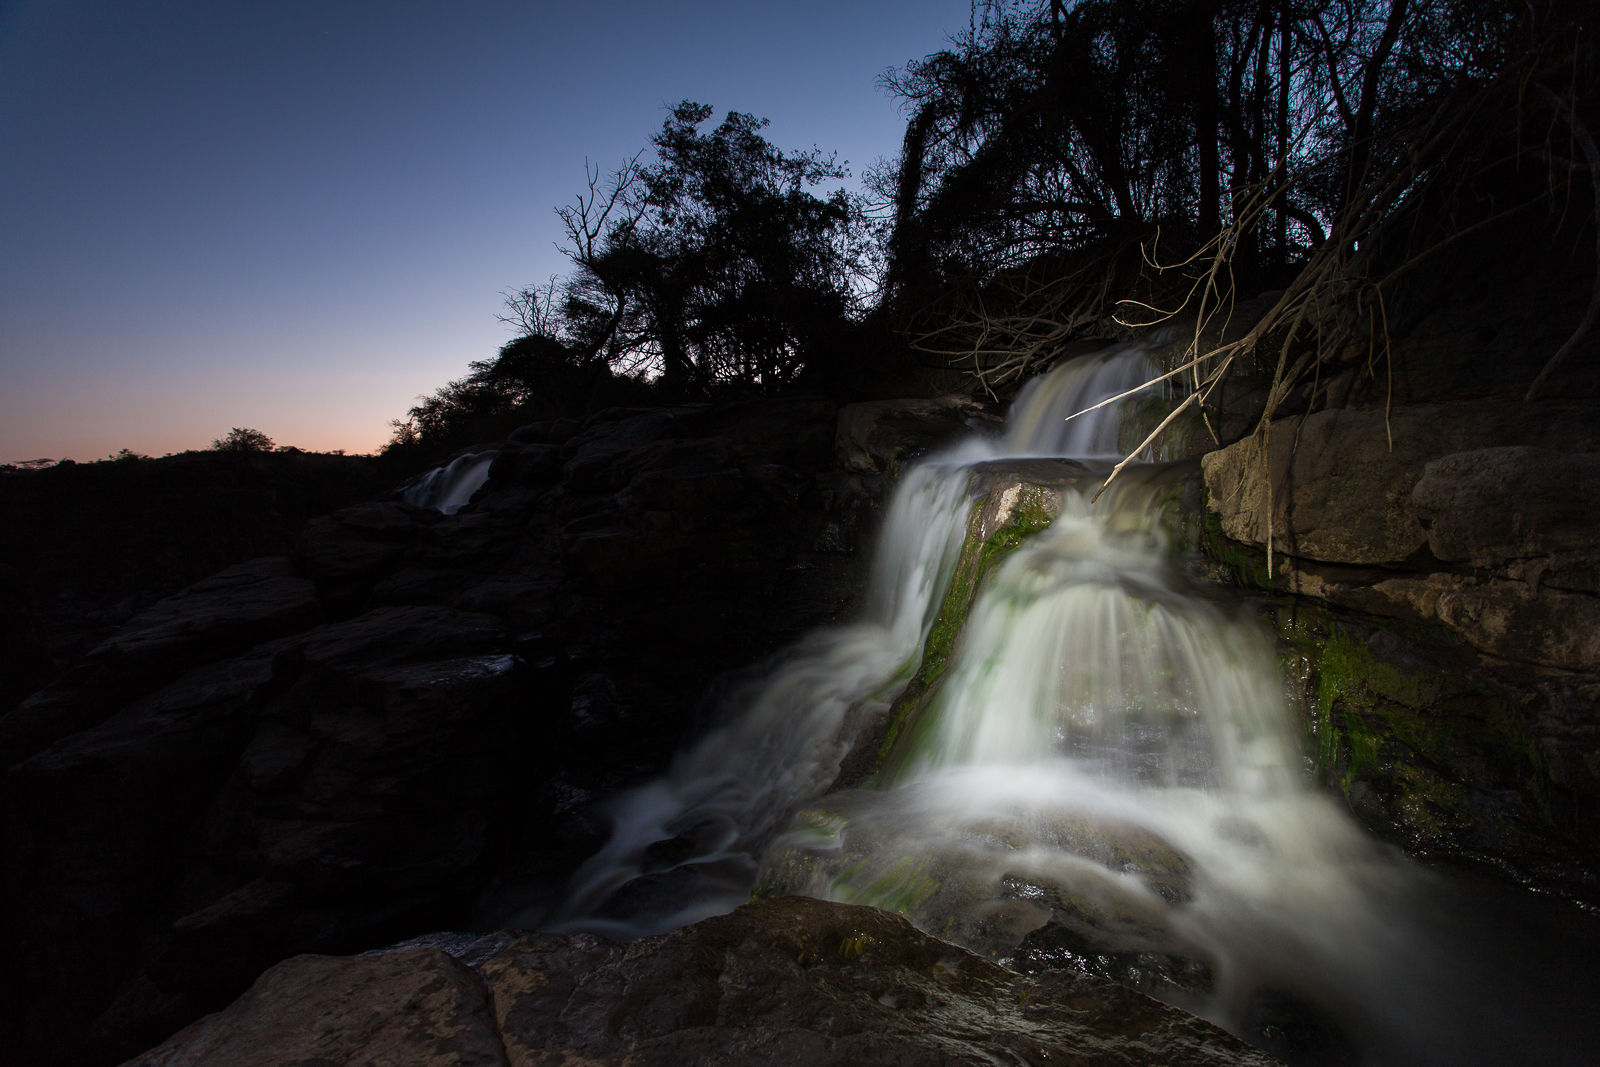
At the lodge in the national park there may be some time before darkness completely takes hold to make the easy three minute trek to the Awash waterfalls. The waterfall is certainly worth taking the time photograph – what will be against you is the fact that you arrive late in the afternoon. The light likely will not be ideal, but you can get creative with some light painting.

_MG_9738
The light was fading even as we arrived, but a handy torch always comes in useful! [Click to enlarge]

The evening was spent in comfort. The food was good and the beds comfortable. Mosquitoes are a problem here – you are close to water after all – and so make sure you are protected. You will also get to bathe properly as the huts have a toilet and shower, albeit the water is not that warm and has a distinct odour to it. Still enjoy it a few days from now you’ll give anything for a cold, odd-smelling shower. The other thing you will get to experience, which for a town-dweller like myself was breath-taking – is the night sky. Before coming to Ethiopia, read up on how to photograph the night sky – you won’t regret it!


Day 2

Day two is more time in the 4WD vehicles covering distance... [Click to enlarge!]

Day two is more time in the 4WD vehicles covering distance… [Click to enlarge!]

The day starts reasonably late at about 7AM with breakfast although you may be up about an hour earlier if you’re hoping to find a good angle for sunrise. There is an argument that a dawn start at Awash is worthwhile but the most impressive sight there is the waterfall which is largely cast in deep shadow even after sunrise due to the high cliff face immediately opposite.

If you're looking to get some quality wildlife photography this may not be the trip for you. We spent a couple of hours in Awash national Park and saw relatively few animals... [Click to enlarge!]

If you’re looking to get some quality wildlife photography this may not be the trip for you. We spent a couple of hours in Awash National Park and saw relatively few animals… [Click to enlarge!]

You also get to experience the very flexible notion of time that will be the norm for the rest of the trip – the 8AM start is more like 9AM before everyone is ready and the 4WDs area packed. The day starts with a couple of hours in the national park itself day although – and please remember that I am not interested in wildlife photography – it is not that spectacular.

The remainder of the day is spent driving a further 360km north to Logia – what is possibly best described as a truck-stop town. Again there are a few token stops and you may be able to get a good composition from them. You’ll likely stop for lunch in one of the many road-side town that you have been passing through since starting yesterday and it is really you’re first opportunity to see how rural Ethiopians live up close.

Today you'll get to stop in one of the road-side towns that have grown around the busy transport link between Addis and Djibouti [Click to enlarge!]

Today you’ll get to stop in one of the road-side towns that have grown around the busy transport link between Addis and Djibouti [Click to enlarge!]

One of the things you will also begin to notice is the panoramic vistas. This is a big country with big stretches of nothingness – it is a land of unbroken horizons.

The second day begins to show just how empty Ethiopia can be... {Click to enlarge!]

The second day begins to show just how empty Ethiopia can be… [Click to enlarge!]

Again the accommodation was fine – a basic hotel, but clean and there was a toilet, shower (again cool) and electricity. Now would be a good time to make sure that all your batteries are charged as from here on in, with the exception of the cigarette lighters, there is no electricity and with everyone wanting to charge phones and cameras, there’s guaranteed to be a queue. Or you could do what I did and take a solar charger.

Here we were also introduced to the cook Muscara who would be preparing us food for the next few days and had just prepared dinner. There is a saying that ‘an army marches upon it’s stomach’. How true this is I do not know, but I do know that a person can forgive a lot of discomfort when they are happily fed. At the end of the trip when we were all discussing what we had experienced, we all agreed that the high quality of food made a lot of what we had been through bearable. Whilst this may seem a little melodramatic, it is worth remembering that at this point we are still in relative civilisation.

Speaking of which enjoy the sleep you get tonight as it will be your last in civilisation for a while…


Posted in Destinations, Travel, Uncategorized Tagged , , , , , , , |

Erta Ale: The Selfie

After taking my first deliberate ‘selfie’ in Iceland against a backdrop of the stunning Skogafoss waterfall that was less about being a selfie and more about the sheer immensity of nature, I knew I was going to take another selfie in Ethiopia. And I knew precisely where too.

The volcano at Erta Ale – ‘smoking mountain’ in the local Afar dialect – is an unusual phenomenon. One of only six known lava lakes and the oldest having been present since 1906 it is the result of a hole descending 47 kilometres into the Earth at a place where three tectonic plates are slowly ripping the African continent apart. The resulting upwell of magma isn’t pressurised under a cap as is the case with normal volcanoes and so rather than violent and explosive eruptions the lava displays far more gracefully.

But lava is lava and as benign as Erta Ale appears the lava is a distinctly warm 1200°C. The lake also passes through cycles of activity and by the third day of our visit there was a significant rise in the amount of gas in the upwell resulting is some pretty spectacular eruptions. One of the side effects of the eruptions was the occasional lava bomb being thrown into the air and that is not something you want heading your way: Even if they are small, they are still molten rock and will burn through you like a hot knife through butter. It is one of the reasons that you do not stand at the very edge of the crater, the other being that the edges are so brittle and fragile that they collapse at the slightest provocation. Over the years several tourists have died here, our guide Enku himself losing one, simply as they ignored the advice they were given.

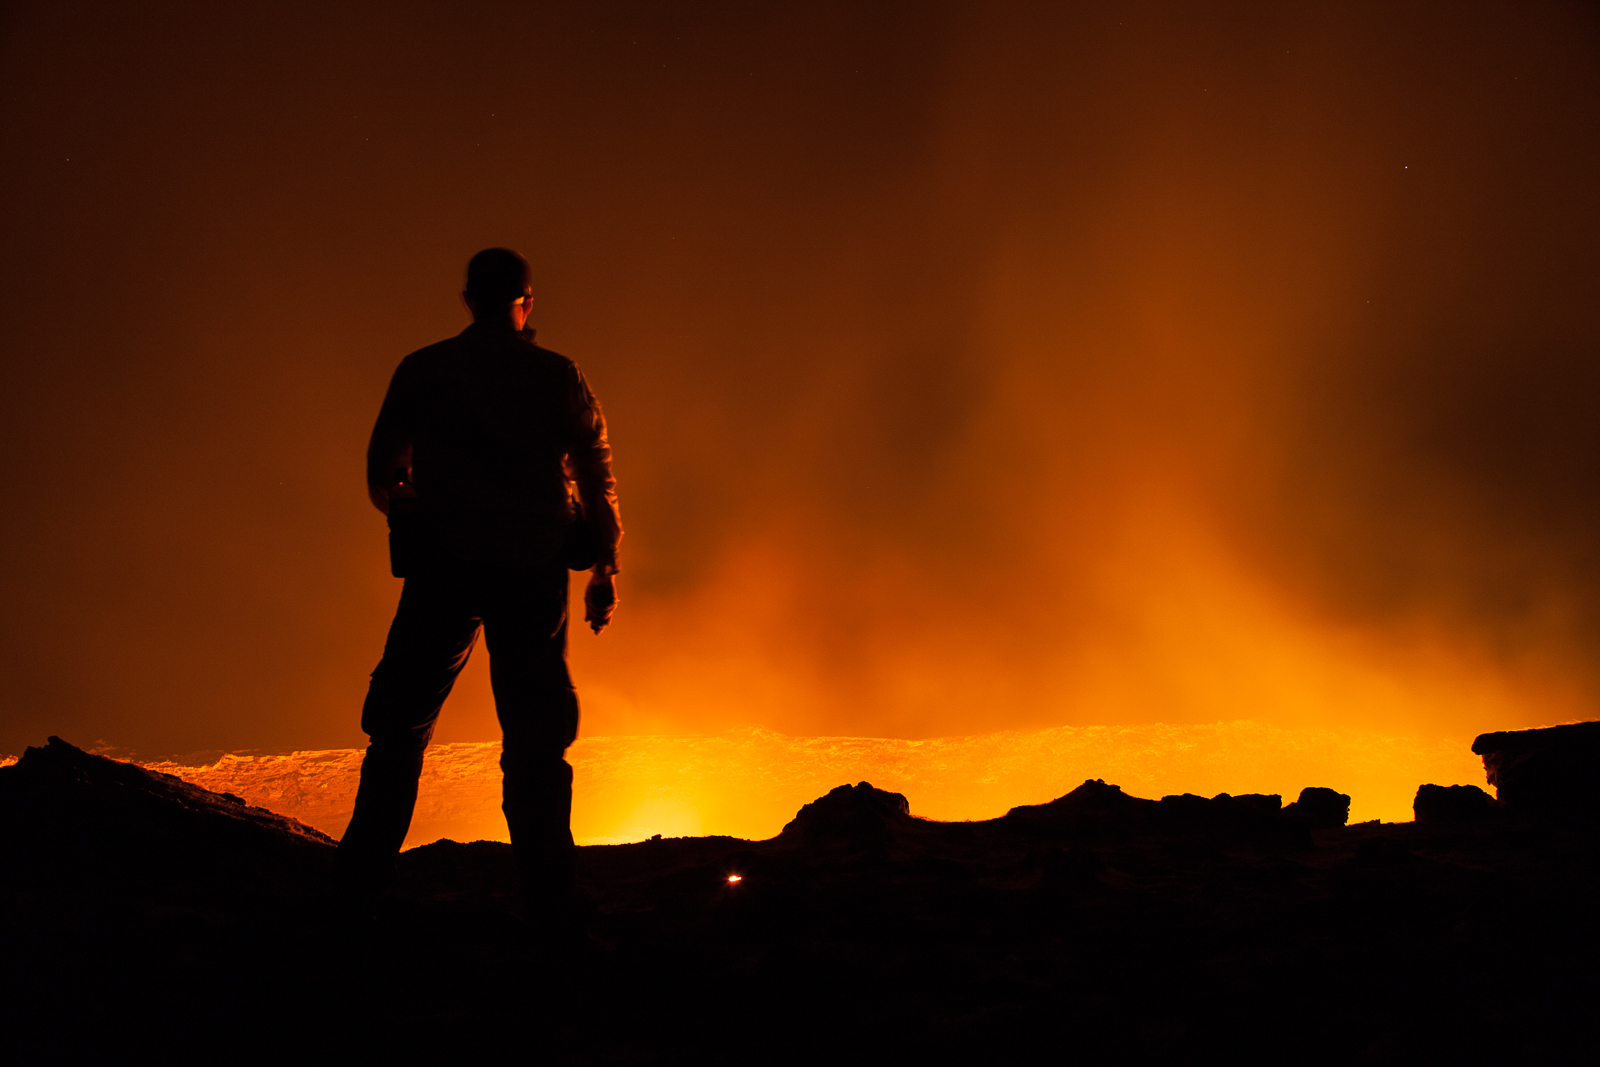
I knew I wanted a silhouette shot where I was as close to the edge as I could be so I stood out against the glow of the lake. I also knew that I didn’t want to die either so I headed off with Enku to find an appropriate spot. As a trained geologist, having worked for a number of mining and exploration companies, he could read the rise and fall of the edge and decided that here, at about one metre, was the closest it was safe to approach. Even then he was less than keen about spending time this close and I remember being a little disappointed that a nice Strombolian eruption didn’t occur as I stood there. But, even at a metre back from the edge, the heat was intense – over 60°C if the readings earlier in the day were correct – and waves of poisonous hydrogen sulphide were buffeting me. I had to be quick.

So it was a bit of a surprise when I finally got round to taking a proper look at my photographs today to find my selfie had been photobombed by a surprise guest lying at my feet…

Well, if you're going to visit one of the more unique places on the planet, you're going to take a selfie, aren't you...?

Well, if you’re going to visit one of the more unique places on the planet, you’re going to take a selfie, aren’t you…? [Click to enlarge]

Posted in Destinations, Frame by Frame, Travel Tagged , , |

There’s Big Money in Battery Packs

After the heat of a lava lake caused a couple of my Canon LP-E6 batteries to begin show issues when charging it is time to replace them. Better now than forget about it until two days before I head off on the next expedition and then panic ensues. In any event, as the recent Ethiopian trip proved, you can never have too many batteries.

Up until now I have been using a mixture of official Canon LP-E6 – which came with the camera bodies – and aftermarket batteries. Without actually looking at them I would be hard pushed to tell the difference between the official and aftermarket cells; both appear to last a for a high shutter count and the Canon 5D MkII body happily shows the charge left on both.

But, as both battery packs that have now developed issues are the aftermarket ones, I have decided to replace them with the official Canon ones. It was not an easy decision to make: £79 for an official battery pack versus £20 for a good quality aftermarket one. But as my work takes me to more extreme and remote locations, I do have to rely on the kit I take. As the old proverb goes “For want of a nail” – the nail in this instance being the battery pack the powers the camera and lens.

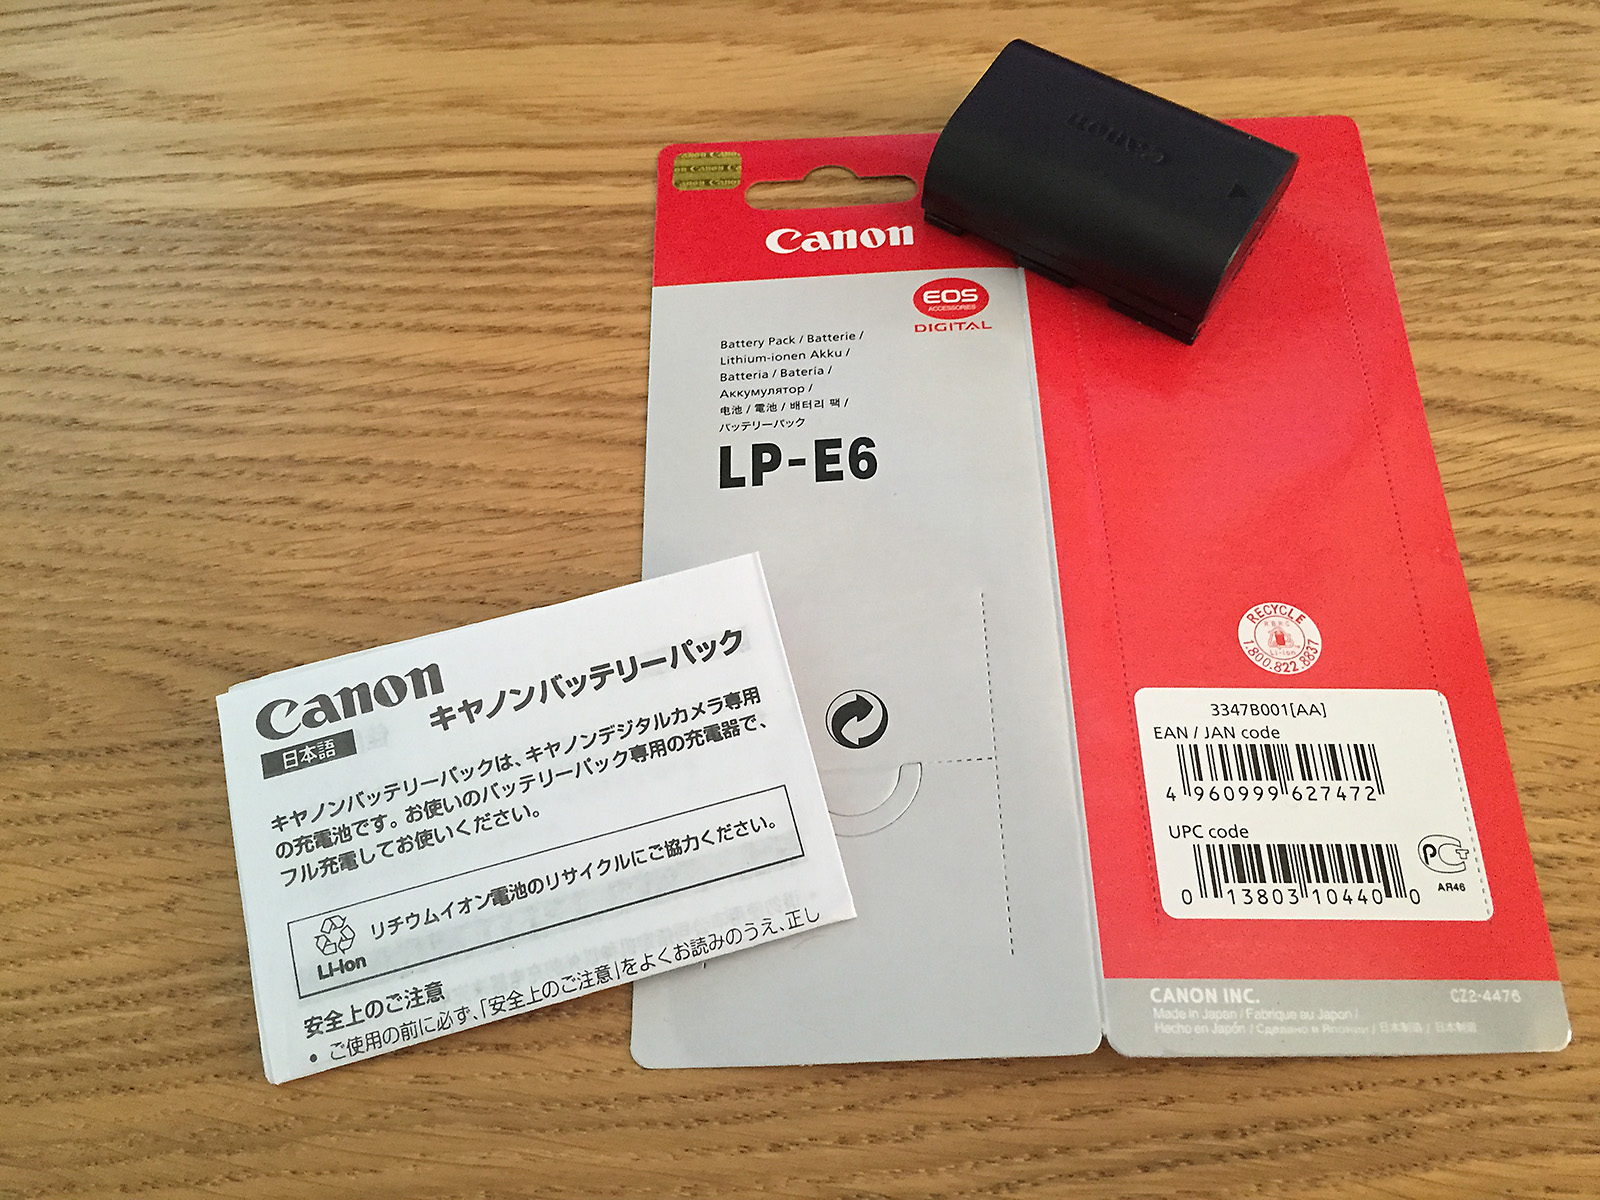
Now, whilst I didn’t buy the battery pack because of the packaging, I do have to say that I’m impressed. A lot of time and effort and been spent on the whole presentation. It oozes quality. In fact, had I not actually been examining every detail I would have never known.

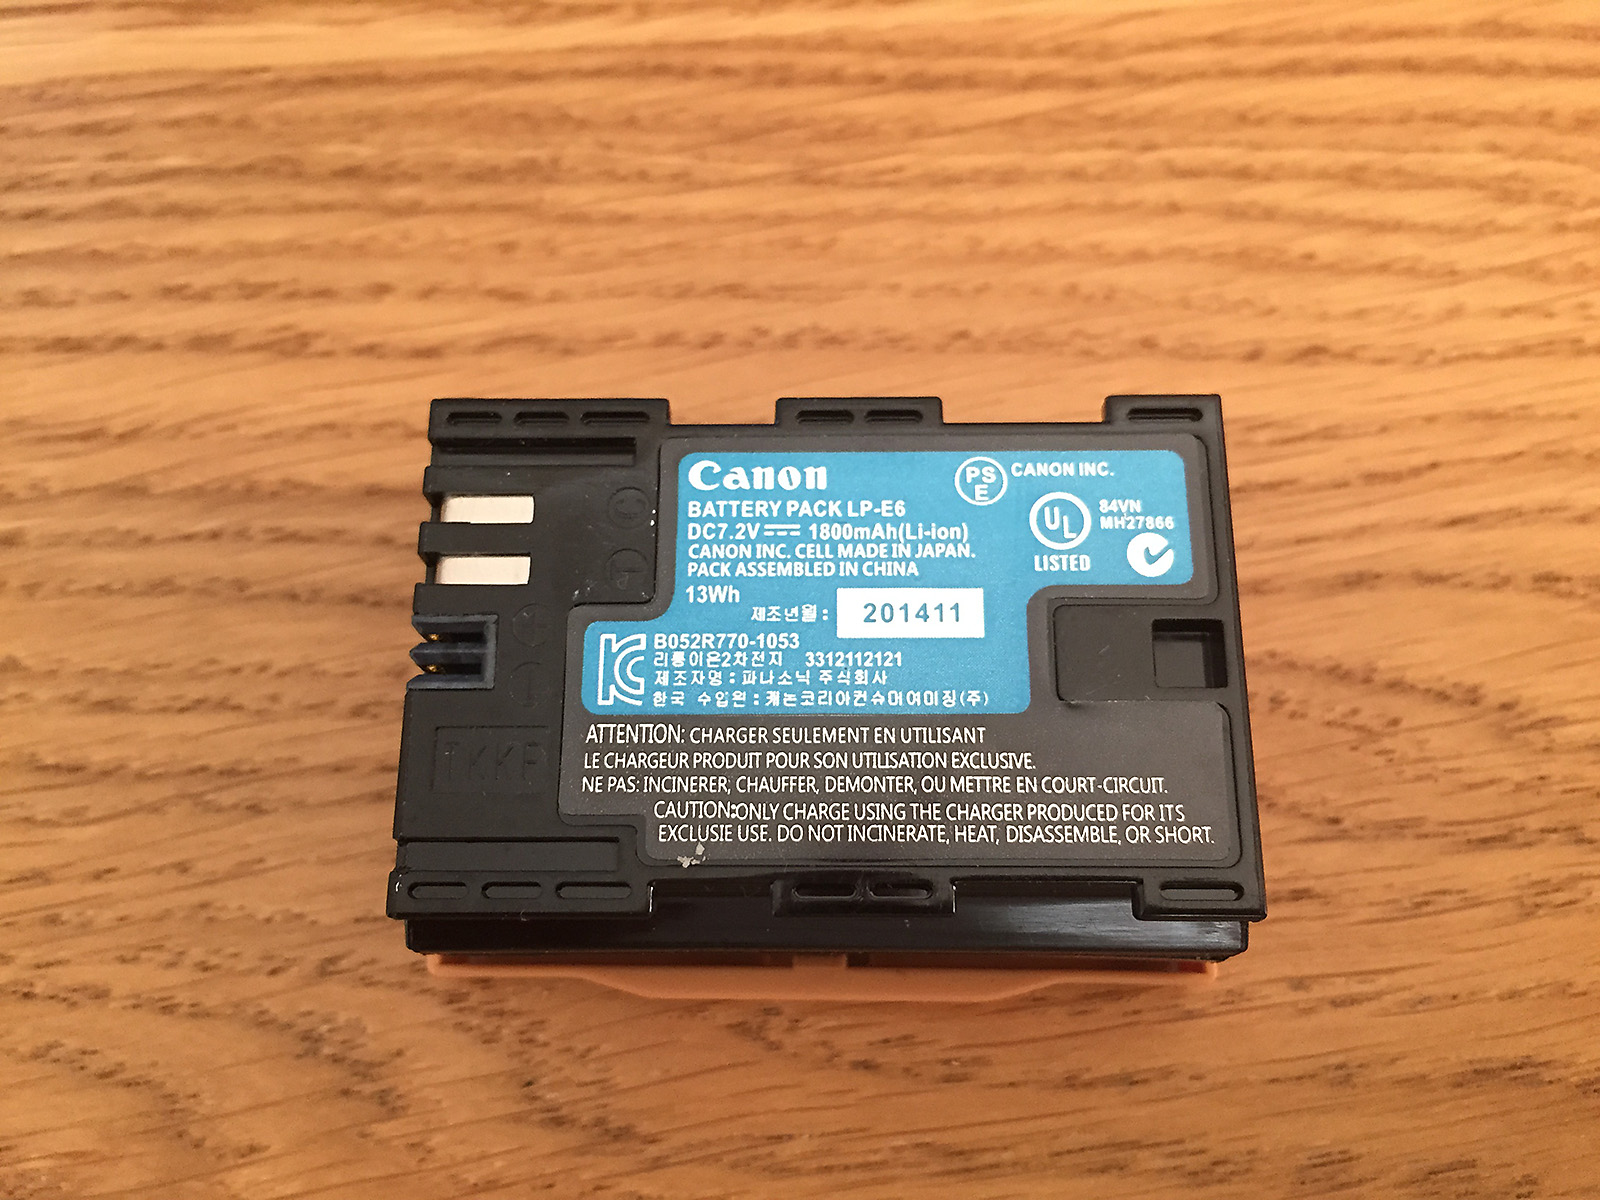
But it is definitely a fake. Can you spot why?

Can you spot why this Canon battery pack is not the real thing...?

Can you spot why this Canon battery pack is not the real thing…?

Here’s some more shots of the very detailed packaging.

Convincing, and high quality, packaging...

Convincing, and high quality, packaging…

The hologram is a nice touch...

The hologram is a nice touch…

Needless to say that this was bought off eBay so it is very much caveat emptor, but this was being sold as “genuine and original” with a price high enough that made me think that it could well be precisely that. It could have been any number of legitimate sellers: unwanted present, Christmas cost more than expected unused items being sold off, someone no longer interested in photography to name but three.

But for someone to go to all this trouble to make a fake look and feel like the genuine battery pack does make me wonder just how much money there is in the fake market.

Now the point of this is not to suggest than battery packs from a source other than the original manufacturer are bad: there is a big difference between aftermarket batteries and fake ones. For many years I have been quite happy with aftermarket batteries (on my current 5D2, and 7D and well as my previous 40D) and before they went bust Diamondback batteries were my favoured option. I also own a Hahnel battery pack and they too are another well regarded manufacturer. Well made aftermarket battery packs from reputable manufacturers include all the require protection circuitry to stop overheating and potential fires. But if a seller is masquerading a battery pack as an original then it is going to be for profit. In that case you can probably forget the niceties such as protection circuits.

So, what are your options?

First, buy from a reputable source and official Canon resellers. If it appears to a ‘too good to be true’ deal, it probably is. That said, you still have to exercise caution. Amazon is a good example:


Don't blindly buy just because the order is 'fulfilled by Amazon'...

Don’t blindly buy just because the order is ‘fulfilled by Amazon’…

Amazon is a reputable company, but there is a big difference between ‘sold by’ and ‘fulfilled by’. The best option here is the £46.48 option as that is sold and fulfilled by Amazon, who incidently are an authorised Canon reseller.

Second, take some time to learn about some of the obvious signs of counterfeiting. Canon have a link off their US site (http://usa.canon.com/cusa/about_canon/standard_display/aboutcounterfeits) although Canon’s images are too small to be of use. A well written and clearly documented article for Canon LP-E6 counterfeits can be found at http://tazintosh.com/en/canon-batteries-watch-out-for-counterfeits/

Third, simply accept that, after spending £1500 on a camera body and sticking a lens costing in the region of £1000 on it, trying to save money by buying cheap batteries to power the whole thing isn’t going to be your greatest decision. Frankly, put in those terms, it really make no sense at all. Even at the full retail price, the Canon LP-E6 is less than 3% of the average camera/lens combination it powers.

But back to my story. The seller has refunded me and I’ve decided not to name-and-shame, primarily as there is no real point. There are too many counterfeits out there and highlighting a single seller will not achieve much. Better to cut the problem off at the source and accept that a reliable and good quality battery pack is going to cost.

Of course, I could go cheap and save £40 but given that my average trip these days costs at least one hundred times that, if the battery pack stopped charging on my next expedition and I missed the shots I was after I had better be near another lava lake – that would give me something to throw myself in…


Posted in Hints and Tips Tagged |

Voltaic Systems’ 17W Solar Charger Field Review

Back in November I gave my initial impressions of the Voltaic Systems solar charging kit and its applicability to photographers in the field. At the time I also mentioned that, as with many things, the real test would be in an actual field trial. Well, after two weeks on location in northern Ethiopia it is safe to say that it has been put through its paces and its strengths and weaknesses revealed.

The kit I took to Ethiopia consisting of the panel (top), the red cable connecting the panel and V72 battery, the black cable to connect the V72 to the camera charger and the white/black cable to connect to my MacBook Air. The car charger (bottom) also came in useful. The camera charger is not shown as it did not survive... [Click to enlarge]

The kit I took to Ethiopia consisting of the panel (top), the red cable connecting the panel and V72 battery, the black cable to connect the V72 to the camera charger and the white/black cable to connect to my MacBook Air. The car charger (bottom) also came in useful. The camera charger is not shown as it did not survive… [Click to enlarge]

The kit in question is the 17W single-panel kit consisting of the panel, the V72 20,000mAh lithium polymer battery and a number of connecting cables and adapters. In addition to the base kit I ordered the Canon LP-E6 battery charger and an Apple MagSafe power adapter for a 2011 model MacBook Air. It is hard to tell whether the panel and V72 are designed by Voltaic or merely off-the-shelf items but the advantage to me as a photographer was that I didn’t have to spent inordinate amounts of time trying to work out which items were required, which were not and whether they would work together. The Canon battery charger was definitely a third-party item (more on that later) whilst the MagSafe adapter was definitely hand-crafted by Voltaic.


PREPARING FOR THE TRIP

Before heading out I knew that, given our location, there would be no chance of a power source during critical parts of the journey. There are some stunning landscapes in the north of the country, but they are far from civilisation. So, whatever power requirements I had needed to be met by the kit that I carried. In the original article I outlined what I considered to be fairly simple needs: I needed a means to charge the LP-E6 batteries for the 5D Mk II and 7D bodies and also my MacBook Air that would be used for the end-of-day review and image backup. It was a simple requirement and one that the Voltaic web site suggested fell well within the capabilities of the kit.

I had also given a fair amount of consideration to how – and when – I would need to charge my equipment and I anticipated two basic scenarios. First, when moving between locations in the 4WD vehicles. Second, when on location. In the first scenario, we’d be spending a lot of time sitting around and not doing much shooting. According to the itinerary, these would be long days driving and arriving at the destination after sunset. In the second scenario, we’d be out-and-about but with a fixed camp to return to at the end of the day.

The issue that I could see, however, was that there was no easy way to attach the solar panel to the vehicle. Voltaic Systems had very kindly included a set of plastic attachments that would allow the panel to be tied to something (for example with velcro or cable ties), but they weren’t too much use on a vehicle. Luckily a good friend of mine has a mechanical aptitude and a comprehensive workshop, after a few conversations, he created a magnetic mounting kit for the panel. Now I could attach the panel to any magnetic surface – such as the roof of a 4WD – and simply run the connecting cable to the V72 safely inside the cabin. So now I was ready: I could mount the panel on a vehicle, a camel or any other fixed structure.

Although not part of the provided system the magnetic mount really made a huge difference - and one I recommend Voltaic Systems consider adding... [Click to enlarge]

Although not part of the provided system the magnetic mount really made a huge difference – and one I recommend Voltaic Systems consider adding… [Click to enlarge]

A close-up of the panel on the 4WD showing the (home-made) silver metal magnetic mounts and the (provided) plastic loops in each corner for cable-tie mounting. The panel happily survived repeated bumps and knocks as well as being covered in dust and volcanic ash... [Click to enlarge]

A close-up of the panel on the 4WD showing the (home-made) silver metal magnetic mounts and the (provided) plastic loops in each corner for cable-tie mounting. The panel happily survived repeated bumps and knocks as well as being covered in dust and volcanic ash… [Click to enlarge]

One of the nice things about the V72 battery is that you do not have to use the solar panel to charge it. The recommended input is a 14-20V DC input and the kit came with an appropriate mains adapter for this purpose. Initial tests in the UK (and shown in the original article) also showed the solar panel happily generated around the 20V mark. Voltaic also include a cigarette lighter lead suggesting that even a 12V DC supply can charge the battery. This was especially convenient as, for the first few days as we covered the 700km from the capital to the north of the Rift Valley, we would have access to cigarette lighters in the 4WD vehicles. Once at the Erta Ale base camp however, where we swapped transport to camels, we would be on our own.

One of the things that separates Voltaic’s solar kit apart from the other ones I researched is the capacity of the V72. At 20,000mAh it has, in theory, enough reserve for ten of Canon’s 1,800mAh LP-E6 batteries although Voltaic’s web site suggests a more conservative 3.5 times reserve. Voltaic also suggested that a single, full, charge of the V72 would be enough to replenish the Air’s own internal cells.

Using the ten foot cable I had a lot of flexibility as to where I put the V72 in the 4WD. All I then had to do was wait for the sun to work its magic... [Click to enlarge]

Using the ten foot cable I had a lot of flexibility as to where I put the V72 in the 4WD. All I then had to do was wait for the sun to work its magic… [Click to enlarge]

The charging process can work in one of two ways, depending upon what you are charging. Voltaic’s web site suggests that camera batteries can be charged directly from the panel, presumably relying on the battery charger’s regulation circuitry to ensure the battery is not over-cooked. However, smart phone and laptop charging should be performed via the V72 battery. In the end everything was charged via the V72 battery although it was here that I hit a bit of an inconvenience. Voltaic offer two cables (the red cables in the photographs) to connect the panel to the V72, one at 4 feet and one at 10 feet in length. In both cases they are terminated in a 3.5mm male DC plug. This is fine for the camera charger but for the V72 – which takes a 5.5mm input – a small (provided) adapter had to be used. One thing I have learnt is that when moving about at some point during the various unpackings and repackings, you lose small stuff. It is inevitable. Given that Voltaic only recommend direct charging for camera batteries, this seems an odd choice of connector. In the end I replaced the provided 3.5mm plug with a 5.5mm plug before heading out.

The other reason that I ended up always charging the V72 is one of convenience. At 12° north of the equator we were still in winter and so daylight hours were limited. Sunrise was around 6:30AM and sunset around 6:30PM. The activities of the day meant that direct charging was almost always impractical until we came to a halt in the evening.


IN USE

The first few days were spent covering distance as we moved up country. Long hours in the 4WD interspersed with stops to examine some interesting geologic phenomenon. It was a light draw upon the camera batteries but in the evening it was still worth topping them up from the V72. An unexpected power drain, however, was the iPhone 6. Quite by accident I began to use it to record video clips and take those panoramas that didn’t quite seem worth setting up the panoramic tripod head for. The iPhone turns out some quite reasonable results, but its video capabilities have a heavy drain on the battery.

With the added load of the iPhone battery using the long hours of driving to keep the V72 fully charged turned out to be very useful. Even so, the first few days were a gentle introduction for the charging kit.

Home at Erta Ale. "A compact, fully air-conditioned, one bedroom apartment backing on to a stunning panoramic landscape." it said in the brochure. It even came with free mice... [Click to enlarge]

Home at Erta Ale. “A compact, fully air-conditioned, one bedroom apartment backing on to a stunning panoramic landscape.” it said in the brochure. It even came with free mice… [Click to enlarge]

Once we arrived at the Erta Ale base camp and headed up the volcano, the solar charging kit panel took a more fundamental role. A few of the other travellers also had Canon 5D MkII and/or 7D bodies, one had a quadracopter and the rest had their own cameras form different manufacturers. With three days at the edge of a lava lake we all became a little shutter-happy. I managed, with no real effort, to take over a 1000 shots as well as a large number of video clips and I was not alone. The quadracopter was set free and captured some stunning footage although you could literally watch the batteries drain. The problem was that we had zero access to power. The 4WD vehicles were three hours away and as the journey would require a military escort to be organised, short of a medical emergency, we weren’t going to be making it. Only one other person had a solar kit – a $60 affair off eBay – and that was so ineffective as to be useless. Suddenly I had become a popular guy to know.

We relied on the Voltaic charger. Several Canons, a Fuji, two iPhones and even the quadracopter were all kept alive by the solar charger... [Click to enlarge]

We relied on the Voltaic charger. Several Canons, a Fuji, two iPhones and even the quadracopter were all kept alive by the solar charger… [Click to enlarge]

Due to the number of videos I was taking and a lot of use of image stabilisation I was getting through around two of the Canon LP-E6 batteries a day, some of the other serious photogs were too. The iPhone battery also required daily attention and the end-of-day upload to Adobe Lightroom on the Air drained its battery at an unholy rate. A queue formed. The Voltaic charger simply could not keep up with it all. This is in no way a criticism: It is intended vey much as a personal charging solution and we were asking it to keep up with four people each placing a heavy demand upon it. In truth it actually coped better than I expected and the ability of the V72 to output as USB and simultaneously one of 12,16 or 19V really shone; there were a couple of instances where charging the iPhone and a camera battery simultaneously was a real benefit.

It was whilst camped up on the crater of Erta Ale that the provided ‘tie-attachments’ came in useful as they allowed me to cable tie the panel to the wooden branches of the hut I was it. It was unlikely to be stolen, but we were exposed and the wind did pick up every now and then. As my hut backed on to a sheer drop to the old, razor-sharp lava, caldera floor, had the wind decided to get too playful then panel would have met a very quick end.

The provided plastic attachments allowed the panel to be cable-tied to the shack and the cable fed inside via one of the many, many holes. The next nearest source of power was a 4WD somewhere in the distance... [Click to enlarge]

The provided plastic attachments allowed the panel to be cable-tied to the shack and the cable fed inside via one of the many, many holes. The next nearest source of power was a 4WD somewhere in the distance… [Click to enlarge]

Disaster almost struck. The Canon battery charger provided by Voltaic broke. After disassembling it I discovered that the DC input socket had a snapped solder joint and had lifted the solder tracks off the circuit board. In other words it was definitely not repairable in the field. Had it not been for one of the guys having a USB Canon charger I, and the other Canon users would have been in dire straits. It is worth pointing out that I was not trying to be overly rough with any part of the provided kit, but I was in the field. Things do get knocked about, repeatedly plugged and unplugged otherwise moved and I would expect the elements of the charging kit to withstand this level of abuse. If I am blunt about it, the supplied battery charger is (or rather was) a rather cheap-and-cheerful piece of kit. But to balance that negative, the solar panel and V72 stood up to field work admirably. The V72 may have a few scratches now and a dent or two, but it continues to be rock-solid. The panel itself has a few surface scratches but these have no effect upon its operation. The only let-down is the provided third-party battery charger.

By day three the lack of camera battery charger would have been catastrophic to the shoot and shots like this would have been missed... [Click to enlarge]

By day three the lack of camera battery charger would have been catastrophic to the shoot and shots like this would have been missed… [Click to enlarge]

After descending from Erta Ale we moved further north to Dalol (or Dallol, depending upon which map you read) and close to the DMZ between Ethiopia and Ertitrea. Here the accommodation improved as we swapped the crude huts with volcanic ash floors and mice for crude beds under the stars. We did have one structure available to use and this doubled as a kitchen and storage area for our bags. It’s roof also server as a convenient high place to mount the panel out of the reach of the local children. Whilst we again had access to the 4WD vehicle as so everyone returned to charging their batteries that way, continuing to use the panel meant that I did not have to wait in line – and took some strain off the vehicles.

Eventually we returned to civilisation and for the last couple of days found ourselves in hotel rooms. Aside from the joy of now actually having toilets and showers, everyone rejoiced in the concept of electricity that came from sockets in the walls! Except me. I had left all my mains chargers back in the UK and so I still relied on the solar kit to provide me with power. In the first hotel $5 bought me access to the roof; in the second there was a rooftop bar.


CONCLUSION

So, the bottom line is whether I can recommend the Voltaic offering or not. The answer is an almost definite yes but I would like to suggest to Voltaic Systems the following changes:

  • Include a magnetic mounting system for vehicles.
  • Change, or at least offer an alternative cable to connect the panel to the V72 battery terminating in a 5.5mm DC plug thereby removing the need for an adapter.
  • Offer a more resilient camera battery charger.

In addition to the suggestions to Voltaic Systems I recommend having a second V72 to hand. I’m not totally sure how keeping two charged would work given that the panel couldn’t charge a single V72 in one day, but heading out to location with two fully charged 20,000mAh batteries certainly would not hurt.

In spite of these suggestions, and even without my modifications, the bottom line is that the kit not only worked, it worked well. Despite being asked to perform far beyond it’s intended use it helped all of us keep power to our cameras and get shots from a location we’ll likely never see again. And since that was the whole point of having a solar charging kit in the first place, I can only say that it was well worth the price of purchase and import costs to the UK, the extra luggage weight and the need for me to modify it. Next time I head out to a location where power will be scarce, it is definitely on my packing list.


UPDATE: 30 JAN 2015

After posting this review Jeff over at Voltaic responded pretty much immediately (which seems to be normal for their customer service) to the points I raised. I’ve then sat on the interesting replies until now (although in my defence I have been busy).

Voltaic now link to an US-based web site that provide off-the-shelf magnets that can be purchased and fit directly to the panel’s threads. For USA customers this is a great solution although I would just point out that (1) shipping to the UK (and presumably anywhere else outside of the US) was prohibitively expensive when I sent Voltaic the link last year, and (2) the magnets have no protection and so may scratch the surface they are attached to.

Not mentioned elsewhere on their site but they have now changed the style of adapter that I was so concerned over losing (as it would prevent solar charging) that I discarded it and soldered on my own connector. Apparently Voltaic now provide an adaptor that clips over the cable coming from the solar panel. If this is anything like the one they already use on the red connecting cable then you’re probably not going to lose it – it needed a serious amount of pulling to detach the cable from the panel.

As for the failed battery charger, right now it seems that they are still being sold and I guess that my experience was not-so-common. Voltaic are interested in alternatives and I’m testing a German-made one right now. But my advice would be to take at least one spare charger – they’re critical yet very lightweight and only a few dollars.

Voltaic have posted highlights of my review on their web site here.

Posted in Travel Tagged , , , , , |