Monthly Archives: May 2015

Iceland 2015: The Itinerary

In the last post I mentioned that I’m returning to Iceland as the ‘reward’ for learning to dive. Of course there’s no point in travelling to what is a photographic dream of a country and not spending a bit of time exploring, especially as I have seen so little of it, and so the past few weeks have seen me spending hours hunched over maps and making good use of Google and the Trip Advisor Iceland forum. And finally I have what I believe to be a workable outline for the 14 day trip.

The trip in 2014 concentrated on a section of the southern coast between the Reykjanes peninsula and Jokulsarlon. Despite being such a small section of the country there is an incredible amount to see – a testament to how much Iceland has to offer – and I left feeling that I had spent my time well and not regretting the decision to limit myself.

Much like the trip in 2014, for this trip I’ve picked just three bases to work from in the centre and west of the country: Thingvellir National Park, Kerlingarfjoll and Grundarfjordur.

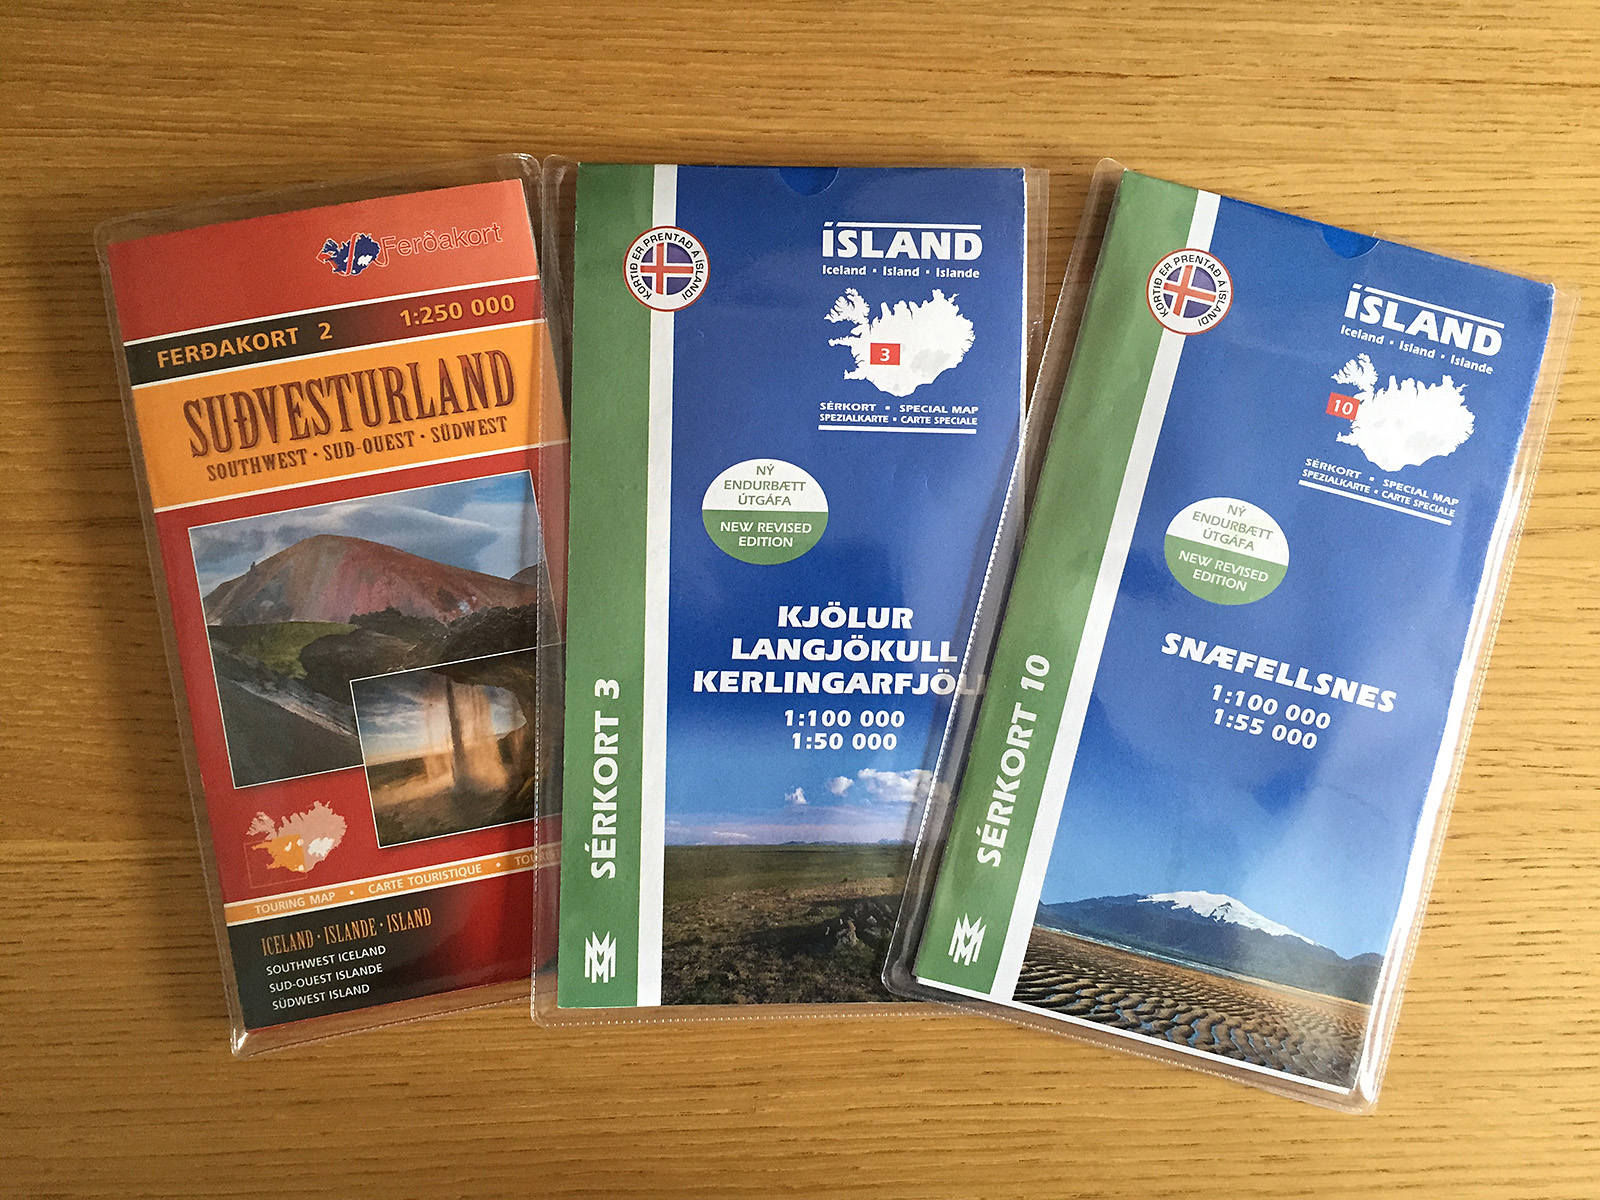
As good as Google Maps is, I recommend that you invest in the Ferdakort 1:250,000 touring map for the area that you are visiting. They’re clear, detailed and full of highly useful information such as locations of petrol stations, camping sites, accommodation and, for those venturing onto the highland roads, where you will have to drive through rivers. For my 2015 trip I only need to take Map 2, covering the south west. They are perfect for driving but if you’re considering hiking, you may want to invest in some higher scale maps, such as the Serkort 1:50,000 maps.

A good map can make all the difference when on a self-drive or hiking trip.

A good map can make all the difference when on a self-drive or hiking trip.

Thingvellir

Arriving on the evening of day 1, the first base is just south of Thingvellir National Park. Thingvellir is a popular tourist stop for its historical and geological significance although for me it is the latter that draws me there. Whilst the immense North American and Eurasian tectonic plates are separating along their entire length at a rate of approx. 2cm per year, only in Iceland can you see the result of this on land. In dramatic terms, Iceland is literally being torn, very slowly, in half although it would be more accurate to say that, due to the resulting magma rising up to fill the void, Iceland is very slowly getting bigger. Whilst most visitors view the geologic transformation from above, it is here that you find Silfra, a lake formed by glacial runoff filtered through volcanic rock. The resulting waters are crystal clear and said to offer some of the best diving visibility on the planet. It is also jolly cold.

Being under no illusions as to my lack of underwater skill I have allowed for two days diving, each day consisting of a morning and afternoon dive. I’ve also left a spare day just in case I need it. I’ve checked and they dive even if there is only a single participant although I hope I’m not the only one as a lot of the shots I have in my head require more people.

The remaining day – or two if a third day of diving is not needed – is spent visiting Gulfoss and Geysir and the national park itself. I’m not planning on spending too much time at these two sites as they are very touristy and anyway, you don’t go to visit Geysir but rather its little brother Strokkur – Geysir rarely erupts these days but Strokkur repeats approximately every six minutes.

The second half of day 5 has been reserved for one of the sights worth visiting although it has turned into something akin to my own Moby Dick: Bruarfoss, a picturesque waterfall with wonderfully vivid blue waters. However, the more I read about this waterfall the more I become confused as to whether it is easily accessible or not. After three evenings of reading trip reviews, blogs and going over Google Maps inch-by-inch I’ve ended up with a definite “maybe”.

The issue isn’t its location – it is on the map and I have GPS co-ordinates – the issue is how to get there. From what I have been able to piece together it is behind a summer home area with three access roads. Two of these have already had barrier access erected and the third is an unknown. The next issue that reports from those who have been there recently suggest that you then have to pass through a hole in a fence which may, or may not, still be there when I arrive. However I have a plan B that entails parking along route 35 at a safe place and hiking for about 90 minutes along the Bruar river. I’d prefer to get the car as close as possible as I’m after dusk shots and so the thought of hiking back along the river in pitch black isn’t enticing. Last time I was in a similar situation was on the Falkland Islands and the only person at Cape Pembroke. There were only three kilometres between me and any form of civilisation but it was all marshland and I discovered the hard way that hiking on boggy ground in the dark not only wasn’t fun, it bordered on dangerous. I want to avoid the same in Iceland if I can…

As pretty as Cape Pembroke was at sunset, hiking back wasn’t a fun experience. [Click to enlarge!]

As pretty as Cape Pembroke was at sunset, hiking back wasn’t a fun experience. [Click to enlarge!]

But, the main reason to be here is really the diving.

The Highlands and Kerlingarfjoll

On day six I head out from Thingvellir and head north into the highlands. I’ve left a whole day travel time to get to the hot spring at Hveravellir, in part because I know that I’ll be stopping every so often to marvel at some new landscape, but also because most of the journey is on route F35, a notorious, pothole-filled highland road. Accommodation is (hopefully) at the hot-springs although they haven’t confirmed yet. Well, they had confirmed but it went into my SPAM folder and so I only found it a week later. So I have confirmed their confirmation, but I may be too late. But if there are problems I am not really too worried as it is only for a single night and so if the worst happens I can simply sleep in the 4WD. In some ways I’m hoping they don’t confirm as it adds to the adventure. Ah, well its time to live up to my words: They don’t have a room anymore for that evening so it looks like sleeping in the 4WD is the plan! I’m pretty sure that the back seats fold down flat and I will have a sleeping mat and sleeping bag. The Alpkit sleeping bag is a serious bit of kit which I really want to try ‘in-the-field’, and throw in a couple of beers, pasta cooked the night before and I’ll not only be OK, I’ll have a ball!

Much of the day will be spent on the highland road F35 - not something you would want to attempt without a 4WD. [Click to enlarge!]

Much of the day will be spent on the highland road F35 – not something you would want to attempt without a 4WD. [Click to enlarge!]

On day seventh I have a dawn shoot planned at one of the hot springs after which I travel back down the F35 from Hveravellir about 35km to Kerlingarfjoll. This leg of the journey takes me past Gígjarfoss, a waterfall that I discovered during the original trip planning in 2013, and so I’m keen to see it this time around. To be honest the entire day is quite relaxed. Whether I spend the day at the waterfall and arrive late afternoon, or arrive early afternoon and go on a recon mission into the Kerlingarfjoll mountains I don’t know, however the main focus is to arrive at the second base at Kerlingarfjoll at some point.

Kerlingarfjoll offers some stunning landscapes; the lights hues of the rhyolite mountains sandwiched between two vast glacial caps. Peppered around the area are hot springs and fumaroles. There are a number of marked hiking paths in the area of differing lengths and difficulties and with two days to explore I’m going to get see a fair bit. The only thing to watch – as is always the case in Iceland, but particularly in the highlands – is the weather. It can turn from sun to blizzard in a very short period of time.

It is also in Kerlingarfjoll I get to try the Serkort 1:50,000 scale maps. A scale of 1:250,000 is perfect for driving – and you’d have to prise the Ferdakort out of my cold, dead, hands – but for hiking I wanted a lot more detail. Ferdakort do have higher scale maps, but not that I could find in the UK so the Serkort maps are about to get chance.

On day 10, I have a full day of travel as I travel back south along the F35 again before turning west and out to the Snaefellsnes peninsula. The original plan was to turn on to the F338 as this is what Google Maps’ directions option suggested. But while examining both the Ferdakort and Serkort maps I noticed a discrepancy: On the Ferdakort map it lists both the F35 and F338 as gravel roads, but on the Serkort it lists the F338 as a track. A small difference but one that had me asking about the F338 on the Trip Advisor Iceland forum. And, just as well I did as the F338 is apparently a power line service track and one that not only passes through several rivers but it may already be impassable in early September! So, as good as Google is, always double-check your sources!

Luckily with the entire day set aside for travel the error has not put me in a difficult situation and is another reason that travelling in Iceland is best done with plenty of ‘slack’. In this case allowing a whole day for travel had meant the new, significantly longer, path F35 – 37 – 365 – 36 – 48 – 47 not only doesn’t cause a problem it allows me to travel the coastal road around Hvalfjordur and see the fjords there. The real delay will be the innumerable stops I’ll be making.

Google Maps chose the blue line as the 'best' route between Kerlingarfjoll and Grundarfjordur, but best for whom? Reseach and local knowledge suggests the longer, but safer route in blue/white. [Click to enlarge!]

Google Maps chose the shorter blue line as the ‘best’ route between Kerlingarfjoll and Grundarfjordur, but best for whom? Research and local knowledge suggests the longer, but safer, route in blue/white. [Click to enlarge!]

Snaefellsnes Peninsula

From day 11 I’m at my final base of the trip, Grundarfjordur, a small town conveniently located halfway along the peninsula’s northern coastline where I have easy access to many of the locations I want to visit. The Snaefellsnes peninsula is often said to have some of the best landscapes Iceland has to offer including the distinctive Kirkjufell mountain and the Snaefellsjokull glacier made famous by Jules Verne’s Journey to the Centre of the Earth.

Again I’m hoping that the 1:25,000 Serkort maps prove their worth as a lot of the trip here is on foot along the countless hiking paths that criss-cross the peninsula.

The day-to-day plans are much more loosely defined at this point and the only reason that I’ve been so specific for the first two-thirds of the trip is necessity – rapid changes in accommodation and trying to be in places at specific time dictating the schedule. Once on Snaefellsnes I can relax a bit more.

The trip ends on day with a leisurely drive back to Keflavik airport for a late afternoon flight. Even if I err on the side of caution and allow four hours for the journey that still leaves me half the morning to sort out any last minute shots.

Snaefellsnes may be a relatively small peninsula but it offers a wide range of landscapes to photograph. I struggled to limit myself to the dozen points of interest above. [Click to enlarge!]

Snaefellsnes may be a relatively small peninsula but it offers a wide range of landscapes to photograph. I struggled to limit myself to the dozen points of interest above. [Click to enlarge!]

Planning a photographic trip takes a lot more effort than normal – in large part because everything is so time-dependent. But after a few weeks of planning and a few major changes to the schedule I’m now happy that I have a workable itinerary. I’m confident in the time I have allowed at various places and also in knowing what to expect when travelling (no dubious power line tracks, for example). Importantly I also know where and when to stock up on food and fuel. All I need now is to turn up. Oh, and learn to dive…


Posted in Travel Tagged , , , , |

The Diving Gift Horse

Years ago I subscribed to the UK travel magazine Wanderlust for a short while. It is a magazine that styles itself as one for “adventurous” travellers, eager to go beyond tourism.

One of the first editions I received had an article on Iceland and its lead image, a full page shot, showed a diver in the crystal clear glacial waters of Silfra with arms extended. To their right they touched the vast North American continental plate; to their left the touched the equally gargantuan Eurasian plate. A lone human between trillion tonne lumps of rock.

I can’t dive, but it stuck I in my mind and a few years later in 2013 I found myself planning a trip to Iceland. I made the classic mistake of “doing Iceland” in 14 days although Iceland is in part to blame as it offers those who dare an easy round-the-country path in the form of the oval route 1. After a few weeks of planning I realised that, as someone interested in trying to capture the essence of what they see in a photographic image, this was a foolish idea. Being so close to the departure date meant that I couldn’t change accommodation and so the trip was scrapped.

In 2014 the trip was reborn as a 15 day trip covering a route along the southern coast. It was a good trip with just me and the rental car and three bases to work from. I fell I love with the solitude that Iceland offered me and left with images I felt proud of.

Like most offices across the globe in ours there are always several lines of conversation going on about peoples’ interests and hobbies and you learn to tune out one that you are not particularly interested in. One of the guys at our place is a keen diver – passionate about it – and spends as much free time as he can pursuing his dream. Maybe it was the recent return from Iceland and the remembered full-page image in Wanderlust, or his utter enthusiasm, but I began paying more attention. I put learning to dive on the 2014 list of things to achieve, but then the trip to Ethiopia suddenly appeared and sucked up a lot of time and money. By the end of 2014 I still hadn’t learnt to dive.

But the return from Ethiopia brought two things: First it was the start of a new year – the time at which I set my yearly goals. Second, Ethiopia had cemented in my mind something that had been troubling me for some time – a lack of photographic direction. After witnessing one of the more extreme environments nature has to offer I had a direction. There are many extreme environments on the planet, but the one underwater remains one of the most enigmatic.

So learning to dive is an aim for 2015, but it is nice to have a specific goal to aim for and mine is to dive at Silfra in Iceland. I’ve set an aggressive target; Aiming to get my PADI Open Water certificate in early July, then the PADI Advanced soon after, followed by diving at Silfra in early September. In between there’ll have to be plenty of practice dives too.

I’m under no illusion just how difficult this will be; diving is difficult enough but trying to photograph under water – and in temperatures of 2°C – adds a layer of complexity on top of that where even something as simple on land as standing still becomes a battle underwater. Plus trying to operate a camera with 7mm thick neoprene gloves is an acquired skill. Frankly, right now, I don’t even know how you focus a camera underwater. It is going to be a very steep learning curve and one where the chance of not being good enough to take the images I have in my head is easily 50% and likely much higher.

But if you don’t try you don’t know. If nothing else I’ll be able to learn from the mistakes making the next attempt easier. And anyway, it is a little early for me to be talking about failure. I’m very lucky. I know a passionate diver very willing to give advice and help with any questions and less than an hour’s drive away is a place where I can go and practise diving on a Tuesday evening – which is a traditionally dead evening for me. And as for the expensive underwater camera gear needed, well, I have the loan of that too. At any other point in my life, learning to dive would have a number of challenges to overcome but right now I’m being given this opportunity on a plate.

And, as the saying goes, never look a gift horse in the mouth.

Posted in Travel Tagged , , , , |

Displaying Photographs: Part 1

A little while ago I mentioned that I’d be discussing the various options for hanging prints of your own photographs at home and today’s post aims to give you some ideas of how to go about this. I should point out that, far from being an exhaustive discussion of every possible option, I’m actually only going to discuss one option in detail, although I do mention some others. The reason for pushing one particular option is that I feel it serves a dual purpose. For those who just want a low cost, low effort way of displaying their work – one that doesn’t have to last for years – this may be a simple way to achieve an elegant result. For those wanting to move a bit further into the art of framing, this same process acts as the very basis for that option.

Before I dive into this I’m making an assumption: You’ve already got a printed image, either from your own printer or from a high street or online company, and that it is an inkjet image. The fact that it has been printed on an inkjet printer will be important when considering certain display options although after talking to a few professional framers I’m becoming convinced that some of these “old-school” techniques for mounting a photograph to a rigid surface are becoming less relevant. In many ways this is good for the home framer as those techniques involve expensive and bulky equipment.

Luckily the outlay on tools is minimal - you may even already have most of what's needed.

You don’t need many tools – you may even already have most of what’s needed.

Speaking of equipment you are going to need some although thankfully it is not only cheap, but you may already have some it.

  • A cutting board, needed to protect whatever surface you’re working on.
  • A very sharp craft knife, such as an X-Acto.
  • A clean straight edge for cutting, longer than the longest edge of your image.
  • A roller of some kind to flatten the photograph against the mat board or foam board.

As with everything there is some terminology to try and remember, simply because you’ll have to buy some supplies and asking a shop assistant for the right thing usually helps.

  • Backing board – the rear board (usually 2mm hardboard) that sandwiches all the parts of a framed image in place. Not needed unless you’re framing the image.
  • Mount board – the flat and rigid board that the image rests on, typically mat board or foam board. All images will need to be mounted in some way.
  • Mat board – A piece or card or cotton fibre board usually 1.4mm thick. There are several grades available depending on how expensive/important the artwork is.
  • Mat – Mat board with a window cut out that surrounds the image and provides visual separation from the surrounding wall and keeps the front glass from touching the image.
  • Foam board – a lightweight board with a dense foam core coated in paper. Usually comes in white or black. Also called foamcore.
  • Moulding – the material that makes up the frame itself – usually wood or metal.

The “Off-The-Shelf” Compromise

Before I talk about materials there is one option to discuss: The pre-made frame. The theory behind pre-made frames is pretty straightforward – give you a professional finish but at a fraction of the cost of a bespoke frame. There’s a big pre-made market too and searching an online retailer such as Amazon shows an almost overwhelming choice, but I do have a couple of issues with pre-made frames because, if you’re going to the trouble of actually putting a frame around your image, you may as well do it properly.

For me a frame should achieve three basic aims: Support, protect and compliment. Support is a fairly easy job and really entails keeping the artwork flat and rigid – if you’re hanging the image on a living room wall you’re going to want to avoid curling corners or the image sagging under its own weight. Protection covers three elements: protection from the environment such as dust, tiny airborne droplets of everyday household liquids such as cooking oil and furniture cleaner and protection from the frame itself. And finally, the frame should complement the artwork, not detract or otherwise stand out.

The problem I have with pre-made frames is they often fail to achieve at least one of these three goals. Most of them allow the glass (or these days more likely acrylic) to come into direct contact with the artwork which for inkjet images is a pretty bad idea. Not only can it cause the photograph to smudge but try changing the image in the future and you’ll find that part of it has stuck to the glass/acrylic due to trapped moisture in the inkjet print and the air itself. The way to avoid this is to use a separator between the glass and the image, usually a white card frame with a hole in the middle called a mat, but that then means either finding a pre-made frame with a mat that just happens to be cut to the right size for your image (otherwise we’ll fail the ‘compliment’ requirement), or getting a local or online framing company to cut a mat for you adding more expense to what was meant to be a low-cost option and simple option!

So, unless you’re very lucky – or simply don’t care – the pre-made option isn’t really an option.

Basics

The most basic element of framing is that of support – keeping the image flat and rigid. Luckily there are a number of ways to do this and you can achieve excellent results with very little cost as it simply entails sticking your image to a board of some kind – a process usually called mounting. There are two common choices for the mount board.

Mat board is a paper or cotton sheet, usually about 1.4mm thick. If you’re considering framing then you’ll have to buy mat board anyway because, as the name suggests, it is used to create the mat that separates the image from the glass. There are several types of mat board available such as museum, archival, conservation and standard and I’ll look at these in a future article but in essence if you’re looking to keep the image in top condition for a few years, a low acidity mat board is required. There is a huge range of different colours for mat board – remember that framing is not meant to detract from the artwork and so the mat has to compliment the colours of the image.

If you hate having too many options then choosing foam board is wonderful: Black or white.

If you hate having too many options then choosing foam board is wonderful: Black or white.

Foam board and Foamex for our purposes achieve the same goal and differ only in whether you can print directly onto their surface and whether they are for indoor or outdoor use. Usual thicknesses are 3mm, 5mm and 10mm. Again, for long-term display, low acidity board is better. As foam board is not designed to be seen colour options as much more limited and usually come down to black or white.

To Frame or Not To Frame?

If the ultimate goal is to display your work in a frame then there isn’t an awful of difference between the two mounting options – mat board and foam board will achieve the same goal unless you’re getting very creative with mounting and looking at something like float mounting. I’m going to be looking at framing – and float mounting – in a future article but for today we’re trying to keep things as simple as possible.

The alternative is to simply not frame at all. The most common form of unframed art display is the canvas and these days you’d be hard pushed to find a hotel or trendy bar that doesn’t have art canvases on the wall. It’s a popular choice for the home environment too being hard-wearing and cheap compared to the professionally framed option. But, home-made canvasses are definitely not easy to get right.

Another option would be to display the image simply mounted on foam board, making use of the thickness of the foam board to provide a visual separation from the surrounding wall. It won’t work for everyone as one of the uses of a mat is to separate the image from the distracting ‘noise’ of the wall and so if the wall is patterned (for example wallpaper) then this approach won’t give very good results. But as naked as the final product is, it has a contemporary feel and some exhibitions use this approach.

The other advantage is that it is simple and inexpensive, great if the artwork is to be changed frequently or likely to get damaged (children’s bedrooms, for example).

Buying foam board isn’t a difficult process. It is common enough that most hobby and craft stores carry it as a stock item and as mentioned earlier, colour choice is limited to white or black.  I bought foam board off Amazon simply because I was buying in bulk and the cost savings were significant – half the price of buying in the local craft store – but even in store an A2 size foam board was approximately £4.50. The other thing you’ll need is some means of attaching the image to the foam board. The most common way to do this is using spray adhesive – again a common item in craft stores, although you can also get self-adhesive sheets of foam board.

About all you need to get your image ready for display is the foam board and some glue - both easily found in a craft supply store.

About all you need to get your image ready for display is the foam board and some glue – both easily found in a craft supply store.

The Process

Now I’m going to assume that the next step really needs no detailed instructions – you have a photograph, a board and some glue and you really would have to try exceptionally hard to get it wrong, but there are a couple of tips worth mentioning. First, unless you have stunning hard/eye co-ordination, cut the foam board to be larger than the photograph and that way you won’t have to worry about perfectly aligning the image. Once the glue has dried we’ll trim it with the X-Acto knife. The other tip is to lay the image starting at one end and slowly lowering it much as you would when applying a screen protector to a phone. This way you’ll reduce the risk of air bubbles.

Here are some pictures of the process:

Spray adhesive usually requires a couple of minutes to become tacky.

Spray adhesive usually requires a couple of minutes to become tacky.

Cover the image with a protective sheet and the use a roller to press the image to the glued surface.

Cover the image with a protective sheet and the use a roller to press the image to the glued surface.

Check the photograph is firmly attached to the board. I covered the whole board in adhesive just to make sure.

Check the photograph is firmly attached to the board. I covered the whole board in adhesive just to make sure.

As exciting as the whole process is, leave the adhesive to dry before attempting to trim the foam board to size.

As exciting as the whole process is, leave the adhesive to dry before attempting to trim the foam board to size.

Trimmed to size.

Trimmed to size.

I’d suggest leaving the glue for a few hours to dry before trimming the image.

When trimming make sure that the blade is VERY sharp; cutting foam board with anything less will likely cause it to ‘bobble’ and as the foam board is now acting as the separator between wall and artwork it really has to look right.

It won't matter how good the image is - all you will see if the shabby cutting.

It won’t matter how good the image is – all you will see is the shabby cutting.

Display Options

One of the things to bear in mind with mounting in this way is that the result is quite fragile; the foam board is delicate and banging the edge will likely result in it being dented. It can be passed around to people or left on a coffee table, but its best use would be for display on a table top easel or placing on a wall. One of the benefits however is that the final product is really lightweight and so you can make use of a simple wall mounting option such as the 3M Command picture hanging strips – inexpensive velcro pads – so no need to make holes in the wall.

For lightweight work the 3M Commander strips should do a perfect job.

For lightweight work the 3M Commander strips should do a perfect job.

So, how does it look?

For an inexpensive contemporary feel I'm very happy with the result, especially as it is very easy to change the image whenever I want.

For an inexpensive contemporary feel I’m very happy with the result, especially as it is very easy to change the image whenever I want.

Like songs, everyone has a favourite photograph – one that has the power to lift the spirits when we are feeling down. So why not get these images out in the open and on your walls? Hopefully today’s article will convince you that doing so needn’t be an expensive, difficult or messy process.

Posted in Hints and Tips Tagged , , , |

How to Choose a Compact Flash (CF) or SD Card For Your Camera

Buying the right memory card for your needs should be simple, but it isn't. The sales staff will convince you that only the fastest, biggest card will do, but that's far from the truth...

Buying the right memory card for your needs should be simple, but it isn’t. The sales staff will convince you that only the fastest, biggest card will do, but that’s far from the truth…

It’s a tense moment when you’re on location in the middle of nowhere about to shoot that “killer shot” and you suddenly realise that you’re very quickly running out of storage. It happened to me, for the first time ever, on the last trip and had it not been for one of the other guys very kindly donating a spare card I would have been faced with a nasty decision: stop shooting or re-use a card full of unbacked-up images.

Now, in my defence I should point out that I do have a pretty good strategy for image storage. For a start I have four 32GB and two ‘emergency’ 4GB memory cards that can handle approximately 4,500 images, usually more than enough capacity. I also perform, religiously, an end-of-day backup of all images to my trusty MacBook Air and a 500GB portable hard drive. So, should the worst happen and I do fill up all the cards, I can at least reformat one and use it again.

But the recent trip saw a number of factors conspire against me. First, we were in a location that did not have any electricity and had been there for a few days. Power was at a premium and as impressive as the Voltaic Systems’ solar charger (reviewed here)that I was carrying was, it was struggling to keep up with charging everyone’s camera batteries. Using it to recharge the laptop would have resulted in someone losing camera power. So no end-of-day backup.

Second, I was shooting a lot more video than expected on both the Canon 5D2 and 7D cameras and this was chewing its way through the memory cards. Third I was shooting a demanding scene – a moving landscape of lava in this case – where virtually every image was ruined by heat haze and so a lot of the shooting was using burst mode to try and capture the dancing lava in a pleasing and undistorted shape. In the course of two days I shot over a thousand images of lava and could have shot more.

So, with my excuses out of the way, I’m I the market for some more memory cards. Now I’m all for the idea of buying the best that you can afford and firmly believe the “you get what you pay for” mantra. But I don’t see the point in throwing money needlessly away, especially as I have two trips coming up (and still wondering how I’m going to pay for them) and so, rather than simply blindly buy the most expensive, I decided to do some research. What I discovered was that making an educated purchase was harder than it looks.

Hundreds of images were very nearly harmed in the making of this shot... [Click to enlarge]

Hundreds of images were very nearly harmed in the making of this shot… [Click to enlarge]

Depending upon the make and model of your camera you’ll either be in the market for a compact flash (CF) or Secure Digital (SD) memory card. Whilst there are some technical differences between the two standards most people won’t have a choice, although if your camera does support both, the general advice seems to be use CF due to slightly more advanced control circuitry and wear-levelling to prolong the card’s life.

But, irrespective of which format you use you’ll likely be judging the hundreds of available choices on the criteria of reliability, capacity, speed and cost.

Reliability

In a recent – and completely unscientific – poll I ran on Facebook reliability was the one common requirement. Not that this is surprising as, no matter whether the images are of a volcano, your child’s birthday, your wedding or you and the lads on holiday, no-one is going entrust their images to something unreliable.

Now it doesn’t take very long with Google to discover that a few brand names keep getting mentioned when the subject of reliability comes up. SanDisk is by far and away the most popular choice although Lexar and Transend also have a loyal following. Dig deep enough and you will always find a one-star review stating that the card failed, but sticking to any of the big name brands is usually a safe bet.

One argument that could be raised is that the memory market is so commoditised that a memory card is simply a standard memory chip inside a standardised case – in buying a brand name you’re simply paying for the name. Whilst there is undoubtedly an element of paying a brand premium, a well-made memory card is much more than a “chip in a box”. I look for brands with anti-shock gel (because it’s easy to drop these little things when wearing thick gloves), and also those that have a good working temperature range. If you’re a diver or passionate yachtsman some form of water resistance (or all-out water proof) will be important.

Be warned though: These days where you buy is just as important as what you buy. The memory card market is rife with counterfeits and it is worryingly easy to buy a counterfeit card on eBay, on Amazon and even on the high street. Avoid eBay altogether. With Amazon, look for the “Dispatched and sold by Amazon”. Amazon are an official reseller for most major memory card providers and so you’re going to get the real deal, but Amazon can also dispatch goods on behalf of other sellers who may be less legitimate.

Buying from Amazon falls inside most people's comfort zone, but for peace of mind you should check that it is sold by Amazon and not one of their 'authorised'' sellers.

Buying from Amazon falls inside most people’s comfort zone, but for peace of mind you should check that it is sold by Amazon and not one of their ‘authorised” sellers.

Amazon isn’t the only official source, of course and here are some links to find authorised resellers in your country:

http://www.lexar.com/where/

http://www.sandisk.com/about-sandisk/find-a-retailer/

http://ca.transcend-info.com/support/buy

Yes, an official card from an authorised reseller will cost more, and no one likes paying more, but when the temperature is so hot that the glue holding the soft grip on your camera has melted – and you’re still shooting – you’ll be glad of paying extra.

Capacity

Contrary to popular myth, bigger (capacity in this case) is not better. My 32GB cards hold approximately 1000 images from my 21 megapixel cameras and you don’t need a maths degree to work out that a 64GB memory card will hold 2000. If the card fails I lose, potentially, all images on that card. One thousand images may sound like a lot, but whilst I shot that in two days on my last trip a sports photographer can shoot that in an afternoon and cards always fill up just as that crucial photographic moment is about to occur. Memory cards – CF and SD – are now readily available in capacities up to 256GB and modern camera firmware is capable of handling such large capacity cards. So, why not make use of them?

First off, memory cards fail. It is not “if” but rather “when”. Most manufacturers publish a mean time between failure, or MTBF, figure that can be used to gauge the average expected life of the card, but it is only an average. A card can fail a long time before or a long time after the ‘average’ and when the card fails, you have to assume that the data will not be recoverable, or at least recoverable in a financially acceptable way. The big brand names offer recovery software, for example SanDisk’s Recovery Pro, that may recover some or all of the images in a failed card but you have to assume that a dead card cannot have its contents salvaged.

Second, you can lose the card. They are small and lightweight and one falling out of a bag or shirt pocket won’t make a lot of noise hitting the ground. Whilst I’m sure that most photographers have checklist when wrapping up on location to make sure they have everything, sometimes circumstance forces you to head off in a rush. On the last trip we were quite happily camped out on some high ground, camera bags open and gear laid out ready for use when the call came in that the snipers had seem something in the DMZ and we had to leave. Immediately. In the seconds it took us to throw everything in the bags and go, a loose memory card would have been easy to miss. Perhaps less melodramatic, but equally final, is dropping one in the sea when swapping a full one for a fresh one.

Or it could simply be stolen.

So, the size of the card you choose will be a therefore be a trade-off off between the inconvenience of having to frequently replace full cards against the effects of a lost, damaged or stolen card full of images.

Speed

Whilst both CF and SD cards are beginning to show their speed rating in megabytes per second (MB/s) many still use more cryptic means.

CF cards are a great example of this. The image below shows two cards from brand name manufacturers. But, which is faster?

No standard ways of indicating speed and lots of symbols can be confusing, especially when all you need to know is the card's speed in MB/s.

No standard way of indicating speed and lots of symbols can be confusing, especially when all you need to know is the card’s speed in MB/s.

Compact Flash is a standard, created by SanDisk, at a time when CD-ROM reigned supreme in the computer world. The CD-ROM standard defined a transfer speed of 150KB/s (approx. 0.146 MB/s) and so it was natural to express the speed of Compact Flash relative to this. So in the above image the Transcend CF card has a rated speed of 0.146 x 400, or 58.4 MB/s. On the face of it, the two cards are the same speed.

But it is a trick question, and the answer should be “Faster for reading, or faster for writing?”

The speed of a memory card will affect you in two important ways: How fast you can write images from the camera to the card and how fast you can transfer these to images to your computer. Whilst a slow transfer speed can be irritating, a slow write speed can result in lost shots or ruined video.

All cameras have an on-board memory buffer that allows you to hold the shutter down and take a rapid burst of images in quick succession. But at some point that buffer fills up and the camera has to move the images to the memory card before more can be taken. Cameras are clever enough to be writing images to card whilst adding new ones to the buffer, but the write speed of the card will play a key role in keeping the on-board buffer empty enough to accept incoming images.

In the above photograph the SanDisk is rated at 60MB/s, but note the *. This is the theoretical maximum speed of the card and actual read and write speed will depend upon the make and model of your camera, and even the specific firmware your camera is running.

It is a minefield as essentially you could buy an older generation 60MB/s card and a newer 160MB/s card (for double the cost) but both may give the same performance. Or, as I see it, I could spend the same amount of money for twice the storage.

Luckily, there are web sites that run “real-world” tests of memory cards in various devices and cameras and one that holds a great deal of information is http://www.cameramemoryspeed.com/. For me it didn’t have any tests of memory cards in my cameras but the (no longer updated) http://www.robgalbraith.com/camera_wb_multi_paged527.html?cid=6007-9784 did and it lists the burst mode test of my 60MB/s card at 35.6 MB/s on my Canon 5D2 and 40.1 MB/s on my Canon 7D. By comparison the same site lists the SanDisk Extreme Pro (90MB/s card) at 40.7MB/s on the 5D2 and 45.1MB/s on the 7D, not a huge increase in actual performance.

The issue gets more complex when looking at faster memory cards as the camera’s firmware begins to have an effect. Take a quick look on Amazon and you’ll see speeds of 160MB/s or 1000x – fantastic speeds but of no use to you if your camera doesn’t support the UDMA7 standard these memory cards employ. My 5D2 and 7D did not until I updated the firmware. But the average consumer should never get to the point where they’re considering firmware limitations.

If you’re shooting video – and 1080p is the standard here – you need a minimum write speed of around 20MB/s to ensure that you don’t get pauses in the recording. You can go lower – down to around 8MB/s – but it isn’t recommended. The SanDisk CF card shown above clearly states its suitability for video by showing the Video Performance Guarantee (VPG) logo, but the Transcend would be equally capable.

And we haven’t even mentioned SD card speed rating yet.

SD labels

SD cards complicate the issue slightly by not using a multiplier, but rather the class system, although this is being replaced by the newer UHS speed class system, simply as it is no longer relevant to today’s high-speed cards. Still if the black SanDisk card in the image above didn’t clearly state its speed in MB/s, you wouldn’t know if this UHS class 1 card could reliably support 1080p video.

SD classes and UHS speed classes decoded into MB/s. Courtesy of Wikipedia.

SD classes and UHS speed classes decoded into MB/s. Courtesy of Wikipedia.

Like Compact Flash the maximum speed you actually get will depend upon the camera and firmware but unless burst mode photography is important to you any card with a guaranteed speed of 20MB/s or above will be fine and even cope with 1080p video recording.

Cost

The final consideration is cost and thankfully and easy point to address. No matter what your budget is, the sales staff will convince you it isn’t enough. But if you’ve read the above you’ll have a better understanding of what factors are important to you and there’ll likely be a couple of options to choose from. If that is the case and you have a choice of, say, a 16GB card at 160MB/s and 32GB at 60MB/s – within your budget – get the 32GB card as you’ll not notice the difference when taking photographs and video, or buy the cheaper card and save the money.

Summary

Buying anything on a budget means that compromises have to be made, but hopefully the above gives some help in deciding how to choose a memory card for your budget. It is another big article, and so I’ll summarise the key points here:

  1. Buy a reputable brand name and to avoid counterfeits ensure the seller is an authorised reseller. For example, buy from Amazon as a seller and not simply one of Amazon’s retailers.
  2. Don’t worry about speed unless you’re doing something very specific, such as shooting 1080p video whilst simultaneously taking photographs or shooting a very long series of burst mode photographs (or lots of bursts in quick succession). As long as the card has a write speed of 20MB/s you’ll be able to shoot 1080p video.
  3. For most people the only thing a faster memory card will give is better transfer times to their computer, not better in-camera performance.
  4. It is better to buy four 16GB cards than it is to buy a single 64GB card. That way loss, theft or damage to the card won’t have such a devastating effect.
Posted in Hints and Tips Tagged , |
Vancouver allopurinol shipping Generic caverta from Alberta Madison diflucan shipping