Tag Archives: trip planning

Gearing Up for Iceland #1

Planning for Iceland continues and the current tasks revolve around making sure that I have the right equipment to stay safe.

Travelling alone always means taking a few additional steps to ensure a safe journey as a single pair of eyes can only look in one direction at once, and so I usually make sure that I know the basics such as which parts of a city to avoid roaming around at night by myself, where pick pockets most frequently operate and always ensure that any flashy jewellery, such as watches, are either left at home or kept well covered.

Still Iceland presents a different challenge as my usual planning doesn’t really apply. It’s one of the safest cities on the planet, certainly one of the safest countries and so, aside from some minor pick pocketing in Reykjavik the country’s 320,000 or so inhabitants are generally a friendly bunch. The problems I’m likely to face come from a far less discriminatory source: The weather.

Travelling around the country, even when sticking mainly to route 1, the circular route that provides the island’s main artery, means spending a lot of time alone. Only 10% of visitors arrive outside of the May to August peak season and even if you’re one of them you’d still be one of only 10% of those that make it out of Reykjavik. Reports from others travelling at a similar time of year report of only seeing a handful of cars a day and this, combined with lots of alone time makes for a great photography trip. Of course, if things should go wrong, it is a different story.

The biggest worry is that the 4×4 will break down, leaving me stranded until recovery arrives, which in the worst case scenario, that could mean an overnight stay in the car. Whilst Iceland’s weather is unlikely to live up to its name during September,  it’ll still be cold at night and, as everybody knows from this year, freak weather does occur.

To that end I decided to mitigate any issues with being stranded by purchasing a sleeping bag. With hundreds of choices available and not having been camping for 20 or so years,  it took a while but research, combined with a requirements list narrowed the options down considerably. Here’s what I was after:

  • Compact and light. It’ll be left in the 4×4 whilst I’m there, but I have to get it to Iceland and back in a suitcase with a 23Kg limit.
  • Warm. The 4×4 will acts as the wind and rain barrier, but it needed to be able to cope with projected temperatures – ideally to -5C.
  • Inexpensive. I’m avoiding the word ‘cheap’ as that isn’t what I was after – when safety is concerned, cheap can mean dangerous – but I was buying the sleeping bag as a fix for a specific issue, so I wanted to minimise the investment.

It very quickly became apparent that my three requirements represented the holy trinity of sleeping bags. It also became apparent that you could quite easily have any two of the three: Light and inexpensive;  warm and inexpensive; compact and warm. All the combinations were possible and several options existed in each category. The problem was, I found, to get all three.


Warm, lightweight and inexpensive: The Holy Grail for sleeping bags. Alpkit's SkyeHigh 600 may be a contender...

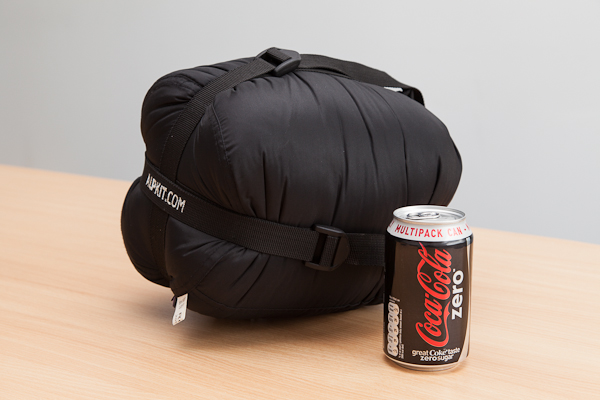
Warm, lightweight and inexpensive: The Holy Grail for sleeping bags. Alpkit’s SkyeHigh 600 may be a contender…


As I carried on reading the forums the general advice was to go for a goose down bag as they tend to have a high thermal rating to weight ratio, but their main issues were cost and they suffer badly when wet. For me, wet was not likely to be an issue and so I largely ignored that aspect and concentrated on finding a good value goose down bag. There are not that many options, but I did find a lot of recommendations for the SkyeHigh 600 bag from UK manufacturer Alpkit and after much debate decided to get one. Alas, the Alpkit website was showing out-of-stock (and still is) but I luckily managed to pick up a barely used one on eBay. I would have preferred to have bought a new one, but it would appear that the SkyeHigh range is popular due to it appearing to meet all three attributes mentioned above and comments on various forums show frequent stock issues.

I must admit to being initially rather impressed at the size and weight when inside the provided compression sack – 1.345Kg and it even compresses down to a bit smaller than the billed 23x25cm which is easily light enough and small enough for the suitcase. Of course, the acid test will be to actually use the bag but for now it does seem promising.

So  the first contingency plan is now in place. Hopefully I’ll not need to use it, but I may just try it out just for fun one suitably cold evening…


Posted in Travel, Trip Planning Also tagged , , |

Looking After Your Camera Gear in Antarctica

Before travelling to Antarctica I spent countless hours researching on the Internet looking for advice on what camera kit and accessories would be useful. There’s a lot of advice out there; some good, some not so good and much that is contradictory. Even after all the research I still arrived a little apprehensive about how my gear would cope. So hopefully this article, written with the benefit of hindsight, will help anyone thinking of going to Antarctica or a similar region arrive prepared.


Harsh weather can cause photographic misery...

Harsh weather can cause photographic misery, so be prepared…


The Cold

Antarctica presents a number of challenges for photographic equipment. Of these the most obvious is perhaps the cold. Not that it is really that cold. On an average day out-and-about the temperature is likely going to be anywhere between -5C and +2C which is far warmer than people may have thought it would be. Checking manufacturer’s specifications is always worthwhile, and Canon rate the 5D MK2 body as having an operating temperature of 0C – 40C which means that in reality the conditions in Antarctica are not too far outside of this.

The problem is less to do with the cold and more to do with condensation. After several hours off the ship in the cold ambient air the camera body and lenses end up being the same temperature. And, much like taking a cold beer or bottle of wine from the fridge, as soon as you get back to the ship and the toasty warm interior, condensation is going to form pretty quickly. It is this that will be your real problem.

I tried a couple of ways to reduce the risk of condensation damage. First I had a number of large zip-loc bags that I purchased on eBay and a collection of those silica gel sachets you find in boxes containing electronic equipment. Before getting back on the zodiac, or when back on ship, but before going inside, I’d simply put the cameras in the bags, squeeze out as much air as possible and then seal them. The theory being that as the cameras warmed up, any condensation would form on the bags, not the camera and that the silica gel would cope with what air was still inside the bag.

After a few days, I largely abandoned this practice in favour of a simpler one. Not because it wasn’t working, but simply because it was such a pain. The simpler approach was to let the gear acclimatise in stages. The ship had a wet room where we put on the gumboots and lifejackets or wetsuits. Despite the room being unheated and the bulkhead door almost constantly open the surrounding warmth of the ship meant the room was never truly cold, and so represented a good halfway house between the cold of the outdoors and the warmth of the rest of the ship.

Additionally, most of the Antarctic expeditions aim to get you out-and-about twice a day. What I would do is after the morning trip, I’d simply leave the camera bag in the wet room unopened. The camera bag  still had silica gel sachets in it, just not the zip-loc bags. When the second trip started a couple of hours later, the camera kit was already pretty much acclimatised and when returning at the end of the day, I just left the camera bag in the wet room until after dinner – giving the contents a good couple of hours to warm up slowly. It does mean that you need patience, but I used the downtime to review the previous day’s shooting and keyword the shots.

This approach also meant that the camera was in a good state for the inevitable shooting when on deck – there’s always something to see and it was easy to grab the camera and go on deck.


The Dust

Antarctica is dusty. Surprisingly so in fact. Despite having the sensor on the Canon 1Ds3 fully cleaned just prior to the trip, it took less than a day for sensor dust to show up. The 1Ds3 seems very prone to sensor dust anyway but the conditions in Antarctica just meant it was a losing battle to keep it clean. The Canon 5D2 seemed to fare much better, but it too gained sensor dust over time. I tried to minimise the effects of dust in two ways: First I tried not to swap lenses. After all, if you don’t take the lens off then you’re far less likely to get dust inside the camera. Second, if I did have to swap lenses, then I turned the camera off first in an effort to reduce the static charge of the camera sensor.

I had the luxury of two camera bodies which meant I could have a wide angle lens on one body whilst a zoom lens on the other. This worked well and is something I would recommend, not least as, especially when in the zodiacs, events can happen so quickly that you do not have time to change lenses. However,  if you can’t hire or borrow a second body for the trip and so have no choice but to  swap lenses I do recommend turning the camera off and also making you that you can shield the camera from the wind, say inside a camera bag, when you do so. I would also strongly recommend a Giottos Rocket Air Blower or similar as dust WILL get in and on the mirror and sensor.  My rocket air blower earned it’s keep!


The Wet

Antarctica is, perhaps  unsurprising, wet. Depending when you travel it’ll likely snow at least once per day and you have at least one zodiac cruise around icebergs. Snow and sea-spray will become part of your camera’s daily routine and trying to avoid these will mean you’ll end up missing a lot of good opportunities. I’m not suggesting that you throw all caution and good sense to the wind, but a few basic extras are worth having  to hand.

I had a number of Op-Tech Rain Shields with me – essentially plastic bags that go over your camera and lens. For years I’ve kept one in the bag just in case and for Antarctica I purchased a few more. In the end I  never used them. It’s a good product, but really better used in a less hectic environment. A lot of what you see in Antarctica happens fast – or rather you’ll be moving fast. Getting your hands inside the protective covering is a bit of a faff and they would soon become annoying. I’ve also read that keeping you hands inside them for any length of time in a cold environment can cause condensation to form on the inside and actually creates the problem you’re trying to avoid. I cannot attest to that so  whether it is true or not I cannot say.  I’m not saying the Op-Tech are bad; they very good. It’s just that they are perhaps better suited for more static shoots such as landscape.


The 5D's weather sealing has been much maligned. Mine had no issues and even survived the attentions of a  curious Sheathbill. (Image courtesy of Daisy Gilardini).

The 5D’s weather sealing has been much maligned. Mine had no issues and even survived the attentions of a curious Sheathbill. (Image courtesy of Daisy Gilardini).


Instead I decided to go naked. The Canon 1-series has renowned weather sealing and all my lenses are from Canon’s L-series, also known for their whether sealing. But after the horror stories on the Internet about how many Canon 5D MK2 camera have died in Antarctica, I feared the worst for my 5D MK2 and sealed the battery compartment, memory card slot and lens mount with gaffer tape.  That stopped after a couple of days as water still got in and the tape simply appeared to be preventing it from leaving.  In the end I decided that I was being over cautious and that the report from 2009 detailing the high failure rate of the Canon 5D MK2 was making me paranoid. Both the 5D MK2 and the 1Ds MK3 ended up being left lying on the snow and ice for extended periods, used whilst snowing on a moving zodiac and the 5D MK2 even survived a wave, although I did dry it off pretty quickly. In short, both camera bodies survived intact, although I would strongly suggest that you follow the recommendation regarding temperature above: Damp and condensation can both cause mould inside the camera body and lens.

I also has a copious supply of Pec Pad lens wipes and Eclipse cleaning fluid. The lenses got cleaned after every trip once back in the wet room and I and kept a stash of wipes in the camera bag. I needed them too – snow on the front element of the lens and sea spray when out zodiac cruising were constant challenges.

I also recommend three or four decent-sized microfibre clothes. I picked up a pack of four 50cm square clothes off eBay or Amazon for under £10. These were very useful in wiping excess moisture off the camera before it had a chance to seep into any seals. Remember, too, that sea water is corrosive.

It’s probably also worth mentioning the UV filter at this point. Despite whether you think they are a good idea or not, I would strongly recommend that you use one in Antarctica. As mentioned you’ll spend a lot of time close to the sea and spray is going to play a big part in your life. Cleaning the front of your lens is going to also massage salt crystals into the coatings on the front of your expensive lens. The UV filter acts as a convenient barrier that can be replaced cheaply. One of the crew had just bought herself a nice Canon 70-200mm F4 lens but had no protective filter on it. I do wonder what it will look like after four months of constant exposure.


Hopefully the above tips will help take some of the guesswork out of how to look after photographic gear in Antarctic, or other similar, environments.  All the items mentioned can be purchased easily and cheaply and I would really recommend that you do so. You cannot help but get some wonderful shots – but only if the camera is clean and working!

Posted in Hints and Tips, Travel, Trip Planning Also tagged , , , |

Being cheap has it’s time and place. This wasn’t one of them…

So, I’ve managed to move forward with the planning of the Iceland trip today. The rental car has been secured.

When I started to look into rental car options in Iceland it was a bit of a shock as to just how expensive they were. I understand that, as an island, most of the consumables need to be imported, along with much of the heavy machinery and industrial equipment. But still, as I searched through the  various household name rental companies such as Hertz, Avis and Budget I began to wonder if I had underestimated the sheer cost of the endeavour!

After a week of using Google to learn from others who had visited, the general consensus was that a four wheel drive was pretty much a requirement. Iceland essentially has two types of roads: The major arterial roads, such as route 1, which are mostly tarmac surfaces and passable by all vehicles and then the F-roads which are essentially gravel, compacted ground or rubble. Route 1, or the Ring Road as it appears to be called is a 1300km orbital road that connects many of the major sights on the island and has the benefit of taking you back to where you started if you keep moving forward. However, some of the more interesting sights can only be reached via the F roads. Want to see some of the less visited places? You need a 4WD…

However, as I checked out some of the rental companies I was getting quotes of GBP £1200 or more for a 16 day rental. Utterly crazy prices and it was at that point I started to make a big mistake. Sticking to route 1 would allow me to see a lot of wonderful sights. I didn’t need to stray off the tarmac roads at all. Sure, I’d miss a couple of places, but the rental would be half that of a 4WD.

Luckily I spent some time thinking about it and a couple of hours searching for any rental company, not just the big names. A few local companies came to the surface IcelandCarRental, Reykjavik Rent-a-Car, SADcars, Geysir etc. All had prices that were, whilst still high, much lower that the big names. And all had 4WD vehicles that came in at comfortably under GBP £1000 for a 16 day rental.

It’s very easy to get hung up on horror stories about rentals. Dig deep enough and someone, somewhere will have a bad story to tell about such-and-such a company. But a quick Google to for all four companies showed nothing obvious. IcelandCarRental came in with a Toyota Rav4 4WD for GBP £750 and, after a quick email to them I discovered that the vehicles are relatively new (2010 or newer) and that they are actually they are essentially the same company as Reykjavik Rent-a-Car.

So, a booking has been confirmed for a Rav4 and I’m really glad I did spend the extra money; it’s going to be an expensive trip anyway and so the extra £200-£300 won’t really matter once I’m back and the journey is a memory.  My justification is simply that, to me at least, whilst keeping costs down is a wise move, spending £2500 to have half an experience is worse value for money than £3000 to have the full experience. Plus, you never know – I may just get that killer shot…

Posted in Travel, Trip Planning Also tagged , , |